Radio mode
 Introduction
In radio mode you can receive various available radio stations on different frequencies and save your favorites to the station buttons for quick access.
Available reception modes and frequency bands depend on the vehicle equipment and the country. Frequency bands in individual countries may be changed, switched off or no longer provided.
 The radio stations are responsible for the transmitted content.
Other electrical devices connected in the vehicle can impair radio signal reception and cause noise in the speakers.
Decals or metal-coated stickers on the vehicle windows can impair radio reception in vehicles with window antennas.
Types of radio reception
Depending on the vehicle equipment and the region in which the Infotainment system is operated, one or more types of radio reception may be available:
-
AM: Radio reception via amplitude modulation (medium wave – MW).
-
FM: Radio reception via frequency modulation (very high frequency – VHF).
-
Digital radio: Infotainment systems equipped with a digital radio receiver can receive the following depending on the country:
-
DAB, DAB+ and DMB audio.
-
HD radio with additional services provided.
-
Only applies to the USA: Internet radio.
-
-
Satellite radio: Infotainment systems equipped with a satellite radio tuner can receive SiriusXM™ with paid services.
Symbols and their meanings
General symbols for radio operation

- Displays the frequency band in order to manually select a station. The function is only available if the station display is set to FM.

- In the AM and FM frequency band: Open the station list.

- Select the previous station from the station list or station on the previous station preset button.

- Select the next station from the station list or station on the next station preset button.

- Manually update the station list.

- Shows additional services only in FM mode.

- Symbol for a station in the station list that has already been stored on a station preset button.

- Slideshow functions are supported.

- Search options for stations and podcasts in Internet radio mode.

- Podcast functions.

- Tap to select a station frequency for traffic information. Only possible in the FM frequency band. Tap the Close function button to end the transmission.

- Save track information (iTunes® tagging).

- Cycle through substations.

- Indicates that the scan function is active.
- TP
- TP (Traffic Program) is activated and can be received.
- No TP
- The selected report news station is not available.
- --:--
- Displays the time.

- Closes the window and returns to the previous view.

- Opens the settings menu.
- Tagged songs
- Display the number of stored song tags and delete tags.
- AF Off
- Automatic station tracking is switched off.
- RDS Off
- The Radio Data System (RDS) is switched off.
Symbols in the FM/DAB frequency band
- Display the frequency band for manual selection. Only possible when the summarized station list is switched off.

- DAB reception not possible.

- Slideshow functions are supported.
- The DAB station supports slideshow.

- Slideshow is not available for the DAB station.
Symbols for satellite radio operation
- Open the window for entering the channel number.
- Save the current track information (iTunes® tagging).
Symbols for HD Radio™ operation

- Station supports HD Radio™.


- Tuning HD Radio™ substations.

- Open the Emergency list of the HD Radio™ Emergency Alerts function.
- HD Radio™ logo.
- Save the current track information (iTunes® tagging).
Symbols for Internet Radio operation

- Display the station selection.

- Open full-text search.

- Display the last internet radio station.

- Display the 100 most popular internet radio stations.

- Display the available Internet Radio podcasts.

- Display Internet Radio stations that originate from the preferred country.

- Display Internet Radio stations that transmit their program in the preferred language.

- Display Internet Radio stations whose programs are of the preferred genre.
Function keys and their meaning in radio mode:
-
FM or AM: Start FM or AM frequency band.
-
DAB: starts DAB radio mode.
-
Internet Radio: Start Internet Radio mode.
-
SCAN: Scan function is active. Tap the function button to end the scan function.
-
Station info: displays radio text and slideshows at the same time instead of the station buttons.
-
Slideshow: slideshows are displayed on the entire screen and are not supported by every DAB station.
-
Cancel: Cancel function.
-
Deactivate: Deactivate function.
Frequency bands
Certain frequency bands are not available in all countries or may be deactivated or no longer offered in certain countries.
- AM
- Starts radio mode in the AM band.
- FM
- Starts radio mode in the FM band.
- Internet radio
- Starts Internet radio mode.
Changing the station group
Station preset buttons are displayed in groups of six function buttons each. To change the station group, tap one of the gray dots or make a swiping motion if hand movement control is activated.
Station preset buttons
To listen to a stored station, tap the desired station preset button. To store stations, press and hold one of the station preset buttons until an audible signal sounds. Station preset buttons that are already programmed will be overwritten. You can only listen to a stored station if it is available in your current location.
Selecting, tuning, and storing stations
Setting up the radio
-
Tap MENU
 RADIO
RADIO  . Radio mode switches on.
Or: press RADIO.
Selecting the frequency band
Before selecting a station, you must first select a frequency band or reception mode. Various stations are available depending on the selected frequency band or reception mode.
-
To open the list of frequency bands and reception modes, tap Band, Source or RADIO.
-
Select the available frequency band or reception mode.
Searching for and selecting a station
There are different ways to select a radio station. The options vary based on the frequency band and reception mode.
Selecting via the frequency band (AM and FM)
-
Turn the control knob to show the frequency band.
Or: Tap
. -
Tap the cursor to press and slide to the frequency band and release at the desired frequency.
Or: tap a point on the frequency band. The cursor automatically jumps to the corresponding frequency.
The station at the set frequency will be tuned.
Selecting from a station list (AM and FM/DAB)
The station list displays the stations that currently can be received. It is possible in the AM frequency band that the station list must be manually updated if you have left the area since the last time the station list was opened. The station list updates automatically in the FM/DAB frequency band.
-
Open the station list.
-
To browse the list, tap
or .Or: Turn the menu knob. Press the control knob to select the desired station.
-
Tap the desired station.
The selected station will be tuned. In FM/DAB, the best reception mode is selected automatically depending on station availability.
If the reception signal for a DAB station is too weak and the station cannot be found in the FM frequency band, the radio will be muted.
Using the SCAN scan function (AM and FM/DAB)
In SCAN mode, the stations in the frequency band are set automatically in succession and played for approx. 5 seconds each.
-
To start the scan function, tap SCAN.
Or: Briefly press the control knob.
Or : Tap Setup
SCAN.SCAN mode starts and the current station is shown on the display. SCAN is displayed on the screen.
-
To end the scan function, tap SCAN or select a station.
Or: Press Scan or another station preset button.
Or: Press the control knob again or select a station manually using the station preset buttons.
SCAN mode stops and the station is tuned. The SCAN function key is hidden.
Storing stations on the station preset buttons
Depending on your Infotainment system, you can save up to 36 stations from different frequency bands and reception modes as favorites on the station preset buttons.
-
Tune the desired station.
-
Open the station preset buttons.
Or: To store the current station, press and hold the desired station preset button until a signal tone sounds.
Or: Tap a station preset button that has already been assigned and hold for approx. 3 seconds.
If you store a station on a button that already has a stored station, the station that was previously stored will be deleted.
Or: open the station list
, press and hold the station to be stored, and then tap the desired station preset button to store it. Turn the control knob to search through the list. Press the control knob to select the desired station.
The station is saved on the selected station preset button. will be displayed after the station name.
Stations already stored on a station preset button are marked in the station list. (for example FM1-M1): The station shown is stored on button 1 in the preset group FM1.
Autostore: Automatically save a station to a station preset button
With the autostore function, the stations with the strongest reception at the vehicle location will be automatically stored on the station preset buttons in preset groups FM 1 and FM 2 or AM 1 and AM 2.
-
Select the desired frequency band.
-
Press and hold the Infotainment button FM/AM, FM or AM for around five seconds and then release it.
A message about the storing process will be displayed on the screen while doing this. This process may take a few seconds.
If no stations can be found, a corresponding message appears on the screen.
Travel Link® special functions
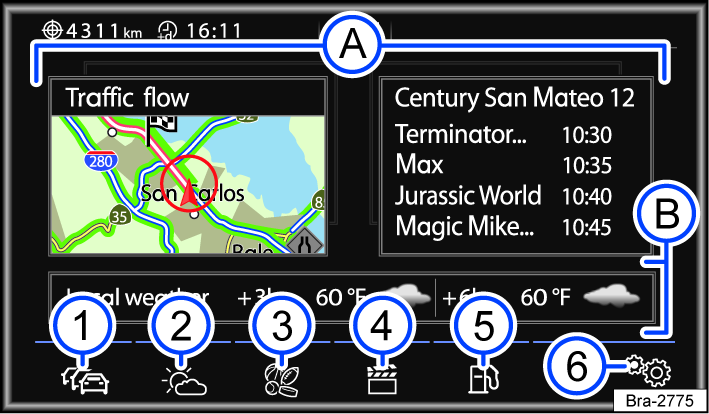
Fig. 117 Travel Link® main menu.
 Slideshows: selection of two SiriusXM Travel Link® services.
 Weather forecasts for the next three and six hours.
 Travel Link® Traffic: current traffic information.
 Travel Link® Weather: current weather information and weather forecasts.
 Travel Link® Sports: current sports information and live coverage.
 Travel Link® Movies: search screen to search for movies and movie theaters.
 Travel Link® Fuel Prices: search screen to search for gas stations.
 Travel Link® Settings: Settings for Travel Link® services:
-
Travel Link® settings favorite lists for the corresponding services.
-
General Subscription Information: information about paid services.
-
In the USA, Sirius XM Travel Link® can also be used through the SiriusXM® satellite radio tuner.
SiriusXM™ is a subscription-based satellite radio service that must be activated before using either by phone or on the SiriusXM website by providing the device-specific SiriusXM™ ID General Subscription Information.
Open the Travel Link® menu:
-
Press INFO.
Or: Setup
Travel Link.Or: MENU
Travel Link.
Tap Travel Link® Main view: All SiriusXM Travel Link® services are shown in an overview.
Travel Link® Fuel
You can access current information about gas station locations and fuel prices.
-
In the Travel Link® (SiriusXM) main menu, tap Fuel.
The search screen opens.
If you enter a gas station name in the search screen, Travel Link® Fuel Prices creates a list of these gas stations.
The gas stations are listed in alphabetical order (Name  ), by price (Price ) or by distance (Distance ) from the current vehicle location.
Call up gas station locations
-
Enter a gas station name or the name of a city.
-
Select a gas station from the list.
-
Tap Start to start route guidance.
Or: To view information about a specific gas station, tap Store. The fuel prices and the date the prices were verified are shown.
Or: Tap Route options and select your preferred route guidance settings, e.g. take the quickest route or take the highway.
The arrow indicates the direction where the gas station is located.
The search can be narrowed down using the following criteria:
-
To display gas stations near the destination address that has been entered, tap In immediate vicinity
. -
To display all gas stations along the route chosen for route guidance, tap Along the route
. -
To display gas stations near the current vehicle location, tap In vicinity of destination.
-
Tap Show list to display the list of gas stations based on the selected search criteria.
-
Tap Find name to enter the name of a gas station or a city in the search screen. Information in the search screen is entered as free text, instead of choosing from a list of possible selections. Because of this, make sure the spelling is correct.
Specifying a favorite fuel type (Fuel type Regular)
-
In the main menu, tap Settings
, and in the Travel Link® settings menu, select Fuel type Regular.Fuel type Regular shows the selected fuel type.
-
To select a location as a favorite in the input screen, tap Add new fuel type.
Travel Link® Movie
Current movie information and information about the theater locations can be accessed.
-
In the Travel Link® (SiriusXM) main menu, tap Movie.
The search screen opens.
-
Tap Theater to display movie theaters nearby.
-
Tap Movie to enter a movie title in the search screen.
During input, only combinations of letters, numbers, and special characters that appear in an available movie name can be selected.
Searching for movies
Information about the movie theater location, the start time, and the movie length is given.
-
Tap Movie to enter a movie title in the search screen.
A list of search results is shown that lists all movie theaters where the movie you searched for is currently playing.
-
Select a movie theater.
-
Tap Start to start route guidance to the destination address.
-
To open the Movie info detailed view, tap the entry in the list.
The detailed view may contain information about the main actors, plot, running time and age restrictions.
Searching for a movie theater
Tap Theater to enter the name of a movie theater in the search screen.
-
Select a movie theater.
Tap Start to start route guidance to the destination address.
The search can be narrowed down using the following criteria:
-
To display movies near the destination address that has been entered, tap In immediate vicinity
. -
To display movies near the current vehicle location, tap In vicinity of destination
. -
Tap Search results to display the list of movie theaters based on the selected search criteria.
-
Tap Enter movie theater to enter the name of a movie theater or a movie in the search screen. Information in the search screen is entered as free text, instead of choosing from a list of possible selections. Because of this, make sure the spelling is correct.
The system only allows movie and movie theater information from the area around the vehicle location to be accessed.
Travel Link® Sports
You can access current sports information and live coverage for sports teams that are available for selection.
-
In the Travel Link® (SiriusXM) main menu, tap Sport.
The Sport main menu allows you to choose from 14 different leagues.
Selecting the display time period
Tap  ... in the upper right and select the desired display time period:
-
Previous: the time period is specified by SiriusXM® and generally includes games from the last five to seven days.
-
Live: live games that have already begun.
-
Scheduled: preview of upcoming games.
Opening the detailed view for a game
-
Tap one of the games displayed in the information window.
-
Tap
 to close the detailed view and switch to the information window view.
In the detailed view, you can tap one of the lower function buttons during a game to select an audio broadcast.
Changing leagues
-
Tap Change league in the information window.
-
In the list of selectable sports leagues, tap a league to select it.
Selecting a live broadcast
-
Tap Live Broadcast.
All stations with current live sports coverage in the selected league are shown in a list.
-
To switch to sports coverage, tap the chosen station display.
Setting sports teams as favorites
In the Sport main menu, tap Settings , and in the Travel Link® settings menu, select Sports teams. You can store up to 30 sports teams from various leagues as favorites in the Favorites (teams) menu.
-
To make a selection from the list of available teams, tap Add new team.
The selected team is shown in the Favorites (teams) list.
All stored favorite teams are listed in the Select team menu. An icon in front of the team name indicates the league to which the team is assigned. Teams can also be assigned to individual leagues directly without going through the overview.
Deleting saved favorite teams
You can delete stored favorite teams individually.
-
Tap
 after a favorite team.
SiriusXM® specifies which leagues are supported by the Favorites function.
Ranking lists
-
In the Sport main menu, tap Ranked List Sports.
-
From the list that follows, tap one of the sporting events shown to select it.
-
To select a different sporting event in the selected sport, tap League in the information window.
Displaying news
-
To display headlines relating to the selected league, tap News.
-
To display information about the selected tournament, tap Tournament info.
Travel Link® Weather
You can access current weather information and weather forecasts for selectable areas.
-
In the Travel Link® (SiriusXM) main menu, tap
 .
.
The Weather main menu allows you to choose from three different weather displays:
-
Illustrated weather maps:
-
Icon map: This map uses icons to show the cloud coverage and temperatures in the entire country, or in a radius of approximately 373 miles (600 km) around the vehicle location.
-
Isobar map: The map shows the high and low pressure areas in the entire country, or in a radius of approximately 373 miles (600 km) around the vehicle location.
-
Radar map: The map shows the precipitation in the entire country, or in a radius of approximately 373 miles (600 km) around the vehicle location.
-
-
Weather information tables, such as wind speed, cloud coverage, pollen levels, UV index, and precipitation.
-
Information about ski resorts and snow conditions.
Changing the display time period
-
Tap
... in the upper right and tap to select the desired display time period:-
Current: current weather information.
-
Hourly: weather forecasts for the next three and six hours.
-
Daily: weather forecasts for the next five days.
-
Changing the location
-
To select a location for the weather display using the input screen, tap Search city in the Weather main menu.
-
Or: To check the weather in a location that is saved in your favorites list, tap Favorite Cities.
-
Or: To check the weather at the nearest weather station, tap In the vicinity.
-
Or: To check the weather at a ski resort using the input screen, tap Search for ski resort.
-
You can search for a different ski area or weather station using the Change ski resort and Change weather station function buttons.
The maps are automatically updated every 30 minutes. The closest weather station and ski resort are always shown.
Setting a city as a favorite (Favorites (cities))
In the Favorites (cities) menu, you can store up to 10 weather stations as favorites and access them to display weather information.
-
In the Weather main menu, tap Settings
, and in the Travel Link® settings menu, select Cities (weather stations). -
To select a location as a favorite in the input screen, tap Add new weather station.
Or: In the Weather main menu, tap Setup
, and in the Travel Link™ settings menu, select Ski resorts.
Save favorites
In the Favorites (ski resorts) menu, you can store up to 10 cities as favorites and access them to display weather information.
-
To select a location as a favorite in the input screen, tap Add new resort.
Deleting saved favorites
You can delete stored favorites individually.
-
Tap
after a favorite.
4) If “Not available” is displayed, the station is not included in the current subscription package.
Artist Experience®
Artist Experience® involves transmitting, providing and displaying images related to the corresponding audio segment on the HD Radio Technology receiver.
Potential uses include:
-
Cover images such as artist photos, slideshows, station logo or other images related to the song or audio file being played.
-
Commercial images such as sponsor logos and advertisements related to a marketing campaign.
The image is shown and is closely synchronized with the song or audio file being played. If the cover image is not available, the station logo or another standard image is displayed on the receiver.
If the current radio station supports Artist Experience®, the images can be shown under Station info.
-
Press View
Station info.
iTunes tagging
When a station is received via HD Radio™ Technology or “SiriusXM™”, the track information (song tag) for a track that is playing can be transferred to a connected iPod. You can readout this track information later to a computer.
If an iPod is connected, the track information is automatically saved to it.
If an iPod is not connected, track information can be stored for up to 50 tracks in the Infotainment system on a Tag list. The next time an iPod is connected, the track information is automatically transmitted and deleted from the Tag list in the Infotainment system.
The Tag list can be deleted manually in the settings in the AM or FM/DAB frequency band.
Requirements:

A USB interface that is compatible with an iPod®.
-
An FM or AM station must be received digitally with HD Radio™ Technology
Or: Radio station is received via SiriusXM™.
-
The song and artist must be displayed
-
Song information must be available as a song tag
-
There must be a compatible iPod® for storing song tags or selecting the Tagged songs
Saving the track information
-
Tap RADIO
 to save the track information for the track currently being played.
When a compatible iPod® is connected to the MEDIA-IN multimedia interface, the song information will be stored directly in the iPod® as a song tag.
Already saved tracks are marked on the display with .
Storing song tags without a connected iPod®
If an iPod is not connected, track information can be stored for up to 50 tracks in the Infotainment system on a Tag list. The next time an iPod is connected, the track information is automatically transmitted and deleted from the Tag list in the Infotainment system.
Manually deleting Song tags
The Tag list can be deleted manually in the settings in the AM or FM/DAB frequency band.
-
In the RADIO
main menu, tap Settings . -
Tap Tag list.
-
Tap Delete list to delete all stored song tags after confirming the deletion.
HD Radio
HD Radio is a digital radio station that can be received in the USA and Canada.
HD Radio Technology
Some AM and FM radio stations also transmit their content digitally via HD Radio™ Technology.
When the function is activated in settings in the AM or FM band and the current station supports HD Radio™ Technology, the function key appears on the Infotainment system display. The Infotainment system switches automatically between digital and analog reception depending on the reception quality. If the station is currently received in analog mode, the function key is grayed out.
Some stations offer additional substations via HD Radio Technology (multicast programming). If this is the case, HD1 is displayed after the station frequency of the main station. Substations are marked accordingly with HD2, HD3 etc.
Tuning the HD Radio substations
-
Tap
to cycle through the available substations.Or: Select an additional station from the station list.
Or: to cycle through the additional stations individually, tap < or >.
The substation that is currently selected is displayed after the main station on the screen (for example ... HD3 for the second substation).
The available substations of the current stations are displayed on the station list.
Additional HD Radio Technology services
-
To select your chosen additional service, tap View.
HD Radio Emergency Alerts
The HD Radio Emergency Alerts function can be used to receive reports of unusual, potentially life-threatening events, such as natural disasters. These notifications are played as pop-up notifications while the radio is on. This function is activated in the factory.
If you tap Remind me later when a notification appears, the notification will appear again about ten minutes later. If you tap Close, the notification will be moved to the Alert list. If the HD Radio Emergency Alerts function is deactivated, these notifications are moved directly to the Alert list and indicated by and a number in the status bar. The number on the symbol displays the number of notifications.
Activating or deactivating HD Radio Emergency Alerts
-
In radio mode, activate or deactivate
 Radio Emergency notifications.
Opening the Alert list
Up to five notifications can be displayed in the Alert list.
-
Tap
in radio mode.
SiriusXM™
SiriusXM™ is a satellite radio station that can be received in the USA and Canada. Satellite radio services are subject to fees and must be enabled for the Infotainment system by phone or online.
Displaying the SiriusXM™ ID
Each radio has its own SiriusXM™ ID with which you can manage your subscription.
-
In satellite radio mode: Tap
Subscription information.Or: tap
.The channel selection window will open.
-
Enter channel number 0 and press OK to confirm.
The SiriusXM™ ID, the services that have already been enabled and the website and phone number for the SiriusXM™ activation hotline will be displayed on the screen.
SiriusXM™ channels
The channels available depend on the enabled services. All available channels are displayed in the channel list.
The channel list can be sorted either alphabetically, by channel number or by channel category. In the settings menu, individual channels can be filtered out of the channel list.
Each channel is assigned a number. The channels can be opened via their number directly under .
-
To search for channels with content related to the content currently being played, tap Related in the station display.
A list with related content will open.
SiriusXM™ Seek function
Current program content can be saved as favorites using the seek function. If such program content is sent on an available channel, a message is displayed in the Infotainment system. This message gives you the option to switch directly to the relevant station.
You can save a maximum of 36 favorites.
Save favorites
-
While the program that is to be saved is running: Tap ((SXM))
SiriusXM™ Seek. The Save Seek menu is opened. -
Tap Save next to the desired program content. The following program content can be saved as favorites:
-
Tracks
-
Artist name
-
Sports team
-
The desired program content will be added to the favorites list.
Setting up a listener profile
The personalized listener profile saves recommendations based on the program content currently being listened to and the latest listening history, and is regularly updated.
The listener profile is set up in the user account and can be used with the SiriusXM™ app.
-
To set up a new listening profile, tap
 in the station display.
Or: tap
Radio Set up new listening profile in radio or media mode.
For each listener profile, a list of SiriusXM content recently listened to is displayed. This listening history can be reset at any time.
TP function (traffic program)
The TP function monitors the messages of a set traffic report station and automatically tunes it in the current radio mode or media playback. It must be possible to receive the traffic news station.
Some stations without their own traffic program still support the TP function using a corresponding traffic news station (EON).
While in the AM frequency band or in media mode, a traffic report station will be tuned automatically in the background, as long as it can be received.
If it is not possible to receive a traffic news station, No TP appears on the display. The device automatically searches for a traffic news station that can be received. As soon as a new traffic news station can be received, the status on the display switches back to TP.
Traffic news stations are not available in all countries.
Switching on the TP function
-
In radio or media mode, tap
or RADIO. -
Activate
 Traffic program (TP).
Digital radio mode (DAB/DAB+)
The digital radio receiver supports the DAB, DAB+ and DMB audio transmission standards. These are currently not available in every country.
Digital radio in Europe is transmitted through the frequencies in frequency band III (174 MHz to 240 MHz).
Start DAB radio mode.
-
MENU
RADIO DAB.
The last selected DAB station will be played, if it is available in the current location.
DAB additional stations
Some DAB stations offer additional stations temporarily or permanently, for example, for sports broadcasting.
If an additional station is available, it will be displayed in the DAB station list by or next to the station name.
-
Tap on the main station name in the DAB main menu to select an additional station.
Or: Select an additional station from the station list.
Automatic station tracking: switching from DAB to FM
DAB is currently not available everywhere. is displayed when in DAB radio mode in areas without DAB reception.
If the DAB station you were listening to can no longer be received (e.g. no DAB available), the system automatically switches to the FM band and (FM) is displayed after the station name. If the corresponding DAB station can be received again, the radio will switch back to DAB mode after a brief period. The (FM) display will disappear.
The only requirement for cross-frequency station tracking is that the DAB station and the FM station must broadcast the same signal ID.
Or: DAB must signal which FM station corresponds to the DAB station, and there must be sufficient reception for the FM station.
If the reception signal for a DAB station is too weak and the station cannot be found in the FM frequency band, the radio will be muted.
Automatic station tracking: switching to other DAB stations
If a DAB station can no longer be received, the Infotainment system will first try to tune to another ensemble with the same program. The DAB - DAB program tracking can be enabled for this in the Advanced settings. If no other DAB station can be found, the system will try to tune to a corresponding FM station, if one can be received. If the Switch to a similar station option is enabled, the system can also switch to programs with different content. These programs are often from nearby regional stations. The DAB station can signal which alternative station can be selected.
Switching to the radio mode view
-
Tap View
and select the desired additional service.
You can switch between the station information, radio text and slideshow.
Some DAB stations also offer a picture-based “slideshow”. Radio stations can use the slideshow to transfer information as digital images to the Infotainment system.
After switching stations, it may take several minutes for the slideshow from the selected DAB station to load in the background.
Station logos
Station logos may be pre-installed in the Infotainment system for some frequency bands, or they may be imported using a data carrier (such as an SD card). In some countries, station logos can be downloaded from the Volkswagen website or the “Volkswagen station logos” website.
Images in common formats (such as .jpg, .bmp, or .png), with a maximum size of 400 x 240 pixels can be used as station logos.
-
Save station logos on a suitable data carrier (such as an SD memory card or USB flash drive) in order to import them into the Infotainment system.
Assigning station logos automatically
Automatically assigning or saving station logos to station preset buttons:
-
Activate Settings
Advanced settings Automatically save station logos.Or: activate Settings
Advanced settings Automatic station logo selection.
Assigning station logos manually
-
In FM/DAB mode, tap Settings
Station logos.Or: RADIO
Select band Settings Station logos.Or: RADIO
Settings Station logos. -
Select the station to which a station logo should be assigned.
-
Optional : Select the source where the logo is saved (such as SD).
-
Select the station logo.
-
This process can be repeated for additional stations.
-
End the assignment of station logos with
 .
.Or: To return to the main menu, press the RADIO button.
Or: To return to the main menu, tap the MENU sensor area.
Or: Tap
to switch to the previous view.
Deleting station logos from station preset buttons
-
Select the desired frequency in the RADIO
menu. -
Settings
Station logos. -
Tap the desired button where the logo should be deleted.
Or: To delete station logos from all station preset buttons, tap
Delete all.
Station name
If RDS is available, station names will be displayed in the RADIO menu and in the FM station list.
FM radio stations can temporarily or permanently broadcast differing content under one name (such as Radio 3) on frequencies that vary by region.
Automatic station tracking
Automatic station tracking is not available in all countries.
Automatic station tracking generally ensures that the system will switch to the frequency with the best reception for the selected station while you are driving. However, this may cause a regional station to be interrupted.
The automatic frequency switch (alternative frequency) and automatic station tracking can be deactivated in the FM settings.
Disabling station name scrolling (FM)
Some radio stations broadcast a very long name, which is displayed as scrolling text on the screen.
-
To disable the scrolling text for a radio station and to display only the text currently shown, tap and hold the station name until an audible signal sounds.
Station names that have had the scrolling text disabled are displayed with a period at the left and right of the station name.
The non-scrolling text applies to all station preset buttons where this station is stored.
Download Manual