Exterior lighting
 Introduction
Before changing a light bulb, check if it is an incandescent bulb or an LED light. Generally, light bulbs can be replaced by yourself. If the exterior lighting on your vehicle is equipped with LED technology, it is not possible to change LED lights or individual LEDs by yourself. The malfunction of individual LEDs may be an indication that more LEDs will malfunction. If this is the case, have the LEDs checked and/or replaced if necessary by suitably qualified professionals. Volkswagen recommends contacting an authorized Volkswagen dealer or authorized Volkswagen Service Facility.
Driving with exterior lighting that is inoperative may be against the law.
Additional bulb specifications
Some bulbs in the headlights or in the taillights may have certain manufacturer specifications that differ from conventional light bulbs. The respective name will be on the bulb socket or glass bulb.
 WARNING
Accidents can occur if the road is not well lit and the vehicle cannot be seen by others on the road, or is very difficult to see by others.
WARNING
Changing the bulbs incorrectly can cause accidents and serious injuries.
-
Always read and observe the warnings before performing any work in the engine compartment ⇒ Safety precautions for working in the engine compartment. The engine compartment in any motor vehicle is a potentially dangerous area that can cause serious personal injury.
-
Be aware that halogen bulbs are under pressure and can break during bulb replacement.
-
Only change bulbs when they have cooled down completely.
-
Never perform a bulb replacement if you are not familiar with the required procedures. If you are not sure what to do, have the work performed by an authorized Volkswagen dealer or authorized Volkswagen Service Facility qualified in this respect. Volkswagen recommends contacting an authorized Volkswagen dealer or authorized Volkswagen Service Facility.
-
Do not touch the glass bulb with bare fingers. Fingerprints on the bulb will vaporize from the heat when the light is switched on and will cause the reflector to “darken”.
-
Components with sharp edges are located on the headlight housing and on the taillight housing. Protect your hands during bulb replacement.
 NOTICE
If the rubber cover or plastic covers on the headlight housing were not installed correctly after a bulb change, this could cause damage to the electrical system, especially if water enters.
Information about replacing bulbs
Please read the introductory information and heed the Warnings and Notice ⇒  and
and Introduction.
Always perform the following steps for changing a bulb in the specified sequence ⇒ :
-
Park the vehicle a safe distance away from moving traffic on level and solid ground as soon as possible.
-
Set the parking brake ⇒ Operating the parking brake.
-
Switch the lights off ⇒ Switching the lights on and off.
-
Turn off the turn signal if it is activated ⇒ Switching the turn signals on and off.
-
Automatic transmission: move the selector lever into the P position ⇒ DSG® automated transmission: selecting the selector lever position.
-
Stop the engine and remove the vehicle key from the ignition lock ⇒ Stopping the engine.
-
Allow the orientation lighting to turn off ⇒ “Exit lighting” and “Entry lighting” function (orientation lighting).
-
Allow the affected light bulbs to cool down.
-
Check if you can see that a fuse is burnt out ⇒
Introduction. -
Change the affected light bulb according to the instructions ⇒
. A light bulb may only be replaced with the same type of light bulb. The respective name will be on the bulb socket or glass bulb. -
Never touch a glass light bulb with bare hands. The fingerprints left behind would vaporize from the heat when the bulb is switched on and condense on the reflector, which would then reduce the headlight brightness.
-
Check the bulb function after a bulb is changed. If the bulb does not function, the bulb may not have been inserted correctly, may have fallen out, or the connector may not have been plugged in correctly.
-
After every bulb replacement in the front of the vehicle, have the headlight adjustment checked by suitably qualified professionals. Volkswagen recommends contacting an authorized Volkswagen dealer or authorized Volkswagen Service Facility.
WARNING
Failing to follow these instructions, which are provided for your own safety, can cause accidents and serious injuries.
-
Always follow the steps in the instructions and the general safety precautions.
NOTICE
To reduce the risk of damage to the vehicle paint or to other vehicle components, please note the following:
-
Always be careful when removing and inserting the lights.
Replacing the bulbs in the halogen headlights
Please read the introductory information and heed the Warnings and Notice ⇒ andIntroduction.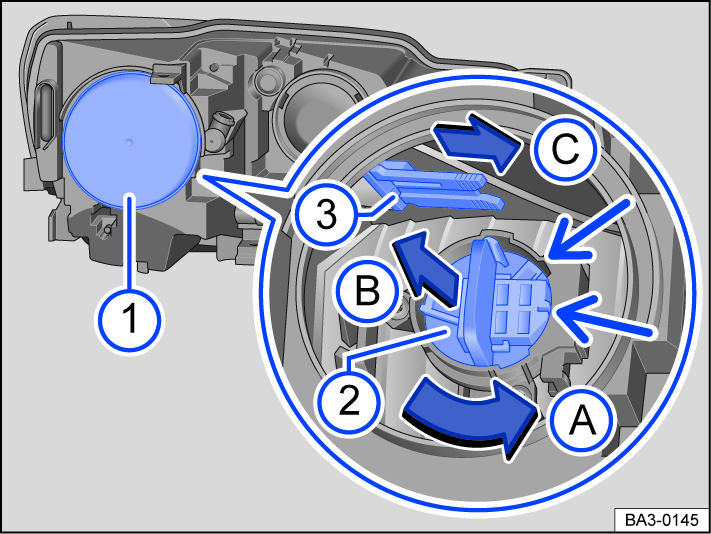
Fig. 127 In the engine compartment: Rear view of the left-side headlight.
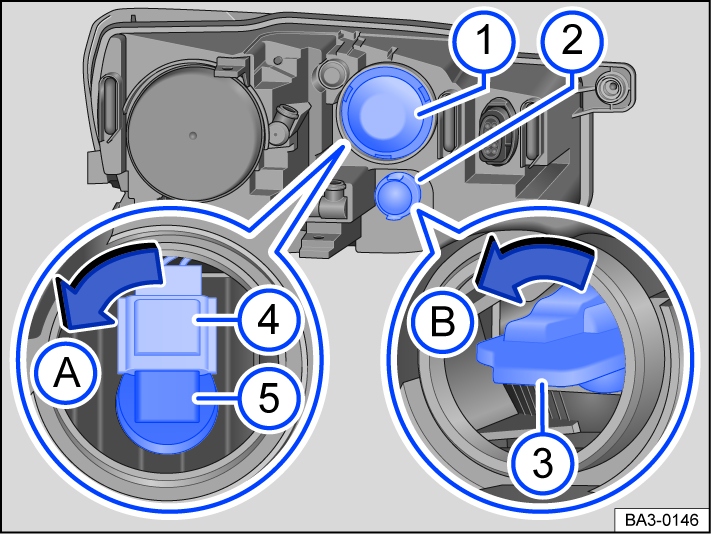
Fig. 128 In the engine compartment: Rear view of the left-side headlight.
The headlight does not need to be removed to replace the bulb.
Replacing a low beam headlight bulb
Only perform these steps in the specified order:
-
Follow the checklist and perform the steps. ⇒ Information about replacing bulbs
-
Open the hood
 ⇒ Safety precautions for working in the engine compartment.
 -
Remove the rubber cover fig. 127
 on the rear side of the headlight.
 -
Turn the bulb holder fig. 127
 in the direction of the arrow (arrow
  ) until the retaining tab of the bulb holder is situated in the recesses in the bulb housing (small arrows). Then remove the bulb holder toward the rear (arrow
  ).
). -
Replace the burned out bulb with a new bulb that is identical to the one being replaced.
-
Insert the bulb holder fig. 127
into the headlight and turn it in the opposite direction of the arrow (arrow ) as far as it will go. -
Fit the rubber cover fig. 127
on the rear side of the headlight. -
Close the hood ⇒ Safety precautions for working in the engine compartment.
Replacing a bulb for a parking light
Only perform these steps in the specified order:
-
Follow the checklist and perform the steps. ⇒ Information about replacing bulbs
-
Open the hood
⇒ Safety precautions for working in the engine compartment. -
Remove the rubber cover fig. 127
on the rear side of the headlight. -
Remove the bulb holder fig. 127
 in the direction of the arrow (arrow
  ).
). -
Replace the burned out bulb with a new bulb that is identical to the one being replaced.
-
Insert the bulb holder fig. 127
into the headlight in the opposite direction to the arrow (arrow ) and push it all the way in. -
Fit the rubber cover fig. 127
on the rear side of the headlight. -
Close the hood ⇒ Safety precautions for working in the engine compartment.
Replacing a high beam headlight bulb
Only perform these steps in the specified order:
-
Follow the checklist and perform the steps. ⇒ Information about replacing bulbs
-
Open the hood
⇒ Safety precautions for working in the engine compartment. -
Remove the rubber cover fig. 128
on the rear side of the headlight. -
Turn the bulb for the high beam headlight fig. 128
 in the direction of the arrow (arrow ) and remove it from the headlight. Then release plug connector fig. 128
  and remove.
 -
Replace the burned out bulb with a new bulb that is identical to the one being replaced.
-
Connect the connector fig. 128
to the bulb for the high beam headlight fig. 128 , ensuring that it audibly locks into place. Then insert the bulb for the high beam headlight fig. 128 into the headlight and turn it in the opposite direction of the arrow (arrow ) as far as it will go. -
Fit the rubber cover fig. 128
on the rear side of the headlight. -
Close the hood ⇒ Safety precautions for working in the engine compartment.
Replacing a bulb for a turn signal, parking light and daytime running light
Only perform these steps in the specified order:
-
Follow the checklist and perform the steps. ⇒ Information about replacing bulbs
-
Open the hood
⇒ Safety precautions for working in the engine compartment. -
Remove the rubber cover fig. 128
on the rear side of the headlight. -
Turn the bulb holder fig. 128
in the direction of the arrow (arrow ) and remove it from the headlight. -
Replace the burned out bulb with a new bulb that is identical to the one being replaced.
-
Insert the bulb holder fig. 128
into the headlight and turn it in the opposite direction of the arrow (arrow ) as far as it will go. -
Fit the rubber cover fig. 128
on the rear side of the headlight. -
Close the hood ⇒ Safety precautions for working in the engine compartment.
 The illustrations show the left headlight from behind. The layout on the right headlight is a mirror image of the left.
It is not possible for you to replace the LEDs for LED headlights. See an authorized Volkswagen dealer or authorized Volkswagen Service Facility for assistance.
Download Manual