Rear View Camera system
 Introduction to the subject
In this chapter you will find information on the following subjects:
There is a camera in the trunk lid to assist the driver while backing up or maneuvering. The camera image is shown together with the orientation lines projected by the system on the screen of the factory-installed Infotainment system.
The Rear View Camera system may take a couple of seconds to bring up the camera image.
The functions and displays of the Rear View Camera system may vary on vehicles with or without Park Distance Control (PDC) .
 WARNING
The Rear View Camera system is not able to give you a clear and undistorted view of all areas behind the vehicle.
- The camera lens can enlarge and distort the field of view and can cause objects on the screen to appear altered and imprecise.
- Due to the screen resolution or in low-light conditions, the camera may not pick up thin posts, chain-link fences and similar fences, and other objects, or it may not show them clearly.
- Always be careful and look around you when parking. The Rear View Camera system has blind spots and cannot always show people, animals, and objects in certain situations. Watch out for small children and animals in particular.
- Always keep the camera lens clean and free of snow and ice; do not cover the lens.
WARNING
The Rear View Camera system technology cannot overcome the laws of physics and the limits of the system. Careless or unintentional use of the Rear View Camera system may result in accidents and severe injuries.
- Always adjust your speed and driving style to road, traffic, weather, and visibility conditions.
- Always keep an eye on the parking direction and the vehicle surroundings. The front of the vehicle swings out more than the rear of the vehicle.
- Never pay so much attention to the images on the screen that you fail to notice what is going on around you.
- Use the Rear View Camera system only when the trunk lid is completely closed.
 NOTE
NOTE
- The Rear View Camera system shows only two-dimensional images on the screen. Due to the lack of depth of field, it may be difficult or impossible to identify protruding objects or potholes in the road, for example.
- Things like thin rods, fences, posts, and trees may not be shown by the Rear View Camera system and could damage the vehicle.
NOTE
The orientation lines are displayed independent of the area around the vehicle. There is no automatic detection of obstacles. The driver is responsible for judging if the vehicle fits into the parking spot.

Volkswagen recommends practicing with the Rear View Camera system in a location or parking space with no traffic in order to become familiar with the system and how it works.
Switching the Rear View Camera system on and off
Read and follow the introductory information and safety information first
Switching the Rear View Camera system on
- Switch the ignition on.
- Shift into reverse (R).
- OR:For vehicles with Park Distance Control, if the full-screen PDC display is on, move your hand toward the screen and tap the function key .
The camera image will be displayed with the orientation lines. The Rear View Camera system function keys are not shown. This helps the driver to have an unobstructed view of the area behind the vehicle.
To access the full functionality of the Rear View Camera system, tap the function key MENU in the top left hand corner of the screen. The function keys will now appear on the screen.
Switching the Rear View Camera system off
- Switch the ignition off.
- OR: Drive forward faster than about 5–10 mph (10–15 km/h) or for longer than 10 seconds.
- OR: Shift out of reverse (R). Depending on equipment, the display may take up to 10 seconds to switch off.
- OR: Press one of the Infotainment system buttons or move your hand toward the screen and tap the
function key.
- OR:For vehicles with Park Distance Control, move your hand toward the screen and tap the
function key to select the full-screen PDC display .
Rear View Camera system display
Read and follow the introductory information and safety information first
Rear View Camera System function keys
The following function keys appear when you tap the MENU function key on the screen or move your hand toward the screen. Options may vary, depending on vehicle equipment.
- x
- Close the current display.
- Adjust the display brightness, contrast, and color.
- Show the full-screen PDC display.
- Switch maneuver braking on and off (depending on vehicle equipment).
- Switch the PDC sound on or off.
- Switch the mini PDC display on.
- Switch the mini PDC display off.
Orientation lines
Horizontal red line: The safety distance, which is the area up to about 16 inches (40 cm) on the road behind the vehicle.
Lateral green lines: Vehicle extension (somewhat wider) toward the rear. The green lines stop about 6 feet (2 meters) on the road behind the vehicle.
All references to orientation line length apply to vehicles on a horizontal surface.
The angles of the red and green lines do not change when turning the steering wheel.
The orientation lines are displayed independent of the area around the vehicle. There is no automatic detection of obstacles. The driver is responsible for deciding if the vehicle fits into the parking space.
Requirements
Read and follow the introductory information and safety information first
The following requirements must be met for parking while using the Rear View Camera system:
- The vehicle speed must not be greater than about 10 mph (15 km/h).
- The driver must be familiar with the system.
- The width of the parking space must be at least the vehicle width +8 inches (20 cm).
- Maintain a distance of about 3 feet (1 meter) from the parking space (parallel parking only).
- The length of the parking space must be about 8 yards (8 meters) (parallel parking only).
The following conditions must be met to display a correct image:
- The trunk lid must be closed.
- The parking or maneuvering area must be level.
- There must be a clear and complete view of the area behind the vehicle.
- The rear of the vehicle must not be heavily loaded.
Parking with the Rear View Camera system
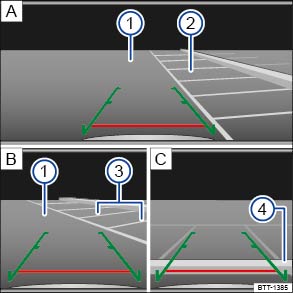
Fig. 123 On the screen: Orientation lines for the parking space behind the vehicle.
Read and follow the introductory information and safety information first
Key to :
- Searching for a parking space.
- Backing into the parking space.
- Maneuvering in the parking space.
 Road.
Road. Selected parking space.
 Boundary lines for the selected parking space.
 Rear boundary of the parking space, such as a curb.
Parking
- The requirements for parking and maneuvering with the Rear View Camera system must be met .
- Slowly drive by a parking space.
- Position the vehicle in front of the parking space
.
- Shift into reverse (R).
- Heed the message: Look! Safe to move?
- Slowly back up and steer so that the lateral green orientation lines lead into the parking space ③
.
- Align the vehicle in the parking space so that the green orientation lines are parallel to the selected parking space ③
- Stop the vehicle before (or at the very latest, when) the horizontal red line reaches the rear boundary, for example, a curb ④
.
NOTE
Smaller objects up to about 20 inches (50 cm) from the rear of the vehicle will not be detected by the camera and could cause vehicle damage.
Tips and troubleshooting
Read and follow the introductory information and safety information first
If the system is not responding as expected
- The camera is dirty . The camera may not work properly if blocked by dirt and snow or residue from abrasive cleaning agents or coatings.
- The system requirements are not met .
- The camera has been damaged or misaligned in low speed impacts or parking maneuvers.
- The system function is impaired by an aftermarket component such as a bicycle rack.
- Paint work or structural modifications have been made in the camera area.
If there is no sensor visibility, an error message, or the system switches itself off
- Clean the camera or remove stickers or accessories from the camera .
- Check for any visible damage.
Possible solutions
- Switch the system off temporarily.
- Check whether any of the causes described in this section apply.
- After checking all the possible causes and making the necessary adjustments, switch the system back on.
- If the system still does not respond as expected, have it checked by an authorized Volkswagen dealer or an authorized Volkswagen Service Facility.
NOTE
The camera must be kept clean and free of ice and snow, and must not be covered up by stickers or other objects, as this will prevent the system from working properly.
- Never use abrasive cleaning agents to clean the camera lens.
- Never remove snow or ice on the camera lens with warm or hot water. This can damage the camera lens.
Download Manual