Infotainment system operation and displays
 Introduction to the subject
In this chapter you will find information on the following subjects:
General information on operating the unit
The following section contains information on the settings that can be adjusted in the Vehicle settings menu. You can find information on operating the Infotainment system as well as warning and safety instructions in a separate manual. See ⇒BookletInfotainment System,.
Some Infotainment features can only be accessed and operated when the vehicle is standing still and the transmission selector lever is in Park (P).
Vehicle settings and information
After pressing the Infotainment button or the
Infotainment button followed by the Vehicle function key, you can tap the corresponding function key on the Infotainment screen to display information or adjust the following settings:
Selection (Vehicle information)
- Sport (Performance Monitor, if equipped)
- Energy consumers
- Driving data (Since start, extend. period, since refuel)
- Think Blue. Trainer.
- Vehicle status (Current warning and information messages)
Radio or Media (Radio station or media selection) ⇒BookletInfotainment System,
Settings or Setup (depending on equipment)
 WARNING
Driving on today's roads demands the full attention of the driver at all times. Driver distraction causes accidents, collisions and serious personal injury!
- Never let yourself be distracted when setting, adjusting, or using the Infotainment system.
- Always drive attentively and responsibly. Use the Infotainment system only if road, traffic, and weather conditions permit and you will not be distracted from your driving.

Starting the engine with a very weak 12 Volt vehicle battery or after the vehicle battery has been replaced may change or delete system settings (including time, date, and programming). Check the settings and correct as necessary once the vehicle battery has built up a sufficient charge.
Vehicle settings menu
Read and follow the introductory information and safety information first
Opening the Vehicle settings menu
- Switch on the ignition.
- If necessary, switch on the Infotainment system.
- Press the
Infotainment button.
- OR: Press the
Infotainment button followed by the Vehicle function key.
- Tap the
- Tap the corresponding function key to open additional menus in the Vehicle settings menu, or to adjust settings in the menu points.
If the box in the function key is checked , the respective function is switched on.
Changes made in settings menus are automatically applied immediately after entry.
Tapping the function key takes you back to the previous menu.
The possible menu items depend on the vehicle electronics and vehicle equipment.
Performance Monitor sport gauges
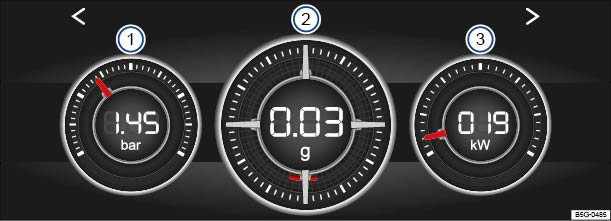
Fig. 21 In the Infotainment system: Performance Monitor sport gauges (if equipped). Gauges shown in the display may vary depending on configuration.
Read and follow the introductory information and safety information first
Your vehicle may be equipped with the Performance Monitor feature, which includes sport gauges and a lap timer/stopwatch in the Infotainment system.
Depending on vehicle equipment, the following Performance Monitor sport gauges may be available:
- Boost pressure gauge
- Accelerometer (g-meter)
- Power display
- Engine oil temperature gauge
- Engine coolant temperature gauge
You can access the Performance Monitor sport gauges in the Infotainment system by pressing the Infotainment button followed by the Vehicle,
, and Sport function keys.
OR: When the vehicle is not moving, press the Infotainment button until the Performance Monitor is displayed .
Tap the arrow buttons at either side of the screen to toggle between the Performance Monitor sport gauges and the lap timer/stopwatch .
Changing the gauges and units in the display
The display can show three Performance Monitor sport gauges at any given time. Swipe your finger up or down on a gauge to select a different one.
For some gauges, the units can be changed in the Vehicle settings menu in the Infotainment system .
Boost pressure gauge
The boost pressure gauge shows the pressure in the boost pressure duct between the turbocharger and the engine (shown in bar or psi, depending on the units selected). The farther right the needle points on the gauge, the higher the pressure in the boost pressure duct and the greater the output from the engine.
Accelerometer (g-meter)
The accelerometer, or g-meter , shows the current vehicle acceleration in the center display (shown in g).
The red mark moves to different areas of the gauge as the direction of acceleration changes. If you turn left, the mark moves to the right of the gauge (and vice versa). The red mark also moves down when accelerating and up when braking. These values are combined in certain situations, for example, when making a right turn while accelerating, the red mark moves to the lower left area of the gauge.
The red mark also moves toward or away from the center of the gauge depending on the level of acceleration. The farther the red mark is from the center, the heavier the acceleration (greater g).
Power display
The power display shows the current engine power output on both a gauge and a digital display (shown in kilowatts).
Engine oil temperature gauge 
If the needle in the engine oil temperature gauge is in the cold range, the engine has not reached operating temperature. Avoid high engine speeds and heavy engine loads until the engine has reached operating temperature.
The engine has reached operating temperature when the needle moves into the center of the gauge under normal driving conditions. The needle may move farther to the right on the gauge with a heavier engine load at high outside temperatures. This is not a cause for concern as long as the indicator light does not light up or flash in the instrument cluster See .
Engine coolant temperature gauge 
If the needle in the engine coolant temperature gauge is in the cold range, the engine has not reached operating temperature. Avoid high engine speeds and heavy engine loads until the engine has reached operating temperature.
Under normal driving conditions, the needle should be in the middle of the gauge. The temperature may go higher when the engine is working hard, especially in hot weather. This is not a cause for concern as long as the indicator light does not light up or flash in the instrument cluster. See .
WARNING
Driving on today's roads demands the full attention of the driver at all times. Driver distraction causes accidents, collisions and serious personal injury!
- Never pay so much attention to the gauges in the Infotainment system that you fail to notice what is going on around you.
WARNING
Rapid acceleration can cause skidding and loss of traction, especially on slippery roads, resulting in a loss of vehicle control, collisions, and serious personal injury.
 NOTE
NOTE
To help prevent engine damage, always avoid high engine speeds, full throttle acceleration and heavy engine loads when the engine is cold.
Because conditions used to determine vehicle performance may vary, the displayed values may not always be exact.
Performance Monitor lap timer and stopwatch
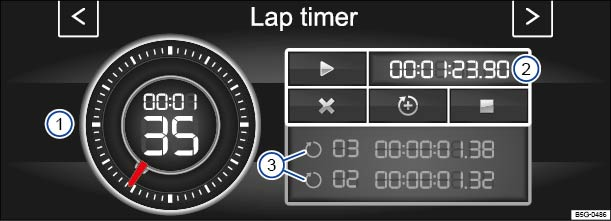
Fig. 22 In the Infotainment system: Performance Monitor lap timer/stopwatch.
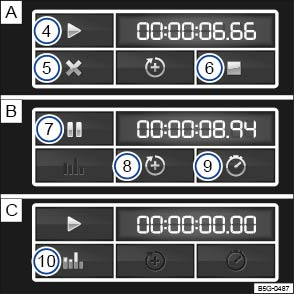
Fig. 23 In the Infotainment system: Buttons for operating the Performance Monitor lap timer/stopwatch. The buttons displayed vary depending on the current lap timer/stopwatch activity.
Read and follow the introductory information and safety information first
You can access the lap timer/stopwatch in the Infotainment system by pressing the Infotainment button followed by the Vehicle,
, and Sport function keys.
OR: When the vehicle is not moving, press the Infotainment button until the Performance Monitor lap timer/stopwatch is displayed .
Tap the arrow buttons at either side of the screen to toggle between the Performance Monitor sport gauges and the lap timer/stopwatch.
Key to and :
 Stopwatch display
 Digital split time display
 Display of recent split times
 Play button to start timing
 Button to cancel the current lap
 Stop button to end timing
 Pause button to pause timing
 Button to start a new lap
 Button to show intermediate time in the stopwatch display
 Button to show statistics
Operating the stopwatch and lap timer
The stopwatch has two different measuring functions. The stopwatch in the outer ring of the display (with timer needle) can measure up to 60 seconds. The digital display in the center of the stopwatch shows the elapsed hours, minutes, and seconds. The seconds appear as large numbers.
The digital display on the right side shows the current lap split time in 1/100 second intervals. If the lap timer is not being used to track split times, both digital displays show the same time.
| Function | Action and |
|---|---|
| Start or resume timing: | Tap the play button If you tap the play button when the vehicle is not moving, a confirmation message appears in the display. Tap Start to begin timing immediately. Otherwise, the timer starts automatically as soon as the vehicle moves forward. If laps have already been completed and are recorded in the statistics, timing will resume on the current lap. A new first lap can only be started if the statistics are reset in the statistics area. Tap the statistics button |
| Pause timing: | Tap the pause button |
| End timing: | After tapping the pause button |
| Start a new lap: | Tap button Timing of the current lap is interrupted and a new lap begins. The time of the completed lap is carried over to the statistics. |
| Cancel the current lap: | After tapping the pause button Timing of the active lap ends and the lap time is deleted. It is entered in the statistics as --:--:--.--. |
| Show the intermediate time in the stopwatch display: | Tap button The intermediate time (the moment the button is pressed) is shown for a few seconds in the center of the stopwatch . After the brief pause, the current time resumes in the center of the stopwatch. |
| Show lap statistics: | After tapping the stop button From this screen you can also reset stored lap times. |
| Reset lap timer and statistics: | Tap the Reset function key in the statistics area (not shown). |
A maximum of 99 laps and a maximum total time of 99 hours, 59 minutes, and 59 seconds can be recorded. If one of the two limits is reached, timing can only start again after tapping the Reset button in the statistics area.
For vehicles equipped with a lap timer in the instrument cluster display, see .
WARNING
Driving on today's roads demands the full attention of the driver at all times. Driver distraction causes accidents, collisions and serious personal injury!
- Never set the lap timer when the vehicle is moving.
WARNING
Rapid acceleration can cause skidding and loss of traction, especially on slippery roads, resulting in a loss of vehicle control, collisions, and serious personal injury.
- Only use the lap timer or fast acceleration if speed limits, visibility, weather, road, and traffic conditions permit and other drivers will not be endangered by your driving and the vehicle's acceleration.
NOTE
To help prevent engine damage, always avoid high engine speeds, full throttle acceleration, and heavy engine loads when the engine is cold.
Driver personalization
Read and follow the introductory information and safety information first
Your vehicle may be equipped with a personalization feature that saves certain vehicle settings for different user profiles, for example, some climate control, instrument cluster, or vehicle lighting settings. There are four user profiles, which the vehicle can identify by the key that is used to unlock the vehicle. Each vehicle key is assigned to a user profile.
Changes to the settings are applied to the active user profile and are saved after the vehicle is locked or when the user profile is changed.
Identifying and selecting the user profile
When personalization is active, the name of the current user profile appears in the instrument cluster display for about 10 seconds after switching on the ignition.
During this time, you can select a user profile using the and
buttons on the multi-function steering wheel .
The saved vehicle settings will be activated after selecting the user profile.
Managing user profiles and applying settings
You can manage user profiles and select settings via the Infotainment system in the Personalization menu when the ignition is switched on.
- Press the
- OR: Press the
- Tap the
If the box in the function key is checked , the feature is switched on.
Switching user profiles
You can select the user profile either in the Personalization menu or in the Vehicle status menu in the Infotainment system.
Manually assigning a vehicle key to a user profile
By selecting Manual key assignment, you can assign a vehicle key to the user profile that is currently active.
- Tap the
- Under Settings, select Manual key assignment.
- Tap the Assign key to current account function key.
- When the confirmation message appears, tap Assign.
- Press the
button on the remote control vehicle key within about 5 seconds .
Automatically assigning a vehicle key to a user profile
- Select Automatic key assignment.
- Vehicles without Keyless Access: When the user profile is switched, the new user profile is automatically assigned to the vehicle key used to unlock the vehicle.
- Vehicles with Keyless Access: When the user profile is switched, the new user profile is automatically assigned to the vehicle key detected when the driver door is opened.
Personalizing vehicle settings
The following settings can be personalized, depending on vehicle equipment:
- Opening and closing (single door opening, convenience opening, etc.).
- Vehicle lighting (3-blink turn signal (convenience indicating), etc.).
- Climate control system (temperature settings, ventilation, etc.).
- Driver assistance systems (PDC, ACC, etc.).
- Driving mode selection (active driving mode, custom settings, etc.).
- MFD and instrument cluster (display selection).
- Infotainment system (display brightness and station sorting).
A new vehicle key is assigned to the current user profile if automatic key assignment is selected. To assign the vehicle key to a different user profile, select the desired user profile and assign it to the vehicle key manually.
Download Manual