Disclaimer: Not affiliated with or endorsed by Toyota Motor Company. For informational purposes only. Full Disclaimer

2019 Toyota RAV4 Owners Manual - Using the audio/visual system


Using the audio/visual system

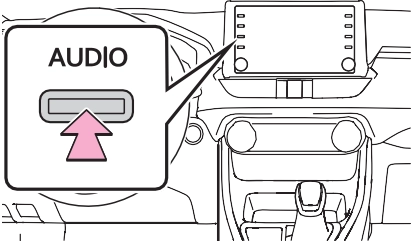
’ From the “AUDIO” button

1 Press the “AUDIO” button.

’ From the “MENU” button

1 Press the “MENU” button, then select “Audio”.

    Using the radio (P.422)
    Playing a USB memory (P.426)
    Playing an iPod/iPhone (P.428)
    Playing a Bluetooth® device (P.431)
    Using the AUX port (P.434)
    Using the steering wheel audio switches (P.436)
    Audio system settings (P.437)

NOTICE

    To prevent the battery from being discharged, do not leave the audio/visual system on lon- ger than necessary when the engine is not running.

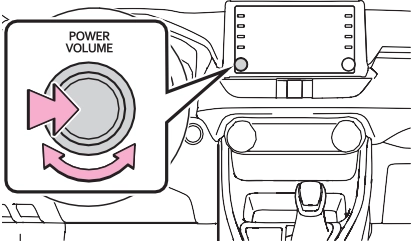
“POWER VOLUME” knob:

Press to turn the audio/visual system on and off. The system turns on in the last mode used. Turn this knob to adjust the vol- ume.

    Press the “AUDIO” button.

    Select “Source” or press “AUDIO” button again.
    Select the desired source.

    Dimmed screen buttons cannot be operated.
    When there are two pages, select or to change the page.
    When an Apple Carplay connec- tion is established, some system functions, such as the following, will be replaced by similar Apple CarPlay function or will become unavailable*:
    iPod (Audio Playback)
    USB audio/USB video
    Bluetooth® audio
    Toyota Entune App Suite Connect

*: This function is not made avail- able in some countries or areas.

Reordering the audio source

    Display the audio source selection screen. (P.418)
    Select “Reorder”.
    Select the desired audio

source then or to reor- der.

    Select “OK”.

1 Connect a device.

    Turn on the power of the device if it is not turned on.
    The AUX port only supports audio input.
    If a USB hub is plugged-in, two devices can be connected at a time.
    Even if a USB hub is used to con- nect more than two USB devices, only the first two connected devices will be recognized.
    If a USB hub that has more than two ports is connected to the USB port, devices connected to the USB hub may not charge or be inoperable, as the supply of cur- rent may be insufficient.
    Display the audio control screen. (P.418)
    Select “Sound”.
    Select the desired item to be set.

Select to set the tre- ble/mid/bass. (P.419)

Select to set the fader/bal- ance. (P.420)

Select to set the automatic sound leveliser. (P.420)

    Treble/Mid/Bass

How good an audio program sounds is largely determined by the mix of the treble, mid and bass levels. In fact, different kinds of music and vocal pro- grams usually sound better with different mixes of treble, mid and bass.

    Select “Treble/Mid/Bass”.
    Select the desired screen button.

Select “+” or “-” to adjust high-pitched tones.

Select “+” or “-” to adjust mid- pitched tones.

Select “+” or “-” to adjust low- pitched tones.

    Fader/Balance

A good balance of the left and right stereo channels and of the front and rear sound levels is also important.

Keep in mind that when listening to a stereo recording or broad- cast, changing the right/left bal- ance will increase the volume of 1 group of sounds while decreasing the volume of another.

    Select “Fader/Balance”.
    Select the desired screen button.

Select to adjust the sound balance between the front and rear speakers.

Select to adjust the sound balance between the left and right speakers.

    Automatic sound levelizer (ASL)

The system adjusts to the opti- mum volume and tone quality

according to vehicle speed to compensate for increased road noise, wind noise, or other noises while driving.

    Select “Automatic Sound Levelizer”.
    Select “High”, “Mid”, “Low” or “Off”.
    Screen format settings

The screen format can be selected for USB video.

    Press the “MENU” button.
    Select “Setup”.
    Select “Audio”.
    Select “Common”.
    Select “Screen Format”.
    Select the desired item to be adjusted.

Select to display a 4 : 3 screen, with either side in black.

Select to enlarge the image horizontally and vertically to full screen.

Select to enlarge the image by the same ratio horizontally

and vertically.

    Contrast and brightness adjustment

The contrast and brightness of the screen can be adjusted.

    Press the “MENU” button.
    Select “Setup”.
    Select “Audio”.
    Select “Common”.
    Select “Display”.
    Select the desired item to be adjusted.
    “Contrast”

“+”: Select to strengthen the con- trast of the screen.

“-”: Select to weaken the contrast of the screen.

    “Brightness”

“+”: Select to brighten the screen. “-”: Select to darken the screen.

    The voice command system and its list of commands can be operated. (P.450)

    Depending on the audio source, some functions may not be avail- able.

Voice command system


Download Manual