Adjusting the seats
|
|
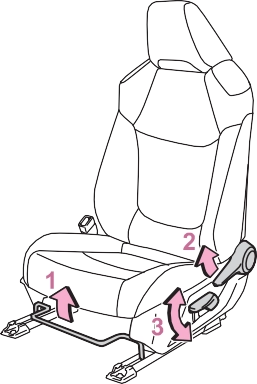
Power seat (driver’s side only)
|
|
Take care when adjusting the seat so that the head restraint does not touch the ceiling.
|
|
|
When adjusting the seat posi- tion
Take care when adjusting the seat position to ensure that other passengers are not injured by the moving seat.
|
 WARNING
|
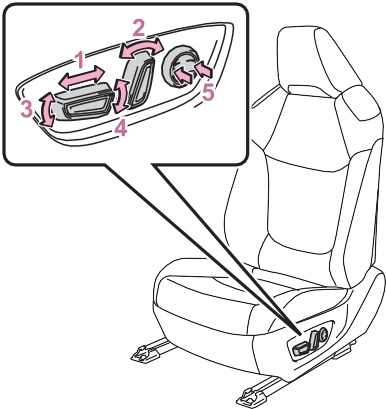
Adjustment procedure |
ment lever , and adjust the seatback angle.
|
|

|
|
|
When operating the seatback
Observe the following precau- tions. Failure to do so may cause death or serious injury. Keep other passengers from being hit with the seatback.
Do not bring your hands close to the moving parts or between the seats, as well as do not let any part of your body get caught.
|
 WARNING

Apply the parking brake (P.205) and shift the shift lever to P. (P.201)
Depending on the position of the front seat, if the seatback is folded backward, it may interfere with the operation of the rear seat.
This step is not necessary when operating the left side seat only.
adjustment lever , fold the seatback down.
|
|
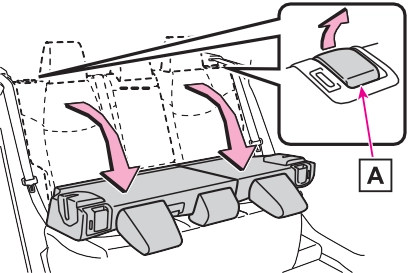
To avoid trapping the seat belt between the seat and the inside of the vehicle, pass the seat belt
inside the seat belt guide and then return the seatback
securely to the locked position.
*: If equipped
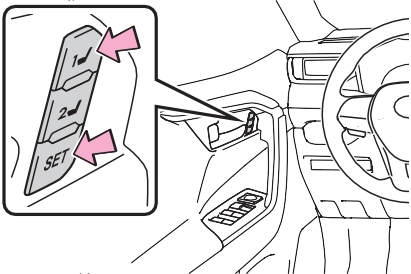
If the selected button has already been preset, the previously recorded position will be overwrit-
ten.
|
|
|
|
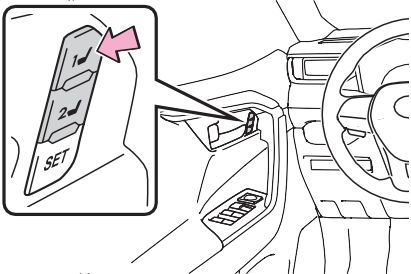
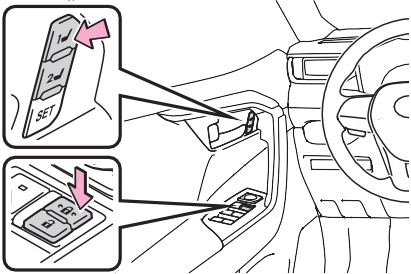
Perform any of the following:
The adjusted positions other than the position adjusted by lumbar sup- port switch can be recorded.
Recorded seat positions can be activated up to 180 seconds after the driver’s door is opened and another 60 seconds after it is closed again.
If a seat position is already in the furthest possible position and the seat is operated in the same direc- tion, the recorded position may be slightly different when it is recalled.
Take care when recalling the driving position so that the head restraint does not touch the ceiling.
The memorized positions are erased.
|
|
|
Seat adjustment caution
Take care during seat adjustment so that the seat does not strike the rear passenger or squeeze your body against the steering wheel. |
 WARNING
Carry only the key you want to register, and then close the
driver’s door.
If 2 or more keys are in the vehi- cle, the driving position cannot be recorded properly.
If the button could not be regis- tered, the buzzer sounds continu- ously for approximately 3 seconds.
|
|
The driving position will move to the recorded position.
If the driving position is in a position
that has already been recorded, the seat will not move.
If 2 or more keys are in the vehi- cle, the driving position cannot be canceled properly.
If the button could not be canceled, the buzzer sounds continuously for approximately 3 seconds.
Settings (e.g. the unlock door set- tings of the memory recall function) can be customized. (Customizable features: P.686)
|
|
|
Head restraint precautions
Observe the following precautions regarding the head restraints. Failure to do so may result in death or serious injury. Use the head restraints designed for each respective seat.
Adjust the head restraints to the correct position at all times.
After adjusting the head restraints, push down on them and make sure they are locked in position.
Do not drive with the head restraints removed.
|
 WARNING
|
Vertical adjustment |
|
|
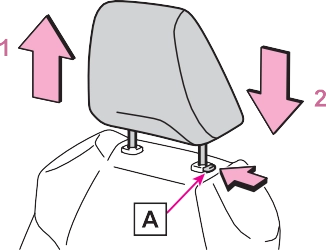
Pull the head restraints up.
Push the head restraint down while pressing the lock release button
.
Pull the head restraints up.
Push the head restraint down while pressing the lock release button
.
Make sure that the head restraints are adjusted so that the center of the head restraint is closest to the top of your ears.
Always raise the head restraint one level from the stowed position when using.
.
If the head restraint touches the ceiling, making the removal difficult, change the seat height or angle. (P.135)
|
Installing the head restraints |
Press and hold the lock release
button when lowering the head restraint.
Align the head restraint with the installation holes and push it down to the lowest lock position.
Download Manual