For safe use
Before driving
Use only floor mats designed specifically for vehicles of the same model and model year as your vehicle. Fix them securely in place onto the carpet.
The shape of the retaining hooks (clips) may differ from that shown in the illustration.
|
|
|
Observe the following precau- tions. Failure to do so may cause the driver’s floor mat to slip, possibly interfering with the pedals while driving. An unexpectedly high speed may result or it may become difficult to stop the vehi- cle. This could lead to an acci- dent, resulting in death or serious injury. When installing the driver’s floor mat
Do not use floor mats designed for other models or different model year vehicles, even if they are Toyota Genuine floor mats.
Only use floor mats designed for the driver’s seat.
Always install the floor mat securely using the retaining hooks (clips) provided.
Do not use two or more floor mats on top of each other.
Do not place the floor mat bot- tom-side up or upside-down.
|
 WARNING
|
|
Always align the marks .
For safe driving
1
|
|
|
Observe the following precau- tions. Failure to do so may result in death or serious injury. Do not adjust the position of the driver’s seat while driving. Doing so could cause the driver to lose control of the vehicle.
Do not place a cushion between the driver or passenger and the seatback. A cushion may pre- vent correct posture from being achieved, and reduce the effec- tiveness of the seat belt and head restraint.
Do not place anything under the front seats.
Objects placed under the front seats may become jammed in the seat tracks and stop the seat from locking in place. This may lead to an accident and the adjustment mechanism may also be damaged. Always observe the legal speed limit when driving on public roads.
When driving over long dis- tances, take regular breaks before you start to feel tired. Also, if you feel tired or sleepy while driving, do not force your- self to continue driving and take a break immediately.
|
 WARNING
Make sure that all occupants are wearing their seat belts before driving the vehicle. (P.30)
Use a child restraint system appropriate for the child until the child becomes large enough to
properly wear the vehicle’s seat belt. (P.50)
|
Adjusting the mirrors |
Make sure that you can see backward clearly by adjusting the inside rear view mirror (if equipped), Digital Rear-view Mirror (if equipped) and outside rear view mirrors properly. (P.145, 147, 156)
1-1. For safe use 29
Seat belts
1
|
|
|
Inspect the seat belt system periodically. Check for cuts, fraying, and loose parts. Do not use a damaged seat belt until it is replaced. Damaged seat belts cannot protect an occupant from death or serious injury.
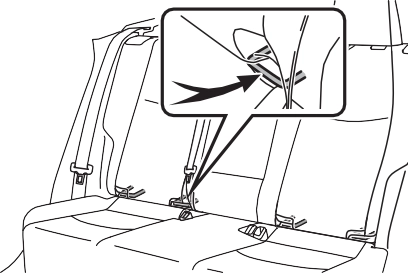
Ensure that the belt and plate are locked and the belt is not twisted.
If the seat belt does not function correctly, immediately contact your Toyota dealer. Replace the seat assembly, including the belts, if your vehi- cle has been involved in a seri- ous accident, even if there is no obvious damage.
Do not attempt to install, remove, modify, disassemble or dispose of the seat belts. Have any necessary repairs carried out by your Toyota dealer. Inap- propriate handling may lead to incorrect operation.
|
 WARNING
|
|
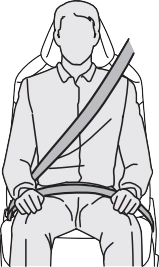
Sit up straight and well back in the seat.
The seat belts of your vehicle were principally designed for persons of adult size.
If your seat belts cannot be fastened securely because they are not long enough, a personalized seat belt extender is available from your Toy- ota dealer free of charge.
|
|
|
Using a seat belt extender
Observe the following precautions to reduce the risk of injury in the event of sudden braking, sudden swerving or an accident. Failure to do so may cause death or serious injury. |
 WARNING
a click sound is heard.
2 To release the seat belt, press the release button A .
The retractor will lock the belt during 1
a sudden stop or on impact. It may
also lock if you lean forward too quickly. A slow, easy motion will allow the belt to extend so that you can move around fully.
 When a passenger’s shoulder belt is completely extended and then retracted even slightly, the belt is locked in that position and cannot be extended. This feature is used to hold a child restraint system (CRS) firmly. To free the belt again, fully retract the belt and then pull the belt out once more.
|
Adjusting the seat belt shoulder anchor height (front seats) |
the release button A .
1 To fasten the seat belt, push the plate into the buckle until
2 Push the seat belt shoulder anchor up.
Move the height adjuster up and down as needed until you hear a
click.
|
|
|
Adjustable shoulder anchor
Always make sure the shoulder belt is positioned across the cen- ter of your shoulder. The belt should be kept away from your neck, but not falling off your shoul- der. Failure to do so could reduce the amount of protection in an accident and cause death or seri- ous injuries in the event of a sud- den stop, sudden swerve or accident. |
 WARNING
The pretensioners do not activate in the event of a minor frontal impact, a minor side impact or a rear impact.
|
|
If the vehicle is involved in multiple collisions, the pretensioner will acti-
vate for the first collision, but will not activate for the second or subse- quent collisions.
|
|
|
Seat belt pretensioners
Observe the following precautions to reduce the risk of injury in the event of sudden braking, sudden swerving or an accident. Failure to do so may cause death or serious injury. Do not place anything, such as a cushion, on the front passen- ger’s seat.
Doing so will disperse the pas- senger’s weight, which prevents the sensor from detecting the passenger’s weight properly. As a result, the seat belt preten- sioner for the front passenger’s seat may not activate in the event of a collision. If the pretensioner has acti- vated, the SRS warning light will come on. In that case, the seat belt cannot be used again and must be replaced at your Toyota dealer.
|
 WARNING
SRS airbags
1
’ SRS front airbags
Can help protect the head and chest of the driver and front passenger from impact with interior components
Can help provide driver protection
Can help restrain the front passenger
Can help protect the torso of the front seat occupants
“AIR BAG ON” and “AIR BAG OFF” indicator lights Front passenger airbag
Side impact sensors (front door) Curtain shield airbags
Seat belt pretensioners and force limiters Side impact sensors (front)
Side airbags
Seat cushion airbag
Front passenger’s seat belt buckle switch Side impact sensors (rear)
Driver’s seat belt buckle switch Driver’s seat position sensor
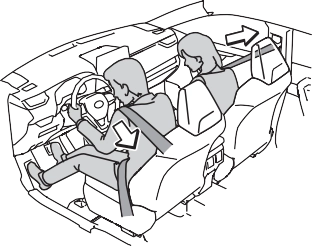
Your vehicle is equipped with ADVANCED AIRBAGS designed based on the US motor vehicle safety standards (FMVSS208). The airbag sensor assembly (ECU) controls airbag deployment based on information obtained from the sensors etc. shown in the system components diagram above. This information includes crash sever- ity and occupant information. As the airbags deploy, a chemical reaction in the inflators quickly fills the airbags with non-toxic gas to help restrain the motion of the occupants.
occur, the system is designed to
send an emergency call to the response center, notifying them of the vehicle’s location (without needing to push the “SOS” button) and an agent will attempt to speak with the occupants to ascertain the level of emergency and assis- tance required. If the occupants are unable to communicate, the agent automatically treats the call as an emergency and helps to dis- patch the necessary emergency services. (P.65)
However, this threshold velocity will
be considerably higher in the follow- ing situations:
The SRS front airbags and SRS cur- tain shield airbags may also deploy if a serious impact occurs to the underside of your vehicle. Some examples are shown in the illustra- tion.
The SRS curtain shield airbags may also deploy under the situations shown in the illustration.
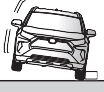 The vehicle skids and hits a curb stone.
The SRS front airbags do not gener- ally inflate if the vehicle is involved in a side or rear collision, if it rolls over, or if it is involved in a low- speed frontal collision. But, when- ever a collision of any type causes sufficient forward deceleration of the vehicle, deployment of the SRS
front airbags may occur.
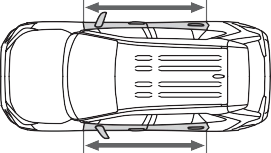
The SRS side and curtain shield air- bags may not activate if the vehicle is subjected to a collision from the side at certain angles, or a collision to the side of the vehicle body other than the passenger compartment.
The SRS side airbags do not gener- ally inflate if the vehicle is involved in a frontal or rear collision, if it rolls over, or if it is involved in a low- speed side collision.
The SRS curtain shield airbags do 1
not generally inflate if the vehicle is involved in a rear collision, if it pitches end over end, or if it is involved in a low-speed side or low- speed frontal collision.
In the following cases, the vehicle will require inspection and/or repair. Contact your Toyota dealer as soon as possible.
 vehicle was involved in an acci- dent that was not severe enough to cause the SRS side and curtain shield airbags to inflate.


1
WARNING

1
|
|
|
Repairs, modifications, removal or replacement of the steering wheel, instrument panel, dash- board, seats or seat upholstery, front, side and rear pillars, roof side rails, front door panels, front door trims or front door speakers
Modifications to the front door panel (such as making a hole in it)
Repairs or modifications of the front fender, front bumper, or side of the occupant compart- ment
Installation of a grille guard (bull bars, kangaroo bar, etc.), snow plows, winches or roof luggage carrier
Modifications to the vehicle’s suspension system
Installation of electronic devices such as mobile two-way radios and CD players
Modifications to your vehicle for a person with a physical disabil- ity
|
 WARNING
1-1. For safe use 43
Front passenger occupant classification system
1
1
|
Indicator/warn- ing light |
“AIR BAG ON” and “AIR BAG OFF” indicator lights |
“AIR BAG ON” |
|
SRS warning light |
Off |
|
|
Driver’s and front passenger’s seat belt reminder light |
Off*2 or flashing*3 |
|
|
Devices |
Front passenger airbag |
Activated |
|
Front passenger seat cushion airbag |
Activated *2 or deactivated*3 |
|
Indicator/warn- ing light |
“AIR BAG ON” and “AIR BAG OFF” indicator lights |
“AIR BAG OFF” or “AIR BAG ON”*4 |
|
SRS warning light |
Off |
|
|
Driver’s and front passenger’s seat belt reminder light |
Off*2 or flashing*3 |
|
|
Devices |
Front passenger airbag |
Deactivated or activated*4 |
|
Front passenger seat cushion airbag |
Deactivated or activated*2, 4 |
|
Indicator/warn- ing light |
“AIR BAG ON” and “AIR BAG OFF” indicator lights |
“AIR BAG OFF” *6 |
|
SRS warning light |
Off |
|
|
Driver’s and front passenger’s seat belt reminder light |
Off*2 or flashing*3 |
|
|
Devices |
Front passenger airbag |
Deactivated |
|
Front passenger seat cushion airbag |
|
Indicator/warn- ing light |
“AIR BAG ON” and “AIR BAG OFF” indicator lights |
“AIR BAG OFF” |
|
SRS warning light |
Off |
|
|
Driver’s and front passenger’s seat belt reminder light |
||
|
Devices |
Front passenger airbag |
Deactivated |
|
Front passenger seat cushion airbag |
1
*1: The system judges a person of adult size as an adult. When a smaller adult sits in the front passenger seat, the system may not recognize him/her as an adult depending on his/her physique and posture.
*2: In the event the front passenger is wearing a seat belt.
*3: In the event the front passenger does not wear a seat belt.
*4: For some children, child in seat, child in booster seat or child in convert- ible seat, the system may not recognize him/her as a child. Factors which may affect this can be the physique or posture.
*5: Never install a rear-facing child restraint system on the front passenger seat. A forward-facing child restraint system should only be installed on the front passenger seat when it is unavoidable. (P.53)
*6: In case the indicator light is not illuminated, consult this manual on how to install the child restraint system properly. (P.50)
Riding with children
1
|
Points to remember |
Points to remember: P.50 Child restraint system: P.52
When using a child restraint sys- tem: P.53
Child restraint system installa- tion method
The laws of all 50 states of the
U.S.A. as well as Canada now require the use of child restraint systems.
|
|
|
When a child is riding
Observe the following precau- tions. Failure to do so may result in death or serious injury. For effective protection in auto- mobile accidents and sudden stops, a child must be properly restrained, using a seat belt or child restraint system which is correctly installed. For installa- tion details, refer to the opera- tion manual enclosed with the child restraint system. General installation instructions are pro- vided in this manual.
|
 WARNING
1-2. Child safety 51
1
Confirm with the operation manual enclosed with the child restraint system about the installation of the child restraint system.
|
Installation method |
Page |
|
|
Seat belt attachment |
|
P.54 |
|
Child restraint LATCH anchors attachment |
|
P.59 |
|
Anchor brackets (for top tether strap) attach- ment |
|
P.61 |
1-2. Child safety 53
|
When using a child restraint system |
For the safety of a child, install a 1
child restraint system to a rear seat. When installing a child restraint system to the front pas- senger seat is unavoidable, adjust the seat as follows and install the child restraint system.
|
|
WARNING
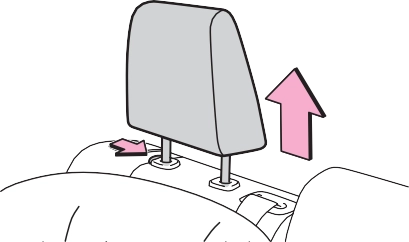
If the head restraint interferes with the child restraint system installation and the head restraint can be removed, remove the head restraint.
|
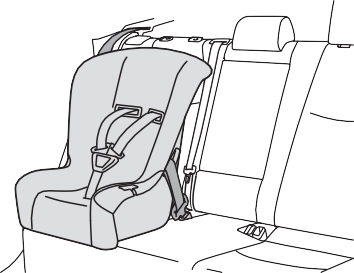
Child restraint system fixed with a seat belt |
A child restraint system for a small child or baby must itself be properly restrained on the seat with the lap portion of the lap/shoulder belt.
Install the child restraint system in accordance to the operation
manual enclosed with the child restraint system.
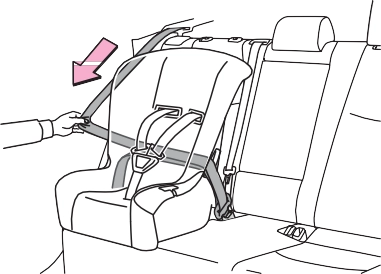
If there is a gap between the child restraint system and the seatback, adjust the seatback angle until good contact is achieved.
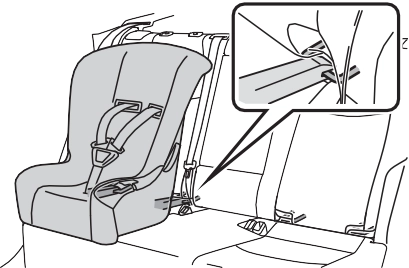
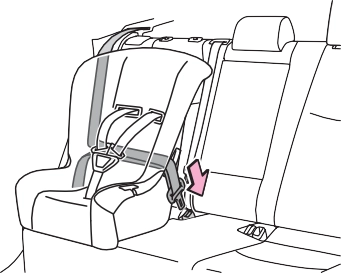
in lock mode. In lock mode, the belt cannot be extended.
1
After the shoulder belt has retracted to a point where there is no slack in the belt, pull the belt to check that it cannot be extended.
|
|
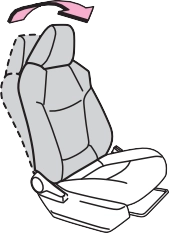
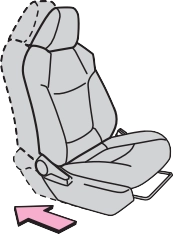
1 Adjust the seat.
When using the front passenger seat: If installing the child restraint system to the front passenger seat is unavoidable, refer to P.53 for front passenger seat adjustment.
When using the rear seat: If there is a gap between the child restraint system and the seatback, adjust the seatback angle until good con- tact is achieved.
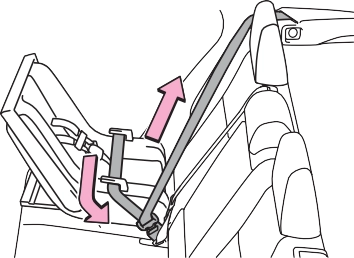
buckle. Make sure that the belt is not twisted.
|
|
|
|
After the shoulder belt has retracted to a point where there is no slack in the belt, pull the belt to
check that it cannot be extended.
removed, remove the head restraint. (P.142)
1
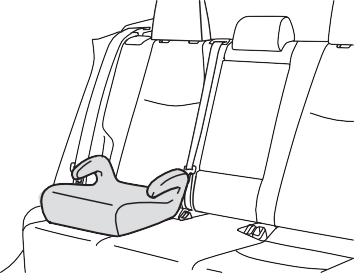
’ Booster type
|
|
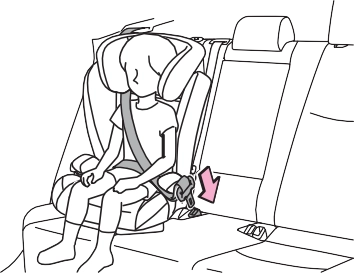
’ High back type
|
|

 buckle. Make sure that the belt is not twisted.
Check that the shoulder belt is cor- rectly positioned over the child’s shoulder and that the lap belt is as low as possible. (P.29)
|
|
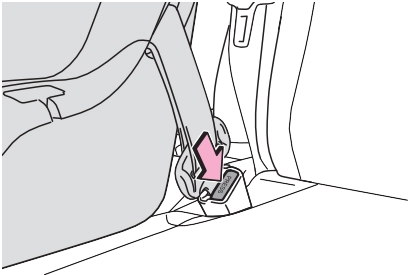
When releasing the buckle, the child restraint system may spring up due to the rebound of the seat cushion. Release the buckle while holding down the child restraint system.
Since the seat belt automatically reels itself, slowly return it to the stowing position.
|
|
|
Child restraint system fixed with a child restraint LATCH anchor |
LATCH anchors are provided for 1
the outboard rear seats.
|
|
Install the child restraint system in accordance to the operation manual enclosed with the child restraint system.
If there is a gap between the child restraint system and the seatback, adjust the seatback angle until good contact is achieved.
remove the head restraint. (P.142)
’ With flexible lower attach- ments
For owners in Canada: The symbol on a child
restraint system indicates the presence of a lower con- nector system.
’ With rigid lower attachments
For owners in Canada: The symbol on a child
restraint system indicates the presence of a lower con- nector system.
|
|

There are no LATCH anchors behind the rear center seat. However, the inboard LATCH anchors of the outboard seats, which are 17.3 in. (440 mm) apart, can be used if the child restraint system manufacturer’s instructions permit use of those anchors with the anchor spacing stated.
Child restraint systems with rigid lower attachments cannot be installed in the center seat. This type of child restraint system can only be installed in the out- board seat.
The LATCH system conforms to FMVSS225 or CMVSS210.2.
Child restraint systems conforming to FMVSS213 or CMVSS213 speci- fications can be used.
This vehicle is designed to conform to SAE J1819.
1
|
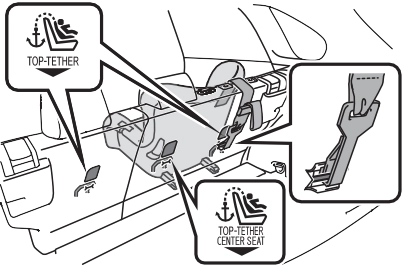
Using an anchor bracket (for top tether strap) |
Anchor brackets are provided for each rear seat.
Use anchor brackets when fix- ing the top tether strap.
’ Outboard rear seats
Anchor brackets Top tether strap
’ Center rear seat
Anchor bracket Top tether strap
to the anchor bracket
Install the child restraint system in accordance to the operation manual enclosed with the child restraint system.
’ Outboard rear seats
|
|
Make sure the top tether strap is securely latched. (P.58)
Top tether strap
restraint system installation, install the head restraint.
’ Center rear seat
If the head restraint interferes with your child restraint system, and the head restraint can be removed, remove the head restraint. (P.142)
Make sure the top tether strap is securely latched.
When installing the child restraint system with the head restraint being raised, be sure to have the top tether strap pass underneath the head restraint.
1
The LATCH system conforms to FMVSS225 or CMVSS210.2.
Child restraint systems conforming to FMVSS213 or CMVSS213 speci- fications can be used.
This vehicle is designed to conform to SAE J1819.
|
|
|
Center rear seat: When install- ing the child restraint system with the head restraint being raised, after the head restraint has been raised and then the anchor bracket has been fixed, do not lower the head restraint.
|
 WARNING
Download Manual