Rear Seats
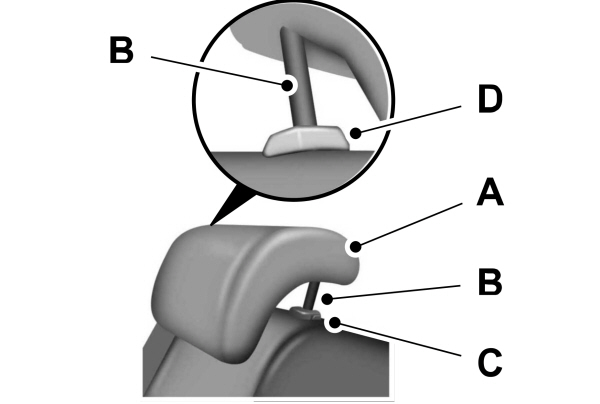
HEAD RESTRAINT COMPONENTS
The second row outermost head restraints are not adjustable or foldable.

|
THE HEAD RESTRAINTS CONSIST OF: AB C |
SECOND ROW CENTER HEAD RESTRAINT
|
THE HEAD RESTRAINT CONSISTS OF: AB C D |
THIRD ROW HEAD RESTRAINTS
The third row head restraints are non-adjustable, but you may be able to fold them.

- A trimmed energy absorbing foam and structure.
- A fold button, if equipped.
ADJUSTING THE HEAD RESTRAINT
For the second row center head restraint, pull the head restraint up to raise it.
To lower the head restraint:
- Press and hold the adjust and release button.
- Push the head restraint down.
To fold the second row outermost and third row head restraints:
- Press the fold button.
- Pull the head restraint up to place it back to the upright position.
REMOVING THE HEAD RESTRAINT
For the second row outermost head restraints:
- Pull the head restraint up until it reaches its highest position.
- Press and hold the guide sleeve unlock and remove button.
- Pull the head restraint up.
For the second row center head restraint:
- Pull the head restraint up until it reaches its highest position.
- Press and hold guide sleeve adjust and release button and the guide sleeve unlock and remove button.
- Pull the head restraint up.
INSTALLING THE HEAD RESTRAINT
Align the steel stems into the guide sleeves and push the head restraint down until it locks.
For the second row outermost head restraints, make sure the fold button is facing the outermost side of the seat.
MOVING THE SEAT BACKWARD AND FORWARD

Lift the handle to move the second row center seat forward or backward.
Note: Move the seat forward to keep a child in a child restraint close to the front seat occupants. Move the seat to the full rearward position when it is occupied by older children or adults, including children in booster seats.
ADJUSTING THE SEAT BACKREST
 WARNING: Reclining the seatback can cause an occupant to slide under the seat's seatbelt, resulting in severe personal injuries in the event of a crash. WARNING: Reclining the seatback can cause an occupant to slide under the seat's seatbelt, resulting in severe personal injuries in the event of a crash. |

For the second row outermost seats, the release handle is on the outermost side of the seat cushion. Lift it to adjust the seat backrest to your preferred position.
FOLDING THE SEAT BACKREST

- Locate the handle on the outermost side of the seat cushion.
- Pull up on the handle to fold the seat backrest.
Note: Use caution when folding the seat backrest to the flat position as the seat moves forward when you lift the release handle.
FOLDING THE SECOND ROW CENTER SEAT (IF EQUIPPED)
| WARNING: To prevent possible damage to the seat or seatbelts, make sure that the seatbelts are not fastened before folding the seatback. |

The release handle is in the upper right seat backrest. Pull the handle to release the folding seat latch.
Note: Use the same release handle to recline the seat backrest.
UNFOLDING THE SEATS
| WARNING: Do not place cargo or any objects behind the seat backrest before returning it to the original position. Pull on the seat backrest to make sure that it has fully latched after returning the seat backrest to its original position. An unlatched seat may become dangerous if you stop suddenly or have a crash. |

- Lift the seat backrest toward the rear of the vehicle.
- Rotate the seat backrest until it engages, locking it in the upright position.
ACCESSING THE THIRD ROW SEATS
| WARNING: Make sure that the seats and the seat backrests are secure and fully locked. Failure to follow this instruction could result in personal injury or death in a sudden stop or crash. WARNING: Check under the seat cushion to make sure no cargo or objects are under the seat cushion before returning the seat cushion to its original position, and that the seat cushion locks into place. Failure to do so may prevent the seat from operating properly in the event of a crash, which could increase the risk of serious injury. WARNING: Do not place cargo or any objects behind the seat backrest before returning it to the original position. Pull on the seat backrest to make sure that it has fully latched after returning the seat backrest to its original position. An unlatched seat may become dangerous if you stop suddenly or have a crash. |
Note: You can move the outermost seats forward to allow access to the third row seats.
This feature allows for easier entry and exit to and from the third row seat.

- Pull the lever on the top of the seat backrest up.
- Tilt the entire seat forward.
- Slide the seat forward until it stops.
To return the seat to the seating position, slide the seat rearward while pulling down on the seat backrest until the latch fully engages.
To move the seat further back, pull the lever under the front of the seat and slide it backward.
Note: You must move the seat to the full forward position before you move it rearward. Otherwise, the seat may not slide properly rearward.
Note: You can slide the outermost seats forward when using a child restraint.
ADJUSTING THE SECOND ROW OUTERMOST SEATS FOR EASY EXIT

When exiting your vehicle from the third row seats, pull the lever up on the upper corner of the outermost seats. Then, push the seat forward until it stops.
ADJUSTING THE HEAD RESTRAINT
The third row outermost head restraints are fixed and cannot be removed.

Press the button on the head restraint or the button on the overhead console to fold the third row outermost head restraints. Pull the head restraint up to place it in the upright position.
Note: These head restraints fold when you press the fold flat button.
ADJUSTING THE SEAT BACKREST
| WARNING: Do not recline a rear seat on which a child restraint is installed. Failure to follow this instruction could reduce the effectiveness of the child restraint. |
The third-row power recline buttons are on the quarter trim panel on each side of the vehicle.

| A B |
UNFOLDING THE SEAT BACKREST
To return the second-row seat backrest to the original position, rotate the seat backrest up until it latches in the upright position. The seat backrest clicks when it is locked into position.
To return the third-row seat backrest to the original position, press the corresponding control again.
Note: If the third row seat does not completely fold or unfold, press and hold the seat button until the seat folds and unfolds twice.
If the power rear seat is disabled after 10 minutes, you can enable the seat by:
- Opening any door.
- Pressing the unlock button on the key fob.
- Pressing any keyless entry keypad button.
- Switching the ignition on.
FOLDING DOWN THE REAR SEATS TO THE LOAD FLOOR
| WARNING: To prevent possible damage to the seat or seatbelts, make sure that the seatbelts are not fastened before folding the seatback. WARNING: Do not place cargo or any objects behind the seatback before returning it to the original position. |
The third-row seats have obstacle detection that prevents the seats from folding or returning if they are obstructed.
MASSAGE SEAT LIMITATIONS
The engine must be running or the vehicle must be in accessory mode to activate the seats.
This feature is disabled when the child safety locks are on.
Allow a few seconds for any selection to activate. Selecting a different adjustment cancels the current one in progress. When the seat backrest and cushion are both active, the massage alternates between zones.
SWITCHING THE MASSAGE SEATS ON AND OFF
You can adjust this feature through the rear touchscreen.
Note: Do not use massage on the rear seats when using a child restraint, if there are hard objects on the seat, or if the rear seats are folded. Failure to follow this instruction can cause damage to the system.
HEATED SEAT PRECAUTIONS
| WARNING: Use caution when using the heated seat if you are unable to feel pain to your skin because of advanced age, chronic illness, diabetes, spinal cord injury, medication, alcohol use, exhaustion or other physical conditions. The heated seat could cause burns even at low temperatures, especially if used for long periods of time. Failure to follow this instruction could result in personal injury. WARNING: Do not poke sharp objects into the seat cushion or seat backrest. This could damage the heated seat element and cause it to overheat. Failure to follow this instruction could result in personal injury. WARNING: Do not place anything on the seat that blocks the heat, for example a seat cover or a cushion. This could cause the seat to overheat. Failure to follow this instruction could result in personal injury. |
Do not:
- Place heavy objects on the seat.
- Operate the heated seat if water or any other liquid spills on the seat. Allow the seat to dry.
SWITCHING THE HEATED SEATS ON AND OFF
The vehicle must be running to use this feature.
The rear seat heat controls are on the rear of the center console.
Press the heated seat symbol to cycle through the various heat settings and off. More indicator lights indicate warmer settings.
Note: The heated seats may remain on after you remote start your vehicle, based on your remote start settings. The heated seats may also turn on when you start your vehicle if they were on when you switched your vehicle off.
AUTOMATIC CLIMATE CONTROLLED SEATS (IF EQUIPPED)
When you switch the auto setting on, the climate controlled seats switch between the heated seats and ventilated seats to match your climate control setting.
VENTILATED SEAT PRECAUTIONS
Do not:
- Spill liquid on the seats. This may cause the air vent holes to become blocked and not work properly.
- Place cargo or objects under the seats. They may block the air intake causing the air vents to not work properly.
SWITCHING THE VENTILATED SEATS ON AND OFF
The vehicle must be running to use this feature.

Press this symbol on the climate controls or the rear touchscreen to cycle through the various ventilation settings and off. More indicator lights indicate higher fan speeds.
Note: When you switch the climate control fan speed and the ventilated seats to their maximum settings, the ventilated seats provide increased cooling.
If the engine falls below 350 RPM while the ventilated seats are on, the feature switches itself off unless the vehicle is in Auto-Start-Stop mode. You may need to reactivate the ventilated seats.
Note: The ventilated seats may remain on after you remote start your vehicle, based on your remote start settings. The ventilated seats may also switch on when you start your vehicle if they were on when you switched your vehicle off.
Download Manual