Changing a road wheel
CHANGING A FLAT TIRE
If you get a flat tire when driving, do not apply the brake heavily. nstead, gradually decrease your speed, hold the steering wheel firmly and slowly move to a safe place on the side of the road.
Have the flat serviced by an authorized dealer to prevent damage to the system sensors. See Tire Pressure Monitoring System. Replace the spare tire with a road tire as soon as possible. During repairing or replacing of the flat tire, have the authorized dealer inspect the system sensor for damage.
Note: Only use tire sealants in roadside emergencies as they may cause damage to the tire pressure monitoring system sensor.
Note: The tire pressure monitoring system indicator light illuminates when the spare tire is in use. To restore the full function of the monitoring system, all road wheels with tire pressure monitoring sensors must be mounted on this vehicle.
DISSIMILAR SPARE WHEEL AND TIRE ASSEMBLY INFORMATION
 WARNING: Failure to follow these guidelines could result in an increased risk of loss of vehicle control, injury or death. WARNING: Failure to follow these guidelines could result in an increased risk of loss of vehicle control, injury or death. |
If you have a dissimilar spare wheel and tire, then it is intended for temporary use only. This means that if you need to use it, you should replace it as soon as possible with a road wheel and tire assembly that is the same size and type as the road tires and wheels that were originally provided. If the dissimilar spare tire or wheel is damaged, it should be replaced rather than repaired.
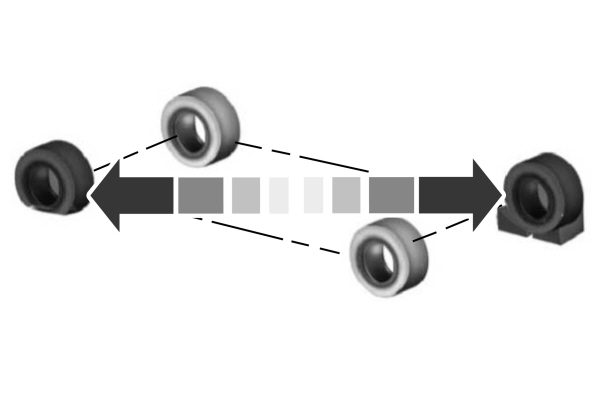
A dissimilar spare wheel and tire assembly is defined as a spare wheel and tire assembly that is different in brand, size or appearance from the other road tires and wheels on your vehicle.
Full-size dissimilar spare
When driving with the full-size dissimilar spare wheel and tire assembly, do not:
- Exceed 70 mph (113 km/h).
- Use more than one dissimilar spare wheel and tire assembly at a time.
- Use snow chains on the end of the vehicle with the dissimilar spare wheel and tire assembly.
When driving with the full-size dissimilar spare wheel and tire assembly, it is recommended that you do not:
- Exceed 50 mph (80 km/h) in four-wheel drive.
- Engage four-wheel drive unless the vehicle is stationary.
- Use four-wheel drive on dry pavement.
Using a dissimilar spare wheel and tire assembly can compromise the effectiveness of the following:
- Handling, stability and braking performance.
- Comfort and noise.
- Ground clearance and parking at curbs.
- Winter weather driving capability.
- Wet weather driving capability.
- Four-wheel driving capability.
When driving with the full-size dissimilar spare wheel and tire assembly additional caution should be given to:
- Towing a trailer.
- Driving vehicles with a camper body.
- Driving vehicles with a load on the cargo rack.
Drive cautiously when using a full-size dissimilar spare wheel and tire assembly and seek service as soon as possible.
LOCATION OF THE SPARE TIRE AND TOOLS
The spare tire is located under the vehicle, just forward of the rear bumper. The jack, swivel wrench and lug wrench are in the following locations:
| Item | Location |
|---|---|
| Spare tire | Under the vehicle, just forward of the rear bumper |
| Jack and tool kit bag | Under the access panel located in the floor compartment behind the rear seat |
TIRE CHANGE PROCEDURE
| WARNING: Only use replacement tires and wheels that are the same size, load index, speed rating, and type as those originally provided for your vehicle. The recommended tire and wheel sizes can be found on the Tire Label on the driver side door frame or the edge of the driver door. If this information is not found in those locations, or for additional options, contact your authorized dealer. Use of any tire or wheel not recommended, could affect the safety and performance of your vehicle, which could result in an increased risk of loss of vehicle control, vehicle rollover, personal injury and death. WARNING: To help prevent your vehicle from moving when changing a wheel, shift the transmission into park (P), set the parking brake and use an appropriate block or wheel chock to secure the wheel diagonally opposite to the wheel being changed. For example, when changing the front left wheel, place an appropriate block or wheel chock on the right rear wheel. WARNING: Only use the jack provided as original equipment with your vehicle. WARNING: Switch off the running boards before jacking or placing any object under your vehicle. Never place your hand between the extended running board and your vehicle. A moving running board may cause injury. WARNING: Only use the spare wheel carrier to stow wheels provided with your vehicle. WARNING: Ensure screwthread is adequately lubricated before use. WARNING: Apply the parking brake, shift into park (P), switch the ignition off and remove the key before you leave your vehicle. Failure to follow this instruction could result in personal injury or death. WARNING: Only use the specified jacking points. If you use any other locations you could damage vehicle components, such as brake lines. WARNING: Do not attempt to change a tire on the side of the vehicle close to moving traffic. Pull far enough off the road to not obstruct the flow of traffic and avoid the danger of being hit when operating the jack or changing the wheel. |
- Park the vehicle on firm, level ground and activate the hazard flashers.
- Apply the parking brake, place the transmission in park (P) and switch the ignition off.
- Block the wheels diagonally opposite the flat tire, for example, if the left front tire is flat, block the right rear wheel.
REMOVING THE JACK AND TOOLS
- Open the liftgate and lift the load floor behind the third row seat. If your vehicle has an access panel, unlatch and remove this panel.
- Remove the wing nut by turning it counterclockwise.
- Remove the jack and tool kit bag from the bracket, loosen the straps and remove the tool bag from the jack.

Note: Pay close attention to the orientation of the jack and tool kit bag, because it needs to be reinstalled after changing the tire.
REMOVING THE SPARE TIRE
- Remove the swivel wrench from the tool kit bag, open the spare tire winch access plug at the bottom of the compartment for the jack and tools tray.
- Insert the swivel wrench through the access hole in the floor to engage the winch. Turn the handle counterclockwise until the tire lowers to the ground and the cable is slightly slack.

- Slide the retainer through the center of the spare tire wheel and remove the spare tire.
Note: If your wheel nuts are hidden, use the tool provided in the jack kit to remove the wheel trim to access the wheel nuts.
- Loosen each wheel lug one-half turn counterclockwise, but do not remove them until the wheel is off the ground.

JACKING THE VEHICLE
| WARNING: No person should place any portion of their body under a vehicle that is supported by a jack. WARNING: The jack supplied with this vehicle is only intended for changing a flat tire in an emergency. Do not attempt to do any other work on your vehicle when it is supported by the jack, as your vehicle could slip off the jack. Failure to follow this instruction could result in personal injury or death. |

| WARNING: The jack supplied with this vehicle is only intended for changing a flat tire in an emergency. Do not attempt to do any other work on your vehicle when it is supported by the jack, as your vehicle could slip off the jack. Failure to follow this instruction could result in personal injury or death. WARNING: The jack should be used on level firm ground wherever possible. WARNING: Never place anything between the vehicle jack and the ground. WARNING: Never place anything between the vehicle jack and your vehicle. WARNING: It is recommended that the wheels of the vehicle be chocked, and that no person should remain in a vehicle that is being jacked. WARNING: Failure to follow these guidelines could result in an increased risk of loss of vehicle control, injury or death. |
Note: The jack does not require maintenance or additional lubrication over the service life of your vehicle.
Note: Both the front and rear jacking points are on the frame rails. The correct locations on the frame rails are marked with an arrow punched into the frame rail. Jack at the specified locations to avoid damaging your vehicle.
Front jacking point

Rear jacking point

- Position the jack at the jacking point indicator arrow closest to the flat tire location. Assemble the jack drive extension to the lug wrench as shown and use it to turn the jack drive clockwise to raise the vehicle until the flat tire is completely off the ground.

- Remove the lug nuts with the lug wrench. Replace the flat tire with the spare tire, making sure the valve stem is facing outward.
- Reinstall the lug nuts until the wheel is snug against the hub. Do not fully tighten the lug nuts until the wheel has been lowered.
- Completely lower the vehicle by turning the jack drive counterclockwise.
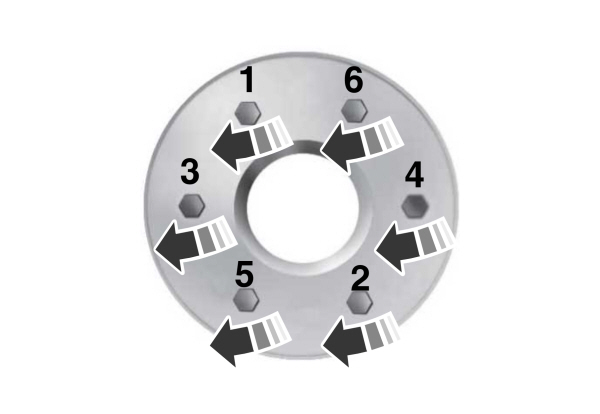
- Remove the jack and fully tighten the lug nuts in the order shown. See Wheel Nuts.
STOWING THE FLAT OR SPARE TIRE
- Lay the tire on the ground, near the rear of the vehicle, with the valve stem side facing up.
- Slide the wheel partially under the vehicle and install the retainer through the wheel center. You may have to remove the wheel center cap prior to pushing the retainer through the center of the wheel. To remove the center cap, press it off with the jack tool from the inner side of the wheel. Pull on the cable to align the components at the end of the cable.
- Using the swivel wrench, insert it through the access hole behind the third row seat and engage the winch.
- Turn the swivel wrench clockwise until the tire is raised to its stowed position underneath the vehicle. The wrench becomes harder to turn and the spare tire winch ratchets or slips when the tire is raised to maximum tightness. A clicking sound can be heard from the winch indicating that the tire is properly stowed.
- Carefully place all tools back into the tool kit bag.
- Reinstall the tool kit bag on the jack and tighten the straps.
- Reinstall the jack properly on the bracket and secure with the wing nut.
- Close the access hole with the rubber plug.
- If the vehicle has an access panel, reinstall.
- Unblock the wheel.
WHEEL NUTS
| WARNING: When you install a wheel, always remove any corrosion, dirt or foreign materials present on the mounting surfaces of the wheel or the surface of the wheel hub, brake drum or brake disc that contacts the wheel. Make sure to secure any fasteners that attach the rotor to the hub so they do not interfere with the mounting surfaces of the wheel. Installing wheels without correct metal-to-metal contact at the wheel mounting surfaces can cause the wheel nuts to loosen and the wheel to come off while your vehicle is in motion, resulting in loss of vehicle control, personal injury or death. |
| Bolt Size | lb.ft (Nm)1 |
| M14 x 1.5 | 150 lb.ft (204 Nm) |
1Torque specifications are for nut and bolt threads free of dirt and rust. Use only our recommended replacement wheel nuts and or wheel bolts.
Retighten the wheel nuts to the specified torque within 100 mi (160 km) after any wheel disturbance, such as tire rotation, changing a flat tire or wheel removal.
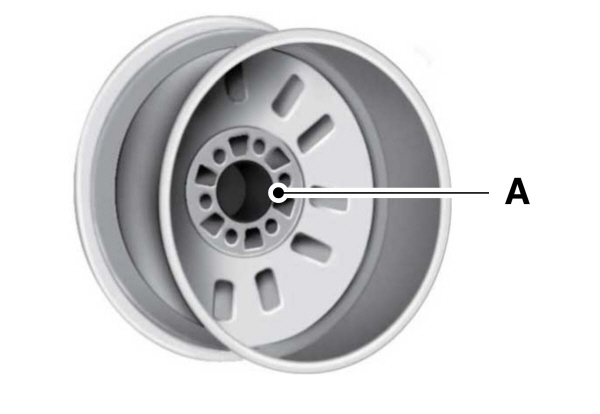
| A Inspect the wheel pilot hole and mounting surface prior to installation. Remove any visible corrosion or loose particles. |
Download Manual