Wheels and tires
Tire pressure
General information
The tire condition and tire pressure influence the following:
The service life of the tires.
Driving safety.
Driving comfort.
Fuel consumption.
Safety information

Checking the tire pressure regularly
Warning
A tire with too little or no tire inflation pressure may heat up significantly and sustain damage. This will have a negative impact on aspects of handling, such as steering and braking response. There is a risk of accident. Regularly check the tire inflation pressure, and correct it as needed, for instance twice a month and before a long trip.
Tire pressure specifications
In the tire inflation pressure table
The tire inflation pressure table contains all tire inflation pressure specifications for the specified tire sizes at the ambient temperature. The tire inflation pressure values are in the printed Owner's Manual and apply to tire sizes approved by the manufacturer of the vehicle for the vehicle type.
To identify the correct tire inflation pressure, please note the following:
Tire sizes of your vehicle.
Maximum speed for driving.
On the control display
The current tire inflation pressure values for the mounted tires can be displayed on the Control Display.
The current tire inflation pressure value is located on each tire.
Checking the tire pressure
General information
Tires heat up while driving. The tire pressure increases with the tire temperature.
Tires have a natural, consistent tire pressure loss.
The displays of inflation devices may under-read by up to 0.1 bar/2 psi.
Checking using tire inflation pressure specifications in the tire inflation pressure table
Determine the intended tire inflation pressure levels for the mounted tires.
Check the tire inflation pressure in all four tires, using a pressure gage, for example.
Correct the tire inflation pressure if the actual tire inflation pressure deviates from the intended tire inflation pressure.
Check whether all valve caps are screwed onto the tire valves.
The tire inflation pressure specifications in the tire inflation pressure table only relate to cold tires or tires at the same temperature as the ambient temperature.
Only check the tire inflation pressure levels when the tires are cold, i.e.:
A distance traveled of max. 1.25 miles/2 km has not been exceeded.
If the vehicle has not moved again for at least 2 hours after a trip.
Checking using the tire inflation pressure specifications on the Control Display
"CAR"
"Vehicle status"

"Tire Pressure Monitor"
Check whether the current tire inflation pressure levels deviate from the intended tire pressure value.
Correct the tire inflation pressure if the actual tire inflation pressure deviates from the intended tire inflation pressure.
The display of the current tire pressure may be limited when the vehicle is stationary. After a short drive, the tire pressure is updated.
After correcting the tire pressure
The corrected tire inflation pressures are applied automatically. Make sure that the correct tire settings have been made.
With tires that cannot be found in the tire pressure values on the control display, reset the Tire Pressure Monitor (TPM).
Tire inflation pressures up to 100 mph/160 km/h
For speeds of up to 100 mph/160 km/h and for optimum driving comfort, note the tire pressure values in the printed Owner's Manual and adjust as necessary.
These pressure values can also be found on the tire pressure label on the driver's door pillar.
Do not exceed a speed of 100 mph/160 km/h.
Tire inflation pressures at maximum speeds above 100 mph/160 km/h
Speeds above 100 mph/160 km/h
For speeds over 100 mph/160 km/h and for optimum driving comfort, note the tire pressure values in the printed Owner's Manual and adjust as necessary.
Tire marking
Tire size
245/45 R 18 96 Y
245: nominal width in mm
45: cross-sectional relationship in %
R: radial tire code
18: rim diameter in inches
96: load bearing capacity
Y: speed code letter
ZR tires: reinforced radial tire for speeds exceeding 150 mph/240 km/h
Maximum tire load
Maximum tire load is the maximum permissible weight for which the tire is approved.
Locate the maximum tire load on the tire sidewall and the Gross Axle Weight Rating – GAWR – on the certification label on the driver door B-pillar. Divide the tire load by 1.1. It must be greater than one-half of the vehicle’s Gross Axle Weight Rating – GAWR. Note, front vs. rear GAWR and tire loads, respectively.
Speed letter
|
Designation |
Maximum speed |
|---|---|
|
Q |
up to 100 mph/160 km/h |
|
R |
up to 106 mph/170 km/h |
|
S |
up to 112 mph/180 km/h |
|
T |
up to 118 mph/190 km/h |
|
H |
up to 131 mph/210 km/h |
|
V |
up to 150 mph/240 km/h |
|
W |
up to 167 mph/270 km/h |
|
Y |
up to 186 mph/300 km/h |
|
(Y) |
above 186 mph/300 km/h |
Tire Identification Number
DOT Code: DOT xxxx xxx 3822
xxxx: manufacturer code for the tire brand
xxx: tire size and tire design
3822: tire age
Tires with DOT codes meet the guidelines of the U.S. Department of Transportation.
Tire age
Recommendation
Regardless of the tire tread depth, replace tires at least every 6 years.
Manufacture date
You can find the manufacture date of the tire on the tire sidewall.
|
Designation |
Manufacture date |
|---|---|
|
DOT … 3822 |
38th week of 2022 |
Uniform Tire Quality Grading
Quality grades can be found where applicable on the tire sidewall between tread shoulder and maximum section width.
E.g.: Treadwear 200; Traction AA; Temperature A
DOT Quality Grades
Treadwear
Traction AA A B C
Temperature A B C
All passenger vehicle tires must conform to Federal Safety Requirements in addition to these grades.
Treadwear
The treadwear grade is a comparative rating based on the wear rate of the tire when tested under controlled conditions on a specified government test course. E.g., a tire graded 150 would wear one and one-half, 1 g, times as well on the government course as a tire graded 100. The relative performance of tires depends upon the actual conditions of their use, however, and may depart significantly from the norm due to variations in driving habits, service practices and differences in road characteristics and climate.
Traction
The traction grades, from highest to lowest, are AA, A, B, and C.
Those grades represent the tire's ability to stop on wet pavement as measured under controlled conditions on specified government test surfaces of asphalt and concrete. A tire marked C may have poor traction performance.
The traction grade assigned to this tire is based on straight-ahead braking traction tests, and does not include acceleration, cornering, hydroplaning, or peak traction characteristics.
Temperature
The temperature grades are A, the highest, B, and C, representing the tire's resistance to the generation of heat and its ability to dissipate heat when tested under controlled conditions on a specified indoor laboratory test wheel. Sustained high temperature can cause the material of the tire to degenerate and reduce tire life, and excessive temperature can lead to sudden tire failure. The grade C corresponds to a level of performance which all passenger car tires must meet under the Federal Motor Vehicle Safety Standard No. 109. Grades Band A represent higher levels of performance on the laboratory test wheel than the minimum required by law.
Temperature grade for this tire
M+S
Winter and all-season tires with better cold weather performance than summer tires.
Tire tread
Summer tires
Do not drive with a tire tread depth of less than 0.12 in/3 mm, otherwise there is an increased risk of aquaplaning.
Winter tires
Do not drive with a tire tread depth of less than 0.16 in/4 mm, as such tires are less suitable for winter driving conditions.
All-season tires
Do not drive with a tire tread depth of less than 0.16 in/4 mm, as such tires are less suitable for winter driving conditions.
Minimum tread depth
Distributed over the tire circumference are the tire manufacturer’s wear indicators with a height of at least 0.06 in/1.6 mm, which serve as an indicator of tire tread wear.
The positions of the wear indicators are marked on the tire sidewall with TWI, Tread Wear Indicator.
Irrespective of the wear indicators, observe the statutory regulations on the minimum tread depth.
Tire damage
General information
Check your tires regularly for damage, foreign bodies lodged in the tread, and tread wear.
Driving over rough or damaged road surfaces, as well as debris, curbs and other obstacles can cause serious damage to wheels, tires and suspension parts. This is more likely to occur with low-profile tires, which provide less cushioning between the wheel and the road. Be careful to avoid road hazards and reduce your speed, especially if your vehicle is equipped with low-profile tires.
Indications of tire damage or other vehicle malfunctions:
Unusual vibrations.
Unusual tire or running noises.
Unusual handling such as a strong tendency to pull to the left or right.
Uneven wear pattern, e.g., increased wear in the area of the tire shoulder.
Damage can be caused by the following situations, for instance:
Driving over curbs.
Road damage.
Tire pressure too low.
Vehicle overloading.
Incorrect tire storage.
Safety information
Observe with tire damage
Drive around obstacles where possible
Exchanging wheels and tires
Mounting and wheel balancing
Have the wheel mounted and balanced by an authorized service center or another qualified service center or repair shop.
Approved wheels and tires
General information
The following sizes are recommended and approved by the vehicle manufacturer for the approved wheels and tires per vehicle type and special equipment:
Wheel and tire combinations.
Rim designs.
Tire sizes.
Tire brands.
Ask an authorized service center or another qualified service center or repair shop about wheels and tires approved for the vehicle as well as special equipment.
Safety information
Use only suitable wheels and tires
Do not mount steel wheels
Use suitable wheel/tire combinations
Recommended tire brands
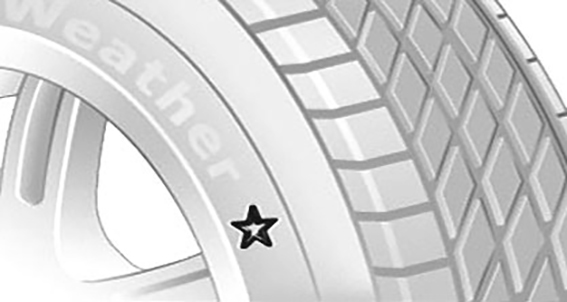
For each tire size, the manufacturer of the vehicle recommends certain tire brands. The tire brands can be identified by a star on the tire sidewall.
New tires
Tire traction is not optimal due to manufacturing circumstances when tires are brand new.
Drive conservatively for the first 200 miles/300 km.
Retreaded tires
Do not use retreaded tires
Winter tires
General information

Winter tires are recommended for operating on winter roads.
Winter tires can be identified by the icon with mountain and snowflake, as well as the M+S marking on the tire sidewall.
All-season tires with the M+S designation, but without icon with mountain and snowflake, have better winter characteristics than summer tires but generally do not achieve the performance of winter tires.
Maximum speed of winter tires
If the maximum speed of the vehicle is higher than the permissible speed for the winter tires, then attach a sign showing the permissible maximum speed in the field of vision. The info label is available from an authorized service center or another qualified service center or repair shop.
With winter tires mounted, observe and do not exceed the permissible maximum speed.
Wheel change between axles
Do not change wheels between axles
Storing tires
Tire pressure
Do not exceed the maximum tire inflation pressure indicated on the tire sidewall.
Storage
Store wheels and tires in a cool, dry and dark place.
Always protect tires against all contact with oil, grease, and solvents.
Do not leave tires in plastic bags.
Remove dirt from wheels or tires.
Repairing a flat tire
Safety precautions
Park the vehicle as far away as possible from passing traffic and on solid ground.
Turn on the hazard warning system.
Secure the vehicle against rolling away by setting the parking brake.
Turn the steering wheel until the front wheels are in the straight-ahead position and engage the steering wheel lock.
Have all vehicle occupants get out and make sure that they remain outside the hazardous area such as behind a guardrail.
If necessary, set up a warning triangle at an appropriate distance.
Tire repair set
Principle
With the tire repair set, minor tire damage can be sealed temporarily to enable continued driving.
General information
The filled in tire sealant closes the damage from the inside when it hardens.
Follow the instructions on using the tire repair set found on the compressor and sealant bottle.
The use of a tire repair set can be ineffective if the tire puncture measures above approx. 0.16 in/4 mm.
Do not remove foreign objects that have penetrated the tire. Remove foreign objects only when they are visibly protruding from the tire.
The compressor can be used to check the tire inflation pressure.
Overview
Storage
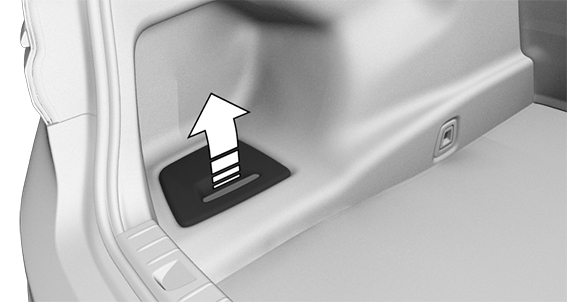
Storage for the tire repair set is provided in the left storage compartment of the trunk.
Sealant bottle and filler hose
1
2
3
4
5
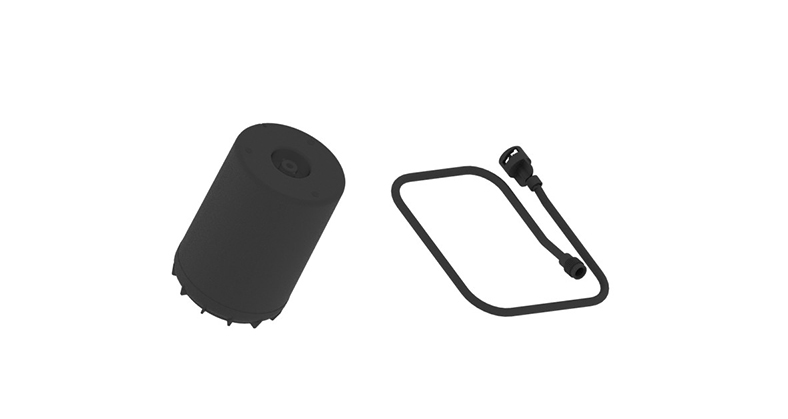
1
Sealant bottle
2
Sealant bottle outlet
3
Filler hose
4
Sealant bottle connection
5
Wheel valve connection
Compressor
1
2
3
4
5
6
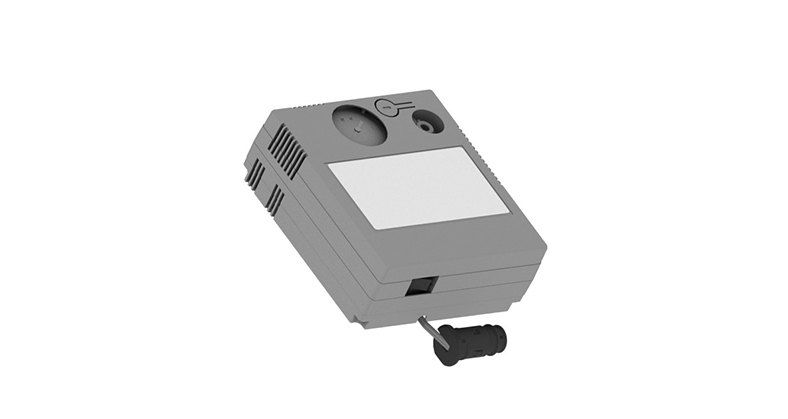
1
Compressor
2
Tire pressure display
3
Pressure reducing valve button
4
Sealant bottle mount
5
Connector for socket
6
On/off switch
Safety precautions
Park the vehicle as far away as possible from passing traffic and on solid ground.
Turn on the hazard warning system.
Set the parking brake.
Turn the steering wheel until the front wheels are in the straight-ahead position and engage the steering wheel lock.
As soon as permitted by the traffic flow, have all vehicle occupants get out and make sure that they remain outside the hazardous area such as behind a guardrail.
If necessary, set up the hazard triangle or hazard warning lights at an appropriate distance.
Remove the warning label for the maximum permissible speed from the compressor and attach it in the visible area in the vehicle interior.
Remove the warning label from the tire sealant bottle and attach it to the rim.
Preparing the tire repair set
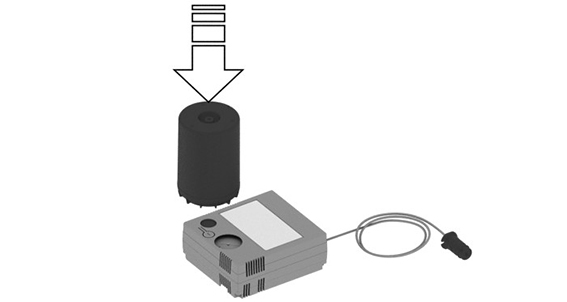
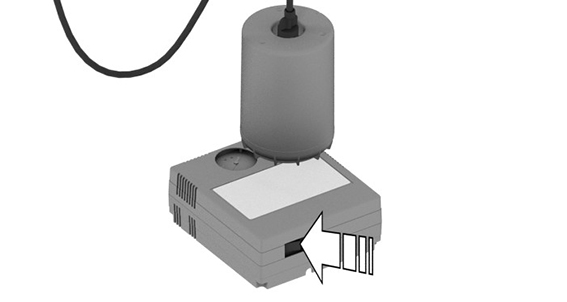
Insert the sealant bottle into the mount on the housing of the compressor.
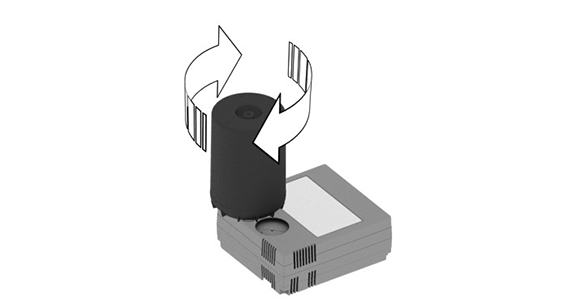
Turn the sealant bottle clockwise by 90° to the stop.
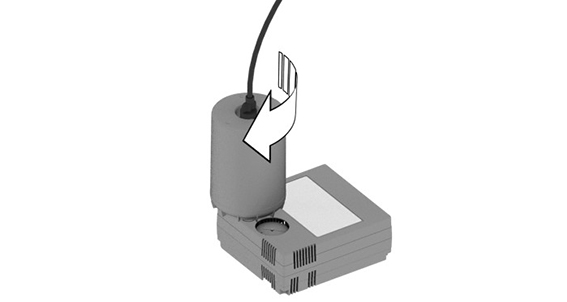
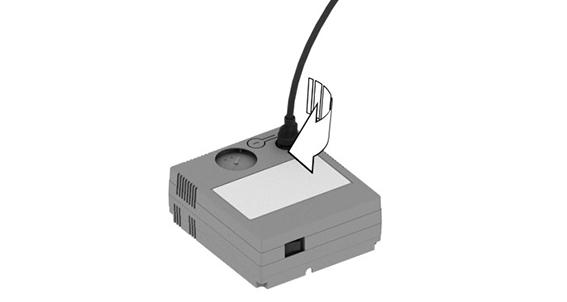
Connect the filler hose to the outlet of the sealant bottle and turn clockwise by 90° to the stop.
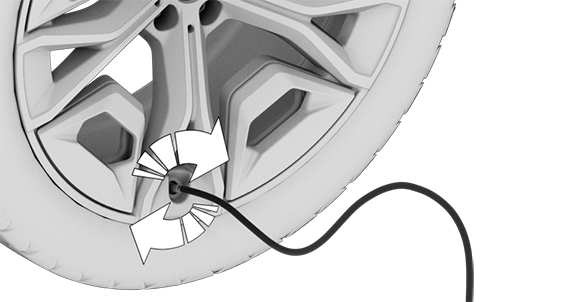
Unscrew the valve cap from the wheel and screw the connecting piece of the filler hose onto the valve.
With the compressor switched off, insert the connector into the power socket in the vehicle interior.
Filling the tire with sealing compound
Safety information
Observe in closed areas
Switch off the compressor after 10 minutes
Filling the tire with sealing compound
With standby state or drive-ready state switched on, switch on the compressor.
Let the compressor run for max. 10 minutes to fill in the tire sealant and reach a tire pressure of 2.5 bar/36 psi.
While the tire is being filled with tire sealant, the tire pressure can briefly reach approx. 6 bar/87 psi. Do not turn off the compressor in this phase.
Switch off the compressor.
Checking the tire pressure
Read the tire pressure on the tire pressure display of the compressor. The tire pressure must be at least 2.5 bar/36 psi.
Tire pressure too high
If the tire pressure is too high, reduce the tire pressure with the pressure reducing valve on the compressor.
Minimum tire inflation pressure is not reached
Do not continue driving unless a minimum tire pressure of 2.5 bar/36 psi is reached. Contact an authorized service center or another qualified service center or repair shop.
Minimum tire inflation pressure is reached
Pull the connector out of the socket in the vehicle interior.
Disconnect the hose from the sealant bottle and the valve on the wheel.
Unscrew the valve cap.
Stow the tire repair set in the cargo area.
Immediately drive 5 miles/10 km to ensure that the tire sealant is evenly distributed in the tire.
Do not exceed the permissible maximum speed of 50 mph/80 km/h.
If possible, do not drive at speeds less than 12 mph/20 km/h.
Tire sealant may spray from the damaged area during the initial wheel rotations.
Adjusting the tire pressure
Stop at a suitable location.
Connect the hose directly to the compressor and turn clockwise by 90° until it audibly engages.
Unscrew the valve cap from the wheel and screw the connecting piece of the hose onto the valve.
Insert the connector into the socket in the vehicle interior.
Read the tire pressure on the tire pressure display of the compressor.
Do not continue driving unless a minimum tire pressure of 1.3 bar/19 psi is displayed. Contact an authorized service center or another qualified service center or repair shop.
Correct the tire pressure to 2.5 bar/36 psi.
Increase tire pressure: with standby or driving readiness turned on, turn on the compressor and let it run for a maximum of 10 minutes.
Reduce tire pressure: press the pressure reducing valve button on the compressor.
Remove and stow the tire repair set
Switch off the compressor.
Pull the connector out of the socket in the vehicle interior.
Disconnect the hose from the compressor and the valve on the wheel.
Unscrew the valve cap.
Stow the tire repair set in the cargo area.
Continuing the trip
Do not exceed the permissible maximum speed of 50 mph/80 km/h.
Do not exceed a maximum distance travelled of 125 miles/200 km.
Re-initialize the flat tire monitor or reset the Tire Pressure Monitor.
Replace the faulty tire and the sealant bottle of the tire repair set promptly.
Additional information:
Tire pressure monitor.
System limits
If the tire cannot be made drivable, contact an authorized service center or another qualified service center or repair shop.
With the Tire Pressure Monitor: using sealant can damage the wheel electronics. In this case, have the electronics checked and replaced at the next opportunity.
Snow chains
Safety information
Mount snow chains on suitable tires only
Tighten snow chains sufficiently
Fine-link snow chains
The manufacturer of the vehicle recommends the use of fine-link snow chains. Certain types of fine-link snow chains have been tested by the manufacturer of the vehicle and recommended as road-safe and suitable.
For information on suitable snow chains, contact an authorized service center or another qualified service center or repair shop.
Use
Use only in pairs on the rear wheels, equipped with the tires of the following size:
265/40 R 19.
Information on the wheel size and rim offset is located on the inside of the wheel.
The list can also include wheel/tire sizes that are only suitable for certain models.
Information on wheels and tires approved for the vehicle can be requested from an authorized service center or another qualified service center or repair shop.
Follow the snow chain manufacturer's instructions.
Do not reset the Tire Pressure Monitor after mounting snow chains, as doing so may result in incorrect readings.
When driving with snow chains, if needed, briefly activate M Dynamic Mode.
Maximum speed with snow chains
Do not exceed a speed of 30 mph/50 km/h when using snow chains.
Tire pressure monitor
Principle
The Tire Pressure Monitor monitors the tire pressure and issues a warning if the tire pressure has dropped.
General information
Sensors in the tire valves measure the tire inflation pressure and tire temperature.
Using the tire settings in iDrive, the system can automatically compare the predefined target pressures with the actual tire inflation pressures.
If tires are being used that are not specified in the tire inflation pressure details on the vehicle, such as tires with special approval, the system needs to be actively reset. The system will then take over the actual tire inflation pressures as the target pressures.
When operating the system, also note the information found in the Tire inflation pressure chapter.
Additional information:
Tire inflation pressure.
Safety information
Correctly entering the tire settings
Functional requirements
The following prerequisites must be met for the system; otherwise, reliable notification of a tire pressure loss is not assured:
Every time a tire or wheel is changed, the correct details on the mounted tires must be entered in the tire settings.
The Tire Pressure Monitor does not activate until after driving for a few minutes:
After a tire or wheel change.
After a reset, for tires with special approval.
After changing the tire setting.
For tires with special approval:
After a tire or wheel change, a reset was performed with the correct tire inflation pressure.
After the tire inflation pressure was adjusted to a new value, a reset was performed.
Wheels with wheel electronics.
Tire settings
General information
The tire sizes of the mounted tires can be gathered from the tire inflation pressure details on the vehicle or directly on the tires.
The tire details do not need to be re-entered when the tire pressure is corrected.
For summer and winter tires, the tire details entered last are stored. After a tire or wheel change, the settings of the tire sets used last can be selected.
Changing settings
"CAR"
"Vehicle status"
"Tire Pressure Monitor"
"Tire settings"
"Tire selection"
"Manual"
"Tire type"
Select the tire type that is mounted on the rear axle.
For tires with special approval:
"Other tires/raceway"
Observe further proceeding in the perform a reset section.
Select the maximum road speed that will be used with the tires.
"Save tire settings"
The measurement of the current tire inflation pressure is started. The measurement progress is displayed.
Status display
Current status
The system status can be displayed on the Control Display, e.g., whether or not the system is active.
"CAR"
"Vehicle status"
"Tire Pressure Monitor"
The current status is displayed.
Current tire pressure
The current tire pressure is displayed for each tire.
The current tire inflation pressures may change during driving or depending on the outside temperature.
Current tire temperature
The current tire temperatures are displayed.
The current tire temperatures may change while driving or due to the outside temperature.
Tire conditions
General information
Tire and system status are indicated by the color of the wheels and a text message on the control display.
Any existing messages may not be deleted if the nominal pressure is not reached after the tire inflation pressure is corrected.
All wheels green
The system is active and bases warnings on the target pressures.
For tires with special approval: the system is active and bases warnings on the tire inflation pressures stored during the last reset.
One to four yellow wheels
A flat tire or major tire pressure loss has occurred in the indicated tires.
Gray wheels
It may not be possible to identify tire pressure losses.
Possible causes:
Malfunction.
During tire inflation pressure measurement, after confirmation of the tire settings.
For tires with special approval: a reset is performed for the system.
For tires with special approval: performing a reset
"CAR"
"Vehicle status"
"Tire Pressure Monitor"
Make sure that correct tire settings have been made.
Tire settings.
Turn on drive-ready state and do not drive off.
Reset tire pressure: "Perform reset".
Drive off.
The wheels are displayed in gray and the following is displayed: "Resetting tire pressure…".
After a travel time of several minutes, the set tire inflation pressures are accepted as the predefined tire inflation pressures. The reset is completed automatically while driving.
After a successfully completed reset, the wheels on the control display are shown in green and the following is displayed: "Reset successful."
You may interrupt this trip at any time. When you continue driving the reset resumes automatically.
Messages: for tires without special approval
General information
When a flat tire is indicated, the Dynamic Stability Control may be turned on.
Safety information
Do not continue driving with insufficient tire inflation pressure
If a tire inflation pressure check is required
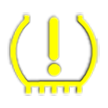
Message
An icon with a Check Control message appears on the control display.
|
Icon |
Possible cause |
|---|---|
|
|
Inflation was not carried out according to specifications, for instance when the tire has not been sufficiently inflated or in the case of a natural steady tire pressure loss. |

Measure
Check the tire pressure and correct as needed.
If the tire inflation pressure is too low
Message
A yellow warning light is illuminated in the instrument cluster.
In addition, an icon with a Check Control message appears on the control display.
|
Icon |
Possible cause |
|---|---|
|
|
There is a tire pressure loss. |

Measure
Reduce the vehicle speed. Do not exceed a speed of 80 mph/130 km/h.
At the next opportunity, for instance at a filling station, check the tire inflation pressure in all four tires and correct if necessary.
If there is a significant tire pressure loss
Message
A yellow warning light is illuminated in the instrument cluster.
In addition, an icon with the affected tire appears in a Check Control message on the control display.
|
Icon |
Possible cause |
|---|---|
|
|
There is a flat tire or a major tire pressure loss. |

Measure
Reduce your speed and stop cautiously. Avoid sudden braking and steering maneuvers.
Read the description on what to do in case of a flat tire.
Actions in the event of a flat tire.
Messages: for tires with special approval
General information
When a flat tire is indicated, the Dynamic Stability Control may be turned on.
Safety information
Do not continue driving with insufficient tire inflation pressure
If a tire inflation pressure check is required
Message
An icon with a Check Control message appears on the control display.
|
Icon |
Possible cause |
|---|---|
|
|
Inflation was not carried out according to specifications, e.g., the tire has not been sufficiently inflated. The system has detected a wheel change, but no reset was done. The tire inflation pressure has fallen below the level of the last reset. No reset was performed for the system. The system issues a warning based on the tire inflation pressures stored during the last reset. |
Measure
Check the tire pressure and correct as needed.
Perform a system reset.
If the tire inflation pressure is too low
Message
A yellow warning light is illuminated in the instrument cluster.
In addition, an icon with a Check Control message appears on the control display.
|
Icon |
Possible cause |
|---|---|
|
|
There is a tire pressure loss. No reset was performed for the system. The system issues a warning based on the tire inflation pressures stored during the last reset. |
Measure
Reduce the vehicle speed. Do not exceed a speed of 80 mph/130 km/h.
At the next opportunity, for instance at a filling station, check the tire inflation pressure in all four tires and correct if necessary.
Reset the system.
If there is a significant tire pressure loss
Message
A yellow warning light is illuminated in the instrument cluster.
In addition, an icon with the affected tire appears in a Check Control message on the control display.
|
Icon |
Possible cause |
|---|---|
|
|
There is a flat tire or a major tire pressure loss. No reset was performed for the system. The system issues a warning based on the tire inflation pressures stored during the last reset. |
Measure
Reduce your speed and stop cautiously. Avoid sudden braking and steering maneuvers.
Read the description on what to do in case of a flat tire.
Actions in the event of a flat tire.
Actions in the event of a flat tire
Identify the damaged tire.
Check the tire pressure in all four tires, for instance using the tire pressure display from a tire repair set.
For tires with special approval: if the tire pressure in all four tires is correct, the Tire Pressure Monitor may not have been reset. In this case, perform the reset.
If no tire damage can be identified, contact an authorized service center or another qualified service center or repair shop.
Repair the flat tire, for instance with a tire repair set or by changing the wheel.
Using a sealing compound, for instance from the tire repair set, may damage the wheel electronics. Have the electronics replaced at the next opportunity.
System limits
Temperature
The tire inflation pressure depends on the tire's temperature.
Driving or exposure to the sun will increase the tire temperature, thus increasing the tire inflation pressure.
The tire inflation pressure is reduced when the tire temperature falls again.
These circumstances may cause a warning when temperatures fall very sharply.
Sudden tire pressure loss
The system cannot indicate sudden serious tire damage caused by external circumstances.
Failure performing a reset
Tires with special approval: the system will not function correctly if a reset was not performed, for example a flat tire may be indicated although the tire inflation pressures are correct.
Malfunction
Message
The yellow warning light flashes and is then illuminated continuously. A Check Control message is displayed. It may not be possible to identify tire pressure losses.
Measure
A wheel without wheel electronics is mounted: have the wheels checked, if needed.
Fault caused by systems or devices with the same radio frequency: after leaving the area of the interference, the system automatically becomes active again.
For tires with special approval: the system was unable to complete the reset. Perform a system reset again.
Tire Pressure Monitor malfunction: have the system checked by an authorized service center or another qualified service center or repair shop.
Declaration according to NHTSA/FMVSS 138 Tire Pressure Monitoring System
Declaration according to NHTSA/FMVSS 138 Tire Pressure Monitoring Systems
Changing wheels/tires
General information
When a tire repair set is used, the wheel does not always need to be changed immediately in the event of a breakdown when there is tire pressure loss.
If necessary, a suitable wheel change tool, e.g., a jack, is available as an accessory from an authorized service center or another qualified service center or repair shop.
Safety information
Do not lie under the raised vehicle
Do not place supports under the jack
Only use the jack in the event of a breakdown
Always change the wheel on a suitable surface
Use the jack only for changing wheels
Insert jack into the jacking points
Do not exert forces on the raised vehicle
Using only one lug wrench
Securing the vehicle against rolling away
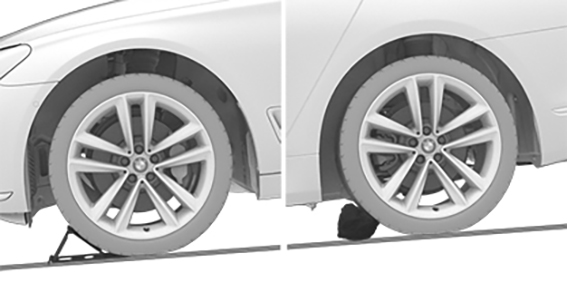
General information
The vehicle manufacturer recommends to additionally secure the vehicle against rolling away when changing a wheel.
On a level surface
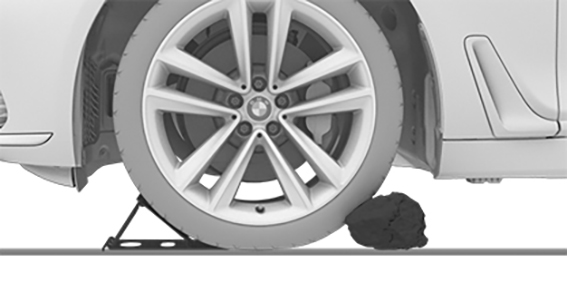
Place wheel chocks or other suitable objects in front and behind the wheel that is diagonal to the wheel to be changed.
On a slight downhill gradient
If you need to change a wheel on a slight downhill grade, place chocks and other suitable objects, for instance rocks, under the proper side of the wheels of both the front and rear axles to block the car from rolling downhill.
Preparing the vehicle
Park the vehicle on solid and non-slip ground at a safe distance from road traffic.
Turn on the hazard warning system.
Set the parking brake.
Engage a gear or move the selector lever to position P.
As soon as permitted by the traffic flow, have all vehicle occupants get out and make sure that they remain outside the hazardous area such as behind a guardrail.
Depending on the vehicle equipment, get wheel change tools and, if necessary, the emergency wheel from the vehicle.
If necessary, set up a warning triangle or portable hazard warning light at an appropriate distance.
Secure the vehicle additionally against rolling away.
Loosen the lug bolts a half turn.
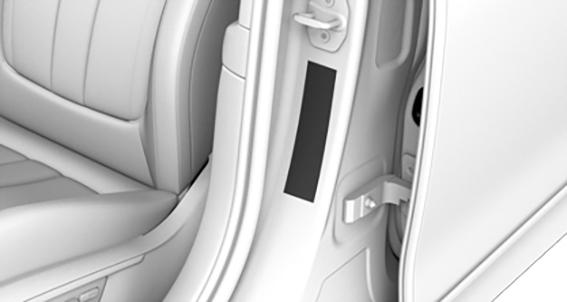
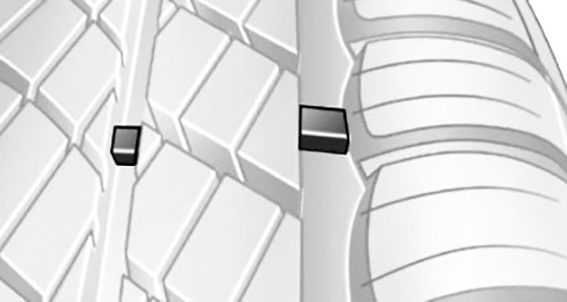
Jacking points
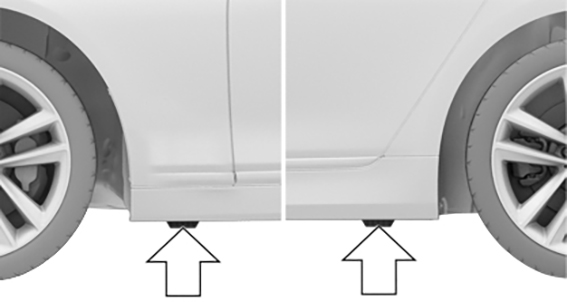
The jacking points are located at the indicated positions.
Jacking up the vehicle
Pay attention to the position of the hands
Hold the vehicle jack with one hand, arrow 1, and grasp the jack crank handle or lever with your other hand, arrow 2.
Insert the jack into the rectangular recess of the jacking point closest to the wheel to be changed.
Extend the jack by turning the jack crank handle or lever clockwise.
Take your hand away from the jack as soon as the jack is under load and continue turning the jack crank handle or lever with one hand.
Make sure that the car jack foot extends vertically and is at a right angle beneath the jacking point.
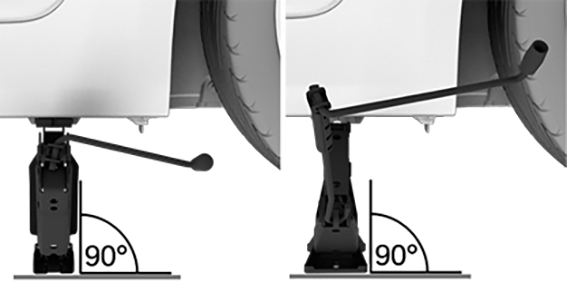
Make sure that the car jack foot is vertical and at a right angle beneath the jacking point after extending the vehicle jack.
Crank the vehicle up until the vehicle jack has the entire surface on the ground and the relevant wheel is maximum 1.2 inches/3 cm above ground.
Mounting a wheel
Mount one emergency wheel only, as required.
Unscrew the lug bolts.
Remove the wheel.
Put the new wheel or emergency wheel on and screw in at least two lug bolts in a crosswise pattern until hand-tight.
When non-original light-alloy wheels of the vehicle manufacturer are mounted, the accompanying lug bolts may have to be used as well.
Hand-tighten the remaining lug bolts and tighten all lug bolts well in a crosswise pattern.
Turn the jack crank handle counterclockwise to retract the jack and lower the vehicle.
Remove the jack and stow it securely.
After the wheel change
Tighten the lug bolts crosswise. The tightening torque is 101 lbs ft/140 Nm.
Stow the faulty wheel in the cargo area, if necessary.
Check tire inflation pressure at the next opportunity and correct as needed.
Re-initialize the flat tire monitor or reset the Tire Pressure Monitor.
Check to make sure the lug bolts are tight with a calibrated torque wrench.
Drive to the nearest authorized service center or another qualified service center or repair shop, then have the damaged tire renewed.
Download Manual