Map
Map
Call up the map

The map can be accessed directly with the button on the Controller.
Map view
General information
The map can be used via iDrive.
Additional information:
Basic entry explanation, operating concept.
Overview
8
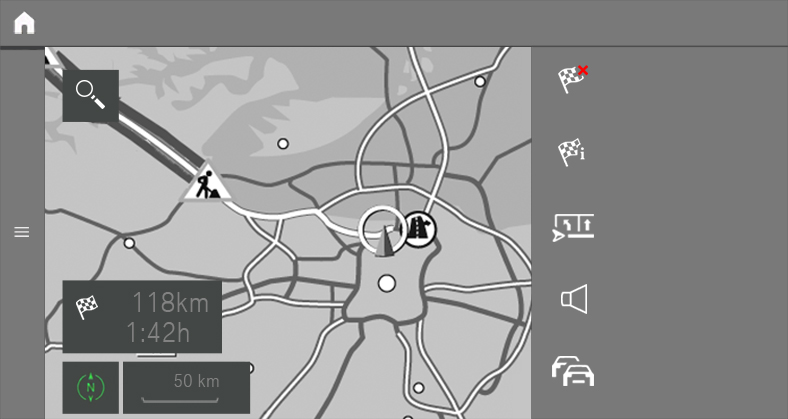
1
Status field
2
Touchscreen: change view
3
Destination input menu
4
Search
5
Traffic obstruction
6
Planned route
7
Current location
8
Toolbar
Toolbar
To change to the toolbar, tilt the Controller to the right.
|
Icon |
Function |
|---|---|
|
|
Go to Demo mode. |
|
|
End destination guidance. |
|
|
Turn voice guidance on and off. |
|
|
Status of the Advanced Real Time Traffic Information. |
|
|
Select theme map. |
|
|
Set up map. |
|
|
Add intermediate destination. |
|
|
Display alternative routes. |
|
|
Route preview. |
|
|
Settings. |
|
|
Split screen. |


Status field
The following information is displayed:
Icon for active destination guidance.
Time and distance to destination.
If necessary, time delay due to traffic obstructions.
Traffic obstructions
When traffic bulletins are received, traffic obstructions can be displayed on the map.
Additional information:
Advanced Real Time Traffic Information.
Destination guidance
Starting destination guidance

Press the button on the Controller.
Select the type of destination input.
Type of destination input.
Select the destination.
If necessary, start destination guidance.
Pop-ups for destination guidance
General information
After the route has been started, a pop-up will appear automatically in which the route preference can be adapted and alternative routes can be displayed. The route magnet can be used to change the current route details.
Display pop-ups again
Press the button on the Controller.
With operation via touchscreen: when the guidance is active, you can tap on the Status field in the map view to display the pop-up again.
Additional information:
Map.
Go to active destination guidance
Principle
After a destination guidance has been started, it can be accessed again.
Call up guidance
Press the button on the Controller.

"Current guidance"
Ending destination guidance
Press the button on the Controller.
Tilt the Controller to the right.

"Cancel route"
Demo mode
Principle
While the vehicle is stopped and destination guidance is active, driving on the route can be simulated.
Activate/deactivate
Press the button on the Controller.
Tilt the Controller to the right.

"Settings"
"Demo mode"
Call up Demo mode
Press the button on the Controller.
Tilt the Controller to the right.

"Demo"
Functions
|
Icon |
Function |
|---|---|
|
|
"Stop" |
|
|
"Start" |
|
|
"Pause" |
|
|
"Change location" |


Adjusting the speed
Press the button on the Controller.
Tilt the Controller to the right.
"Demo"
"Speed"
Select the desired setting.
Settings for destination guidance
Further settings can be adjusted for destination guidance.
Additional information:
Destination guidance.
Route
Principle
During the guidance, information about the current route can be displayed and the route details can be adjusted.
Route view
Depending on the equipment, different views are available to display the route details during destination guidance:
Route preview.
Map view.
Route guidance information on the map.
Route preview on the split screen.
Route preview In the instrument cluster.
Depending on how the vehicle is equipped: route preview in the Head-up display.
Route calculation
General information
Depending on the equipment and national-market version, routes are also transferred to the vehicle online. Information on traffic obstructions and traffic forecasts are taken into account for the calculation of online route suggestions.
For routes to be calculated online, the function must be activated in the Data Protection menu.
Activate/deactivate
Press the button on the Controller.
Tilt the Controller to the right.
"Settings"
"Configure services"
"Online alternative routes"
Route preference
General information
The route calculated can be influenced by selecting certain criteria. The recommended route may differ from the route you would take based on personal experience.
Default settings
The route preference can be individually adjusted. The settings are stored as standard and automatically applied to new destination guidances.
Additional information:
Adjusting route preference.
Route preview
Principle
When destination guidance is activated, an overview of the route sections can be displayed.
General information
The following information is displayed:
Display of route guidance information, such as turn information or lane information.
Traffic events and traffic flow.
Points of interest along the route. Points of interest can be selected and transferred directly to the destination guidance.
Possible stops along the route, such as refueling or charging station recommendations.
Display of information along the route, such as for dangerous curves.
Display route preview
Press the button on the Controller.
Tilt the Controller to the right.

"Route preview"
Route magnet
Principle
With active destination guidance, the route displayed on the map can be adjusted manually. To do this, use a marker point, the so-called route magnet, to pull the route into the desired direction.
General information
As an alternative, the route magnet can be used via the touchscreen.
When destination guidance is active, the route magnet can also be accessed via the pop-up on the map.
Additional information:
Destination guidance.
Open route magnet
Press the button on the Controller.
Tilt the Controller to the right.
"Route preview"
Tilt the Controller to the right.

"Add route magnet"
Setting a route magnet
Press the button on the Controller.
Press the Controller.
"Interactive map"
Use the cross-hairs to select the route section for which the route magnet must be set.
To change the scale: turn the Controller.
To shift the map: tilt the Controller in the required direction.
To shift the map diagonally: tilt the Controller in the required direction and turn it.
Press the Controller.
"Add route magnet"
Editing a route magnet
If necessary, tilt the Controller to select the route section in which the route magnet must be processed.
Press the Controller.
Select the desired setting.
Alternative routes
Principle
When destination guidance is activated, if possible, alternative routes will be suggested.
As soon as alternative routes are available, they will automatically be displayed on the Control Display and can be applied to the destination guidance.
General information
The alternative routes can be displayed and changed on the map via a pop-up.
Additional information:
Destination guidance.
When the dynamic destination guidance has been activated along with the calculation of online route suggestions, available alternative routes are automatically adopted in the destination guidance.
Displaying alternative routes
Press the button on the Controller.
Tilt the Controller to the right.

"Alternative routes"
Select an alternative route in order to accept it in the destination guidance.
Display
An overview showing the current route and the suggested alternative routes is displayed. The routes are displayed in color on the map.
The following details are displayed:
Arrival time and, if applicable, the delay due to the current traffic situation.
Route length.
 The icon indicates the energy consumption for the route. The more leaves are displayed, the more efficient the route.
Costs for toll, for example, that may be incurred on the route.
Plan possible stops along the route
Principle
For the active destination guidance, a points of interest search can be used to plan possible stops along the route, e.g. to refuel, charge or to take a break.
General information
With a low remaining range, a notification is automatically displayed with a refueling or charging suggestion. The refueling or charging recommendation shows a list of filling stations or charging stations, which can be applied as intermediate destinations.
Additionally, refueling or charging recommendations are displayed in the route preview.
Call up places to stop
Press the button on the Controller.
Tilt the Controller to the right.
"Route preview"
Tilt the Controller to the right.

"Places to stop"
Search for desired point of interest category.
"Filter": adjust the search criteria as needed.
If necessary, "Show results"
Select the desired point of interest.
Details are displayed.
If necessary, "Start guidance"
Reduced display
Principle
Only the traffic flow is displayed in the lower part of the route preview.
Activate/deactivate
Press the button on the Controller.
Tilt the Controller to the right.
"Route preview"
Tilt the Controller to the right.

"Reduced display"
Learning navigation
Principle
Destinations that have been transferred to the destination guidance repeatedly will also be considered for future route planning and may be suggested automatically.
Activate/deactivate
Press the button on the Controller.
Tilt the Controller to the right.
"Settings"
"Configure services"
"Learn route"
Voice guidance
Principle
If destination guidance is active, voice guidance may be given for the respective maneuvers.
Activate/deactivate
Press the button on the Controller.
Tilt the Controller to the right.

"Voice guidance"
Repeat
Inside of the map view:
Press the button on the Controller.
Outside of the map view:
Press the button twice.
Volume
Turn the volume button during the voice guidance until the desired volume is set.
Storing on the programmable memory buttons
The function for turning the voice guidance on/off can be stored on a programmable memory button for fast access.
Additional information:
Programmable memory buttons.
Theme maps
Principle
The map view is optimized for a specific view, e.g. the display of the current parking space situation.
General information
Depending on the setting, the theme maps are displayed automatically.
Additional information:
Set map.
Select theme map
Press the button on the Controller.
Tilt the Controller to the right.
If necessary "Theme map"
Select the desired setting:
 "Weather map": display map with weather icons. The weather map is not available until consent to the Privacy Policy has been given.
Services.
 "Gas station map": display fuel card.
Parking map
Principle
The parking map makes the search for available parking spaces in cities easier.
Activate/deactivate
Press the button on the Controller.
Tilt the Controller to the right.
"Settings"
"Configure services"
"Parking"
Call up functions
Press the button on the Controller.
Tilt the Controller to the right.
"Theme map"

"Parking map"
Tilt the Controller to the right.
Select the desired setting:
 "Find Parking": call up parking space assistant.
 "Recently vacated": display icons for vehicles that are exiting a parking space on the side of the road. The outline of the icon indicates the chances of finding a parking space. When the outline of the icon is still completely blue, the chances of finding a parking space are best.
 "Points of interest": display icons for parking garages or Park-and-Ride parking spaces on the map.
 "On-Street Parking": display colored lines for the probability of available parking spaces along the side of the roads. The more visible the lines, the greater the probability of finding a parking space.
Parking space assistant
Principle
The parking space assistant can be used to start destination guidance to the streets near the destination with the highest probability of available parking spaces or a nearby parking garage or a charging station.
When parking information is available for the surrounding area of the destination, a message with parking suggestions is displayed just before the destination is reached.
Call up
Press the button on the Controller.
Tilt the Controller to the right.
"Theme map"
"Parking map"
Tilt the Controller to the right.
"Find Parking"
A message with the suggestions is displayed.
Settings
Press the button on the Controller.
Tilt the Controller to the right.
"Theme map"
"Parking map"
Tilt the Controller to the right.
"Settings"
Select the desired setting:
"Supported cities": the list of cities for which parking information is available can be displayed.
"On-Street Parking": select which types of parking spaces along streets must be displayed, e.g., free-of-charge parking spaces only.
"Points of interest": select points of interest categories for the parking map.
Fuel card
Principle
The fuel card makes the search for filling stations easier. The remaining range is calculated, and if needed, filling stations along the route are displayed.
Depending on the national-market version, online information, e.g., fuel prices, is available for filling stations.
Additional information:
Activate/deactivate online information.
Call up functions
Press the button on the Controller.
Tilt the Controller to the right.
"Theme map"
"Gas station map"
Tilt the Controller to the right.
Select the desired setting:
"Suggested station": display fueling recommendations. If gas station recommendations are not available for the active destination guidance or a destination guidance was not started, a search for filling stations in the surrounding area is carried out.
"Place to stop": for the active destination guidance, a point of interest search can be used to plan possible stops along the route for refueling.
"Info about stations": displaying additional information, e.g., fuel prices.
Set up map
Set up
Press the button on the Controller.
Tilt the Controller to the right.

"Map settings"
Select the desired setting:
"Map views": select the map view.
"Zoom behavior": select scale.
"Auto zoom": with active destination guidance, the map is enlarged automatically when approaching a maneuver.
When guidance is disabled, the map zooms dynamically depending on the road being driven and the current vehicle speed.
"Manual zoom": enlarge or reduce map scale manually.
"Route overview": display the distance between current location and the destination.
"Map contents": select map contents.
"Points of interest": icons for points of interest are displayed.
"Traffic flow": routes for traffic flow are displayed for Advanced Real Time Traffic Information.
"Traffic events": icons for traffic events are displayed for Advanced Real Time Traffic Information.
"Guidance labels": when route guidance is activated, route guidance information along the route will be displayed.
"Delay labels": if necessary, small pop-ups with the expected delay due to traffic jams are displayed on the map in the traffic bulletins.
"Favorites": the icons for stored destinations are displayed.
"Traffic lights": icons for traffic lights are displayed.
"3D buildings": depending on availability and resolution, buildings may be shown in three dimensions in some scales.
"Satellite images": depending on availability and resolution, in some scales satellite images are displayed as the background.
"Additional settings": enter additional settings.
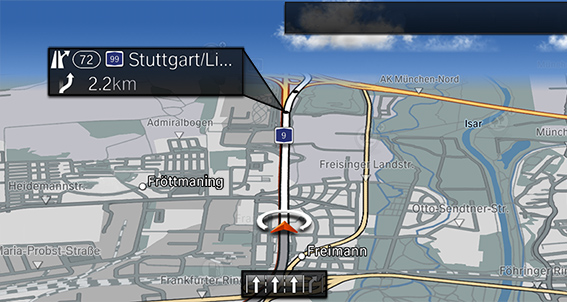
Destination guidance hints
Principle
If route guidance is active, route guidance information can be displayed in the map view for the respective maneuvering points of the current route.
General information
In the case of multi-lane roads, lane information may indicate the recommended lanes.
Depending on the national-market version, the current vehicle position is displayed in the driving lane information.
Route guidance information can also be displayed as route preview on the split screen. When the route preview is active on the split screen, no lane information will be displayed.
Display route guidance information
Press the button on the Controller.
Tilt the Controller to the right.
"Map settings"
"Guidance labels"
Display
Interactive map
General information
Different information can be called up for any point on the map and settings can be adjusted.
Here, the map can alternatively be used via the touchscreen.
Operating the interactive map
Press the button on the Controller.
Press the Controller.
"Interactive map"
Select the desired point on the map with the cross-hairs:
To change the scale: turn the Controller.
To shift the map: tilt the Controller in the required direction.
To shift the map diagonally: tilt the Controller in the required direction and turn it.
Press the Controller.
Select the desired setting.
Exit interactive map
Press the Controller.
"Leave interactive map"
Settings
Various information and settings are available depending on the point selected on the map:
"Repeat voice guidance":
With destination guidance active.
"Show details": details about the destination can be displayed as necessary.
"Show list": if the cross-hairs are positioned over a place with multiple points of interest, these destinations will be displayed in a list.
"Save as favorite": store position in the cross-hairs as Favorite.
"Show destination": the map section around the destination is displayed.
"Change map view": change the map view.
"Parking and maneuvering": find parking spaces at the destination.
"Start guidance": start destination guidance for the selected point on the map.
"Add as stop": add an intermediate destination with active destination guidance.
"Delete stop": delete the intermediate destination.
"Back to current location": return to current vehicle position.
"Search at this location": call up search for selected point on the map.
"Send current location": send current vehicle position.
Areas to be avoided
Principle
Areas that should be driven around can be specified as areas to be avoided.
General information
Stored areas to be avoided can be activated and deactivated.
Activate/deactivate
Press the button on the Controller.
Tilt the Controller to the right.
"Settings"
"Route preferences"
"Areas to avoid"
Select the desired setting.
Defining an area to avoid
Press the button on the Controller.
Press the Controller.
"Interactive map"
Press the Controller.
"Set new area to avoid"
Follow the instructions on the Control Display.
Press the Controller to accept the area to be avoided.
Edit area to be avoided
Select desired area to be avoided on the map.
Press the button on the Controller.
Press the Controller.
Select the desired setting.
Learning map
Principle
Data such as speed or position is stored in the vehicle in an anonymized state and transmitted to the manufacturer in order to improve the digital map.
Activate/deactivate
Press the button on the Controller.
Tilt the Controller to the right.
"Settings"
"Configure services"
"Learning map"
The Advanced Real-time traffic information
Principle
The Advanced Real Time Traffic Information localizes traffic obstructions. Traffic conditions on roads other than the highways, for instance secondary roads and urban streets are also recorded and displayed for a wide area.
General information
Detour recommendations can be calculated based on information from the Advanced Real Time Traffic Information. The risk of becoming caught in a further traffic obstruction on detour routes is reduced. If applicable, several detour recommendations or additional information may be offered. Depending on the equipment, detour recommendations are suggested automatically.
In the event of special dangers, for instance objects on the road, a message is displayed.
Several hazard messages are also displayed in the instrument cluster as a Check Control message.
End-User Provisions For Traffic Data
Activate/deactivate
Press the button on the Controller.
Tilt the Controller to the right.
"Settings"
"Configure services"
"Traffic info"
Displaying traffic bulletins
Press the button on the Controller.
Tilt the Controller to the right.


"Traffic Info"
With active destination guidance, first the traffic bulletins for the calculated route are displayed with red icons. Then, the traffic bulletins that do not affect the route are shown with gray icons. The traffic bulletins are sorted by their distance from the current position of the vehicle.
Select a traffic bulletin:
"Next traffic event": browse to the next traffic bulletin.
"Previous traffic event": browse to the previous traffic bulletin.
Display recommended detour manually
Press the button on the Controller.
Tilt the Controller to the right.
"Traffic Info"
"Detour": a detour recommendation is displayed.
The following functions are available:
"Current route": stay on current route.
"Alternative route": accept detour.
Traffic bulletins via voice operation
Principle
The voice activation system can be used to ask questions about the current traffic situation depending on the destination guidance status.
Announcing traffic information
Example with active destination guidance:

Press the button on the steering wheel.
›Traffic on the route‹: information about the traffic situation is announced.
Traffic bulletins on the map
Principle
Traffic events can be displayed as icons in the map view.
General information
Traffic flow information can be displayed as colored lines along the individual roads in the map view. The line colors indicate the traffic density.
Black: road blocked.
Red: traffic jam.
Orange: stop-and-go traffic.
Yellow: heavy traffic.
Green: clear roads.
Gray: general traffic bulletins, for instance construction site.
The display of the icons for traffic events and traffic flow information is independent from the scale of the map and the location of the traffic obstruction.
With the use of destination guidance with intermediate destinations, possible traffic events ahead are displayed in form of lighter icons.
Displaying traffic bulletins in the map view
Press the button on the Controller.
Tilt the Controller to the right.
"Map settings":
"Traffic events": icons for traffic events are displayed.
"Traffic flow": lines for traffic flow are displayed.
Traffic icon in the map view
|
Icon |
Function |
|---|---|
|
|
Gray icon: There are no, or only minor, delays for the route. |
|
|
Yellow icon: The delays for the route are moderate. |
|
|
Red icon: There are major delays, road closures or warnings for the route. |
|
|
A suitable detour is available for the traffic bulletins. |
Dynamic destination guidance
Principle
With dynamic destination guidance, traffic bulletins are considered when calculating routes.
Adjust dynamic destination guidance
Press the button on the Controller.
Tilt the Controller to the right.
"Settings"
"Route preferences"
"Dynamic routing"
Select the desired setting.
Frequently Asked Questions
Why can the current position not be displayed?
The position is located in an unrecognized region, is in a poor reception area, or the system is currently determining the position.
Reception is usually best when you have an unobstructed view of the sky.
Why does destination guidance not accept a destination without the street?
No downtown can be determined for the entered town/city.
Enter any street in the selected town/city and start destination guidance.
Why does destination guidance not accept a destination?
The destination data is not contained in the navigation data.
Select a destination that is as close as possible to the original.
Why can letters not be selected for destination input?
The destination data is not contained in the navigation data.
Select a destination that is as close as possible to the original.
Why are voice guidance instructions not provided at intersections?
You have left the recommended route and the system requires a few seconds to calculate a new route suggestion.
Download Manual