Opening and closing
Vehicle key
General information
Two vehicle keys are included in the scope of delivery, each containing an integrated key.
Each vehicle key contains a replaceable battery.
Depending on the equipment and national-market version, various settings are possible for the button functions.
A driver profile with personal settings can be assigned to a vehicle key.
To provide information on maintenance recommendations, the service data is stored in the vehicle key.
To prevent possible locking in of the vehicle key, take the vehicle key with you when exiting the vehicle.
Safety information

Keep vehicle key out of reach of children
Warning
The vehicle key has a button cell battery. Batteries or button cell batteries can be swallowed and lead to serious or fatal injuries within two hours, for example due to internal burns or chemical burns. There is a risk of injury or danger to life. Keep the vehicle key and batteries out of reach of children. Immediately seek medical help if there is any suspicion that a battery or button cell battery has been swallowed or is located in any part of the body.
Carrying a vehicle key
Warning
People or animals in the vehicle can lock the doors from the inside and lock themselves in. In this case, the vehicle cannot be opened from the outside. There is a risk of injury. Take the vehicle key with you so that the vehicle can be opened from the outside.
Do not lock from the outside
Warning
For some national-market versions, unlocking from the inside is only possible with particular knowledge.
If persons spend a lengthy time in the vehicle and are thereby exposed to extreme temperatures, there is a risk of injury or danger to life. Do not lock the vehicle from the outside when there are people in it.
Do not leave children or animals unattended in the vehicle
Warning
Unattended children or animals in the vehicle can cause the vehicle to move and endanger themselves and traffic, for instance due to the following actions:
Pressing the Start/Stop button.
Releasing the parking brake.
Opening and closing the doors or windows.
Engaging selector lever position N.
Using vehicle equipment.
There is a risk of accidents or injuries. Do not leave children or animals unattended in the vehicle. Take the vehicle key with you when exiting and lock the vehicle.
Overview
1
2
3
4
5
6
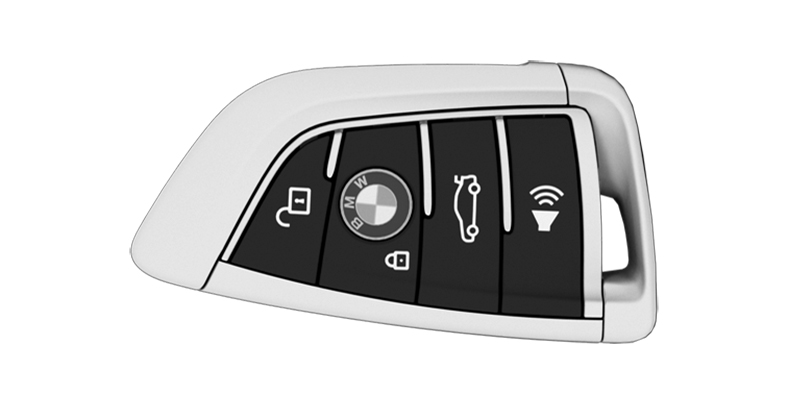
1
Unlocking
2
Locking
3
Pre-conditioning
4
Opening the trunk lid
5
Panic mode
6
Pathway lighting
Unlocking
General information
The behavior of the vehicle during unlocking using the vehicle key depends on the following settings:
If only the driver's door and the fuel filler flap or all access to the vehicle will be unlocked when the button is pressed for the first time.
If the unlocking of the vehicle is confirmed with a light signal or a sound signal.
If the welcome light is switched on when the vehicle is being unlocked.
Welcome lights.
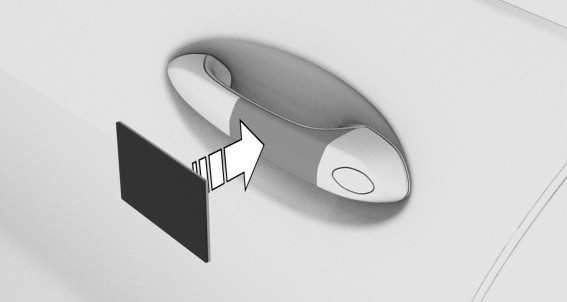
Unlocking the vehicle

Press the button on the vehicle key.
If only the driver's door and fuel filler flap have been unlocked due to the settings, press the button on the vehicle key again to unlock the other vehicle access points.
In addition, the following functions are executed:
If a driver profile has been assigned to the vehicle key, this driver profile will be activated and the settings that are saved in it will be applied.
The interior lights are switched on, unless they were manually switched off.
Folded in exterior mirrors are folded out.
If the exterior mirrors were folded in via the button in the vehicle interior, they will not be folded out during unlocking.
The alarm system will be switched off.
After opening one of the front doors, the vehicle is ready for operation.
The lighting functions may depend on the ambient brightness.
Convenient opening
Press and hold the button on the vehicle key after unlocking.
The windows open for as long as the button on the vehicle key is pressed.
Locking
General information
The behavior of the vehicle during locking using the vehicle key depends on the following settings:
If the locking of the vehicle is confirmed with a light signal or a sound signal.
If the exterior mirrors are automatically folded in when the vehicle is locked. The exterior mirrors are not folded in when the hazard warning flashers are switched on.
If pathway lighting is activated during locking.
Locking the vehicle
Close the driver's door.

Press the button on the vehicle key.
The following functions are executed:
All doors, the trunk lid, and the fuel filler flap are locked.
The alarm system will be switched on.
If the drive readiness is still turned on when you lock the vehicle, the vehicle horn will honk twice. In this case, the drive-ready state must be switched off by means of the Start/Stop button.
Convenient closing
Safety information
Keep the travel path unobstructed during convenient closing
Closing
Press and hold the button on the vehicle key in close range to the vehicle after locking.
The windows close for as long as the button on the vehicle key is pressed.
The exterior mirrors are folded in unless they were folded in during locking. The exterior mirrors are not folded in when the hazard warning flashers are switched on.
Switching on the interior and exterior lighting
Press the button on the vehicle key with the vehicle locked.
The function is not available for the first 10 seconds after locking.
The interior lights are switched on, unless they were manually switched off.
Interior lights.
Depending on the settings, parts of the exterior lighting will be switched on.
The lighting functions may depend on the ambient brightness.
Trunk lid
General information
To avoid locking the vehicle key in the vehicle, do not place the vehicle key in the cargo area.
Depending on the vehicle equipment and country version, it is possible to specify whether the trunk lid can be unlocked with the vehicle key and how the vehicle doors will respond to this.
Selector lever position P must be engaged to open the trunk lid with the vehicle key.
Safety information
Keep the travel path of the trunk lid unobstructed
Observe the travel path of the trunk lid
Opening

Press and hold the button on the vehicle key for approx. 1 second.
Switching pathway lighting on

Press and hold the button on the vehicle key for approx. 1 second.
It is possible to adjust the duration of the pathway lighting feature.
Additional information:
Pathway lighting.
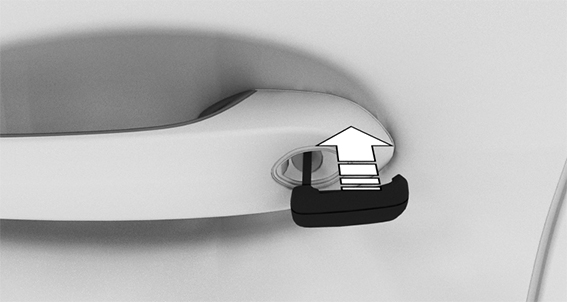
Replacing the battery
Do not use unsuitable batteries
Remove the integrated key from the vehicle key.
Integrated key.
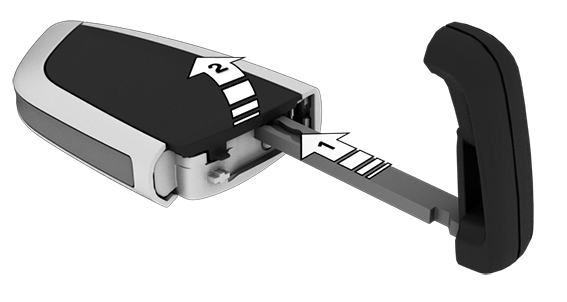
Place the integrated key underneath the battery compartment cover, arrow 1, and lift the lid with a lever movement of the integrated key, arrow 2.

Push battery in arrow direction using a pointed object and lift it out.
Insert a type CR 2032 3 V battery with the positive side facing up.
Press the lid closed.
Push the integrated key into the vehicle key until the integrated key engages.

Have old batteries disposed of by an authorized service center or another qualified service center or repair shop, or take them to a collection point.
Additional vehicle keys
Additional vehicle keys are available from an authorized service center or another qualified service center or repair shop.
Loss of vehicle keys
A lost vehicle key can be disabled and replaced by an authorized service center or another qualified service center or repair shop.
If the lost vehicle key has an assigned driver profile, the connection to this vehicle key must be deleted. A new vehicle key can then be assigned to the driver profile.
Malfunction
General information
A Check Control message is displayed.
Vehicle key detection by the vehicle may malfunction under the following circumstances:
The battery of the vehicle key is discharged.
Fault of the radio link from transmission towers or other equipment with high transmitting power.
Shielding of the vehicle key due to metal objects.
Do not transport the vehicle key together with metal objects.
Fault of the radio link from mobile phones or other electronic devices in direct proximity to the vehicle key.
Do not carry the vehicle key in close proximity to other electronic devices.
Fault of radio transmission by a charging process of mobile devices, for instance charging of a mobile phone.
The vehicle key is located in direct proximity of the wireless charging tray.
Place the vehicle key in a different location.
In the case of interference, the vehicle can also be unlocked and locked from the outside with the integrated key.
Additional information:
Integrated key.
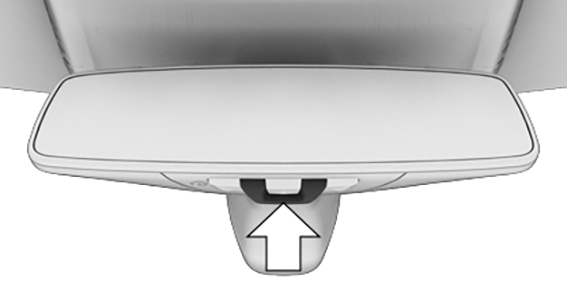
Switching the drive-ready state on via emergency detection of the vehicle key
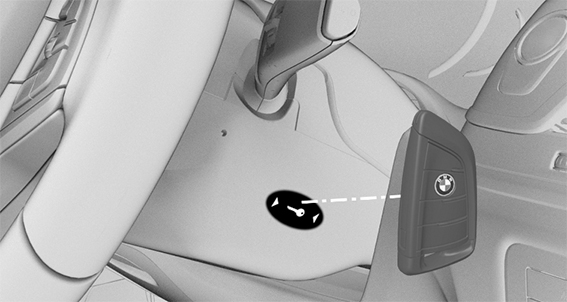
It is not possible to switch on the drive-ready state if the vehicle key has not been detected.
Proceed as follows in this case:
Hold the rear of the vehicle key against the mark on the steering column. Pay attention to the display in the instrument cluster.
If the vehicle key is detected:
Turn on drive-ready state within 10 seconds.
If the vehicle key is not recognized, slightly change the position of the vehicle key and repeat the procedure.
Frequently Asked Questions
What precautions can be taken to be able to open a vehicle, despite accidentally locking in the vehicle key?
The Remote Services of the BMW app include the option to lock and unlock a vehicle.
This requires an active BMW ConnectedDrive contract and the BMW app must be installed on a smartphone.
Unlocking the vehicle can be requested via the BMW ConnectedDrive Call Center.
An active BMW ConnectedDrive contract is required.
Key Card
Principle
The Key Card allows the vehicle to be unlocked and locked, as well as started.
General information
The availability of the Key Card depends on the equipment and the country.
A digital key that has already been paired with the vehicle is installed on the Key Card. The digital key must be activated via iDrive.
Before leaving the vehicle, deactivate the Key Card or take the Key Card with you because the active Key Card can be used to start the vehicle. Always take the vehicle key with you to a service appointment.
Safety information
Carrying a vehicle key
Do not lock from the outside
Do not leave children or animals unattended in the vehicle
Connection to the vehicle
The communication between the vehicle and the Key Card uses near field communication, NFC.
Activating/deactivating Key Card in the vehicle
General information
The Key Card must be located in the smartphone tray and a vehicle key must be located in the vehicle to activate the Key Card.
A vehicle key must be located in the vehicle to deactivate the Key Card.
When the BMW Digital Key is activated for the vehicle, a digital key can be used instead of the vehicle key.
A deactivated Key Card remains in the list of paired digital keys.
Activating Key Card
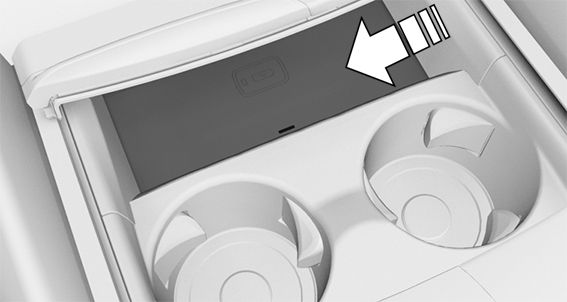
Open the cover of the smartphone tray.
Place Key Card in the center of the smartphone tray.
Follow the instructions on the Control Display to activate the Key Card.
Deactivating Key Card
"CAR"
"Settings"
"Doors/ vehicle access"
"Digital Key"
Select Key Card.
"Key Card active"
A deactivated Key Card remains in the list of paired digital keys.
Unlocking and locking the vehicle
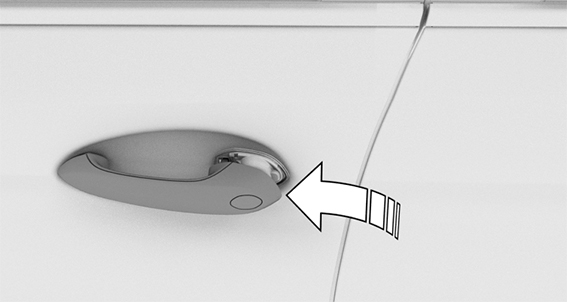
Hold activated Key Card directly on the center of the external door handle of the driver's door.
If the Key Card is not detected, slightly change the position of the Key Card and repeat the procedure.
Turning on the drive-ready state
Do not place Key Card and mobile device in the wireless charging tray at the same time
Open the cover of the smartphone tray.
Place activated Key Card in the center of the smartphone tray.
Press the Start/Stop button to start the engine.
After starting the engine, take the Key Card out of the tray to make tray available for charging compatible smartphones.
Malfunction
The detection of the Key Card by the vehicle may be disrupted by objects between the sensors and the Key Card, for instance a wallet or smartphone cover.
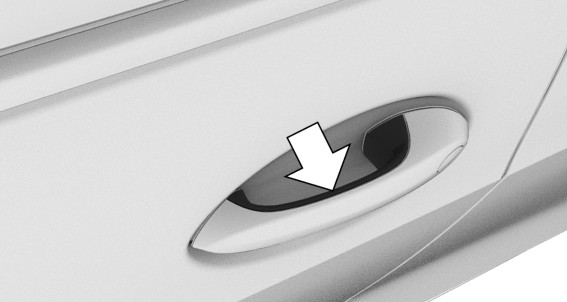
Integrated key
General information
The driver's door can be locked and unlocked without the vehicle key using the integrated key.
Depending on the national-market version, the integrated key also fits in the glove compartment.
Safety information
Do not lock from the outside
Remove the key before pulling the door handle
Removing
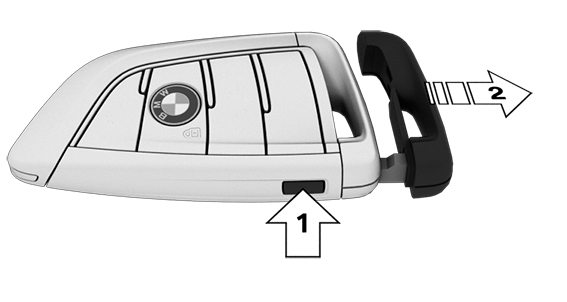
Press the button, arrow 1, and pull out the integrated key, arrow 2.
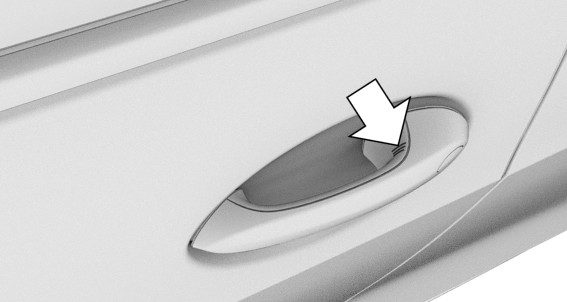
Locking/unlocking via the door lock
Pull and hold the door handle outward with one hand.
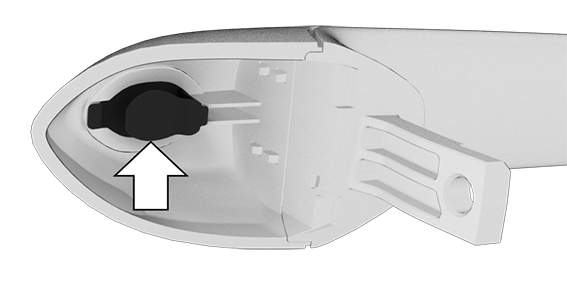
Guide one finger of your other hand from the back under the cover cap and push the cover cap out.
Use the thumb for counter support to prevent the cover cap from falling out of the door handle.
Remove the cover cap.
Unlock or lock the door lock using the integrated key.
The other doors must be unlocked or locked from the inside.
Alarm system
If the vehicle is unlocked with the integrated key via the door lock, the activated alarm system will be triggered when the door is opened.
If the vehicle is locked with the integrated key via the door lock, the alarm system will not be activated.
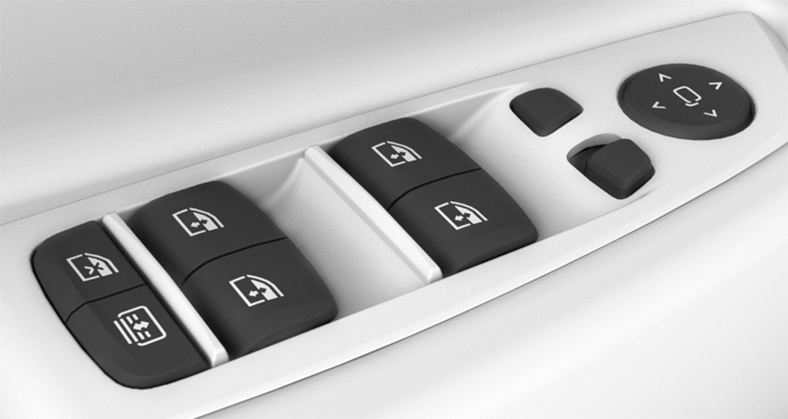
Buttons for the central locking system
General information
In the event of a severe accident, the vehicle is automatically unlocked. The hazard warning system and interior lights come on.
Overview
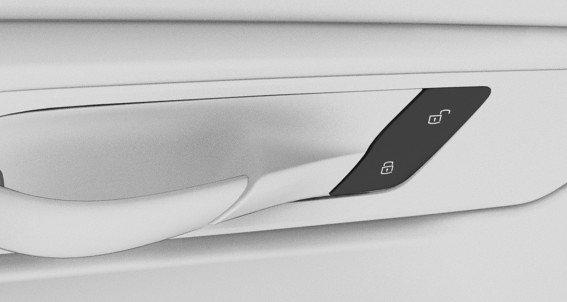
Buttons for the central locking system.
Locking

Press the button with the front doors closed.
The fuel filler flap remains unlocked.
The vehicle is not secured against theft when locking.
Unlocking

Press the button.
Opening
Press the button to unlock all the doors.
Pull the door opener above the armrest.
Front doors: pull the door handle on the door to open the door. The other doors remain locked.
Back doors: pull twice on the door handle on the door to be opened; the first time unlocks the door, the second time opens it. The other doors remain locked.
Comfort Access
Principle
Animation: Comfort Access

The vehicle can be accessed without operating the vehicle key.
Carrying the vehicle key with you, e.g., in your pants pocket, is sufficient.
The vehicle automatically detects the vehicle key when it is in close proximity or in the interior.
General information
Comfort Access supports the following functions:
Unlocking and locking the vehicle from the door handle.
Convenient closing.
Touchless unlocking and locking of the vehicle.
Unlocking and locking the vehicle using the BMW Digital Key.
Opening trunk lid.
Opening and closing the trunk lid with no-touch activation.
Functional requirements
To lock the vehicle, the vehicle key must be outside of the vehicle near the doors.
The next unlocking and locking cycle is not possible until after approx. 2 seconds.
Unlocking
General information
The behavior of the vehicle during unlocking via the Comfort Access depends on the following settings:
If the unlocking of the vehicle is confirmed with a light signal or a sound signal.
If the welcome light is switched on when the vehicle is being unlocked.
Unlocking the vehicle
Grasp the handle of a vehicle door completely.
In addition, the following functions are executed:
If a driver profile was assigned to the vehicle key, this driver profile will be activated and the settings that are stored in it will be applied.
The interior lights are switched on, unless they were manually switched off.
Folded in exterior mirrors are folded out.
If the exterior mirrors were folded in via the button in the interior, they will not be folded out when unlocking.
The alarm system will be switched off.
Locking
General information
The behavior of the vehicle during locking via the Comfort Access depends on the following settings:
If the locking of the vehicle is confirmed with a light signal or a sound signal.
If the exterior mirrors are automatically folded in when the vehicle is locked. The exterior mirrors are not folded in when the hazard warning flashers are switched on.
If pathway lighting is activated during locking.
Locking the vehicle
Close the driver's door.
Touch the grooved surface on the handle of a closed vehicle door with your finger for approx. 1 second without grasping the door handle.
The following functions are executed:
All doors, the trunk lid, and the fuel filler flap are locked.
The alarm system will be switched on.
Convenient closing
Safety information
Keep the travel path unobstructed during convenient closing
Closing
Touch the grooved surface on the handle of a closed vehicle door with your finger and hold it there without grasping the door handle.
In addition to locking, the windows also closed.
The exterior mirrors are folded in unless they were folded in during locking. The exterior mirrors are not folded in when the hazard warning flashers are switched on.
Opening the trunk lid
General information
If you open the trunk lid via Comfort Access, locked doors will not be unlocked.
To avoid locking the vehicle key in the vehicle, do not place the vehicle key in the cargo area.
Safety information
Keep the travel path of the trunk lid unobstructed
Observe the travel path of the trunk lid
Opening
Press the button on the outer side of the trunk lid.
Opening and closing the trunk lid with no-touch activation
Principle
The trunk lid can be opened and closed with no-touch activation using the vehicle key you are carrying. Two sensors detect a forward-directed foot movement in the central rear area and the trunk lid is opened or closed.
General information
To avoid locking the vehicle key in the vehicle, do not place the vehicle key in the cargo area.
If the vehicle key is in the sensor area, the trunk lid may open or close inadvertently if you unintentionally move your foot or if a foot movement is detected.
The sensor has an approximate range of 5 ft/1.50 m extending from the rear area.
If contactless opening of the trunk lid is activated, the locked doors will not be unlocked.
Safety information
Do not touch vehicle
Keep the travel path of the trunk lid unobstructed
Observe the travel path of the trunk lid
Functional requirements
Selector lever position P must be engaged for touchless opening of the trunk lid.
Contactless opening and closing of the trunk lid must be activated in the settings.
Settings
Contactless opening and closing of the tailgate can be switched on or off.
"CAR"
"Settings"
"Doors/ vehicle access"
"Tailgate"
Performing the foot movement
Stand in the middle behind the vehicle at approx. one arm's length away from the rear end.
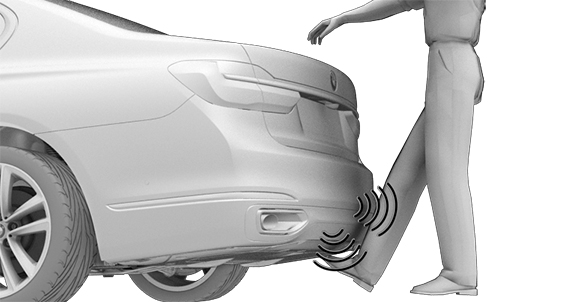
Wave a foot under the vehicle in the driving direction and immediately pull it back. With this movement, the leg must pass through the ranges of both sensors.
Opening
Perform the foot movement.
Before the trunk lid opens, the hazard warning system flashes.
Moving your foot again will stop the opening procedure, and moving it one more time after that will close the trunk lid.
Closing
Perform the foot movement.
The hazard warning system flashes and an acoustic signal sounds.
Moving your foot again will stop the closing motion, and moving it one more time after that will re-open the trunk lid.
System limits
The detection of the foot movement may be limited due to the following external conditions:
Ice, snow or slush on the rear of the vehicle.
Dirt or road salt on the rear of the vehicle.
Movement in the range of the sensors may cause unintended opening or closing of the cargo area, for instance due to water running down when cleaning the vehicle or with heavy rainfall. To prevent such unintended opening or closing of the cargo area in such cases, keep the vehicle key at a sufficient distance from the rear of the vehicle.
Touchless unlocking and locking of the vehicle
Principle
When the driver approaches the locked vehicle with the vehicle key, the vehicle is unlocked.
When the driver walks away from the unlocked vehicle with the vehicle key, the vehicle will be locked.
General information
The vehicle will be unlocked when an authorized vehicle key is detected in the unlocking zone.
The unlocking zone is located within a radius of approx. 5 ft/1.50 m around the door handles.
The vehicle will be locked when the vehicle key leaves the locking zone.
The locking zone is located within a radius of approx. 9 ft/2 m around the door handles.
If the vehicle key is located in the unlocking zone for an extended period of time without movement, the vehicle will be locked automatically.
If a passenger is detected in the front passenger seat during locking and the seat belt of the front passenger is engaged in the seat belt buckle during locking:
The vehicle will be locked but not secured against theft.
The fuel filler flap remains unlocked.
The behavior of the vehicle during touchless unlocking/locking depends on the following settings:
If the automatic unlocking is active.
If the automatic locking is active.
If only the driver's door and the fuel filler flap or all access to the vehicle will be unlocked.
Only driver's door and fuel filler flap: the driver's door and fuel filler flap will only be unlocked when the driver approaches the vehicle on the driver's side.
All vehicle entry points: the vehicle will be unlocked regardless of the side on which the driver approaches the vehicle.
If the unlocking and locking of the vehicle is confirmed with a light signal or a sound signal.
If the welcome light is switched on when the vehicle is being unlocked.
If pathway lighting is activated during locking.
If the exterior mirrors are automatically folded out and in when the vehicle is unlocked and locked.
Functional requirements
The drive-ready state must be turned off.
Unlocking: when entering the unlocking zone, the doors and trunk lid must be closed.
Locking: when leaving the locking zone, the doors and trunk lid must be closed.
For contactless locking of the vehicle, no second vehicle key may be within a radius of 18 ft/6 m around the vehicle.
If the vehicle has been in the idle state for several days, contactless unlocking/locking will only be available after the vehicle has been driven.
Malfunction
Vehicle key detection by the vehicle may malfunction under the following circumstances:
The battery of the vehicle key is discharged.
For replacing the battery.
Fault of the radio link from transmission towers or other equipment with high transmitting power.
Shielding of the vehicle key due to metal objects.
Do not transport the vehicle key together with metal objects.
Fault of the radio link from mobile phones or other electronic devices in direct proximity to the vehicle key.
Do not carry the vehicle key in close proximity to other electronic devices.
Wet or snowy conditions may disrupt the locking request detection on the door handles.
In the case of a malfunction, unlock and lock the vehicle using the buttons of the vehicle key or use the integrated key.
Additional information:
Integrated key.
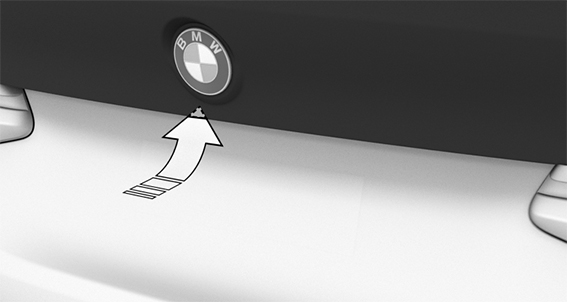
Trunk lid
General information
To avoid locking the vehicle key in the vehicle, do not place the vehicle key in the cargo area.
Depending on the equipment and national-market version, it is possible to specify whether the trunk lid can be unlocked with the vehicle key and how the vehicle doors will function.
Selector lever position P must be engaged to open the trunk lid with the vehicle key.
It may not be possible to open the trunk lid when the vehicle is in valet parking mode.
Additional information:
Valet parking mode.
Safety information
Keep the travel path of the trunk lid unobstructed
Observe the travel path of the trunk lid
Opening and Closing
Opening
From the outside
Unlock the vehicle and then press the button on the outer side of the trunk lid.
Carry vehicle key with you and press button on the outer side of the trunk lid.
Press and hold the button on the vehicle key for approx. 1 second.
Depending on the setting, the doors may also be unlocked.
From the inside

Press the button in the storage compartment of the driver's door.
Interruption of the opening procedure
The opening procedure is interrupted:
When the vehicle starts moving.
By pressing the button on the outer side of the trunk lid. Pressing again closes the trunk lid.
By pressing the button on the inside of the trunk lid. Pressing again closes the trunk lid.
By pressing the button on the vehicle key. Pressing again continues the opening procedure.
By pressing or pulling the button in the driver's door. Pressing again continues the opening procedure.
Closing
From the outside
Press the button on the inside of the trunk lid.

Press the button on the inside of the trunk lid.
The vehicle will be locked after closing the trunk lid. The driver's door must be closed for this purpose and the vehicle key must be outside of the vehicle in the area of the trunk lid.
From the inside
Pull and hold the button in the storage compartment of the driver's door.
The vehicle key must be located inside the vehicle for this function.
An acoustic signal sounds before the trunk lid is closed.
Interruption of the closing procedure
The closing procedure is interrupted in the following situations:
If the vehicle drives off with a jerky movement.
By pressing the button on the outer side of the trunk lid. Pressing again re-opens the trunk lid.
By pressing the button on the inside of the trunk lid. Pressing again re-opens the trunk lid.
By releasing the button in the driver's door. Pulling again and holding continues the closing motion.
Malfunction
In the event of an electrical malfunction, operate the unlocked trunk lid manually with a slow and smooth motion.
Trunk emergency unlocking
Pull the handle inside the cargo area.
The trunk lid unlocks.
Soft-close automatic function
Safety information
Keep the travel path of the doors unobstructed
Closing
To close the doors, push lightly.
The closing happens automatically.
Valet parking mode
Principle
In the valet parking mode, the Control Display is disabled. The operation via iDrive is no longer possible.
E.g., this mode can be used when the vehicle is handed over for valet parking.
General information
In the valet parking mode, it is not possible to change vehicle settings via iDrive. Personal profiles cannot be changed. Personal data cannot be displayed.
Additionally, the following actions are carried out:
The volume of the audio system is limited.
The integrated Universal Remote Control is deactivated.
The Dynamic Stability Control cannot be turned off.
Depending on the vehicle, the trunk lid can be locked and disconnected from the central locking system.
Functional requirements
At least one driver profile has been created.
A driver profile or the guest profile is active.
At least one driver profile has an assigned ConnectedDrive account.
Accessing the menu for the valet parking mode
Via the switch-off screen
After switching off drive-ready state the switch-off screen will be displayed. Select the entry for the valet parking mode on the switch-off screen.
Via the display bar at the upper edge of the Control Display
Tip the Controller up.
"Valet parking mode"
Via the vehicle settings
"CAR"
"Settings"
"General settings"
"Valet parking mode"
Activating the valet parking mode
General information
Before activating the valet parking mode, a PIN must be set up to be able to deactivate the valet parking mode at a future time.
The procedure for the PIN input varies depending on the active driver profile.
Driver profile with PIN
A PIN has been stored for the active driver profile.
It is not necessary to enter another PIN.
"Lock tailgate as well"
The trunk lid will be locked and disconnected from the central locking system.
"Activate now"
Driver profile without PIN
A PIN must be assigned to the driver profile.
"PIN"
Enter PIN.
"Lock tailgate as well"
The trunk lid will be locked and disconnected from the central locking system.
"Activate linkage"
"Activate now"
Guest profile
The guest profile is the active driver profile.
A PIN must be entered.
"PIN"
Enter PIN.
"Lock tailgate as well"
The trunk lid will be locked and disconnected from the central locking system.
"Activate now"
This PIN can be used once to deactivate the valet parking mode for the active guest profile.
Deactivating valet parking mode
General information
The lock screen of the valet parking mode is displayed on the Control Display.
The deactivation of the valet parking mode depends on which driver profile is selected on the lock screen.
Driver profile with PIN
Regardless of which driver activated the valet parking mode, a driver can deactivate the valet parking mode by entering his/her PIN.
Select driver profile.
Enter the assigned PIN for the driver profile.
If you forgot the PIN, the valet parking mode must be deactivated by entering the assigned ConnectedDrive access data.
Driver profile without PIN
The valet parking mode was activated by another person. To deactivate the valet parking mode, a driver without a PIN has to enter the access data for his ConnectedDrive account.
Select driver profile.
Enter the ConnectedDrive access data assigned to the driver profile.
Guest profile
In the guest profile, the valet parking mode can only be deactivated if the valet parking mode was activated in the guest profile.
Select guest profile.
Enter the PIN that was specified during activation.
If the PIN has been forgotten, the valet parking mode must be deactivated via a personal driver profile.
Settings
General information
Depending on the equipment and national-market version, various settings for opening and closing are possible.
These settings are stored for the driver profile currently used.
Unlocking and locking
Doors
"CAR"
"Settings"
"Key button settings"
 Select the icon.
Select the desired setting:
"Driver's door only"
Only the driver's door and the fuel filler flap are unlocked. Pressing again unlocks the entire vehicle.
"All doors"
The entire vehicle is unlocked.
Confirmation signals from the vehicle
"CAR"
"Settings"
"Doors/ vehicle access"
Deactivate or activate the desired confirmation signals:
"Flash when locking/unlocking"
Unlocking is signaled by blinking twice, locking by blinking once.
"Sound when locking/unlocking"
Unlocking is confirmed with two sound signals, locking is confirmed with one sound signal.
Folding mirrors in automatically
"CAR"
"Settings"
"Doors/ vehicle access"
"Fold mirrors in when locked"
Automatic unlocking
"CAR"
"Settings"
"Doors/ vehicle access"
"Unlock at end of trip"
After drive-ready state is switched off by pressing the Start/Stop button, the locked vehicle is automatically unlocked.
Automatic locking
"CAR"
"Settings"
"Doors/ vehicle access"
Select the desired setting:
"Lock in a few minutes"
The vehicle locks automatically after a short period of time if no door is opened after unlocking.
"Lock after starting to drive"
The vehicle locks automatically after you drive off.
Trunk lid
Trunk lid and doors
You can set up if only the trunk lid will be unlocked or if the doors will also be unlocked when the trunk lid is unlocked
Depending on the vehicle equipment and country version, this setting may not be offered.
"CAR"
"Settings"
"Key button settings"
 Select the icon.
The text next to the icon indicates the current setting.
Select the desired setting:
"Tailgate"
Depending on the equipment, the trunk lid will be unlocked or opened.
"Tailgate and door(s)"
Depending on the equipment, the trunk lid will be unlocked or opened and the doors are unlocked.
"Tailgate opens only when vehicle is unlocked."
The vehicle must be unlocked before the trunk lid can be used with the vehicle key.
"Lock tailgate button"
The operation of the trunk lid via the vehicle key is disabled.
Comfort Access
Touchless locking and unlocking
Contactless locking and unlocking can be switched on or off.
"CAR"
"Settings"
"Doors/ vehicle access"
"Comfort access"
Establishing idle state after opening the front doors
"CAR"
"Settings"
"Doors/ vehicle access"
"Turn off vehicle after opening door"
Idle state.
Alarm system
Principle
The alarm system issues a visual and acoustic signal when someone attempts to open the locked vehicle incorrectly.
General information
When the vehicle is locked, the vehicle alarm system reacts to the following changes:
Opening a door, the hood or the trunk lid.
Movements in the interior.
Changes in the vehicle inclination, such as during attempts at stealing a wheel or when towing the vehicle.
Disconnected battery voltage.
Improper use of the socket for OBD on-board diagnostics.
Locking the vehicle while a device is connected to the diagnostic socket.
The alarm system signals these changes visually and acoustically:
Acoustic alarm:
Depending on local regulations, the acoustic alarm may be suppressed.
Optical alarm:
By blinking of the hazard warning system and headlights, where required.
Do not modify the system to ensure function of the alarm system.
Turning on/off
The alarm system is turned on or off as soon as the vehicle is locked or unlocked with the vehicle key or via Comfort Access.
Opening the doors with the alarm system switched on
The alarm system is triggered when a door is opened if the door was unlocked using the integrated key in the door lock.
Opening the trunk lid with the alarm system switched on
The trunk lid can be opened even when the alarm system is switched on.
After the trunk lid is closed, it is locked and monitored again provided the doors are locked. The hazard warning system flashes once.
Panic mode
You can trigger the alarm system if you find yourself in a dangerous situation.
Press the button on the vehicle key and hold for at least 3 seconds.
Briefly press the button on the vehicle key three times in succession.
To switch off the alarm: press any button.
Indicator light on the interior mirror
The indicator light flashes briefly every 2 seconds:
The alarm system is switched on.
Indicator light flashes for approx. 10 seconds, then it flashes briefly every 2 seconds:
Interior motion sensor and tilt alarm sensor are not active, as doors, hood, or trunk lid are not correctly closed. Correctly closed access points are secured.
When the remaining open access points are closed, the interior motion sensor and tilt alarm sensor will be turned on.
The indicator light goes out after unlocking:
The vehicle has not been tampered with.
The indicator light flashes after unlocking until drive-ready state is switched on, but no longer than approx. 5 minutes:
An alarm has been deployed.
Tilt alarm sensor
The inclination of the vehicle is monitored.
The alarm system responds in situations such as attempts to steal a wheel or when the vehicle is towed.
Interior motion sensor
The vehicle interior is monitored.
The alarm system responds when movement is detected in the vehicle interior.
The windows must be closed for the system to function properly.
Avoiding unintentional alarms
General information
The tilt alarm sensor and interior motion sensor can trigger an alarm, although no unauthorized action occurred.
Possible situations for an unwanted alarm:
In car washes.
In duplex garages.
During transport on trains carrying vehicles, at sea or on a trailer.
With animals in the vehicle.
When the vehicle is locked after start of refueling.
The tilt alarm sensor and the interior motion sensor can be switched off in such situations.
Switching off the tilt alarm sensor and interior motion sensor
Press the button on the vehicle key within 10 seconds as soon as the vehicle is locked.
The indicator light lights up for approx. 2 seconds and then continues to flash.
The tilt alarm sensor and interior motion sensor are switched off until the vehicle is locked again.
Ending the alarm
Unlock the vehicle with the vehicle key.
Unlock the vehicle with the integrated key and activate the drive-ready state via emergency detection of the vehicle key.
Malfunction.
When carrying the vehicle key, grasp the driver's door or front passenger door handle completely.
Power windows
General information
The windows can be opened and closed with the vehicle key from the outside.
The windows can be closed from the outside via Comfort Access.
When a window is frequently opened to the same position, this task can be performed by the BMW Intelligent Personal Assistant. For instance when the same parking garage is frequently used.
Additional information:
Vehicle key.
BMW Intelligent Personal Assistant.
Safety information
Keep the travel path of the windows unobstructed
Overview
1
2
3
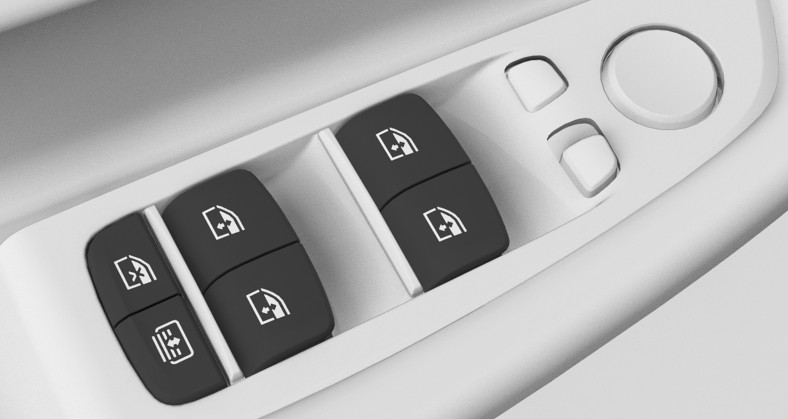
1
Front power window
2
Rear power window
3
Safety switch
Functional requirements
The windows can be operated under the following conditions.
Standby state is switched on.
Drive-ready state is switched on.
The vehicle key must be in the car's interior.
Opening

Press the switch to the resistance point.
The window opens while the switch is being held.
Press the switch beyond the resistance point.
The window opens automatically. Pressing the switch again stops the motion.
Closing
Pull the switch to the resistance point.
The window closes while the switch is being held.
Pull the switch beyond the resistance point.
The window closes automatically if the door is closed. Pulling again stops the motion.
Jam protection system
Principle
The jam protection prevents objects or body parts becoming jammed between the door frame and window while a window is being closed.
General information
If resistance or blockage is detected while a window is being closed, the closing will be interrupted.
Safety information
Keep the travel path of the windows unobstructed
Closing without the jam protection system
In case of danger from the outside or if icing might prevent normal closing, proceed as follows:
Pull the switch past the resistance point and hold it there.
The window closes with limited jam protection. If the closing force exceeds a specific threshold, closing is interrupted.
Pull the switch past the resistance point again within approx. 4 seconds and hold it there.
The window closes without jam protection.
Safety switch
Principle
The safety switch can be used to prevent children, for instance, from opening and closing the rear windows using the switches in the rear.
If an accident of a certain severity occurs, the safety function is switched off automatically.
Turning on/off

Press the button.
The LED lights up if the safety function is switched on.
Rear window roller sunblind
Safety information
Keep the movement area unobstructed
Overview
1
1
Rear window roller sunblind
Operation

Press the button to open the closed roller sunblind or to close the open roller sunblind.
If the button is pressed again during the movement, the roller sunblind is moved in the opposite direction.
System limits
If you are no longer able to move the roller sunblind after having activated it consecutively a number of times, the overheating protection mechanism is active. The system is disabled for a limited time to prevent overheating. Let the system cool down.
The roller sunblind cannot be moved at low interior temperatures.
Roller sunblinds, rear side windows
Safety information
Do not open the window while the roller sunblind is closed
Pull out the roller sunblind at the loop and hook it onto the bracket.
Download Manual