Driving
Start/Stop button
Principle
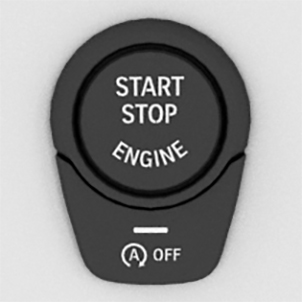
Pressing the Start/Stop button switches drive-ready state on or off.
Drive-ready state is switched on when you depress the brake pedal while pressing the Start/Stop button.
Pressing the Start/Stop button again switches the drive-ready state back off and standby state is switched back on.
Additional information:
Drive-ready state.
Standby state.
Driving off
Turn on drive-ready state.
Apply gear position.
Release the parking brake.
Driving off.
Auto Start/Stop function
Principle
Animation: Auto Start/Stop function

The Auto Start/Stop function helps save fuel. The system switches off the engine during a stop, for instance in traffic jam or at traffic lights. Drive-ready state remains switched on. The engine starts automatically for driving off.
General information
After each engine start using the Start/Stop button, the Auto Start/Stop function is ready. The function is activated from speeds of approx. 3 mph/5 km/h.
Engine stop
Functional requirements
M Steptronic Sport transmission
The engine is switched off automatically during a stop under the following conditions:
The selector lever is in selector lever position D.
The brake pedal remains depressed while the vehicle is at a standstill or the vehicle is held by Automatic Hold.
The driver's seat belt is buckled or the driver's door is closed.
M Steptronic Sport transmission: manual engine stop
If the engine was not switched off automatically when the vehicle stopped, the engine can be switched off manually:
Depress the brake pedal forcefully again from the current pedal position.
Engage selector lever position P.
When all functional preconditions are fulfilled, the engine switches off.
Air conditioning system when the engine is switched off
The air flow from the air conditioning system is reduced when the engine is switched off.
Displays in the instrument cluster
General information

The display in the instrument cluster indicates that the Auto Start/Stop function is ready for an automatic engine start.
The display indicates that the conditions for an automatic engine stop have not been met.
Indications on the Control Display
Total time with switched-off engine
The total time for which the Auto Start/Stop function has switched off the engine is displayed in the trip data.
The total time is automatically reset every time the vehicle is refueled.
Functional limitations
The engine is not switched off automatically in the following situations:
In case of a steep downhill grade.
Brake not engaged strongly enough.
The outside temperature is high and automatic climate control is running.
The car's interior has not yet been heated or cooled to the required level.
Where there is a risk of window condensation when the automatic climate control is switched on.
Engine or other parts not at operating temperature.
Engine cooling is required.
The wheels are at a sharp angle or the steering wheel is being turned.
Vehicle battery is heavily discharged.
At higher elevations.
Hood is unlocked.
The Automatic Parking Assistant is activated.
Stop-and-go traffic.
Selector lever position in N or R.
After driving in reverse.
Starting the engine
Functional requirements
M Steptronic Sport transmission
The engine starts automatically under the following preconditions:
By releasing the brake pedal.
When Automatic Hold is activated: step on the accelerator pedal.
Driving off
After the engine starts, accelerate as usual.
Safety mode
After the engine switches off automatically, it will not start again automatically if any one of the following conditions are met:
The driver's seat belt is unbuckled and the driver's door is open.
Hood was unlocked.
Some indicator lights light up for a varied length of time.
The engine can only be started via the Start/Stop button.
System limits
Even if driving off was not intended, the deactivated engine starts up automatically in the following situations:
In case of excessive warming of the interior when air conditioning is turned on.
In case of excessive cooling of the interior when the heating is turned on.
In case of a risk of window condensation when the automatic climate control is turned on.
Without mild hybrid technology: in case of a steering operation.
When changing from selector lever position D to N or R.
When changing from selector lever position P to N, D, or R.
In case of seriously discharged vehicle battery.
When starting an oil level measurement.
Additional functions Auto Start/Stop
Depending on the equipment and national-market version, the vehicle features a variety of sensors for assessing the traffic situation. The Auto Start/Stop function uses this information to adapt to various traffic situations in a proactive manner.
For instance, this applies to the following situations:
A situation is detected in which the stopping time is expected to be very short. The engine is not automatically switched off. A message appears on the Control Display, depending on the situation.
A situation is detected in which the vehicle should be started up immediately. The switched-off engine starts automatically.
The function may be restricted if the navigation data is invalid, outdated or not available, for example.
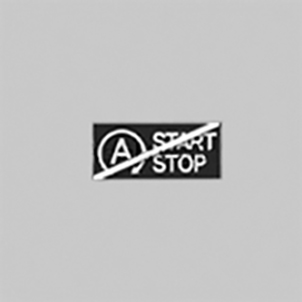
Activating/deactivating the system manually
Principle
The engine is not automatically switched off.
The engine is started during an automatic engine stop.
Via button
1

1
Auto Start/Stop function

Press the button.
Display
LED comes on: Auto Start/Stop function is deactivated.
LED goes out: Auto Start/Stop function is activated.
Switching off the vehicle during an automatic engine stop
General information
During an automatic engine stop, the vehicle can be switched off permanently, for instance when leaving it.
M Steptronic Sport transmission
Press the Start/Stop button.
Drive-ready state is switched off.
Standby state is switched on.
Selector lever position P is engaged automatically.
Set the parking brake.
Automatic deactivation
General information
In certain situations, the Auto Start/Stop function is deactivated automatically for safety reasons, for instance if no driver is detected.
Malfunction
The Auto Start/Stop function no longer switches off the engine automatically. A Check Control message is displayed. It is possible to continue driving. Have the system checked by an authorized service center or another qualified service center or repair shop.
Parking brake
Principle
The parking brake is used to prevent the vehicle from rolling away when it is parked.
Safety information

Observe before exiting the vehicle
Do not leave children or animals unattended in the vehicle
Overview
1
1
Parking brake and Automatic Hold
Setting the parking brake
With a stationary vehicle

Pull the switch.
The LED lights up.

The indicator light in the instrument cluster illuminates red. The parking brake is set.
While driving
General information
Use while driving serves as an emergency braking function.
Pull the switch and hold it. The vehicle brakes hard while the switch is being pulled.
The indicator light in the instrument cluster illuminates red, a signal sounds, and the brake lights illuminate.
A Check Control message is displayed.
The parking brake is engaged when the vehicle is stationary.
With Emergency Stop Assistant
Pull the switch briefly to activate the emergency stop function.
Additional information:
Emergency Stop Assistant.
Releasing the parking brake
Releasing the parking brake manually
Turn on drive-ready state.
Press the switch while stepping on the brake pedal or selector lever position P is set.
The LED and the indicator light go out.
The parking brake is released.
Releasing the parking brake automatically
The parking brake is released automatically when you drive off.
The LED and the indicator light go out.
Automatic Hold
Principle
Automatic Hold assists the driver by automatically setting and releasing the brake, such as when moving in stop-and-go traffic.
The vehicle is automatically held in place when it is stationary.
On uphill grades the system prevents the vehicle from rolling back when driving off.
General information
Under the following conditions, the parking brake is automatically engaged:
Drive-ready state is switched off.
The driver's door is opened while the vehicle is stationary.
The moving vehicle is brought to a standstill using the parking brake.
Safety information
Observe before exiting the vehicle
Do not leave children or animals unattended in the vehicle
Deactivate Automatic Hold
Establishing operational readiness of Automatic Hold
Turn on drive-ready state.

Press the button.
The LED lights up.

The indicator light lights up green.
Automatic Hold is ready to use.
After every vehicle restart, the last selected setting is active.
Automatic Hold holding the vehicle
Operational readiness is established and the driver's door is closed.

After the brake is applied, the vehicle is kept from rolling away as soon as the indicator light illuminates green.
Driving off
Press the accelerator pedal to drive off.
The brake is released automatically and the indicator light of the parking brake is no longer illuminated.
Activating the parking brake automatically
The parking brake is automatically set if drive-ready state is switched off while the vehicle is being held by Automatic Hold or if the vehicle is exited.
The indicator light changes from green to red.
The parking brake is not set automatically if the drive-ready state was switched off while the vehicle was coasting. Automatic Hold is deactivated.
Switching operational readiness off
Press the button.
The LED goes out.
The indicator light goes out.
Automatic Hold is switched off.
If the vehicle is being held by Automatic Hold, also press on the brake pedal when switching off.
Malfunction
If the parking brake fails or in case of a fault, secure the vehicle against rolling away before exiting.
A Check Control message is displayed.
Secure the vehicle against rolling away, for instance with a wheel chock, after getting out of the vehicle.
After a power interruption
To reestablish parking brake functionality after a power interruption:
Turn on standby state.
Pull the switch while stepping on the brake pedal or while selector lever position P is set and then push.
This process may take a few seconds. Some mechanical sounds associated with this process are normal.
The indicator light is no longer illuminated as soon as the parking brake is ready for operation again.
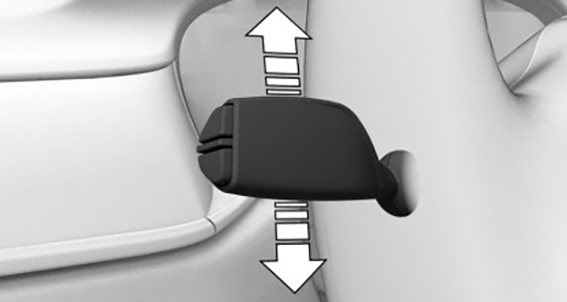
Turn signal
Turn signal in exterior mirror
When driving and during operation of the turn signals or hazard warning system, do not fold in the exterior mirrors so that the turn signal lamps on the exterior mirror are easy to see.
Blinking
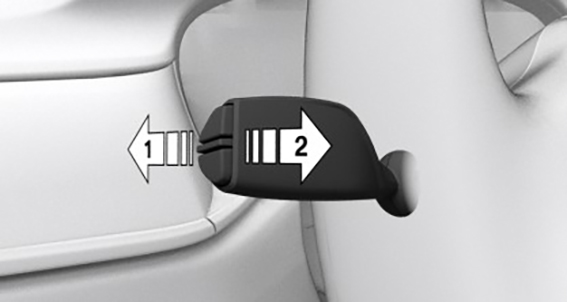
Press the lever past the resistance point.
Triple turn signal activation
Lightly tap the lever up or down.
The triple turn signal duration can be adjusted.
"CAR"
"Settings"
"Exterior lighting"
"One-touch turn signal"
Select the desired setting.
Brief blinking
Press the lever to the resistance point and hold it there for as long as you want the turn signal to flash.
High beams, headlight flasher
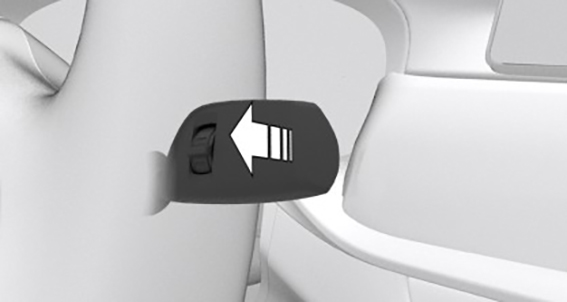
Press the lever forward or pull it backward.
High beams on, arrow 1.
The high beams light up when the low beams are switched on.
High beams off/headlight flasher, arrow 2.
Window wiper system
Safety information
Folding in windshield wipers before turning on the vehicle
Do not use the windshield wipers when the window is dry
Defrost the windshield prior to using the wipers
Turning on window wiper system
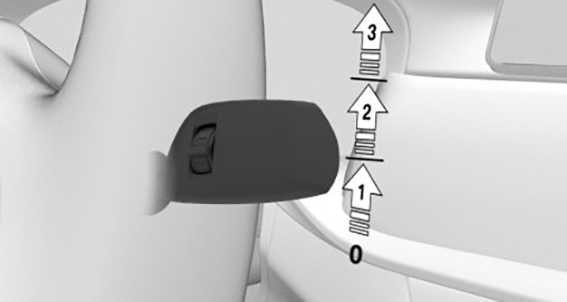
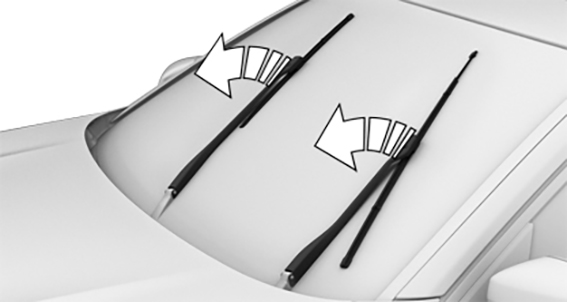
Press the lever up until the desired position is reached.
Resting position of the wipers, position 0.
Rain sensor, position 1.
Normal wiper speed, position 2.
Fast wiper speed, position 3.
When the journey is interrupted with the window wiper system turned on: when the journey continues, the wipers resume at their previous speed.
Turning off the window wiper system and flick wipe
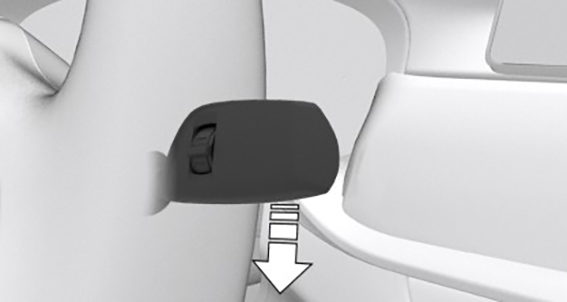
Press the lever down.
Turn off: press the lever down until it reaches the 0 position.
Flick wipe: press the lever down from the 0 position.
The lever automatically returns to its 0 position when released.
Rain sensor
Principle
The rain sensor automatically controls the wiper operation depending on the intensity of the rainfall.
General information
The sensor is located on the windshield, directly in front of the interior mirror.
Safety information
Deactivate the rain sensor in car washes
Activating rain sensor
Press the lever up once from its 0 position, arrow 1.
Wiping operation is started.
The LED in the wiper lever is illuminated.
In frosty conditions, wiping operation may not start.
Deactivating rain sensor
Press the lever back into the 0 position.
Adjusting the rain sensor sensitivity
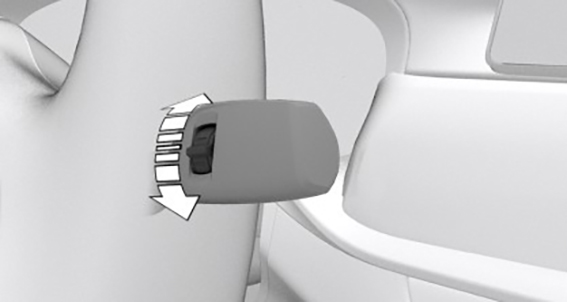
Turn the thumbwheel to adjust the sensitivity of the rain sensor.
Upward: high rain sensor sensitivity.
Downward: low rain sensor sensitivity.
Windshield washer system
Safety information
Ensure sufficient antifreeze
Do not use the washer system when the washer fluid reservoir is empty
Cleaning the windshield
Pull the lever.
The washer fluid is sprayed on the windshield, and the wipers are turned on briefly.
Windshield washer nozzles
The windshield washer nozzles are automatically heated while standby state is switched on.
Fold-out position of the wipers
Principle
In the fold-out position, the wipers can be folded out from the windshield, which is important, for instance, when changing the wiper blades or for folding away under frosty conditions.
Safety information
Fold in wipers before turning on the vehicle
Defrost the windshield prior to using the wipers
Folding out the wipers
Turn on standby state.
Press and hold the wiper lever down until the wipers stop in a nearly vertical position.
Fold the wipers all the way out from the windshield.
Folding in the wipers
Fold the wipers back in onto the windshield.
Switch on standby state and press and hold the wiper lever down again.
Wipers return to their resting position and are ready again for operation.
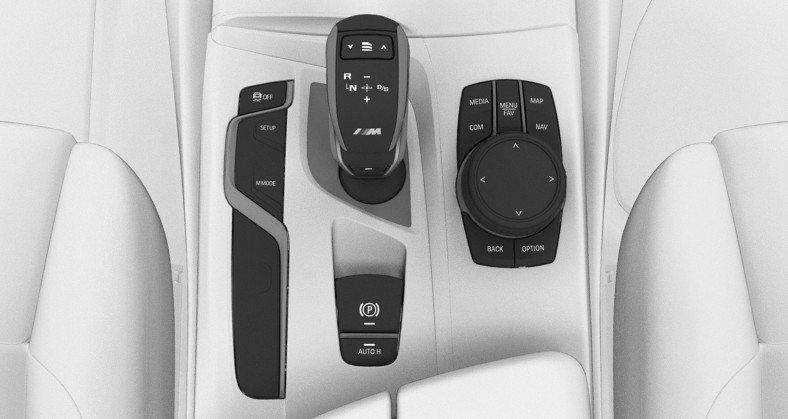
M Steptronic Sport transmission
General information
The M Steptronic Sport transmission is operated via the selector lever or the two shift paddles on the steering wheel.
The following functions are available:
Various driving programs: Drive mode or sequential mode.
Low Speed Assistant.
Various Drivelogic programs.
Launch Control.
Upshifting display, Shift lights.
Safety information
Securing the vehicle against rolling away
Overview
Selector lever
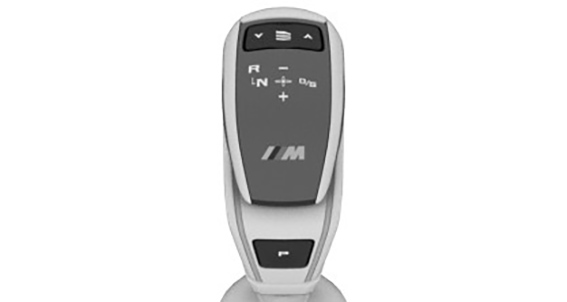
Selector lever functions
|
Icon |
Function |
|---|---|
|
|
Drivelogic programs |
|
R |
Reverse gear. |
|
N |
Neutral. |
|
|
Center position, forward position. |
|
- |
Downshifting, manual. |
|
+ |
Upshifting, manual. |
|
D/S |
Drive mode or sequential mode. |
|
P |
Parking. |

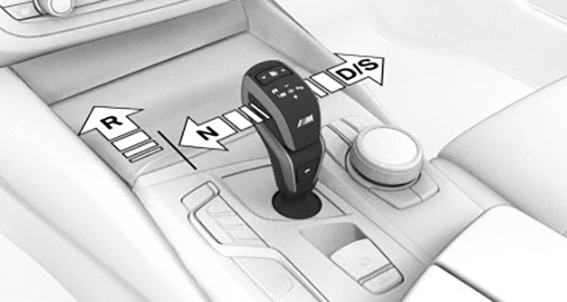
Selector lever positions
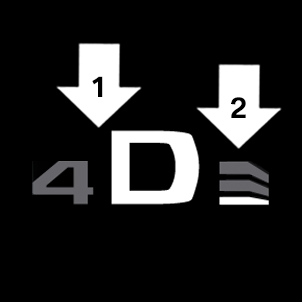
D is Drive mode
Selector lever position for driving. All gears for forward travel are activated automatically.
S is Sequential mode
Selector lever position for driving. All gears for forward travel must be shifted manually.
R is reverse
Engage selector lever position R only when the vehicle is stationary.
N is Neutral
In selector lever position N, the vehicle may be pushed or roll without power, for instance, in car washes.
P Park
Selector lever position, for instance for parking the vehicle. The transmission blocks the drive wheels in selector lever position P.
Engage selector lever position P only when the vehicle is stationary.
Selector lever position P is engaged automatically in situations such as the following:
After the drive-ready state or standby state is switched off and selector lever position D/S or R is engaged.
After the standby state has been switched off when selector lever position N is engaged.
The driver's seat belt is unbuckled, the driver's door is opened, and the brake pedal is not pressed while the vehicle is stationary and the selector lever is set to D/S or R.
Engaging a selector lever position
General information
To prevent the vehicle from creeping after you select a gear position or reverse, maintain pressure on the brake pedal until you are ready to drive off.
The engaged selector lever position is displayed in the instrument cluster and on the selector lever.
Functional requirements
Only when the drive-ready state is switched on and the brake pedal is depressed is it possible to change from selector lever position P to another selector lever position.
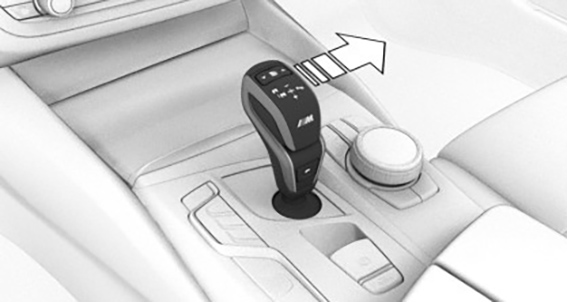
Engaging selector lever position D/S, N, R
With the driver's seat belt fastened, press on the brake pedal and pull or push the selector lever in the required direction. The selector lever automatically returns to the center position when released.
In selector lever position R, the selector lever locks.
Engaging selector lever position P
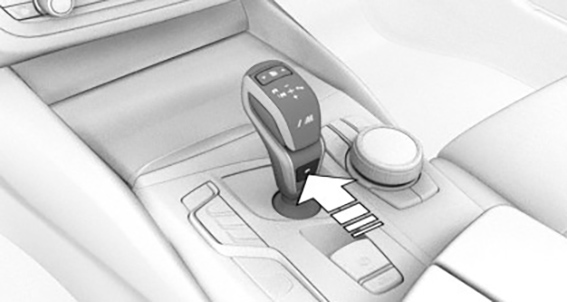
Press button P.
Rolling or pushing the vehicle
General information
In some situations, the vehicle is supposed to roll without its own power for a short distance, for instance in a car wash or to be pushed.
Engaging selector lever position N
Do not switch off standby state in the car wash
Switch on drive-ready state while pressing on the brake pedal.
If necessary, release the parking brake.
If necessary, deactivate Automatic Hold.
Automatic Hold.
Depress the brake pedal.
Engage selector lever position N.
Switch off drive-ready state.
In this way, standby state remains switched on, and a Check Control message is displayed.
The vehicle can roll.
Selector lever position P is engaged automatically after approximately 35 minutes.
If there is a malfunction, you may not be able to change the selector lever position.
Electronically unlock the transmission lock, if needed.
Additional information:
Electronic unlocking of the transmission lock.
Kickdown
Kickdown is used to achieve maximum drive power in Drive mode.
Step on the accelerator pedal beyond the resistance point at the full throttle position.
Drive mode D/S
Principle
In Drive mode, all forward gears are automatically changed.
Activating Drive mode
Push the selector lever out of the center position in the D/S direction.
Drive mode is activated. The engaged gear is displayed in the instrument cluster along with a D, e.g., 1 D.
Deactivating Drive mode
Push the selector lever out of Drive mode in the D/S direction. Sequential mode is activated.
The engaged gear is displayed in the instrument cluster, e.g., 1.
Sequential mode D/S
Principle
In sequential mode, it is possible to shift gears manually using the selector lever or the shift paddles without letting off the gas.
General information
Shortly before falling below a gear-dependent minimum speed, the transmission is automatically downshifted.
Once the maximum engine speed is attained, upshifting is not automatically performed in sequential mode and the kickdown is deactivated.
It is also possible to drive off in 2nd gear; for instance, on icy roads.
Activating sequential mode
Push the selector lever out of Drive mode in the D/S direction, arrow 1, or shift via the selector lever, arrows at 2.
Sequential mode is activated. The engaged gear is displayed in the instrument cluster, e.g., 1.
Deactivating sequential mode
Push the selector lever out of the center position in the D/S direction. Drive mode is activated.
The engaged gear is displayed in the instrument cluster along with a D, e.g., 1 D.
Gear change
Principle
Manual gear-shifting is possible via the shift paddles or the selector lever in sequential mode.
The shift paddles on the steering wheel allow you to change gears quickly while keeping both hands on the steering wheel.
General information
Shifting
Gears will only be shifted at appropriate engine and road speeds; for instance, downshifting is not possible if the engine speed is too high.
The lowest possible gear is selected by simultaneously operating the kickdown and moving the selector lever forward or actuating the left shift paddle.
Temporary sequential mode
After a shift paddle is actuated in Drive mode, the system temporarily switches to sequential mode.
After conservative driving in sequential mode without acceleration or shifting via the shift paddles for a certain amount of time, the transmission switches back to Drive mode.
Permanent sequential mode
Sequential mode remains permanently active if it was active before the shift paddle was actuated.
Switching to Drive mode
It is possible to switch to Drive mode as follows: pull and hold the right shift paddle.
Switching via the selector lever
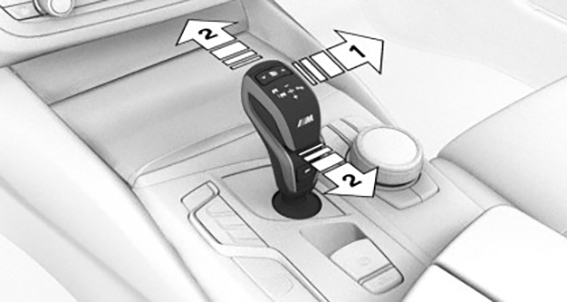
Upshifting: pull the selector lever rearwards.
Downshifting: press the selector lever forward.
A shift in Drive mode causes a switch to Sequential mode.
Switching via the shift paddles
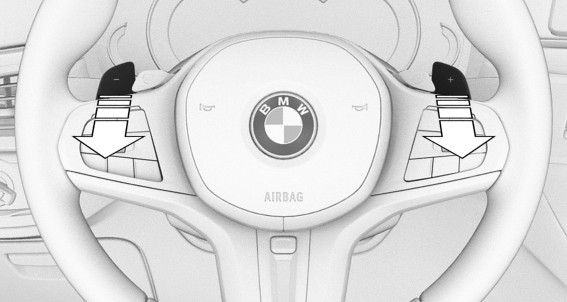
Upshift: pull right shift paddle.
Downshift: pull left shift paddle.
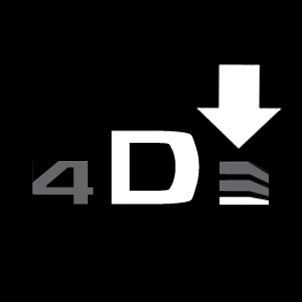
Display on the selector lever
The actually engaged transmission position can deviate from the selector lever position in some situations. The display in the selector lever flashes.
Observe the display in the instrument cluster in these cases.
Displays in the instrument cluster
Drive mode
Engaged gear together with a D, arrow 1.
Selected Drivelogic program, arrow 2.
Sequential mode
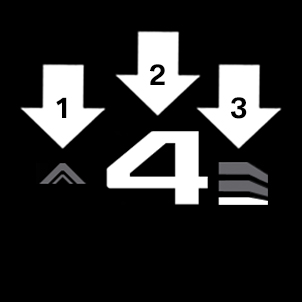
Gear shift indicator, arrow 1.
Engaged gear, arrow 2.
Selected Drivelogic program, arrow 3.
Notice
When the outside temperature is very low, the display may not work. Current driving direction is recognizable at the engaged selector lever position.
Low Speed Assistant
Principle
The Low Speed Assistant gives assistance at very low speeds. The vehicle moves at walking speed.
General information
Use the Low Speed Assistant for maneuvering or in stop-and-go traffic.
The Low Speed Assistant can also be used for rocking the vehicle free in the snow. To do this, change over between reverse gear and forward gear without stepping on the brakes in the process.
Activating
Switch on drive-ready state while pressing on the brake pedal.
If necessary, release the parking brake.
If necessary, deactivate Automatic Hold.
Engage selector lever position D/S or R.
Release brake.
In 1st and 2nd gear and in reverse, the vehicle rolls at minimum speed.
Deactivating
Decelerate the vehicle to a stop.
Drivelogic
Principle
Drivelogic changes the gear-shifting characteristics of the M Steptronic Sport transmission. For example, the shifting points are changed in Drive mode and the shifting times in sequential mode.
General information
Three Drivelogic programs are available.
After each switch between Sequential mode and Drive mode, the last program selected is an active.
If the drive-ready state is switched on after the vehicle has been in the idle state and is in Drive mode, the D1 program is activated.
Programs
|
Program |
Drive mode |
Sequential mode |
|---|---|---|
|
|
Efficient driving. |
Comfortable shifting operations. |
|
|
Fast driving. |
Sporty, fast shifting operations. |
|
|
Sporty driving. |
Maximum shifting speed, Launch Control. |
 D1/S1
D1/S1 D2/S2
D2/S2 D3/S3
D3/S3Selecting a program
Via the rocker switch on the selector lever
1
1
Drivelogic

Press the rocker switch repeatedly until the desired program is displayed in the instrument cluster.
Via iDrive
It is possible to configure the required program for buttons M1 or M2.
"CAR"

"M menu"
"Configure M1" or "Configure M2"

"Transmission"
Select the desired program
"D1" to "D3": Drive mode.
"S1" to "S3": sequential mode.
The setting is immediately applied with active M1 or M2 configuration.
To activate the desired configuration with the selected settings, press the corresponding button on the steering wheel:


Display in the instrument cluster
The selected program corresponds to the number of illuminated fields.
Electronic unlocking of the transmission lock
General information
Unlock the transmission lock electronically, e.g., to maneuver the vehicle out of a hazardous area in the event of a malfunction.
Unlocking is possible, if the starter can crank the engine.
Before unlocking the transmission lock, set the parking brake to prevent the vehicle from rolling away.
Engaging selector lever position N
Press and hold down brake pedal.
Press the Start/Stop button. The starter must audibly start. Hold the Start/Stop button pressed.
With your free hand, press and hold the selector lever in selector lever position N, until selector lever position N is displayed in the instrument cluster.
A Check Control message is displayed.
Release Start/Stop button and selector lever.
Release brake, as soon as the starter stops.
Maneuver the vehicle from the hazardous area and secure it against rolling away.
Additional information:
Tow-starting/towing.
Launch Control
Principle
Launch Control enables optimum acceleration on roads with good traction under dry surrounding conditions.
General information
The use of Launch Control causes premature component wear since this function represents a very heavy load for the vehicle.
Do not use Launch Control during the break-in.
Do not steer the steering wheel when driving off with Launch Control.
Additional information:
Break-in.
Functional requirements
Launch Control is available when the engine is at operating temperature. The engine is at operating temperature after an uninterrupted trip of at least 6 miles/10 km.
Starting with launch control
Turn on drive-ready state.
Deactivate the Dynamic Stability Control.
Dynamic Stability Control.
Select sequential mode with gear 1 and Drivelogic program S3.
With your left foot, forcefully press down on the brake.
Press and hold down the accelerator pedal beyond the resistance point at the full throttle position, kickdown.
A destination flag is displayed in the instrument cluster.
Keep the accelerator pedal in this position.
The starting engine speed adjusts. Within 3 seconds, release the brake. The vehicle accelerates.
Upshifting occurs automatically as long as the destination flag is displayed and the accelerator pedal is not released.
Repeated use during a trip
After Launch Control has been used, it is necessary to drive a certain distance before Launch Control can be used again. Launch Control adjusts to the surrounding conditions, when used again.
After using Launch Control
To support driving stability, reactivate Dynamic Stability Control as soon as possible.
System limits
An experienced driver may be able to achieve better acceleration values in DSC OFF mode.
M Engine Dynamics Control
Principle
The M Engine Dynamics Control affects the response of the vehicle to accelerator pedal movements.
General information
The system offers several different types of engine response characteristics:
|
Program |
Response characteristics |
|---|---|
|
"EFFICIENT" |
Efficient, comfortable. Minimal consumption. Ideal, for instance in city traffic or on snow. |
|
"SPORT" |
Sporty, dynamic. |
|
"SPORT PLUS" |
Spontaneous, direct. Maximum dynamics. |
The "SPORT" and "SPORT PLUS" programs change the sound characteristics of the exhaust system. The sound takes on a sporty nature.
Selecting a program
Using the button
1
1
SETUP

Press the button and select the desired program on the Control Display.
Via iDrive
It is possible to configure the required program for buttons M1 or M2.
"CAR"
"M menu"
"Configure M1" or "Configure M2"

"Engine"
Select the desired program.
The setting is immediately applied with active M1 or M2 configuration.
To activate the desired configuration with the selected settings, press the corresponding button on the steering wheel:
Display in the instrument cluster
When the display of the widget in the instrument cluster for M SETUP is activated, the selected program is displayed.
Additional information:
Widgets in the instrument cluster.
Sound control
Principle
The sound control function changes the sound characteristics of the exhaust system.
General information
When sound control is switched on, the sound of the exhaust system takes on a sporty nature.
When sound control is switched off, the sound is focused on comfort.
During the engine warm-up phase, sound control does not have any effect on the sound of the exhaust system.
Additional information:
High-performance engine.
Selecting a program
Using the button
1
1
Sound control

Press button to activate or deactivate the sound control.
The LED lights up when sound control is switched on.
Via iDrive
It is possible to configure the required program for buttons M1 or M2.
"CAR"
"M menu"
"Configure M1" or "Configure M2"

"Sound Control"
Select the desired program.
The setting is immediately applied with active M1 or M2 configuration.
To activate the desired configuration with the selected settings, press the corresponding button on the steering wheel:
Download Manual