UCONNECT SETTINGS
The Uconnect system uses a combination of buttons on the touchscreen and buttons on the faceplate located on the center of the instrument panel that allow you to access and change the customer programmable features. Many features can vary by vehicle.
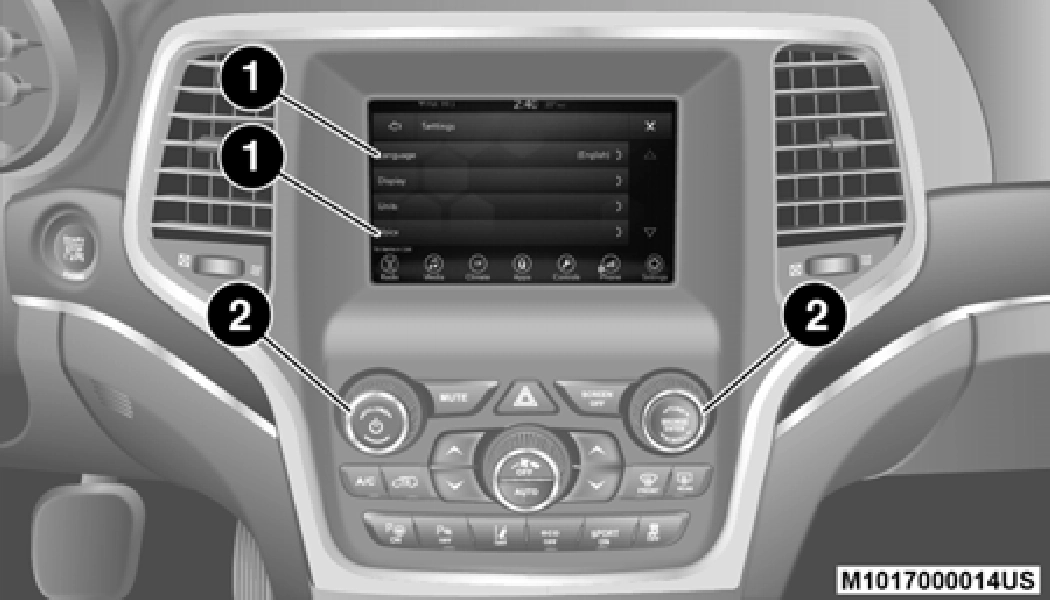
Uconnect 4 Buttons On Touchscreen And Buttons On 9
Faceplate
1 — Uconnect Buttons On The Touchscreen 2 — Uconnect Buttons On The Faceplate
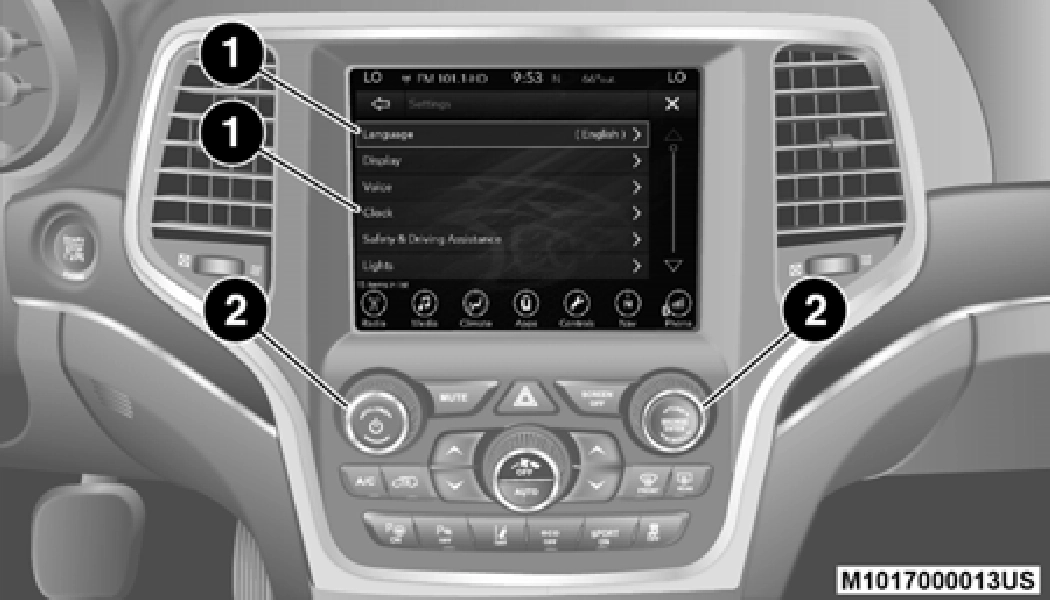
Uconnect 4C/4C NAV Buttons On Faceplate And Buttons On Touchscreen
1 — Uconnect Buttons On The Touchscreen 2 — Uconnect Buttons On The Faceplate
Press the Apps  button, then press the Settings button on the touchscreen to display the menu setting screen. In this mode the Uconnect system allows you to access programmable features that may be equipped such as Language, Display, Units, Voice,
Clock, Safety & Driving Assistance, Lights, Doors & Locks, Auto-On Comfort, Engine Off Options, Audio, Phone/ Bluetooth®, SiriusXM® Setup, Restore Settings, Clear Personal Data, and System Information.
NOTE:
Only one touchscreen area may be selected at a time.
When making a selection, press the button on the touchscreen to enter the desired mode. Once in the desired mode, press and release the preferred setting and make your selection. Once the setting is complete, either press the Back Arrow/Done button on the touchscreen or the Back button on the faceplate to return to the previous menu or press the X button on the touchscreen to close out of the settings screen. Pressing the Up or Down Arrow buttons on the right side of the screen will allow you to toggle up or down through the available settings.
NOTE:
All settings should be changed with the ignition in the ON/ RUN position.
After pressing the Language button on the touchscreen, the following settings will be available:
|
Setting Name |
Selectable Options |
||
|
Set Language |
English |
Français |
Español |
|
NOTE: When the “Set Language” feature is selected, you may select one of multiple languages (English / Français / Español) for all display nomenclature, including the trip functions and the navigation system (if equipped). Press the Set Language button on the touchscreen, and then press the desired language button on the touchscreen until a check-mark appears next to the language, showing that setting has been selected. |
After pressing the Display button on the touchscreen, the following settings will be available:
|
Setting Name |
Selectable Options |
|
|
Display Brightness With Headlights Off |
- |
+ |
|
NOTE: To make changes to the "Display Brightness With Headlights Off" setting, the headlights must be off and the interior dimmer switch must not be in the "party" or "parade" position. |
||
|
AutoShow Smartphone Display Upon Connection |
On |
Off |
|
Touchscreen Beep |
On |
Off |
|
Control Screen Time-Out — If Equipped |
On |
Off |
After pressing the Units button on the touchscreen, the following settings will be available:
|
Setting Name |
Selectable Options |
||
|
Units |
US |
Metric |
Custom |
|
NOTE: The “Custom” option allows you to set the “Speed” (MPH, or km/h), “Distance” (mi, or km), “Fuel Consumption” [MPG (US), MPG (UK), L/100 km, or km/L], “Pressure” (psi, kPa, or bar), and “Temperature” (°C, or °F) units of measurement independently. |
After pressing the Voice button on the touchscreen, the following settings will be available:
|
Setting Name |
Selectable Options |
||
|
Voice Response Length |
Brief |
Detailed |
|
|
Show Command List |
Never |
With Help |
Always |
After pressing the Clock button on the touchscreen, the following settings will be available:
9
After pressing the Safety/Assistance button on the touchscreen, the following settings will be available:
|
Setting Name |
Selectable Options |
||
|
ParkView Backup Camera Delay |
On |
Off |
|
|
NOTE: The “ParkView Backup Camera Delay” setting determines whether or not the screen displays the rear view image with dynamic grid lines for up to 10 seconds after the vehicle is shifted out of REVERSE (R). This delay cancels if the vehicle’s speed exceeds 8 mph (13 km/h), the transmission is shifted into PARK (P), or the ignition is switched to the OFF position. |
|||
|
ParkView Backup Camera Active Guidelines |
On |
Off |
|
|
NOTE: The “ParkView Backup Camera Active Guidelines” feature overlays the Rear Backup Camera image with active, or dynamic, grid lines to help illustrate the width of the vehicle and its projected backup path, based on the steering wheel position when the option is checked. A dashed center line overlay indicates the center of the vehicle to assist with parking or aligning to a hitch/receiver. |
|||
|
Forward Collision Warning — If Equipped |
Off |
Warning Only |
Warning & Braking |
9
|
Setting Name |
Selectable Options |
||
|
Front ParkSense Volume |
Low |
Medium |
High |
|
Rear ParkSense Volume |
Low |
Medium |
High |
|
Rear ParkSense Braking Assist — If Equipped |
On |
Off |
|
|
NOTE: When the “Rear ParkSense Braking Assist” feature is selected, the Park Assist system detects objects located behind the vehicle and utilizes autonomous braking to stop the vehicle. |
|||
|
LaneSense Warning— If Equipped |
Early |
Medium |
Late |
|
NOTE: The “LaneSense Warning” setting determines at what distance the LaneSense system warns you, through steering wheel feedback, of a possible lane departure. |
|||
|
LaneSense Strength — If Equipped |
Low |
Medium |
High |
|
Blind Spot Alert — If Equipped |
Off |
Lights |
Lights & Chime |
9
After pressing the Lights button on the touchscreen, the following settings will be available:
|
Setting Name |
Selectable Options |
|
|
Headlight Off Delay |
0 sec |
30 sec |
|
60 sec |
90 sec |
|
|
NOTE: When the “Headlight Off Delay” feature is selected, it allows the adjustment of the amount of time the headlights remain on after the engine is shut off. |
||
|
Headlight Illumination On Approach |
0 sec |
30 sec |
|
60 sec |
90 sec |
|
|
NOTE: When this feature is selected, it allows the adjustment of the amount of time the headlights remain on after the doors are unlocked with the key fob. |
||
|
Headlights With Wipers — If Equipped |
On |
Off |
|
Auto High Beam — If Equipped |
On |
Off |
|
NOTE: When the “Auto High Beam” is selected, the high beam headlights will activate/deactivate automatically under certain conditions. |
|
Setting Name |
Selectable Options |
|
|
Daytime Running Lights |
On |
Off |
|
NOTE: When the “Daytime Running Lights” feature is selected, the daytime running lights can be turned on or off. The feature is only available if allowed by law in the country of the vehicle purchase. |
||
|
Flash Lights With Lock |
On |
Off |
After pressing the Doors & Locks button on the touchscreen, the following settings will be available:
9
|
Setting Name |
Selectable Options |
|
|
Remote Door Unlock |
Driver Door |
All Doors |
|
NOTE: When “Driver” is selected, only the driver's door unlocks on the first push of the key fob unlock button. You must push the key fob unlock button twice to unlock the passengers’ doors. When “All” is programmed, all of the doors unlocks on the first press of the key fob unlock button. If “All” is programmed, all doors unlock no matter which Passive Entry equipped door handle is grasped. If “Driver” is programmed, only the driver’s door unlocks when the driver’s door is grasped. Touching the handle more than once only results in the driver’s door opening once. If the driver’s door is opened, the interior door lock/unlock switch can be used to unlock all doors (or use key fob). |
||
|
Passive Entry |
On |
Off |
|
Memory Linked To FOB — If Equipped |
On |
Off |
|
NOTE: The “Memory Linked To FOB” feature provides automatic recall of all settings stored to a memory location (driver’s seat, exterior mirrors, steering column position, and radio station pre-sets) to enhance driver mobility when entering and exiting the vehicle. |
||
|
Power Liftgate Alert — If Equipped |
On |
Off |
|
NOTE: The “Power Liftgate Alert” feature plays an alert when the power liftgate is raising or lowering. |
After pressing the Auto-On Comfort & Remote Start button on the touchscreen, the following settings will be available:
|
Setting Name |
Selectable Options |
||
|
Auto-On Driver Heated Seat & Steering Wheel — If Equipped |
Off |
Remote Start |
All Starts |
|
NOTE: When this feature is selected, the driver’s heated seat and heated steering wheel will automatically turn On when tempera- tures are below 40°F (4.4°C). When temperatures are above 80°F (26.7°C), the driver vented seat will turn On. |
After pressing the Engine Off Options button on the touchscreen, the following settings will be available:
9
|
Setting Name |
Selectable Options |
|
|
Easy Exit Seat — If Equipped |
On |
Off |
|
NOTE: When the “Easy Exit Seat” feature is selected, it provides automatic driver seat positioning to enhance driver mobility when entering and exiting the vehicle. |
||
|
Auto Entry/Exit — If Equipped |
On |
Off |
|
NOTE: The “Auto Entry/Exit” feature automatically lowers the vehicle ride height position when shifted into PARK, when it is selected. |
After pressing the Audio button on the touchscreen, the following settings will be available:
|
Setting Name |
Selectable Options |
||||
|
Balance/Fade |
Up Arrow Button |
Down Arrow Button |
Left Arrow Button |
Right Arrow Button |
Center C Button |
|
NOTE: When in this display, you may adjust the “Balance/Fade” of the audio by using the Arrow button on the touchscreen to adjust the sound level from the front and rear or right and left side speakers. Press the Center C button on the touchscreen to reset the balance and fade to the factory setting. |
|||||
|
Equalizer |
Bass |
Mid |
Treble |
9
After pressing the Phone/Bluetooth® button on the touchscreen, the following settings will be available:
|
Setting Name |
Selectable Options |
|
|
Do Not Disturb |
List of Settings |
|
|
NOTE: Press “Do Not Disturb” to access the available settings. The following settings are: Auto Reply (both, text, call), Auto Reply Message (custom, default), and Custom Auto Reply Message (create message). |
||
|
Paired Phones And Audio Devices |
List of Paired Phones |
|
|
NOTE: The “Paired Phones and Audio Devices” feature shows which phones and audio devices are paired to the Phone/Bluetooth® system. For further information, refer to the Uconnect Owner’s Manual Supplement. |
||
|
Display Phone Info In Cluster — If Equipped |
Off |
On |
After pressing the Suspension button on the touchscreen, the following settings will be available:
|
Setting Name |
Selectable Options |
|
|
Auto Entry/Exit Suspension |
On |
Off |
|
NOTE: When the “Auto Entry/Exit Suspension” setting is selected, the vehicle automatically lowers from ride height position when the vehicle is shifted to PARK for easy entry/exit. |
9
After pressing the SiriusXM® Setup button on the touchscreen, the following settings will be available:
|
Setting Name |
Selectable Options |
|
|
Tune Start |
Off |
On |
|
NOTE: The “Tune Start” feature begins playing the current song from the beginning when you tune to a music channel using one of the 12 presets, so you can enjoy the complete song. This feature occurs the first time the preset is selected during that current song. Tune Start works in the background, so you will not even realize it's on, except that you will miss the experience of joining your favorite song with only a few seconds left to play. |
||
|
Channel Skip |
List of Channels |
|
|
NOTE: SiriusXM® can be programmed to designate a group of channels that are the most desirable to listen to or to exclude unde- sirable channels while scanning. This feature allows you to select the channels you would like to skip. |
||
|
Subscription Information |
Sirius ID |
|
|
NOTE: New vehicle purchasers or lessees will receive a free limited time subscription to SiriusXM® Satellite Radio with your radio. Following the expiration of the free services, it will be necessary to access the information on the Subscription Information screen to re-subscribe. Press the Subscription Information button on the touchscreen to access the Subscription Information screen.
Write down the Sirius ID numbers for your receiver. To reactivate your service, either call the number listed on the screen or visit the provider online.
|
After pressing the Restore Settings button on the touchscreen, the following settings will be available:
|
Setting Name |
Selectable Options |
|
|
Restore Settings |
OK |
Cancel |
|
NOTE: When this feature is selected, it will reset all settings to their default settings. |
After pressing the Clear Personal Data button on the touch- screen, the following settings will be available:
|
Setting Name |
Selectable Options |
|
|
Clear Personal Data |
OK |
Cancel |
|
NOTE: When the “Clear Personal Data” feature is selected, it will remove all personal data including Bluetooth® devices and presets. |
9
Press the Apps  button, then press the Settings button on the touchscreen to display the menu setting screen. In this mode the Uconnect system allows you to access programmable features that may be equipped such as Language, Display, Units, Voice, Clock, Safety & Driving Assistance, Mirrors & Wipers, Lights, Doors & Locks, Auto-On Comfort, Engine Off Options, Suspen- sion, Audio, Phone/Bluetooth®, SiriusXM® Setup, Accessi- bility, Reset, and System Information.
NOTE:
Depending on the vehicles options, feature settings may vary.
When making a selection, press the button on the touch- screen to enter the desired mode. Once in the desired mode, press and release the preferred setting “option” until a check-mark appears next to the setting, showing that setting has been selected. Once the setting is complete, either press the Back Arrow button on the touchscreen to return to the previous menu, or press the X button on the touchscreen to close out of the settings screen. Pressing the Up or Down Arrow button on the right side of the screen will allow you to toggle up or down through the available settings.
After pressing the Language button on the touchscreen, the following settings will be available:
|
Setting Name |
Selectable Options |
||
|
Language |
English |
Español |
Français |
|
When the “Language” feature is selected, you may select one of multiple languages (English / Français / Español) for all display nomenclature, including the trip functions and the navigation system (if equipped). Press the Language button on the touchscreen, then press the desired language button on the touchscreen until a check-mark appears next to the language, showing that setting has been selected. |
After pressing the Display button on the touchscreen, the following settings will be available:
9
|
Setting Name |
Selectable Options |
|
|
Control Screen Time-Out — If Equipped |
On |
Off |
|
NOTE: When the “Control Screen Time-Out” feature is selected, the Controls Screen will stay open for five seconds before the screen times out. With the feature deselected, the screen will stay open until it is manually closed. |
||
|
Navigation Turn-By-Turn In Cluster — If Equipped |
On |
Off |
|
NOTE: When the “Navigation Turn-By-Turn In Cluster” feature is selected, the turn-by-turn directions will appear in the instrument cluster display as the vehicle approaches a designated turn within a programmed route. |
||
|
Phone Pop-ups Displayed In Cluster |
On |
Off |
After pressing the Units button on the touchscreen, the following settings will be available:
|
Setting Name |
Selectable Options |
||
|
Units |
US |
Metric |
Custom |
|
NOTE: The “Custom” option allows you to set the “Speed” (MPH, or km/h), “Distance” (mi, or km), “Fuel Consumption” [MPG (US), MPG (UK), L/100 km, or km/L], “Pressure” (psi, kPa, or bar), “Temperature” (°C, or °F), “Power” (SRT only) [HP (US), HP (UK), or kW], and “Torque” (SRT Only) (lb-ft, or Nm) units of measurement independently. |
After pressing the Voice button on the touchscreen, the following settings will be available:
|
Setting Name |
Selectable Options |
||
|
Voice Response Length |
Brief |
Detailed |
|
|
Show Command List |
Always |
With Help |
Never |
After pressing the Clock button on the touchscreen, the following settings will be available:
9
After pressing the Safety/Assistance button on the touchscreen, the following settings will be available:
|
Setting Name |
Selectable Options |
||
|
ParkView Backup Camera Delay |
On |
Off |
|
|
NOTE: The “ParkView Backup Camera Delay” setting determines whether or not the screen will display the rear view image with dynamic grid lines for up to 10 seconds after the vehicle is shifted out of REVERSE (R). This delay will be canceled if the vehicle’s speed exceeds 8 mph (13 km/h), the transmission is shifted into PARK (P), or the ignition is switched to the OFF position. |
|||
|
Active ParkView Backup Camera Guidelines |
On |
Off |
|
|
NOTE: The “Active ParkView Backup Camera Guidelines” feature overlays the Rear Backup Camera image with active, or dynamic, grid lines to help illustrate the width of the vehicle and its projected backup path, based on the steering wheel position when the option is checked. A dashed center line overlay indicates the center of the vehicle to assist with parking or aligning to a hitch/receiver. |
|||
|
Forward Collision Warning — If Equipped |
Off |
Only Warning |
Warning & Active Braking |
9
|
Setting Name |
Selectable Options |
||
|
LaneSense Strength — If Equipped |
Low |
Med |
High |
|
ParkSense — If Equipped |
Sound |
Sound & Display |
|
|
NOTE: The “ParkSense” system setting scans for objects behind the vehicle when the transmission gear selector is in REVERSE and the vehicle speed is less than 7 mph (11 km/h), when enabled. It provides an alert (audible and/or visual) to indicate the proximity to other objects. The system can be enabled with “Sound” or “Sound & Display”. |
|||
|
Front ParkSense Volume |
Low |
Med |
High |
|
Rear ParkSense Volume |
Low |
Med |
High |
|
Rear ParkSense Braking Assist — If Equipped |
On |
Off |
|
|
NOTE: When the “Rear ParkSense Braking Assist” feature is selected, the Park Assist system detects objects located behind the vehicle and utilizes autonomous braking to stop the vehicle. |
|||
|
Electric Power Steering Default |
Normal |
Sport |
Comfort |
|
NOTE: When the “Electric Power Steering Default” is selected, it allows you to change the default setting of your vehicle to either Normal, Sport, or Comfort. |
|||
|
Paddle Shifters — If Equipped |
Enable |
Disable |
|
Setting Name |
Selectable Options |
||
|
Blind Spot Alert — If Equipped |
Off |
Lights |
Lights & Chime |
|
NOTE: When the “Blind Spot Alert” feature is selected, the Blind Spot Monitoring (BSM) system is activated and shows a visual alert in the outside mirrors, or it shows a visual alert in the outside mirrors as well as plays an audible alert when the turn signal is on. When “Off” is selected, the BSM system is deactivated. If your vehicle has experienced any damage in the area where the sensor is located, even if the fascia is not damaged, the sensor may have become misaligned. Take your vehicle to an authorized dealer to verify sensor alignment. A sensor that is misaligned results in the BSM not operating to specification. |
|||
|
Hill Start Assist — If Equipped |
On |
Off |
After pressing the Mirror and Wipers button on the touchscreen, the following settings will be available:
9
After pressing the Lights button on the touchscreen, the following settings will be available:
|
Setting Name |
Selectable Options |
|
|
Headlight Off Delay |
0 sec |
30 sec |
|
60 sec |
90 sec |
|
|
NOTE: When the “Headlight Off Delay” feature is selected, it allows the adjustment of the amount of time the headlights remain on after the engine is shut off. |
||
|
Headlight Illuminated On Approach |
0 sec |
30 sec |
|
60 sec |
90 sec |
|
|
Headlights With Wipers — If Equipped |
On |
Off |
|
Auto Dim High Beams — If Equipped |
On |
Off |
|
NOTE: When the “Auto Dim High Beams” feature is selected, the high beam headlights will activate/deactivate automatically under certain conditions. |
||
|
Daytime Running Lights — If Equipped |
On |
Off |
|
NOTE: When the “Daytime Running Lights” feature is selected, the daytime running lights can be turned on or off. The feature is only available if allowed by law in the country of the vehicle purchase. |
||
|
Flash Lights With Lock |
On |
Off |
After pressing the Doors & Locks button on the touchscreen, the following settings will be available:
|
Setting Name |
Selectable Options |
||
|
Auto Door Locks |
On |
Off |
|
|
NOTE: When the “Auto Door Locks” feature is selected, all doors lock automatically when the vehicle reaches a speed of 12 mph (20 km/h). |
|||
|
Auto Unlock On Exit |
On |
Off |
|
|
NOTE: When this feature is selected, all doors unlock when the vehicle is stopped, the transmission is in the PARK or NEUTRAL (N) position, and the driver's door is opened. |
|||
|
Flash Lights With Lock |
On |
Off |
|
|
Sound Horn With Lock |
Off |
1st Press |
2nd Press |
|
Sound Horn With Remote Start |
On |
Off |
9
|
Setting Name |
Selectable Options |
|
|
1st Press Of Key Fob Unlocks |
Driver Door |
All Doors |
|
NOTE: When "Driver Door" is selected with 1st Press Of Key Fob Unlocks, only the driver's door unlocks with the first push of the key fob unlock button. You must press the key fob unlock button twice to unlock the passengers’ doors. When "All Doors" is programmed for 1st Press Of Key Fob Unlocks, all doors unlock on the first push of the key fob unlock button. If the vehicle is programmed 1st Press Of Key Fob Unlocks “All Doors”, all doors unlock no matter which Passive Entry equipped door handle is grasped. If 1st Press Of Key Fob Unlocks “Driver Door” is programmed, only the driver’s door unlocks when the driver’s door is grasped. With Passive Entry, if 1st Press Of Key Fob Unlocks “Driver Door” is programmed, touching the handle more than once results in only the driver’s door opening. If “Driver Door” is selected, once the driver’s door is opened, the interior door lock/unlock switch can be used to unlock all doors (or use key fob). |
||
|
Passive Entry — If Equipped |
On |
Off |
|
NOTE: This feature allows you to lock and unlock the vehicle’s door(s) without having to push the key fob lock or unlock buttons. |
||
|
Personal Settings Linked to Key Fob — If Equipped |
On |
Off |
|
NOTE: This feature provides automatic recall of all settings stored to a memory location (driver’s seat, exterior mirrors, steering column position, and radio station presets) to enhance driver mobility when entering and exiting the vehicle. |
||
|
Power Lift Gate Alert — If Equipped |
On |
Off |
After pressing the Auto-On Comfort & Remote Start button on the touchscreen, the following settings will be available:
|
Setting Name |
Selectable Options |
||
|
Auto-On Driver Heated/ Ventilated Seat & Steering Wheel With Vehicle Start — If Equipped |
Off |
Remote Start |
All Starts |
|
NOTE: When this feature is selected, the driver’s heated seat and heated steering wheel will automatically turn ON when tempera- tures are below 40°F (4.4°C). |
After pressing the Engine Off Options button on the touchscreen, the following settings will be available:
9
After pressing the Suspension button on the touchscreen, the following settings will be available:
|
Setting Name |
Selectable Options |
|
|
Auto Entry/Exit Suspension |
On |
Off |
|
NOTE: When the “Auto Entry/Exit Suspension” setting is selected, the vehicle automatically lowers from ride height position when the vehicle is shifted to PARK for easy entry/exit. |
||
|
Display Suspension Messages |
All |
Warning |
|
NOTE: The “Display Suspension Messages” setting allows you to choose whether you want the Suspension system to display all suspension messages, or to only display suspension warnings. |
||
|
Tire Jack Mode |
On |
Off |
|
NOTE: When the “Tire Jack Mode” setting is selected, the Air Suspension system is disabled to prevent auto leveling of the suspen- sion while the vehicle is on a jack, changing a tire. |
||
|
Transport Mode |
On |
Off |
|
NOTE: When the “Transport Mode” setting is selected, the Air Suspension system is disabled to assist with flat bed towing. |
||
|
Wheel Alignment Mode |
On |
Off |
|
NOTE: The “Wheel Alignment Mode” setting prevents auto leveling of the Air Suspension while performing a wheel alignment service. |
After pressing the Audio button on the touchscreen, the following settings will be available:
9
|
Setting Name |
Selectable Options |
|
|
NOTE: This feature provides the ability to tune the audio level for portable devices connected through the AUX input. |
||
|
AutoPlay |
On |
Off |
|
NOTE: The “AutoPlay” setting, when activated, automatically starts playing music off of a connected device as soon as it is connected. |
After pressing the Phone/Bluetooth® button on the touchscreen, the following settings will be available:
|
Setting Name |
Selectable Options |
|
|
Phone Pop-Ups Displayed In Cluster |
On |
Off |
|
Do Not Disturb |
Do Not Disturb Options |
|
|
NOTE: The “Do Not Disturb” feature allows the paired phone to send a predetermined call, text, or both, to any incoming call, or text, before sending it directly to voicemail. It also keeps a counter of all missed calls and texts while on the road. |
||
|
Paired Phones and Audio Sources |
List Of Paired Phones and Audio Sources |
|
|
NOTE: The “Paired Phones and Audio Sources” feature shows which phones and audio sources are paired to the Phone and Audio Sources Settings system. Refer to the Uconnect Owner’s Manual Supplement for further information. |
||
|
Display Phone Info In Cluster |
On |
Off |
After pressing the SiriusXM® Setup button on the touchscreen, the following settings will be available:
9
After pressing the Accessibility button on the touchscreen, the following settings will be available:
|
Setting Name |
Selectable Options |
|
|
Video Button Readback |
On |
Off |
|
NOTE: The “Video Button Readback” feature announces a function prior to performing the action selected when using DVD/ Blu-ray™ functions, when it is activated. For example, when activated, and the Play button is selected, the system will announce “Play Button Selected”, and then once pressed again the Play button will perform its action. |
After pressing the Reset button on the touchscreen, the following settings will be available:
|
Setting Name |
Selectable Options |
|
|
Reset App Drawer |
OK |
Cancel |
|
Restore Settings |
OK |
Cancel |
|
NOTE: When this feature is selected, it will reset all settings to their default settings. |
||
|
Clear Personal Data |
OK |
Cancel |
|
NOTE: When the “Clear Personal Data” feature is selected, it will remove all personal data including Bluetooth® devices and presets. |
After pressing the System Information button on the touchscreen, the following settings will be available:
|
Setting Name |
Selectable Options |
|
Software License |
System Software Information Screen |
|
NOTE: When this feature is selected, a “Software License” screen will appear, displaying the system software license and version. |
9
Download Manual