DRIVING TIPS
On-Road Driving Tips
Utility vehicles have higher ground clearance and a nar- rower track to make them capable of performing in a wide variety of off-road applications. Specific design character- istics give them a higher center of gravity than conven- tional passenger cars.
An advantage of the higher ground clearance is a better view of the road, allowing you to anticipate problems. They are not designed for cornering at the same speeds as conventional passenger cars any more than low-slung sports cars are designed to perform satisfactorily in off- road conditions. Avoid sharp turns or abrupt maneuvers. As with other vehicles of this type, failure to operate this vehicle correctly may result in loss of control or vehicle rollover.
NOTE: Prior to off-road driving with non-Summit models that are also equipped with an Off Road Package, remove the lower fascia to prevent damage. The lower fascia is attached to the lower part of the front fascia with seven quarter turn fasteners and can be removed by hand. The front license plate bracket must be removed first if equipped.

Front Air Dam
NOTE: On Summit models the lower front fascia is not removable.
Lower Front Fascia Removal:
6
NOTE: Do not allow the lower fascia to freely hang from the tabs in the opposite corner as damage to lower and upper fascia may result.
NOTE: It is recommend to also remove the radar sensor on vehicle equipped to Adaptive Cruise Control (ACC). This radar sensor is specifically calibrated to your vehicle and is not interchangeable with other radar sensors.
Radar Sensor Removal Procedure (If Equipped With Adaptive Cruise Control [ACC]):
NOTE: It is recommended to scribe location to assist in reinstallation.
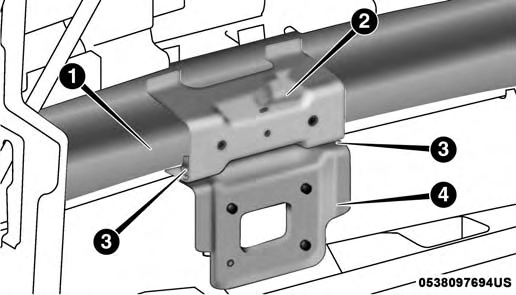
1 — Inside Bumper Beam
 Bumper Beam
bumper beam.
2 — Protective Connector Location 3 — Sensor Bracket Fasteners
4 — Sensor Bracket
NOTE: Only models with the Off Road Package are equipped with the a protective connector.
NOTE: All cruise control functions will be disabled when the radar sensor is disconnected.
Radar Sensor Installation Procedure (If Equipped With Adaptive Cruise Control [ACC]):
1. Disconnect the wiring harness connector from the pro- tective connector on the bumper beam.
NOTE: 6
connector.
NOTE: Some alignment may be required upon fascia installation to align sensor with fascia.
NOTE: If you receive a fault, see your authorized dealer they may need to perform a sensor alignment.
Lower Front Fascia Installation
NOTE: This will only work if you have a helper.
It may be necessary to apply additional force to individual tabs to make sure they are fully engaged.
Do not use any tools to apply additional force to the tabs as damage to the upper and lower fascias may result.
Quadra-Lift — If Equipped
When off-roading, it is recommended that the lowest useable vehicle height that will clear the current obstacle or terrain be selected. The vehicle height should then be raised as required by the changes in terrain.
The Selec-Terrain switch will automatically change the vehicle to the optimized height based on the Selec-Terrain switch position. The vehicle height can be changed from the default height for each Selec-Terrain mode by normal use of the air suspension switches. Refer to “Four Wheel Drive Operation” in “Starting And Operating” for further information.
When To Use 4WD LOW Range — If Equipped
When off-road driving, shift to 4WD LOW for additional traction. This range should be limited to extreme situations such as deep snow, mud, or sand where additional low speed pulling power is needed. Vehicle speeds in excess of 25 mph (40 km/h) should be avoided when in 4WD LOW range.
Driving Through Water
Although your vehicle is capable of driving through water, there are a number of precautions that must be considered before entering the water.
NOTE: Your vehicle is capable of water fording in up to 20 inches (51 cm) of water, while crossing small rivers or streams. To maintain optimal performance of your vehi- cle’s heating and ventilation system it is recommended to switch the system into recirculation mode during water fording.
Driving through water more than a few inches/centimeters deep will require extra caution to ensure safety and pre- vent damage to your vehicle. If you must drive through water, try to determine the depth and the bottom condition (and location of any obstacles) prior to entering. Proceed
with caution and maintain a steady controlled speed less than 5 mph (8 km/h) in deep water to minimize wave effects.
Flowing Water
If the water is swift flowing and rising (as in storm run-off), avoid crossing until the water level recedes and/or the flow rate is reduced. If you must cross flowing water avoid depths in excess of 9 inches (23 cm). The flowing water can erode the streambed, causing your vehicle to sink into
Driving In Snow, Mud And Sand
In heavy snow, when pulling a load, or for additional control at slower speeds, shift the transmission to a low gear and shift the transfer case to 4WD LOW if necessary. Refer to “Four-Wheel Drive Operation” in “Starting and Operating” for further information. Do not shift to a lower gear than necessary to maintain forward motion. Over- revving the engine can spin the wheels and traction will be
deeper water. Determine exit point(s) that are downstream
lost.
6
of your entry point to allow for drifting.
Standing Water
Avoid driving in standing water deeper than 20 inches (51 cm), and reduce speed appropriately to minimize wave effects. Maximum speed in 20 inches (51 cm) of water is less than 5 mph (8 km/h).
Maintenance
After driving through deep water, inspect your vehicle fluids and lubricants (engine oil, transmission oil, axle, transfer case) to assure the fluids have not been contami- nated. Contaminated fluid (milky, foamy in appearance) should be flushed/changed as soon as possible to prevent component damage.
Avoid abrupt downshifts on icy or slippery roads, because engine braking may cause skidding and loss of control.
Hill Climbing
NOTE: Before attempting to climb a hill, determine the conditions at the crest and/or on the other side.
Before climbing a steep hill, shift the transmission to a lower gear and shift the transfer case to 4WD LOW. Use first gear and 4WD LOW for very steep hills.
If you stall or begin to lose forward motion while climbing a steep hill, allow your vehicle to come to a stop and immediately apply the brakes. Restart the engine, and shift into REVERSE. Back slowly down the hill, allowing the compression braking of the engine to help regulate your speed. If the brakes are required to control vehicle speed, apply them lightly and avoid locking or skidding the tires.
Remember, never drive diagonally across a hill. Always drive straight up or down.
If the wheels start to slip as you approach the crest of a hill, ease off the accelerator and maintain forward motion by turning the front wheels slowly. This may provide a fresh “bite” into the surface and will usually provide traction to complete the climb.
Traction Downhill
When descending mountains or hills, use Hill Descent or Selec-Speed Control to avoid repeated heavy braking.
If not equipped with Hill Descent or Selec-Speed Control use the following procedure:
Shift the transmission into a low gear, and the transfer case into 4WD LOW range. Let the vehicle go slowly down the hill with all four wheels turning against engine compres- sion drag. This will permit you to control the vehicle speed and direction.
When descending mountains or hills, repeated braking can cause brake fade with loss of braking control. Avoid repeated heavy braking by downshifting the transmission whenever possible.
After Driving Off-Road
Off-road operation puts more stress on your vehicle than does most on-road driving. After going off-road, it is always a good idea to check for damage. That way you can get any problems taken care of right away and have your vehicle ready when you need it.
Completely inspect the underbody of your vehicle. Check tires, body structure, steering, suspension, and exhaust system for damage.
Inspect the radiator for mud and debris and clean as required.
Check threaded fasteners for looseness, particularly on the chassis, drivetrain components, steering, and sus- pension. Retighten them, if required, and torque to the
values specified in the Service Manual.
Check for accumulations of plants or brush. These things could be a fire hazard. They might hide damage to fuel lines, brake hoses, axle pinion seals, and propeller shafts.
After extended operation in mud, sand, water, or similar dirty conditions, have the radiator, fan, brake rotors, wheels, brake linings, and axle yokes inspected and cleaned as soon as possible.
mud, slush or similar conditions, check the wheels for impacted material. Impacted material can cause a wheel imbalance and freeing the wheels of it will correct the situation.
Download Manual