OCCUPANT RESTRAINT SYSTEMS
Some of the most important safety features in your vehicle are the restraint systems:
Some of the safety features described in this section may be standard equipment on some models, or may be optional equipment on others. If you are not sure, ask an authorized dealer.
Please pay close attention to the information in this section. It tells you how to use your restraint system properly, to keep you and your passengers as safe as possible.
Here are some simple steps you can take to minimize the risk of harm from a deploying air bag:
for further information) must be secured in the appro-
pants and the door and occupants could be injured.
priate child restraint or belt-positioning booster seat in a rear seating position.
Buckle up even though you are an excellent driver, even on short trips. Someone on the road may be a poor driver and could cause a collision that includes you. This can happen far away from home or on your own street.
Research has shown that seat belts save lives, and they can reduce the seriousness of injuries in a collision. Some of the worst injuries happen when people are thrown from the vehicle. Seat belts reduce the possibility of ejection and the risk of injury caused by striking the inside of the vehicle. Everyone in a motor vehicle should be belted at all times.
Enhanced Seat Belt Use Reminder System (BeltAlert) Driver and Passenger BeltAlert (if equipped)
 BeltAlert is a feature intended to remind the driver and outboard front seat passenger (if equipped with outboard front passenger seat BeltAlert) to buckle their seat belts. The Belt Alert feature is active whenever the ignition switch is in the START or ON/RUN position.
Initial Indication
If the driver is unbuckled when the ignition switch is first in the START or ON/RUN position, a chime will signal for
a few seconds. If the driver or outboard front seat passen- ger (if equipped with outboard front passenger seat BeltAlert) is unbuckled when the ignition switch is first in the START or ON/RUN position the Seat Belt Reminder Light will turn on and remain on until both outboard front seat belts are buckled. The outboard front passenger seat BeltAlert is not active when an outboard front passenger seat is unoccupied.
BeltAlert Warning Sequence
The BeltAlert warning sequence is activated when the vehicle is moving above a specified vehicle speed range and the driver or outboard front seat passenger is unbuck- led (if equipped with outboard front passenger seat BeltAlert) (the outboard front passenger seat BeltAlert is not active when the outboard front passenger seat is unoccupied). The BeltAlert warning sequence starts by blinking the Seat Belt Reminder Light and sounding an intermittent chime. Once the BeltAlert warning sequence has completed, the Seat Belt Reminder Light will remain on until the seat belts are buckled. The BeltAlert warning sequence may repeat based on vehicle speed until the driver and occupied outboard front seat passenger seat belts are buckled. The driver should instruct all occupants to buckle their seat belts.
Change of Status
If the driver or outboard front seat passenger (if equipped with outboard front passenger seat BeltAlert) unbuckles their seat belt while the vehicle is traveling, the BeltAlert warning sequence will begin until the seat belts are buck- led again.
Lap/Shoulder Belts
All seating positions in your vehicle are equipped with lap/shoulder belts.
The seat belt webbing retractor will lock only during very sudden stops or collisions. This feature allows the shoulder part of the seat belt to move freely with you under normal
The outboard front passenger seat BeltAlert is not active
conditions. However, in a collision the seat belt will lock 5
when the outboard front passenger seat is unoccupied. BeltAlert may be triggered when an animal or other items are placed on the outboard front passenger seat or when the seat is folded flat (if equipped). It is recommended that pets be restrained in the rear seat (if equipped) in pet harnesses or pet carriers that are secured by seat belts, and cargo is properly stowed.
BeltAlert can be activated or deactivated by an authorized dealer. FCA US LLC does not recommend deactivating BeltAlert.
NOTE: If BeltAlert has been deactivated and the driver or outboard front seat passenger (if equipped with outboard front passenger seat BeltAlert) is unbuckled the Seat Belt Reminder Light will turn on and remain on until the driver and outboard front seat passenger seat belts are buckled.
and reduce your risk of striking the inside of the vehicle or being thrown out of the vehicle.
WARNING!
It is dangerous to ride in a cargo area, inside or outside of a vehicle. In a collision, people riding in these areas are more likely to be seriously injured or killed.
Do not allow people to ride in any area of your vehicle that is not equipped with seats and seat belts. Be sure everyone in your vehicle is in a seat and using a seat belt properly. Occupants, including the driver, should always wear their seat belts whether or not an air bag is also provided at their seating position to minimize the risk of severe injury or death in the event of a crash.
Wearing your seat belt incorrectly could make your injuries in a collision much worse. You might suffer internal injuries, or you could even slide out of the seat belt. Follow these instructions to wear your seat belt safely and to keep your passengers safe, too.
Two people should never be belted into a single seat belt. People belted together can crash into one an- other in a collision, hurting one another badly. Never use a lap/shoulder belt or a lap belt for more than one person, no matter what their size.
Lap/Shoulder Belt Operating Instructions
pull out the seat belt. Slide the latch plate up the 5
webbing as far as necessary to allow the seat belt to go around your lap.
Pulling Out The Latch Plate
Inserting Latch Plate Into Buckle
Positioning The Lap Belt
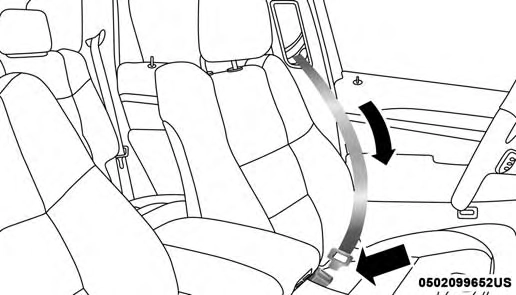
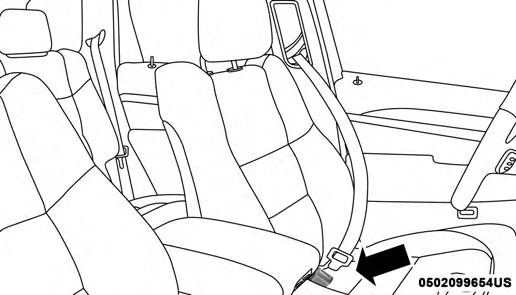
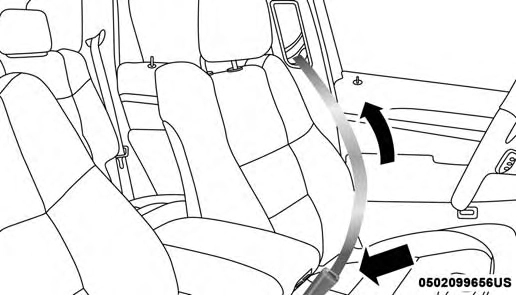
Lap/Shoulder Belt Untwisting Procedure
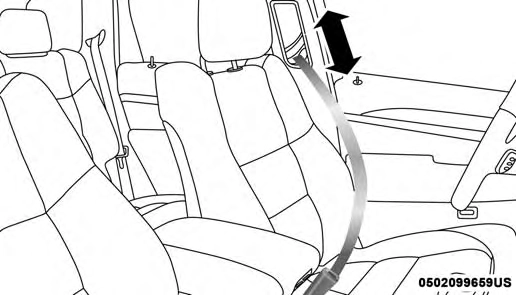
Use the following procedure to untwist a twisted lap/
Adjustable Upper Shoulder Belt Anchorage
In the driver and outboard front passenger seats, the top of the shoulder belt can be adjusted upward or downward to position the seat belt away from your neck. Push or squeeze the anchorage button to release the anchorage, and move it up or down to the position that serves you best.
shoulder belt. 5
Adjustable Anchorage
As a guide, if you are shorter than average, you will prefer the shoulder belt anchorage in a lower position, and if you are taller than average, you will prefer the shoulder belt anchorage in a higher position. After you release the anchorage button, try to move it up or down to make sure that it is locked in position.
NOTE: The adjustable upper shoulder belt anchorage is equipped with an Easy Up feature. This feature allows the shoulder belt anchorage to be adjusted in the upward position without pushing or squeezing the release button. To verify the shoulder belt anchorage is latched, pull downward on the shoulder belt anchorage until it is locked into position.
Seat Belt Extender
If a seat belt is not long enough to fit properly, even when the webbing is fully extended and the adjustable upper shoulder belt anchorage (if equipped) is in its lowest position, an authorized dealer can provide you with a Seat Belt Extender. The Seat Belt Extender should be used only if the existing seat belt is not long enough. When the Seat Belt Extender is not required for a different occupant, it must be removed.
Seat Belts And Pregnant Women
Seat Belt Pretensioner
The front outboard seat belt system is equipped with pretensioning devices that are designed to remove slack from the seat belt in the event of a collision. These devices may improve the performance of the seat belt by removing slack from the seat belt early in a collision. Pretensioners work for all size occupants, including those in child
restraints. 5
Pregnant Women And Seat Belts
Seat belts must be worn by all occupants including preg- nant women: the risk of injury in the event of an accident is reduced for the mother and the unborn child if they are wearing a seat belt.
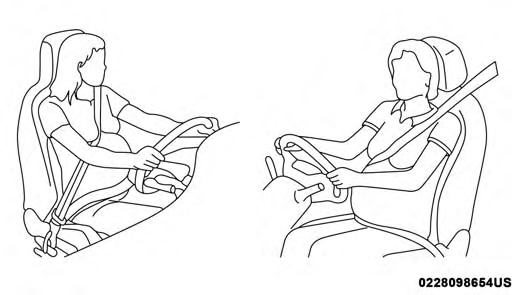
Position the lap belt snug and low below the abdomen and across the strong bones of the hips. Place the shoulder belt across the chest and away from the neck. Never place the shoulder belt behind the back or under the arm.
NOTE: These devices are not a substitute for proper seat belt placement by the occupant. The seat belt still must be worn snugly and positioned properly.
The pretensioners are triggered by the Occupant Restraint Controller (ORC). Like the air bags, the pretensioners are single use items. A deployed pretensioner or a deployed air bag must be replaced immediately.
Energy Management Feature
The front outboard seat belt system is equipped with an Energy Management feature that may help further reduce the risk of injury in the event of a collision. The seat belt system has a retractor assembly that is designed to release webbing in a controlled manner.
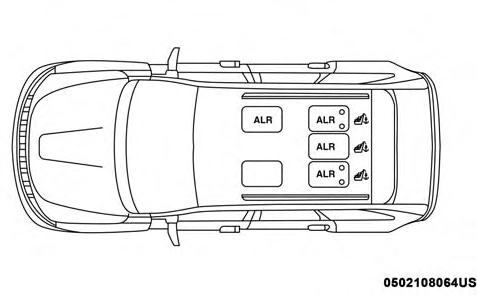
Switchable Automatic Locking Retractor (ALR)
The seat belts in the passenger seating positions are equipped with a Switchable Automatic Locking Retractor (ALR) which is used to secure a child restraint system. For additional information, refer to “Installing Child Restraints Using The Vehicle Seat Belt” under the “Child Restraints” section of this manual. The figure below illustrates the locking feature for each seating position.

Automatic Locking Retractor (ALR) Locations
If the passenger seating position is equipped with an ALR and is being used for normal usage, only pull the seat belt webbing out far enough to comfortably wrap around the occupant’s mid-section so as to not activate the ALR. If the ALR is activated, you will hear a clicking sound as the seat belt retracts. Allow the webbing to retract completely in this case and then carefully pull out only the amount of webbing necessary to comfortably wrap around the occu- pant’s mid-section. Slide the latch plate into the buckle until you hear a "click."
In Automatic Locking Mode, the shoulder belt is automati- cally pre-locked. The seat belt will still retract to remove any slack in the shoulder belt. Use the Automatic Locking Mode anytime a child restraint is installed in a seating position that has a seat belt with this feature. Children 12 years old and under should always be properly restrained in the rear seat of a vehicle with a rear seat.
How To Disengage The Automatic Locking Mode
Unbuckle the combination lap/shoulder belt and allow it to retract completely to disengage the Automatic Locking Mode and activate the vehicle sensitive (emergency) lock- ing mode.
How To Engage The Automatic Locking Mode
Supplemental Active Head Restraints (AHR)
These head restraints are passive, deployable components, and vehicles with this equipment cannot be readily iden- tified by any markings, only through visual inspection of the head restraint. The head restraint will be split in two halves, with the front half being soft foam and trim, the back half being decorative plastic.
How The Active Head Restraints (AHR) Work
The Occupant Restraint Controller (ORC) determines whether the severity or type of rear impact will require the Active Head Restraints (AHR) to deploy. If a rear impact requires deployment, both the driver and front passenger seat AHRs will be deployed.
When AHRs deploy during a rear impact, the front half of the head restraint extends forward to minimize the gap between the back of the occupant’s head and the AHR. This system is designed to help prevent or reduce the extent of injuries to the driver and front passenger in certain types of rear impacts.
NOTE: The Active Head Restraints (AHR) may or may not deploy in the event of a front or side impact. However, if during a front impact, a secondary rear impact occurs, the AHR may deploy based on the severity and type of the impact.
Active Head Restraint (AHR) Components:
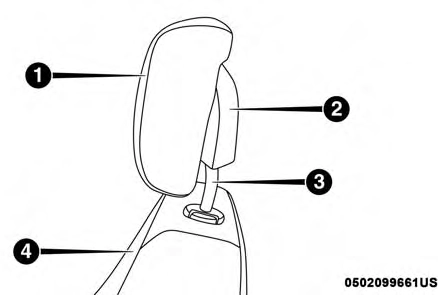
Active Head Restraint (AHR) Components
4 — Seat Back
NOTE: For more information on properly adjusting and positioning the head restraint, refer to “Head Restraints” in “Getting To Know Your Vehicle.”
Resetting Active Head Restraints (AHR)
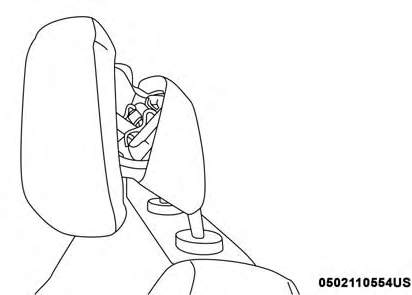
Active Head Restraint (AHR) Deployed
If the Active Head Restraints are triggered during a colli- sion, the front half of the head restraint will be extended forward and separated from the rear half of the head restraint (See Image). Do not drive your vehicle after the AHRs have deployed. The head restraint must be reset into the original position to best protect the occupant for all types of collisions. An authorized FCA US LLC dealer must reset the AHRs on the driver’s and front passenger’s seat before driving. Personally attempting to reset the AHRs may result in damage to the AHRs that could impair their function.
Some of the safety features described in this section may be standard equipment on some models, or may be optional equipment on others. If you are not sure, ask an authorized dealer.
The air bag system must be ready to protect you in a collision. The Occupant Restraint Controller (ORC) moni- tors the internal circuits and interconnecting wiring asso- ciated with the electrical Air Bag System Components. Your vehicle may be equipped with the following Air Bag System Components:
Air Bag System Components
 Air Bag Warning Light
Air Bag Warning Light
The ORC monitors the readiness of the electronic parts of the air bag system whenever the ignition switch is in the START or ON/RUN position. If the ignition switch is in the OFF position or in the
ACC position, the air bag system is not on and the air bags will not inflate.
The ORC contains a backup power supply system that may deploy the air bag system even if the battery loses power or it becomes disconnected prior to deployment.
The ORC turns on the Air Bag Warning Light in the instrument panel for approximately four to eight seconds for a self-check when the ignition switch is first in the ON/RUN position. After the self-check, the Air Bag Warn- ing Light will turn off. If the ORC detects a malfunction in any part of the system, it turns on the Air Bag Warning Light, either momentarily or continuously. A single chime
NOTE: If the speedometer, tachometer, or any engine related gauges are not working, the Occupant Restraint Controller (ORC) may also be disabled. In this condition the air bags may not be ready to inflate for your protection. Have an authorized dealer service the air bag system immediately.
will sound to alert you if the light comes on again after 5
initial startup.
The ORC also includes diagnostics that will illuminate the instrument panel Air Bag Warning Light if a malfunction is detected that could affect the air bag system. The diagnos- tics also record the nature of the malfunction. While the air bag system is designed to be maintenance free, if any of the following occurs, have an authorized dealer service the air bag system immediately.
The Air Bag Warning Light does not come on during the four to eight seconds when the ignition switch is first in the ON/RUN position.
The Air Bag Warning Light remains on after the four to eight-second interval.
The Air Bag Warning Light comes on intermittently or remains on while driving.
Redundant Air Bag Warning Light
If a fault with the Air Bag Warning Light is detected, which could affect the Supplemental Restraint System (SRS), the Redundant Air Bag Warning Light will illuminate on the instrument
panel. The Redundant Air Bag Warning Light will stay on until the fault is cleared. In addition, a single chime will sound to alert you that the Redundant Air Bag Warning
Light has come on and a fault has been detected. If the Redundant Air Bag Warning Light comes on intermittently or remains on while driving have an authorized dealer service the vehicle immediately.
For additional information regarding the Redundant Air Bag Warning Light refer to “Getting To Know Your Instru- ment Panel” section of this manual.
Front Air Bags
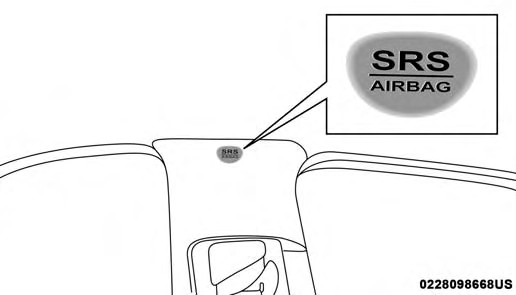
This vehicle has front air bags and lap/shoulder belts for both the driver and front passenger. The front air bags are a supplement to the seat belt restraint systems. The driver front air bag is mounted in the center of the steering wheel. The passenger front air bag is mounted in the instrument panel, above the glove compartment. The words “SRS AIRBAG” or “AIRBAG” are embossed on the air bag covers.
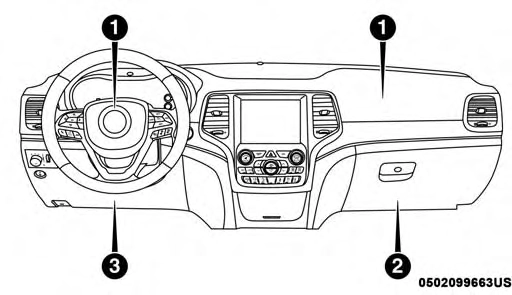
Front Air Bag/Knee Bolster Locations
1 — Driver And Passenger Front Air Bags 2 — Passenger Knee Impact Bolster
3 — Driver Knee Impact Bolster/Supplemental Knee Air Bag
This vehicle may be equipped with a driver and/or front passenger seat belt buckle switch that detects whether the driver or front passenger seat belt is buckled. The seat belt buckle switch may adjust the inflation rate of the Ad- vanced Front Air Bags.
Driver And Passenger Front Air Bag Features
The Advanced Front Air Bag system has multistage driver and front passenger air bags. This system provides output appropriate to the severity and type of collision as deter- mined by the Occupant Restraint Controller (ORC), which may receive information from the front impact sensors (if equipped) or other system components.
The first stage inflator is triggered immediately during an impact that requires air bag deployment. A low energy output is used in less severe collisions. A higher energy output is used for more severe collisions.
Front Air Bag Operation
Front Air Bags are designed to provide additional protec- tion by supplementing the seat belts. Front air bags are not expected to reduce the risk of injury in rear, side, or rollover collisions. The front air bags will not deploy in all frontal collisions, including some that may produce sub- stantial vehicle damage — for example, some pole colli- sions, truck underrides, and angle offset collisions.
On the other hand, depending on the type and location of impact, front air bags may deploy in crashes with little vehicle front-end damage but that produce a severe initial deceleration.
Because air bag sensors measure vehicle deceleration over time, vehicle speed and damage by themselves are not good indicators of whether or not an air bag should have deployed.
Seat belts are necessary for your protection in all collisions, and also are needed to help keep you in position, away from an inflating air bag.
When the ORC detects a collision requiring the front air bags, it signals the inflator units. A large quantity of non-toxic gas is generated to inflate the front air bags.
The steering wheel hub trim cover and the upper passen- ger side of the instrument panel separate and fold out of the way as the air bags inflate to their full size. The front air bags fully inflate in less time than it takes to blink your eyes. The front air bags then quickly deflate while helping to restrain the driver and front passenger.
Knee Impact Bolsters
The Knee Impact Bolsters help protect the knees of the driver and front passenger, and position the front occu- pants for improved interaction with the front air bags.
Supplemental Driver Knee Air Bag
This vehicle is equipped with a Supplemental Driver Knee Air Bag mounted in the instrument panel below the steering column. The Supplemental Driver Knee Air Bag provides enhanced protection during a frontal impact by working together with the seat belts, pretensioners, and front air bags.
The SABs may help to reduce the risk of occupant injury during certain side impacts, in addition to the injury reduction potential provided by the seat belts and body structure.

Supplemental Side Air Bags 5
Supplemental Seat-Mounted Side Air Bags (SABs)
This vehicle is equipped with Supplemental Seat-Mounted Side Air Bags (SABs).
Supplemental Seat-Mounted Side Air Bags (SABs) are located in the outboard side of the front seats. The SABs are marked with “SRS AIRBAG” or “AIRBAG” on a label or on the seat trim on the outboard side of the seats.
Front Supplemental Seat-Mounted Side Air Bag Label
When the SAB deploys, it opens the seam on the outboard side of the seatback’s trim cover. The inflating SAB deploys through the seat seam into the space between the occupant and the door. The SAB moves at a very high speed and with such a high force that it could injure occupants if they are not seated properly, or if items are positioned in the area where the SAB inflates. Children are at an even greater risk of injury from a deploying air bag.
Supplemental Side Air Bag Inflatable Curtains (SABICs)
This vehicle is equipped with Supplemental Side Air Bag Inflatable Curtains (SABICs).
Supplemental Side Air Bag Inflatable Curtains (SABICs) are located above the side windows. The trim covering the SABICs is labeled “SRS AIRBAG” or “AIRBAG.”
Supplemental Side Air Bag Inflatable Curtain (SABIC) Label Location
SABICs may help reduce the risk of head and other injuries to front and rear seat outboard occupants in certain side impacts, in addition to the injury reduction potential provided by the seat belts and body structure.
The SABIC deploys downward, covering the side win- dows. An inflating SABIC pushes the outside edge of the headliner out of the way and covers the window. The SABICs inflate with enough force to injure occupants if
they are not belted and seated properly, or if items are positioned in the area where the SABICs inflate. Children are at an even greater risk of injury from a deploying air bag.
The SABICs may help reduce the risk of partial or complete ejection of vehicle occupants through side windows in certain side impact events.
Side Impacts
The Side Air Bags are designed to activate in certain side impacts. The Occupant Restraint Controller (ORC) deter- mines whether the deployment of the Side Air Bags in a particular impact event is appropriate, based on the sever- ity and type of collision. The side impact sensors aid the ORC in determining the appropriate response to impact
events. The system is calibrated to deploy the Side Air Bags 5
on the impact side of the vehicle during impacts that require Side Air Bag occupant protection. In side impacts, the Side Air Bags deploy independently; a left side impact deploys the left Side Air Bags only and a right-side impact deploys the right Side Air Bags only. Vehicle damage by itself is not a good indicator of whether or not Side Air Bags should have deployed.
The Side Air Bags will not deploy in all side collisions, including some collisions at certain angles, or some side collisions that do not impact the area of the passenger compartment. The Side Air Bags may deploy during angled or offset frontal collisions where the front air bags deploy.
Side Air Bags are a supplement to the seat belt restraint system. Side Air Bags deploy in less time than it takes to blink your eyes.
NOTE: Air bag covers may not be obvious in the interior trim, but they will open during air bag deployment.
Rollover Events
Side Air Bags are designed to activate in certain rollover events. The ORC determines whether the deployment of the Side Air Bags in a particular rollover event is appro- priate, based on the severity and type of collision. Vehicle damage by itself is not a good indicator of whether or not Side Air Bags should have deployed.
The Side Air Bags will not deploy in all rollover events. The rollover sensing system determines if a rollover event may be in progress and whether deployment is appropriate. In the event the vehicle experiences a rollover or near rollover event, and deployment of the Side Air Bags is appropriate, the rollover sensing system will also deploy the seat belt pretensioners on both sides of the vehicle.
If A Deployment Occurs
The SABICs may help reduce the risk of partial or complete
The front air bags are designed to deflate immediately after 5
ejection of vehicle occupants through side windows in certain rollover or side impact events.
Air Bag System Components
NOTE: The Occupant Restraint Controller (ORC) monitors the internal circuits and interconnecting wiring associated with electrical Air Bag System Components listed below:
Air Bag Warning Lightdeployment.
NOTE: Front and/or side air bags will not deploy in all collisions. This does not mean something is wrong with the air bag system.
If you do have a collision which deploys the air bags, any or all of the following may occur:
The air bag material may sometimes cause abrasions and/or skin reddening to the occupants as the air bags deploy and unfold. The abrasions are similar to friction rope burns or those you might get sliding along a carpet or gymnasium floor. They are not caused by contact with chemicals. They are not permanent and normally heal quickly. However, if you haven’t healed significantly within a few days, or if you have any blistering, see your doctor immediately.
As the air bags deflate, you may see some smoke-like particles. The particles are a normal by-product of the process that generates the non-toxic gas used for air bag inflation. These airborne particles may irritate the skin, eyes, nose, or throat. If you have skin or eye irritation, rinse the area with cool water. For nose or throat irritation, move to fresh air. If the irritation continues, see your doctor. If these particles settle on your clothing, follow the garment manufacturer’s instructions for cleaning.
Do not drive your vehicle after the air bags have deployed. If you are involved in another collision, the air bags will not be in place to protect you.
NOTE:
Air bag covers may not be obvious in the interior trim, but they will open during air bag deployment.
After any collision, the vehicle should be taken to an authorized dealer immediately.
Enhanced Accident Response System
In the event of an impact, if the communication network remains intact, and the power remains intact, depending on the nature of the event, the ORC will determine whether to have the Enhanced Accident Response System perform the following functions:
Turn on the interior lights, which remain on as long as the battery has power or for 15 minutes from the intervention of the Enhanced Accident Response Sys- tem.
Your vehicle may also be designed to perform any of these other functions in response to the Enhanced Accident Response System:
Turn off the Fuel Filter Heater, Turn off the HVAC Blower Motor, Close the HVAC Circulation Door
NOTE: After an accident, remember to cycle the ignition to the STOP (OFF/LOCK) position and remove the key from the ignition switch to avoid draining the battery. Carefully check the vehicle for fuel leaks in the engine compartment and on the ground near the engine compart- ment and fuel tank before resetting the system and starting the engine. If there are no fuel leaks or damage to the
vehicle electrical devices (e.g. headlights) after an accident, 5
reset the system by following the procedure described below. If you have any doubt, contact an authorized dealer.
Enhanced Accident Response System Reset Procedure
In order to reset the Enhanced Accident Response System functions after an event, the ignition switch must be changed from ignition START or ON/RUN to ignition OFF. Carefully check the vehicle for fuel leaks in the engine compartment and on the ground near the engine compart- ment and fuel tank before resetting the system and starting the engine.
Maintaining Your Air Bag System
Modifications to any part of the air bag system could cause it to fail when you need it. You could be injured if the air bag system is not there to protect you. Do not modify the components or wiring, in- cluding adding any kind of badges or stickers to the steering wheel hub trim cover or the upper passenger side of the instrument panel. Do not modify the front bumper, vehicle body structure, or add aftermarket side steps or running boards.
It is dangerous to try to repair any part of the air bag
system yourself. Be sure to tell anyone who works on your vehicle that it has an air bag system.
Do not attempt to modify any part of your air bag system. The air bag may inflate accidentally or may not function properly if modifications are made. Take your vehicle to an authorized dealer for any air bag system service. If your seat, including your trim cover and cushion, needs to be serviced in any way (including removal or loosening/tightening of seat attachment bolts), take the vehicle to an authorized
Event Data Recorder (EDR)
This vehicle is equipped with an event data recorder (EDR). The main purpose of an EDR is to record, in certain crash or near crash-like situations, such as an air bag deployment or hitting a road obstacle, data that will assist in understanding how a vehicle’s systems performed. The EDR is designed to record data related to vehicle dynamics and safety systems for a short period of time, typically 30 seconds or less. The EDR in this vehicle is designed to record such data as:
Whether or not the driver and passenger safety belts were buckled/fastened;
How far (if at all) the driver was depressing the accel- erator and/or brake pedal; and,
These data can help provide a better understanding of the circumstances in which crashes and injuries occur.
NOTE: EDR data are recorded by your vehicle only if a non-trivial crash situation occurs; no data are recorded by the EDR under normal driving conditions and no personal data (e.g., name, gender, age, and crash location) are recorded. However, other parties, such as law enforcement,
Children 12 years or younger should ride properly buckled up in a rear seat, if available. According to crash statistics, children are safer when properly restrained in the rear seats rather than in the front.
could combine the EDR data with the type of personally 5
identifying data routinely acquired during a crash investi- gation.
To read data recorded by an EDR, special equipment is required, and access to the vehicle or the EDR is needed. In addition to the vehicle manufacturer, other parties, such as law enforcement, that have the special equipment, can read the information if they have access to the vehicle or the EDR.
Everyone in your vehicle needs to be buckled up at all times, including babies and children. Every state in the United States, and every Canadian province, requires that small children ride in proper restraint systems. This is the law, and you can be prosecuted for ignoring it.
There are different sizes and types of restraints for children from newborn size to the child almost large enough for an adult safety belt. Always check the child seat Owner’s Manual to make sure you have the correct seat for your child. Carefully read and follow all the instructions and warnings in the child restraint Owner’s Manual and on all the labels attached to the child restraint.
Before buying any restraint system, make sure that it has a label certifying that it meets all applicable Safety Stan- dards. You should also make sure that you can install it in the vehicle where you will use it.
NOTE:
For additional information, refer to http:// www.nhtsa.gov/parents-and-caregivers or call: 1–888– 327–4236
Canadian residents should refer to Transport Canada’s website for additional information: http:// www.tc.gc.ca/eng/motorvehiclesafety/safedrivers- childsafety-index-53.htm
Summary Of Recommendations For Restraining Children In Vehicles
|
Child Size, Height, Weight Or Age |
Recommended Type Of Child Re- straint |
|
|
Infants and Toddlers |
Children who are two years old or younger and who have not reached the height or weight limits of their child restraint |
Either an Infant Carrier or a Convert- ible Child Restraint, facing rearward in a rear seat of the vehicle |
|
Small Children |
Children who are at least two years old or who have outgrown the height or weight limit of their rear- facing child restraint |
Forward-Facing Child Restraint with a five-point Harness, facing forward in a rear seat of the vehicle |
Infant And Child Restraints
Safety experts recommend that children ride rear-facing in the vehicle until they are two years old or until they reach either the height or weight limit of their rear-facing child restraint. Two types of child restraints can be used rear- facing: infant carriers and convertible child seats.
The infant carrier is only used rear-facing in the vehicle. It is recommended for children from birth until they reach the weight or height limit of the infant carrier. Convertible child seats can be used either rear-facing or forward-facing in the vehicle. Convertible child seats often have a higher weight limit in the rear-facing direction than infant carriers do, so they can be used rear-facing by children who have outgrown their infant carrier but are still less than at least two years old. Children should remain rear-facing until they reach the highest weight or height allowed by their convertible child seat.
Older Children And Child Restraints
Children who are two years old or who have outgrown their rear-facing convertible child seat can ride forward- facing in the vehicle. Forward-facing child seats and con- vertible child seats used in the forward-facing direction are
for children who are over two years old or who have outgrown the rear-facing weight or height limit of their rear-facing convertible child seat. Children should remain in a forward-facing child seat with a harness for as long as possible, up to the highest weight or height allowed by the child seat.
All children whose weight or height is above the forward- facing limit for the child seat should use a belt-positioning booster seat until the vehicle’s seat belts fit properly. If the child cannot sit with knees bent over the vehicle’s seat cushion while the child’s back is against the seatback, they should use a belt-positioning booster seat. The child and belt-positioning booster seat are held in the vehicle by the seat belt.
Children Too Large For Booster Seats
Children who are large enough to wear the shoulder belt comfortably, and whose legs are long enough to bend over the front of the seat when their back is against the seatback, should use the seat belt in a rear seat. Use this simple 5-step test to decide whether the child can use the vehicle’s seat belt alone:
vehicle seat?
If the answer to any of these questions was “no,” then the child still needs to use a booster seat in this vehicle. If the child is using the lap/shoulder belt, check seat belt fit periodically and make sure the seat belt buckle is latched. A child’s squirming or slouching can move the belt out of position. If the shoulder belt contacts the face or neck, move the child closer to the center of the vehicle, or use a booster seat to position the seat belt on the child correctly.
Recommendations For Attaching Child Restraints
|
Restraint Type |
Combined Weight of the Child + Child Restraint |
Use Any Attachment Method Shown With An “X” Below |
|||
|
LATCH – Lower Anchors Only |
Seat Belt Only |
LATCH – Lower Anchors + Top Tether Anchor |
Seat Belt + Top Tether Anchor |
||
|
Rear-Facing Child Restraint |
Up to 65 lbs (29.5 kg) |
X |
X |
||
|
Rear-Facing Child Restraint |
More than 65 lbs (29.5 kg) |
X |
|||
|
Forward-Facing Child Restraint |
Up to 65 lbs (29.5 kg) |
X |
X |
||
|
Forward-Facing Child Restraint |
More than 65 lbs (29.5 kg) |
X |
Lower Anchors And Tethers For CHildren (LATCH) Restraint System
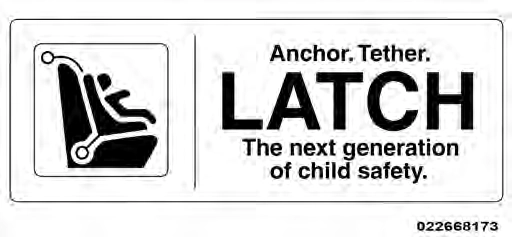
LATCH Label
Your vehicle is equipped with the child restraint anchorage system called LATCH, which stands for Lower Anchors and Tethers for CHildren. The LATCH system has three vehicle anchor points for installing LATCH-equipped child seats. There are two lower anchorages located at the back of the seat cushion where it meets the seatback and one top tether anchorage located behind the seating position. These anchorages are used to install LATCH-equipped child seats without using the vehicle’s seat belts. Some seating posi- tions may have a top tether anchorage but no lower anchorages. In these seating positions, the seat belt must be
used with the top tether anchorage to install the child restraint. Please see the following table for more information.
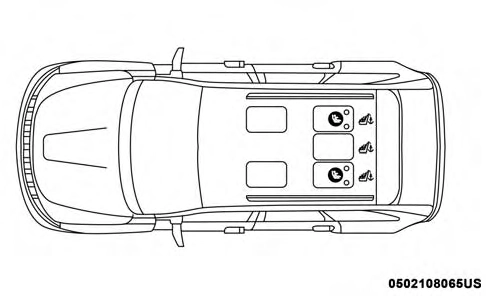
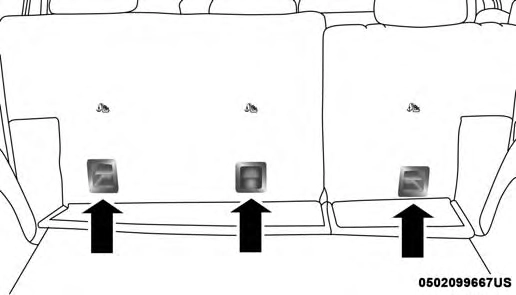
LATCH Positions For Installing Child Restraints In This Vehicle
 5
5
LATCH Positions For Installing Child Restraints In This Vehicle

 Lower Anchorage Symbol (2 Anchorages Per Seating Position) Top Tether Anchorage Symbol
|
Frequently Asked Questions About Installing Child Restraints With LATCH |
||
|
What is the weight limit (child’s weight + weight of the child re- straint) for using the LATCH anchor- age system to attach the child re- straint? |
65 lbs (29.5 kg) |
Use the LATCH anchorage system until the combined weight of the child and the child restraint is 65 lbs (29.5 kg). Use the seat belt and tether anchor instead of the LATCH system once the combined weight is more than 65 lbs (29.5 kg). |
|
Can the LATCH anchorages and the seat belt be used together to attach a rear-facing or forward-facing child restraint? |
No |
Do not use the seat belt when you use the LATCH anchorage system to attach a rear-facing or forward-facing child restraint. Booster seats may be attached to the LATCH anchorages if allowed by the booster seat manufacturer. See your booster seat owner’s manual for more information. |
|
Can a child seat be installed in the center position using the inner LATCH lower anchorages? |
No |
Use the seat belt and tether anchor to install a child seat in the center seat- ing position. |
Locating The LATCH Anchorages
 The lower anchorages are round bars that are found at the rear of the seat cushion where it meets the seatback, below the anchorage sym- bols on the seatback. They are just visible when
you lean into the rear seat to install the child restraint. You will easily feel them if you run your finger along the gap between the seatback and seat cushion.
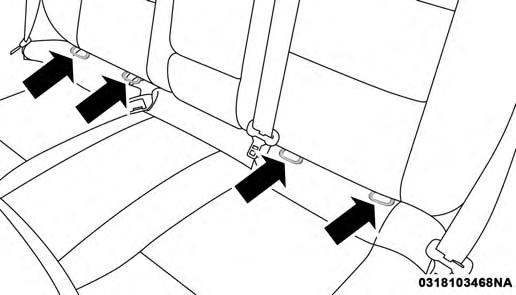
LATCH Anchorages
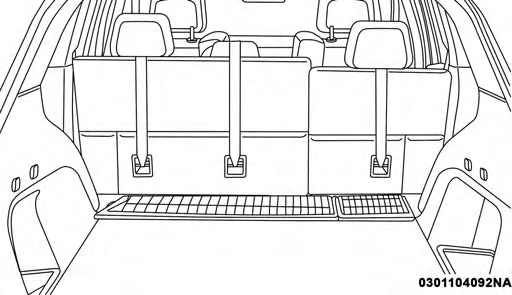
Locating The Upper Tether Anchorages
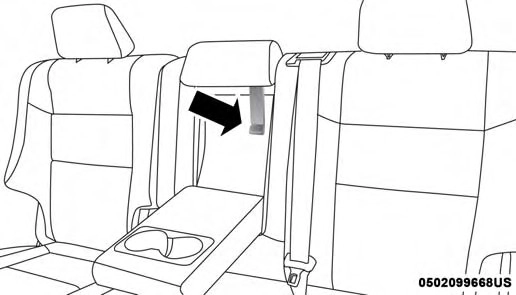
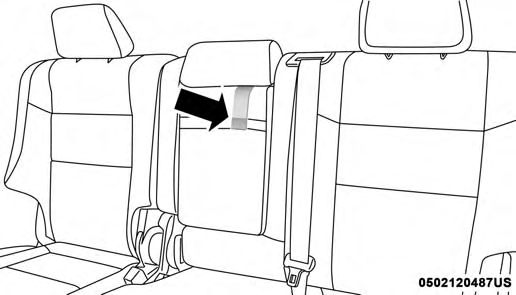
 There are tether strap anchorages behind each rear seating position located on the back of the seat. To access them, pull the carpeted floor panel away from the seat back, this will expose the top
tether strap anchorages.

Pulling Down The Carpet Floor Panel To Access Top Tether Strap Anchorage

Pulling Down The Carpet Floor Panel To Access Top Tether Strap Anchorage
LATCH-compatible child restraint systems will be equipped with a rigid bar or a flexible strap on each side. Each will have a hook or connector to attach to the lower anchorage and a way to tighten the connection to the anchorage. Forward-facing child restraints and some rear- facing child restraints will also be equipped with a tether strap. The tether strap will have a hook at the end to attach to the top tether anchorage and a way to tighten the strap after it is attached to the anchorage.
Center Seat LATCH
Vehicle With A Center Arm Rest Tether
For rear-facing child restraints secured in the center seat position with the vehicle seat belts, the rear center seat position has an armrest tether that secures the arm rest in the upward position.
Center Seat Position Arm Rest Tether
Center Seat Position Arm Rest Tether
Always follow the directions of the child restraint manu- facturer when installing your child restraint. Not all child restraint systems will be installed as described here.
To Install A LATCH-Compatible Child Restraint
If the selected seating position has a Switchable Automatic Locking Retractor (ALR) seat belt, stow the seat belt, following the instructions below. See the section “Installing Child Restraints Using the Vehicle Seat Belt” to check what type of seat belt each seating position has.
tions to attach a tether anchor.
tether strap of the child seat so that you can more easily attach the hooks or connectors to the vehicle anchor- ages.
How To Stow An Unused Switchable-ALR (ALR) Seat Belt:
When using the LATCH attaching system to install a child restraint, stow all ALR seat belts that are not being used by other occupants or being used to secure child restraints. An unused belt could injure a child if they play with it and accidentally lock the seat belt retractor. Before installing a child restraint using the LATCH system, buckle the seat belt behind the child restraint and out of the child’s reach. If the buckled seat belt interferes with the child restraint installation, instead of buckling it behind the child re- straint, route the seat belt through the child restraint belt path and then buckle it. Do not lock the seat belt. Remind all children in the vehicle that the seat belts are not toys and that they should not play with them.
Installing Child Restraints Using The Vehicle Seat Belt
Child restraint systems are designed to be secured in vehicle seats by lap belts or the lap belt portion of a lap/shoulder belt.
The seat belts in the passenger seating positions are equipped with a Switchable Automatic Locking Retractor (ALR) that is designed to keep the lap portion of the seat
Lap/Shoulder Belt Systems For Installing Child Restraints In This Vehicle
belt tight around the child restraint so that it is not 5
necessary to use a locking clip. The ALR retractor can be “switched” into a locked mode by pulling all of the webbing out of the retractor and then letting the webbing retract back into the retractor. If it is locked, the ALR will make a clicking noise while the webbing is pulled back into the retractor.
Refer to the “Automatic Locking Mode” description in “Switchable Automatic Locking Retractors (ALR)” under “Occupant Restraint Systems” for additional information on ALR.
Please see the table below and the following sections for more information.
Automatic Locking Retractor (ALR) Locations
|
Frequently Asked Questions About Installing Child Restraints With Seat Belts |
||
|
What is the weight limit (child’s weight + weight of the child re- straint) for using the Tether Anchor with the seat belt to attach a forward facing child restraint? |
Weight limit of the Child Restraint |
Always use the tether anchor when using the seat belt to install a for- ward facing child restraint, up to the recommended weight limit of the child restraint. |
|
Can the rear-facing child restraint touch the back of the front passenger seat? |
Yes |
Contact between the front passenger seat and the child restraint is al- lowed, if the child restraint manufac- turer also allows contact. |
|
Can the rear head restraints be re- moved? |
Yes |
The head restraint may be removed in only the center seating position if it interferes with the installation of the child restraint. Refer to “Head Restraints” in “Get- ting To Know Your Vehicle” for fur- ther information. |
|
Can the buckle stalk be twisted to tighten the seat belt against the belt path of the child restraint? |
No |
Do not twist the buckle stalk in a seating position with an ALR retrac- tor. |
Installing A Child Restraint With A Switchable Automatic Locking Retractor (ALR):
Child restraint systems are designed to be secured in vehicle seats by lap belts or the lap belt portion of a lap/shoulder belt.
against the child seat. 5
1. Place the child seat in the center of the seating position. For some second row seats, you may need to recline the seat and/or raise the head restraint (if adjustable) to get a better fit. If the rear seat can be moved forward and rearward in the vehicle, you may wish to move it to its rear-most position to make room for the child seat. You may also move the front seat forward to allow more room for the child seat.
Any seat belt system will loosen with time, so check the belt occasionally, and pull it tight if necessary.
Installing Child Restraints Using The Top Tether Anchorage:
(Continued)

Pulling Down The Carpet Floor Panel To Access Top Tether Strap Anchorage
Top Tether Strap Anchorage (Located On Seatback)
Top Tether Strap Mounting
Air Bags deploying in the front seat could harm your pet. An unrestrained pet will be thrown about and possibly injured, or injure a passenger during panic braking or in a collision.
Pets should be restrained in the rear seat (if equipped) in pet harnesses or pet carriers that are secured by seat belts.
Download Manual