UCONNECT SETTINGS
The Uconnect system uses a combination of buttons on the touchscreen and buttons on the faceplate located on the center of the instrument panel. These buttons allow you to access and change the Customer Programmable Features. Many features can vary by vehicle.
Buttons on the faceplate are located below and/or beside the Uconnect system in the center of the instrument panel. In addition, there is a Scroll/Enter control knob located on the right side. Turn the control knob to scroll through menus and change settings. Push the center of the control knob one or more times to select or change a setting.
Your Uconnect system may also have Screen Off and Mute buttons on the faceplate.
Push the Screen Off button on the faceplate to turn off the Uconnect screen. Push the button again or tap the screen to turn the screen on.
Press the Back Arrow button to exit out of a Menu or certain option on the Uconnect system.
CUSTOMER PROGRAMMABLE FEATURES
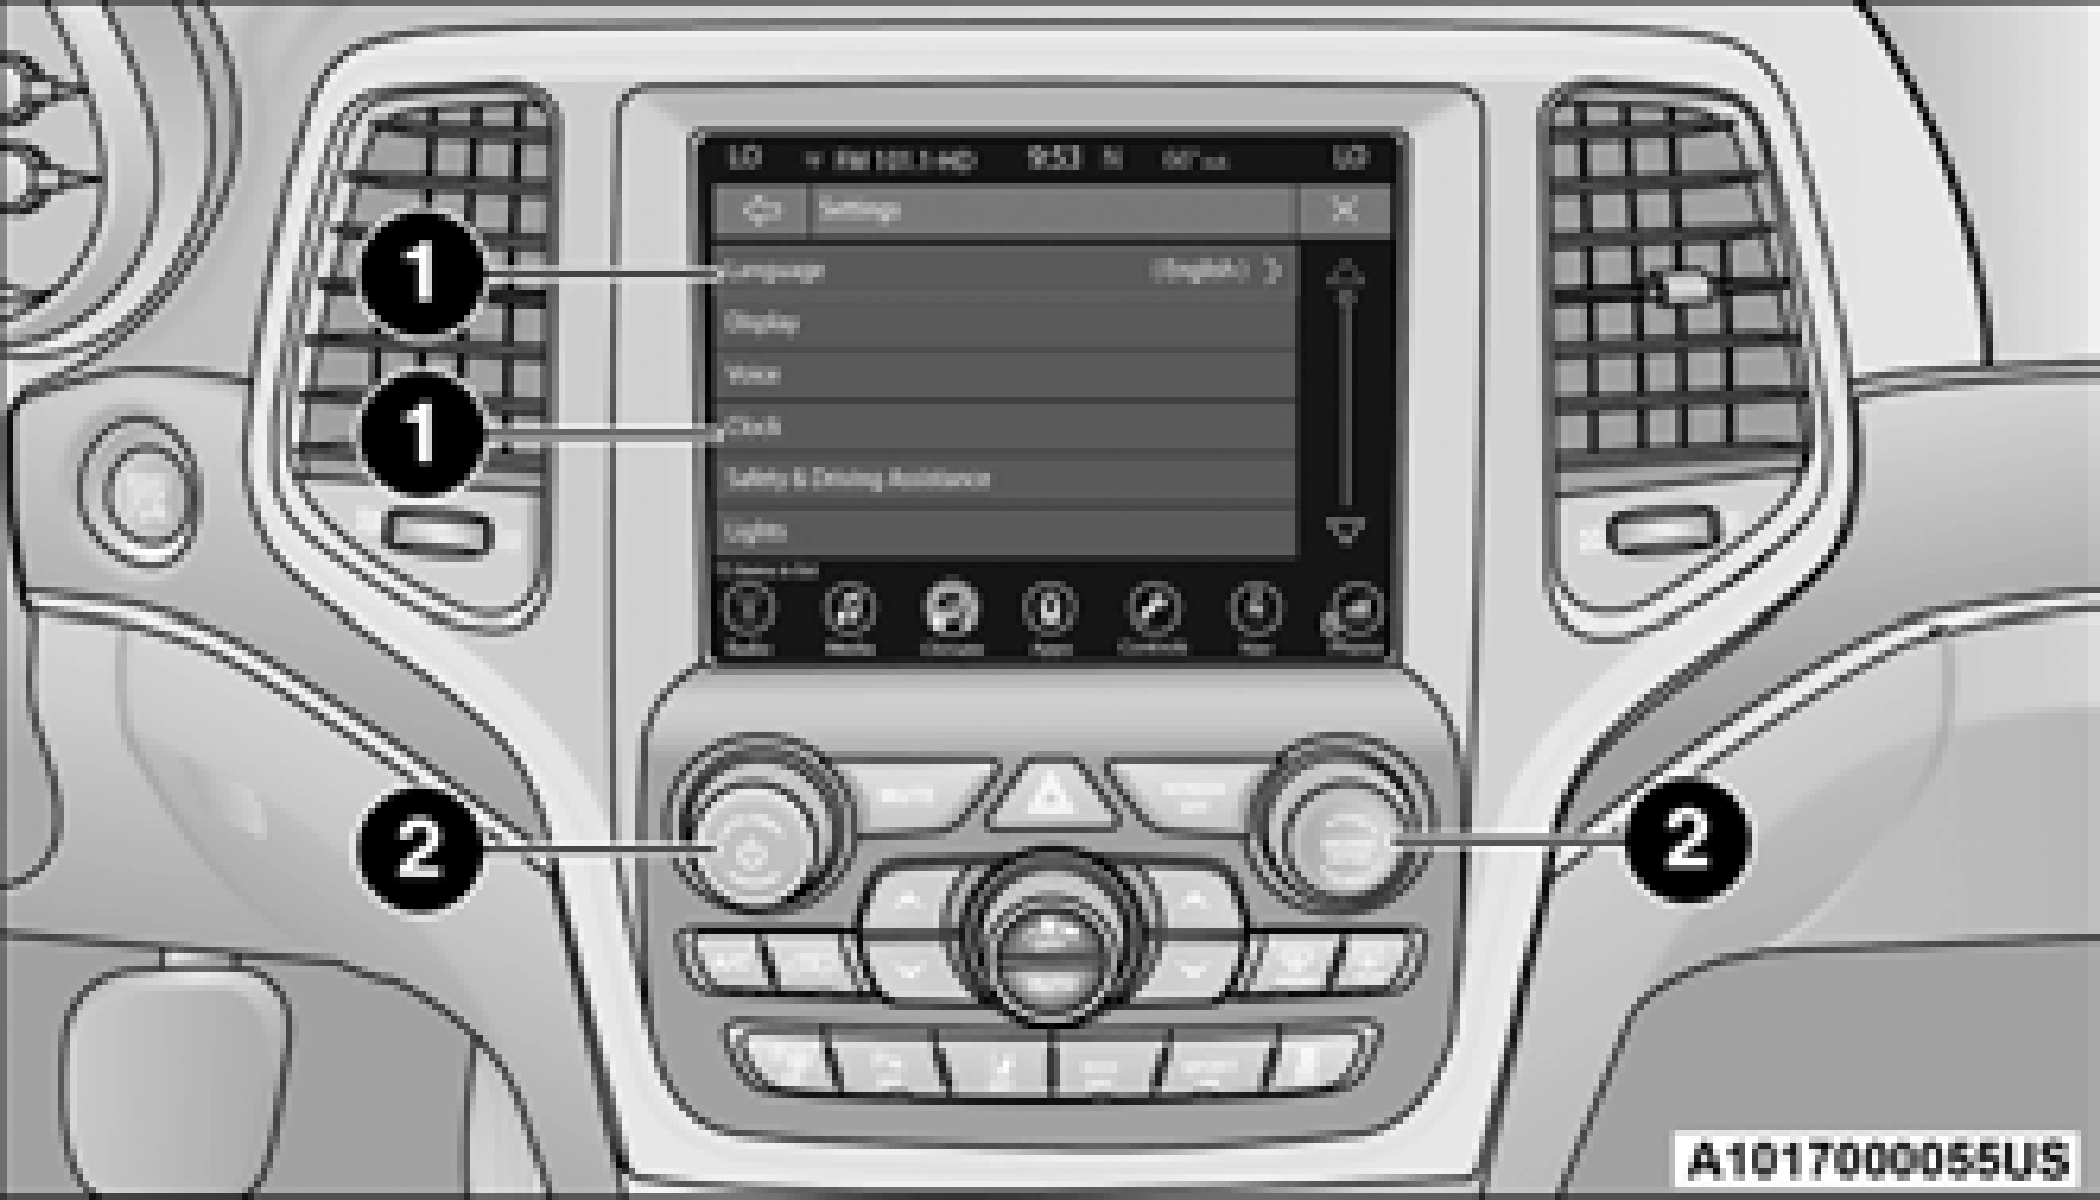
Buttons On Touchscreen
1 — Uconnect Buttons On The Touchscreen 2 — Uconnect Buttons On The Faceplate
Press the  Apps button, then press the Settings button on the touchscreen to display the menu setting screen. In this mode the Uconnect system allows you to access programmable features.
When making a selection, press one button on the touchscreen to enter the desired menu.
Language
Once in the desired mode, press and release the preferred setting option until a check mark appears next to the setting, showing that setting has been selected. Once the setting is complete, either press the Back Arrow button on the touchscreen to return to the previous menu, or press the X button on the touchscreen to close out of the settings screen. Pressing the Up or Down Arrow buttons on the right side of
the screen will allow you to toggle up or down through the available settings.
Availability of settings, setting names, and menu options can vary depending on vehicle features, equipped Uconnect system, and the currently installed software.
When the Language button is pressed on the touchscreen, the system displays the different language options. Once an option is selected, the system will display in the chosen language.
|
Setting Name |
Description |
|
Language |
This setting will change the language of the Uconnect system. The available languages are English, Français, and Español. |
When the Display button is pressed on the touchscreen, the system will display the options related to the theme (if equipped), brightness, and color of the touchscreen. The available settings are:
5
When the Units button is pressed on the touchscreen, the system displays the different measurement options. The selected unit of measurement will display in the instrument cluster display and navigation system (if equipped). The available settings are:
|
Setting Name |
Description |
|
US |
This setting will change the unit of measurement on the display to US. |
|
Metric |
This setting will change the unit of measurement on the display to Metric. |
|
Custom |
This setting changes the “Speed” (MPH or km/h), “Distance” (mi or km), “Fuel Consumption” (MPG [US], MPG [UK], L/100 km, or km/L), “Pressure” (psi, kPa, or bar), and “Temperature” (°C or °F) units of measurement independently. |
When the Voice button is pressed on the touchscreen, the system displays the options related to the vehicle’s Voice Recognition feature.
|
Setting Name |
Description |
|
Voice Response Length |
This setting will change the response length for the Voice Recognition system. The “Brief” setting provides a shortened audio description from the system. The “Detailed” setting provides the full audio description from the system. |
|
Show Command List |
This setting will allow you to turn the command list on or off. The “Always” setting will always show the command list. The “With Help” setting will show the command list and provide a brief description of what the command does. The “Never” setting will turn the command list off. |
When the Clock button is pressed on the touchscreen, the system displays the different options related to the vehicle’s internal clock.
5
When the Camera button is pressed on the touchscreen, the system displays the options related to the vehicle’s camera features.
|
Setting Name |
Description |
|
ParkView Backup Camera Delay |
This setting will add a delay to the rear backup camera when shifting out of reverse. |
|
Active ParkView Backup Camera Guidelines |
This setting will turn the active backup camera guidelines on or off. |
|
Fixed ParkView Backup Camera Guidelines |
This setting will turn the fixed backup camera guidelines on or off. |
When the Safety/Assistance button is selected on the touchscreen, the system displays the options related to the vehicle’s safety settings. These options will differ depending on the features equipped on the vehicle. The settings may display in list form or within subfolders on the screen. To access a subfolder, select the desired folder; the available options related to that feature will then display on the screen.
|
Setting Name |
Description |
|
Forward Collision Warning Sensitivity |
This setting will change the distance at which the Forward Collision Warning (FCW) alert sounds. The “Medium” setting will have the FCW system signal when an object is in view, and the possibility of a collision is detected. The “Near” setting will have the FCW system signal when the object is closer to the vehicle. The “Far” setting will have the FCW system signal when an object is at a far distance from the vehicle. |
|
Forward Collision Warning |
This setting will turn the Forward Collision system on or off. The “Off” setting will deactivate the FCW system. The “Warning Only” setting will provide only an audible chime when a collision is detected. The “Warning + Active Braking” setting will provide an audible chime and apply brake pressure when a collision is detected. |
5
|
Setting Name |
Description |
|
ParkView Backup Camera Active Guidelines |
This setting will turn the backup camera guidelines on or off. |
|
ParkView Backup Camera Delay |
This setting will add a delay to the rear backup camera when shifting out of reverse. |
|
Rain Sensing Auto Wipers |
This setting will turn the Rain Sensing Auto Wipers on or off. |
|
Tilt Mirrors In Reverse |
This setting will tilt the mirrors when the vehicle is place in REVERSE. |
When the Mirrors & Wipers button is pressed on the touchscreen, the system displays the options related to the vehicle’s mirrors and wipers.
|
Setting Name |
Description |
|
Tilt Side Mirrors in Reverse |
This Setting will tilt the mirrors when the vehicle is placed in REVERSE. Setting options are “On” and “Off”. |
|
Auto Folding Side Mirrors |
This setting will automatically fold the side mirrors. Setting options are “On” and “Off”. |
|
Rain Sensing Auto Wipers |
This setting will turn the Rain Sensing Auto Wipers on or off. |
|
Headlights with Wipers |
This setting will turn the headlights on when the wipers are activated. Setting options are “On” and “Off”. |
When the Lights button is pressed on the touchscreen, the system displays the options related to the vehicle’s exterior and interior lights.
When the “Daytime Running Lights” feature is selected, the daytime running lights can be turned On or Off. This feature is only allowed by law in the country of the vehicle purchased.
5
When the Doors & Locks button is pressed on the touchscreen, the system displays the options related to locking and unlocking the vehicle’s doors.
|
Setting Name |
Description |
|
Auto Unlock On Exit |
This setting will unlock the doors when any of the doors are opened from the inside. |
|
Flash Lights With Lock |
This setting will allow you to turn on or off the flashing of the lights when the Lock button is pushed on the key fob. Available settings are “On” and “Off”. |
|
Sound Horn With Lock |
This setting will sound the horn when the Lock button is pushed on the key fob. The “Off” setting will not sound the horn when the Lock button is pushed. The “1st Press” setting will sound the horn when the Lock button is pushed once. The “2nd Press” setting will sound the horn when the Lock button is pushed twice. |
|
Sound Horn With Remote Start |
This setting will sound the horn when the remote start is activated from the key fob. |
|
Remote Door Unlock, Door Lock/1st Press Of Key Fob Unlocks |
This setting will change how many pushes of the Unlock button on the key fob are needed to open all the doors. The “Driver Door” setting will only unlock the driver door on the first push on the Unlock button. The “All Doors” setting will unlock all doors on the first push of the Unlock button. |
|
Passive Entry |
This setting will allow you to turn the Passive Entry feature (Keyless Enter-N-Go) on or off. |
|
Personal Settings Linked To Key Fob |
This setting will recall preset radio stations and driver seat position that have been linked to the key fob. |
|
Power Liftgate Alert |
This setting will allow you to turn the Power Liftgate on or off. |
When Seats & Comfort button is pressed on the touchscreen, the system displays the options related to the vehicle’s comfort systems when remote start has been activated or the vehicle has been started.
When the Key Off Options button is pressed on the touchscreen, the system displays the options related to vehicle shut off. These settings will only activate when the ignition is set to OFF.
|
Setting Name |
Description |
|
Easy Exit Seat |
This setting adjusts the seats to make exiting the vehicle easier. |
|
Engine Off Power Delay |
This setting will keep certain electrical features running after the engine is turned off. When any door is opened, the electronics will deactivate. The available settings are “0 sec”, “45 sec”, “5 min”, and “10 min”. |
|
Headlight Off Delay |
This setting will allow you to set the amount of time the headlights remain on after the vehicle has been turned off. The “+” will increase the amount of time. The “-” will decrease the amount of time. |
|
Auto Entry/Exit Suspension |
This setting will automatically lower the vehicle ride height for easier entry and exit of the vehicle. |
When the Suspension button is pressed on the touchscreen, the system displays the options related to the vehicle’s suspension system.
|
Setting Name |
Selectable Options |
|
Auto Entry/Exit Suspension |
This setting will automatically lower the vehicle ride height for easier entry and exit. Selectable options are “On” and “Off”. |
|
Display Suspension Messages |
This setting will display suspension messages within the Instrument Cluster Display. Selectable options are “All” and “Warning Only”. |
|
Tire Jack Mode |
This setting will disable the suspension system to prevent auto leveling when the vehicle is on a jack for changing a tire. Selectable options are “On” and “Off”. |
|
Transport Mode |
This setting will disable the suspension system for when the vehicle is being flat towed. Selectable options are “On” and “Off”. |
|
Wheel Alignment Mode |
This setting will disable the suspension system for when the vehicle is having wheel alignment service. Selectable options are “On” and “Off”. |
When the Audio button is pressed on the touchscreen, the system displays options related to the vehicle’s sound system. These settings can change the audio location within the vehicle, adjust the bass or treble levels, and auto-play settings from an audio device or smartphone.
5
When the Phone/Bluetooth® button is pressed on the touchscreen, the system displays the options related to Bluetooth® connectivity from an external audio device or smartphone. The list of paired audio devices or smartphones can be accessed from this menu.
|
Setting Name |
Description |
|
Phone Pop-Ups Displayed In Cluster |
This setting will activate phone message pop-ups in the Instrument Cluster Display. |
|
Do Not Disturb |
This setting will open the Do Not Disturb settings menu. The following settings are “Auto Reply” (both, text, call), “Auto Reply Message” (custom, default), and “Custom Auto Reply Message” (create message). |
|
Paired Phones |
This setting will show the list of paired phones. |
|
Paired Audio Sources |
This setting will show the list of paired audio sources. |
|
Paired Phones And Audio Devices |
This setting will show the list of paired phones and audio devices. |
A subscription to SiriusXM® Satellite Radio is required for these settings to be functional.
When the SiriusXM® Setup button is pressed on the touchscreen, the system displays options related to SiriusXM® Satellite Radio. These settings can be used to skip specific radio channels and restart favorite songs from the beginning.
5
When pressing the Accessibility button of the touchscreen, the system will display the option related to the vehicle’s theater system.
|
Setting Name |
Selectable Options |
|
Video Button Readback |
This setting will announce a function prior to performing the action selected when using DVD/Blu-ray™ functions. For example, when activated, and the Play button is selected, the system will announce “Play Button Selected”, and then once pressed again, the Play button will perform its action. |
When the Restore Settings button is pressed on the touchscreen, the system displays the options related to resetting the Uconnect system back to its default settings. These settings can clear personal data and reset selected settings from other menus.
|
Setting Name |
Description |
|
Restore Settings |
This setting will return all the previously changed settings to their factory default. |
|
Reset App Drawer |
This setting will reset the app drawer to its factory default layout. |
|
Clear Personal Data |
This setting will display a pop-up that gives you the option to clear all personal data from the system, including Bluetooth® devices and presets. |
When the System Information button is pressed on the touchscreen, the system displays the radio system information.
|
Setting Name |
Description |
|
Software Licenses |
This will display the software licensing information screen. |
Download Manual