QUADRA-LIFT — IF EQUIPPED
DESCRIPTION
The Quadra-Lift air suspension system provides full time load leveling capability along with the benefit of vehicle height adjustment by the push of a button. The vehicle will automatically raise and lower the ride height to adapt to the appropriate driving conditions. At higher speeds, the vehicle will lower to an aerodynamic ride height and when operating in off-road modes, the vehicle will raise the ride height accordingly. The buttons near the terrain switch in the center console area can be used to set preferred ride height to match the appropriate conditions.
vehicle speed is below 38 mph (61 km/h). 4
When in the OR1 position, if the vehicle speed remains between 40 mph (64 km/h) and 50 mph (80 km/h) for greater than
20 seconds or if the vehicle speed exceeds 50 mph (80 km/h), the vehicle will be auto- matically lowered to NRH page 164.
0.6 inches (15 mm)) — This position provides improved aerodynamics by lowering the vehicle. The vehicle will automatically enter Aero Mode when the vehicle speed remains between 52 mph (83 km/h) and 56 mph (90 km/h) for greater than 20 seconds or if
the vehicle speed exceeds 56 mph (90 km/h). The vehicle will return to NRH from Aero Mode if the vehicle speed remains between 20 mph (32 km/h) and 25 mph (40 km/h) for greater than 20 seconds or if the vehicle speed falls below 20 mph (32 km/h). The vehicle will enter Aero Mode, regardless of vehicle speed if the vehicle is in “SPORT” mode.
speed exceeds 25 mph (40 km/h) the Entry/ Exit Mode change will be canceled. To exit Entry/Exit Mode, press the “Up” button once while in Entry/Exit Mode or drive the vehicle over 15 mph (24 km/h).
Automatic lowering of the vehicle into Entry/Exit Mode can be enabled through the Uconnect Touchscreen Radio. If this feature is enabled, the vehicle will only lower if the gear selector is in "PARK", the terrain switch is in "AUTO", the transfer case is in "AUTO” and the vehicle level should be either in Normal or Aero Mode. The vehicle will not automatically lower if the air suspension level is in OR2 or OR1. If the vehicle is equipped with Intrusion Theft Module (ITM), the lowering will be suppressed when the igni- tion is switched OFF and the door is open to prevent setting the alarm off.
The Selec-Terrain switch will automatically change the vehicle to the proper height based on the position of the Selec-Terrain switch. The height can be changed from the default
Selec-Terrain setting by normal use of the air suspension buttons page 119.
The system requires that the engine be running for all changes. When lowering the vehicle all of the doors, including the liftgate, must be closed. If a door is opened at any time while the vehicle is lowering the change will not be completed until the open door(s) is/are closed.
The Quadra-Lift air suspension system uses a lifting and lowering pattern which keeps the headlights from incorrectly shining into oncoming traffic. When raising the vehicle, the rear of the vehicle will move up first and then the front. When lowering the vehicle, the front will move down first and then the rear.
After the engine is turned off, it may be noticed that the air suspension system operates briefly; this is normal. The system is correcting the position of the vehicle to ensure a proper appearance.
To assist with changing a spare tire, the Quadra-Lift air suspension system has a feature which allows the automatic leveling to be disabled page 171.
If equipped with a touchscreen radio, all enabling/disabling of air suspension features must be done through the radio page 171.
AIR SUSPENSION MODES
The Air Suspension system has multiple modes to protect the system in unique situations:
To assist with changing a spare tire, the air suspension system has a feature which allows the automatic leveling to be disabled
page 171.
This mode is intended to be enabled with the engine running.
To assist in entering and exiting the vehicle, the air suspension system has a feature which automatically lowers the vehicle to entry/exit ride height page 171.
This mode is intended to be enabled with the engine running.
To assist with flat bed towing, the air suspension system has a feature which will put the vehicle into Entry/Exit height and disable the automatic load leveling system
page 171.
This mode is intended to be enabled with the engine running.
The “Suspension Display Messages” setting allows you to only display suspension warnings page 171.
This mode is intended to be enabled with the engine running.
Before performing a wheel alignment this mode must be enabled page 171.
This mode is intended to be enabled with the engine running.
If equipped with a touchscreen radio all enabling/disabling of air suspension features
must be done through the radio page 171. 4
INSTRUMENT CLUSTER DISPLAY MESSAGES
When the appropriate conditions exist, a message will appear in the instrument cluster page 81.
OPERATION
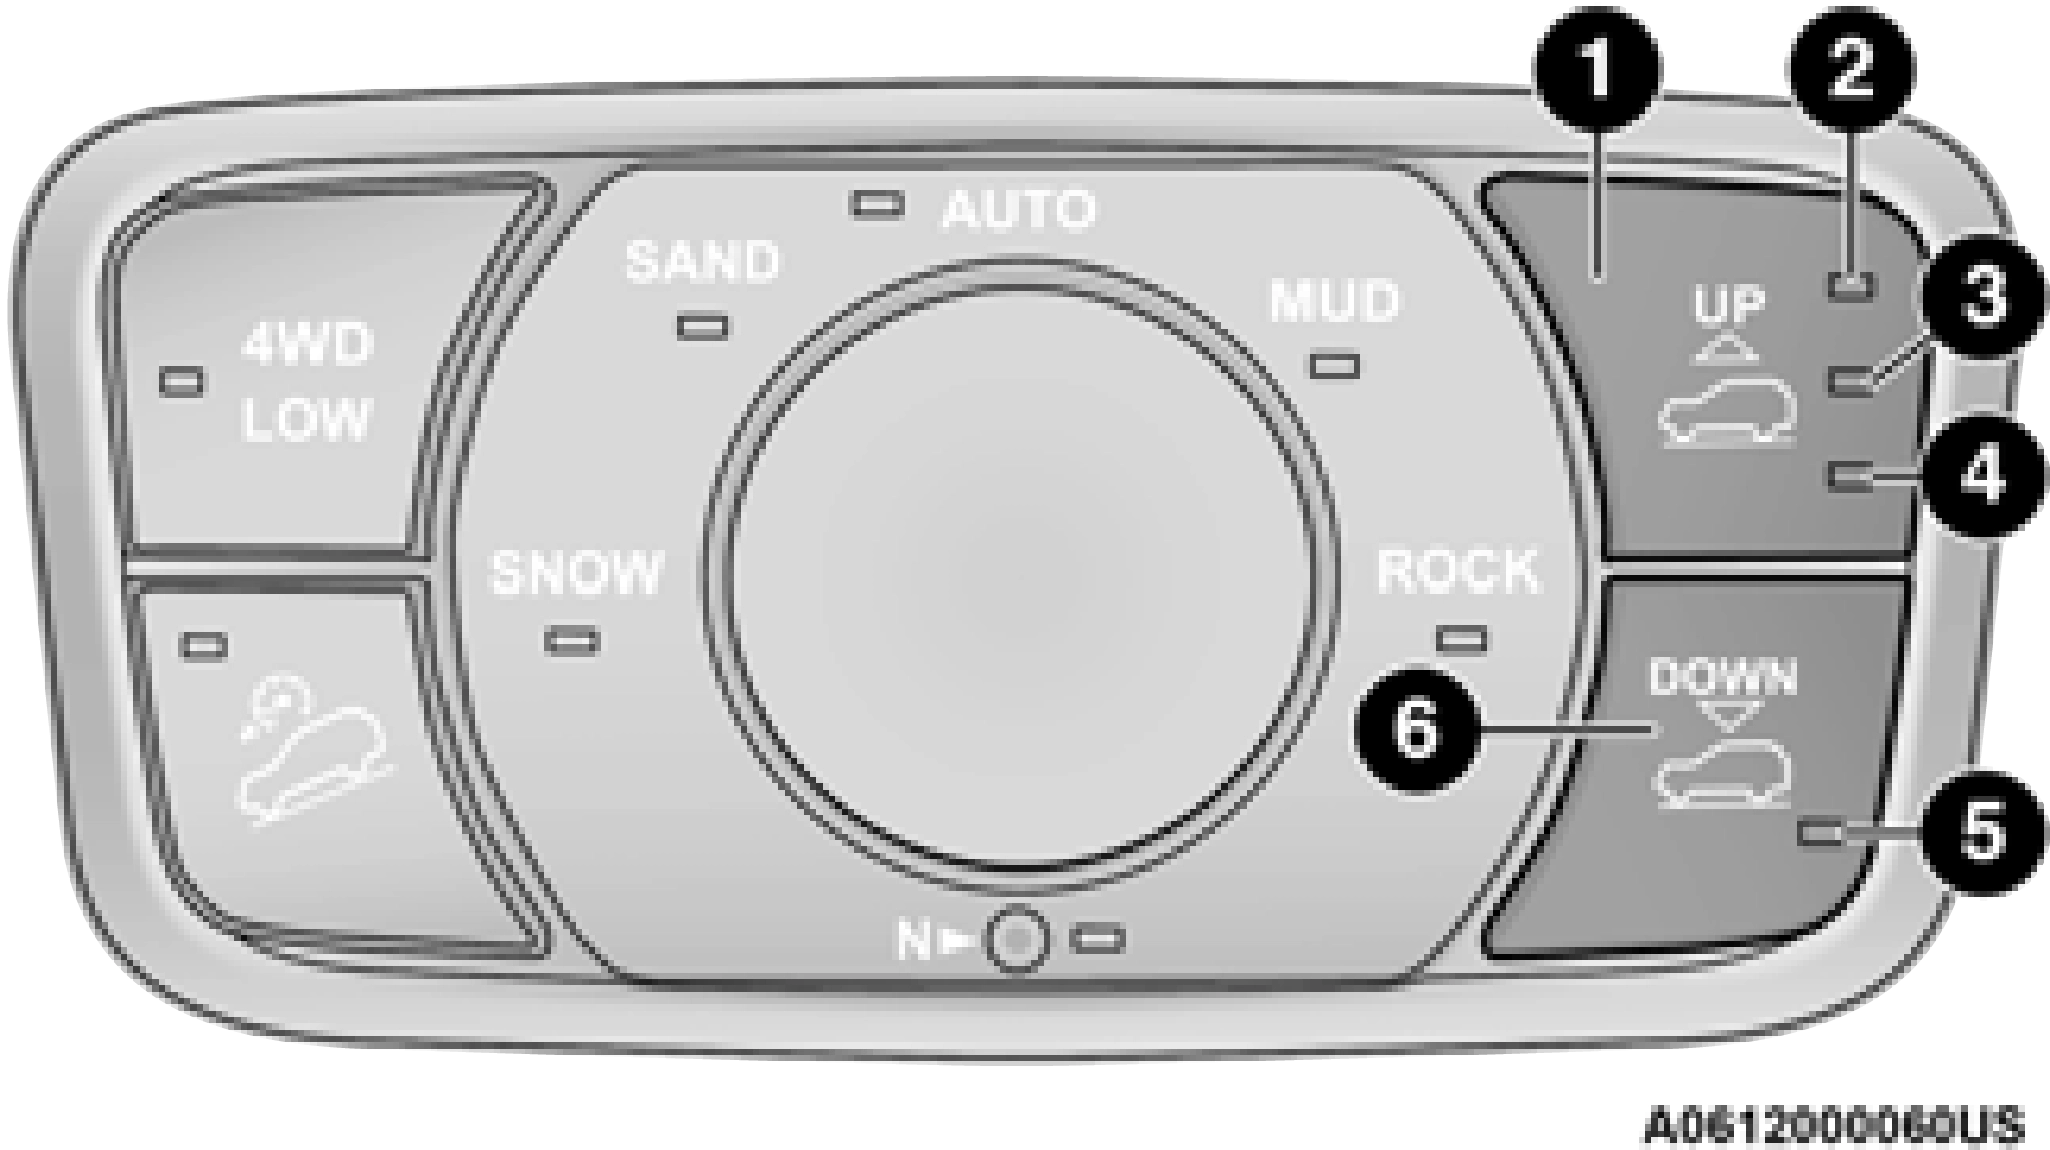
The indicator lamps 2 through 5 will illuminate to show the current position of the vehicle.
Flashing indicator lamps will show a position which the system is working to achieve. When raising, if multiple indicator lamps are flashing on the “UP” button, the highest flashing indicator lamp is the position the system is working to achieve. When lowering, if multiple
indicators are flashing on the "DOWN" button the lowest solid indicator lamp is the position the system is working to achieve.
Pushing the “UP” button once will move the suspension one position higher from the current position, assuming all conditions are met (i.e. engine running, speed below threshold, etc). The “UP” button can be pushed multiple times. Each push will raise the requested level by one position up to a maximum position of OR2 or the highest position allowed based on current conditions (i.e. vehicle speed, etc).
Pushing the “DOWN” button once will move the suspension one position lower from the current level, assuming all conditions are met (i.e. engine running, doors closed, speed below threshold, etc). The “DOWN” button can be pressed multiple times. Each push will lower the requested level by one position down to a minimum of Park Mode or the lowest position allowed based on current conditions (i.e. vehicle speed, etc.)
Automatic height changes will occur based on vehicle speed and the current vehicle height. The indicator lamps and instrument cluster display messages will operate the same for automatic changes and user requested changes.
turn off and indicator lamp 5 will flash until Entry/Exit Mode is achieved at which point indicator lamp 5 will go solid. If during the height change to Entry/Exit Mode, the vehicle speed exceeds 15 mph (24 km/h), the height change will be paused until the vehicle speed either goes below 15 mph (24 km/h) and the height change continues to Entry/ Exit Mode, or exceeds 25 mph (40 km/h) and the vehicle height will return to NRH. Entry/Exit Mode may be selected while the vehicle is not moving provided that the engine is still running and all doors remain closed.
4 and 5 will be illuminated. Customer driving will disable Wheel Alignment Mode.
Download Manual