UCONNECT REAR SEAT ENTERTAINMENT (RSE) SYSTEM — IF EQUIPPED
Your Rear Seat Entertainment (RSE) System (if equipped) plays your favorite CDs, DVDs or
Blu-ray™ Discs, listen to audio over the wireless headphones, or plug and play a variety of video games or audio devices.
GETTING STARTED
 PLAY A BLU-RAY™ DISC
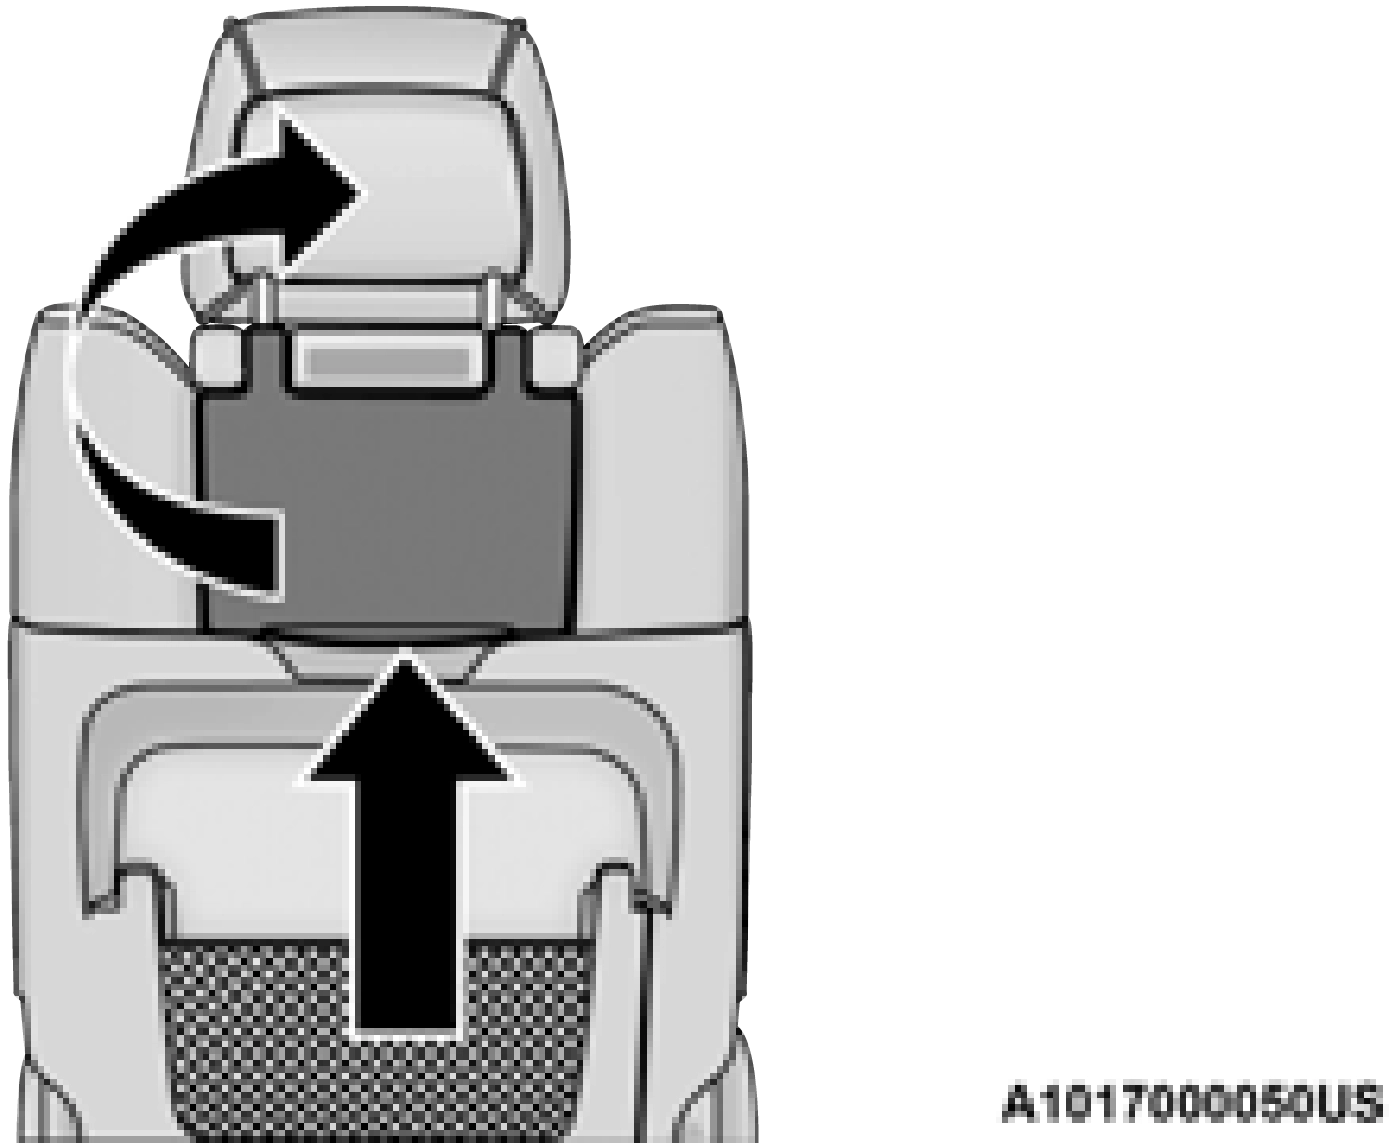
The Blu-ray™ disc player is located in the center console.
RSE System Headphone Channel Selectors
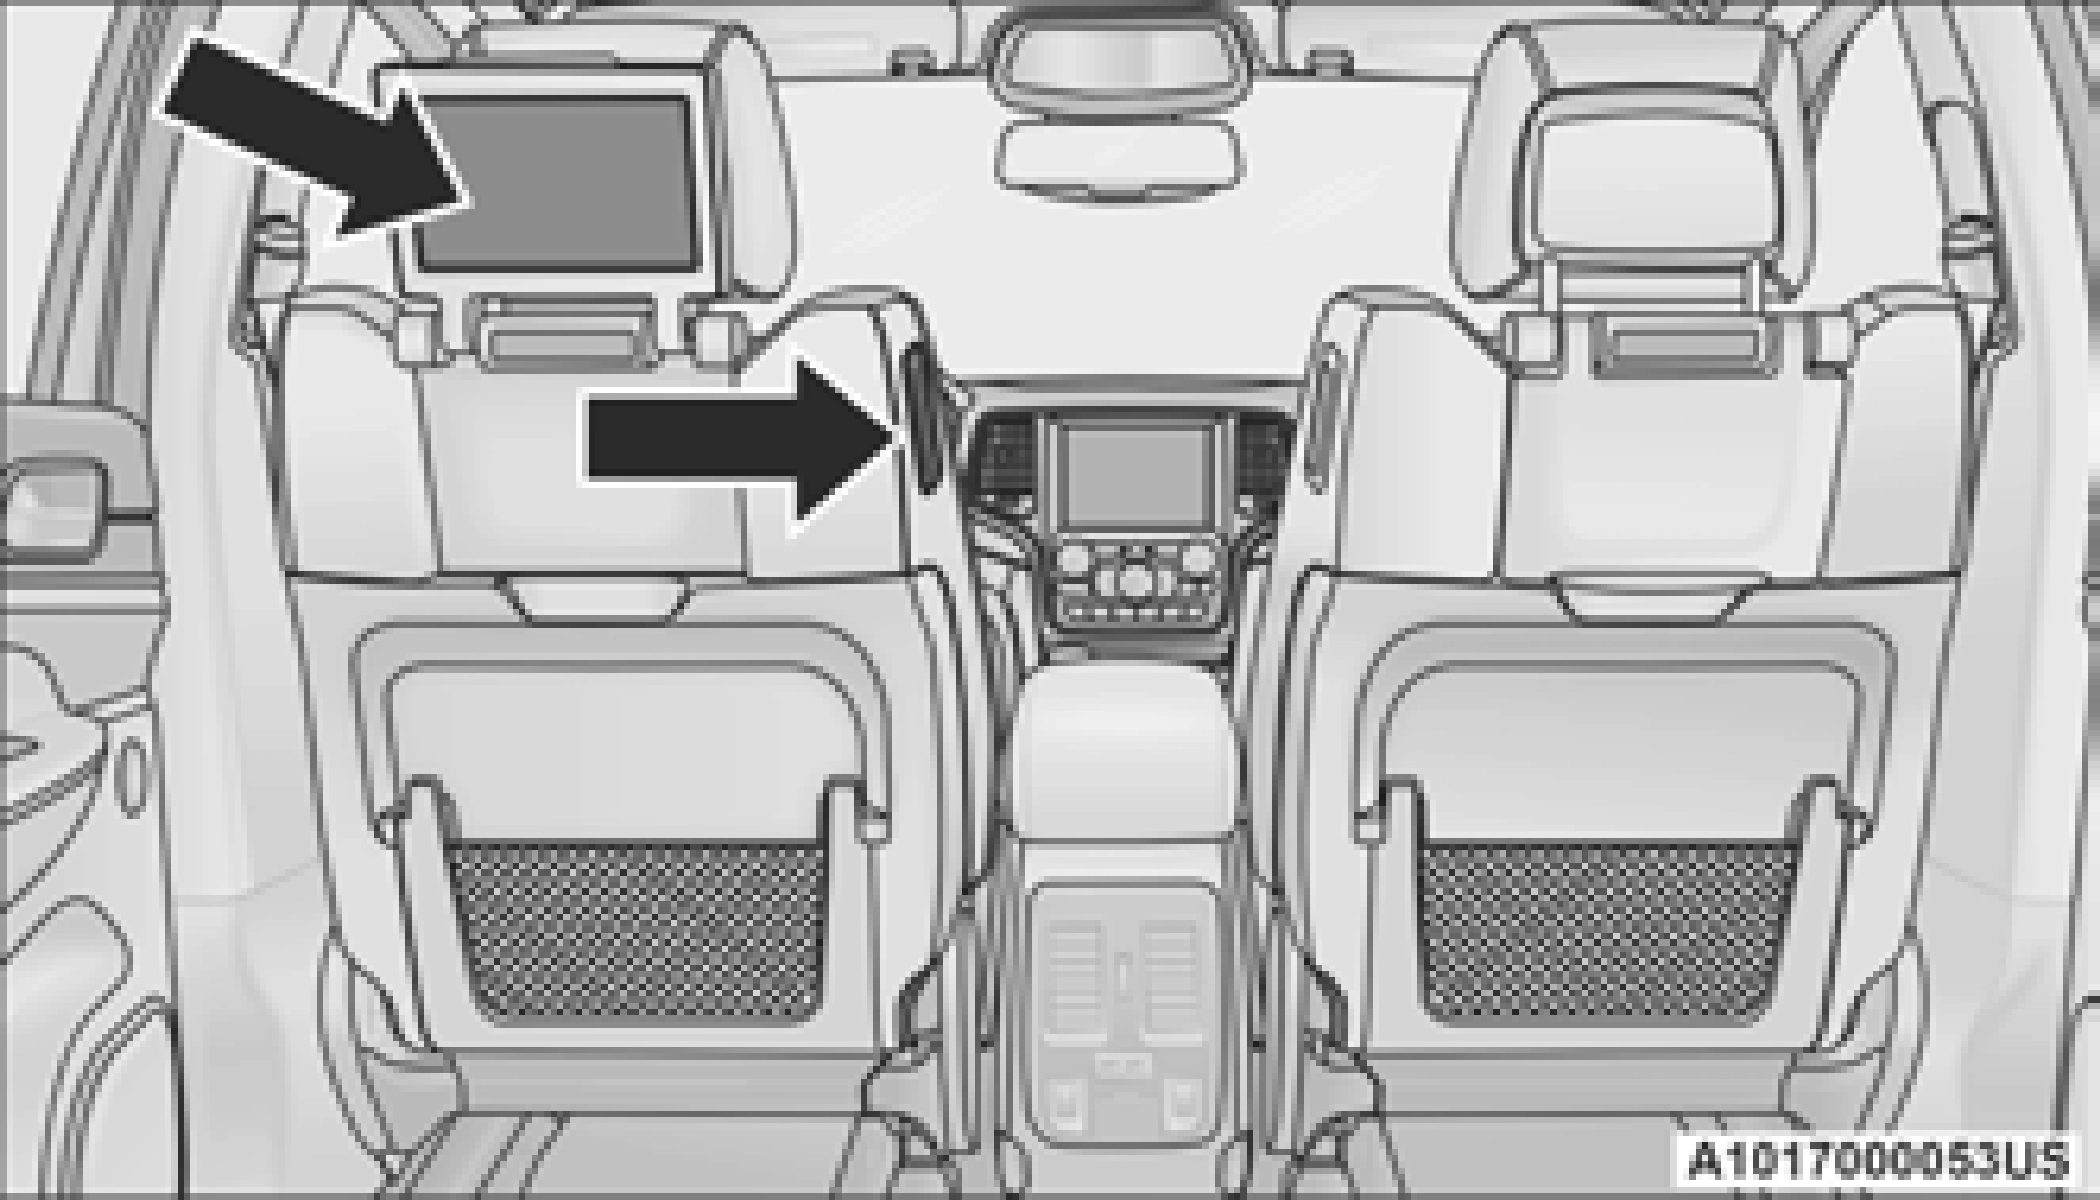
DUAL VIDEO SCREEN
Typically there are two different ways to operate the features of the Rear Seat Entertainment System:

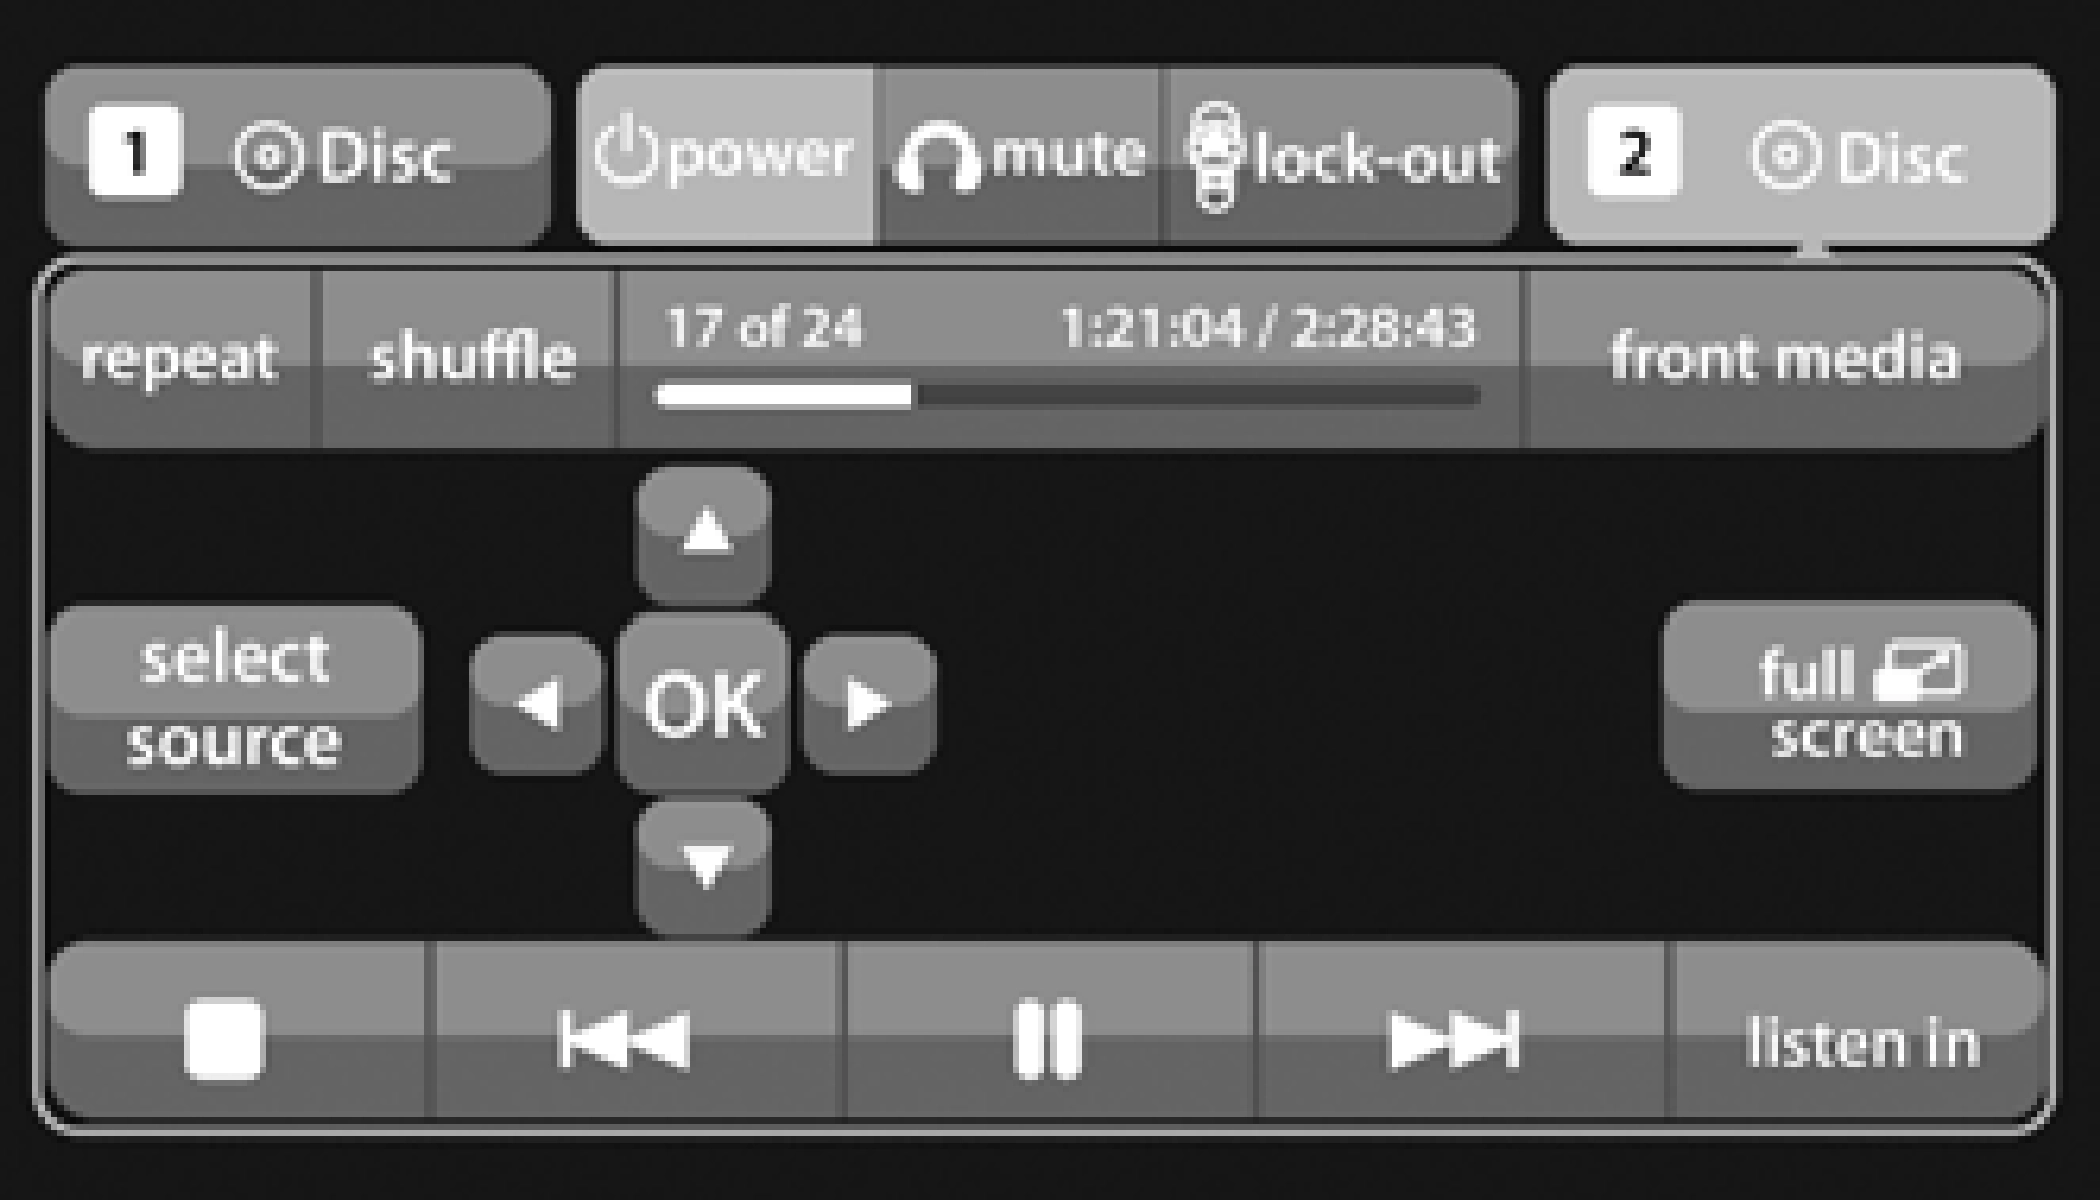
Rear Media Control Screen
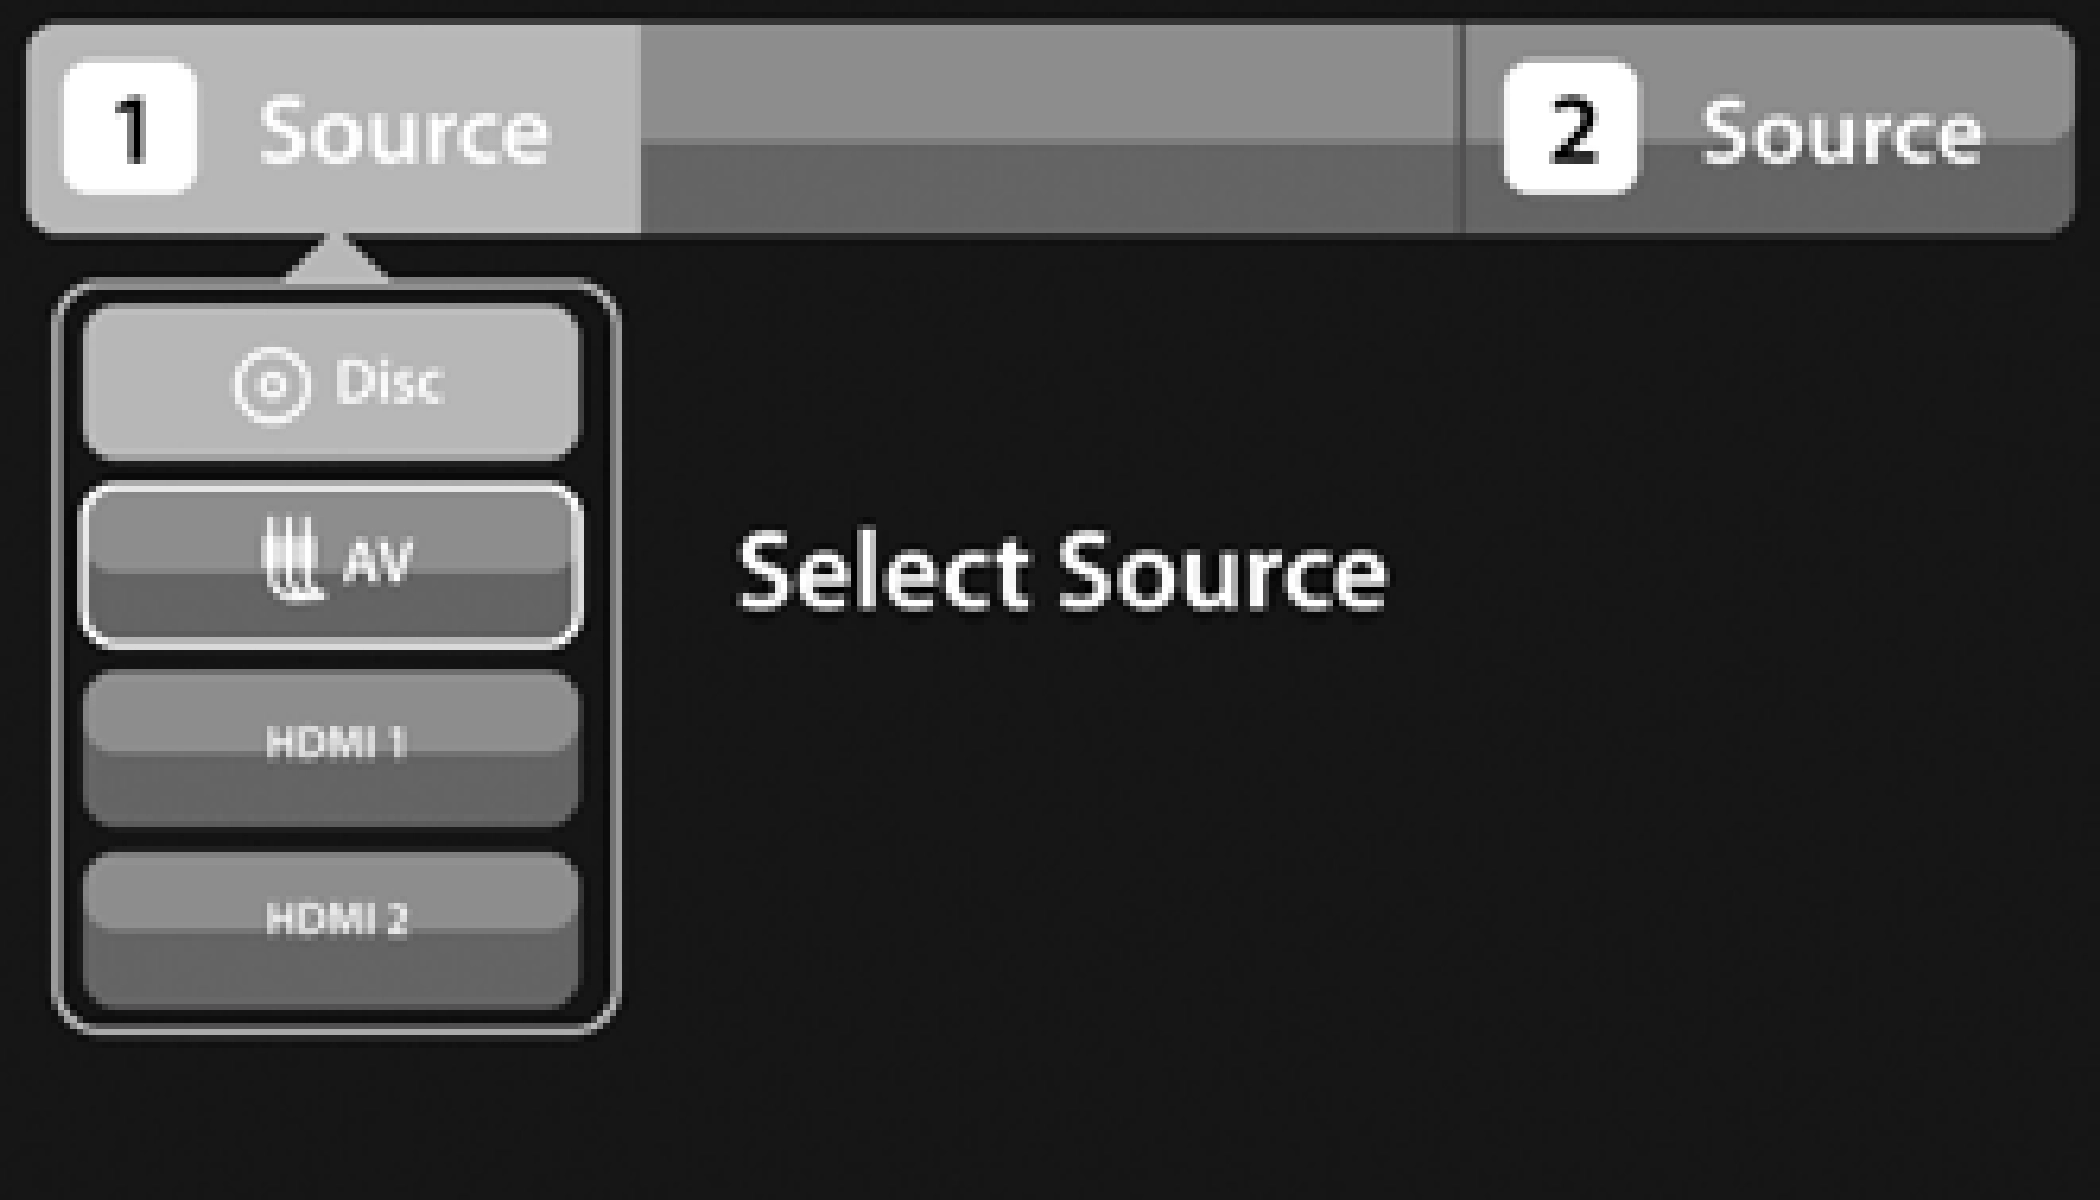
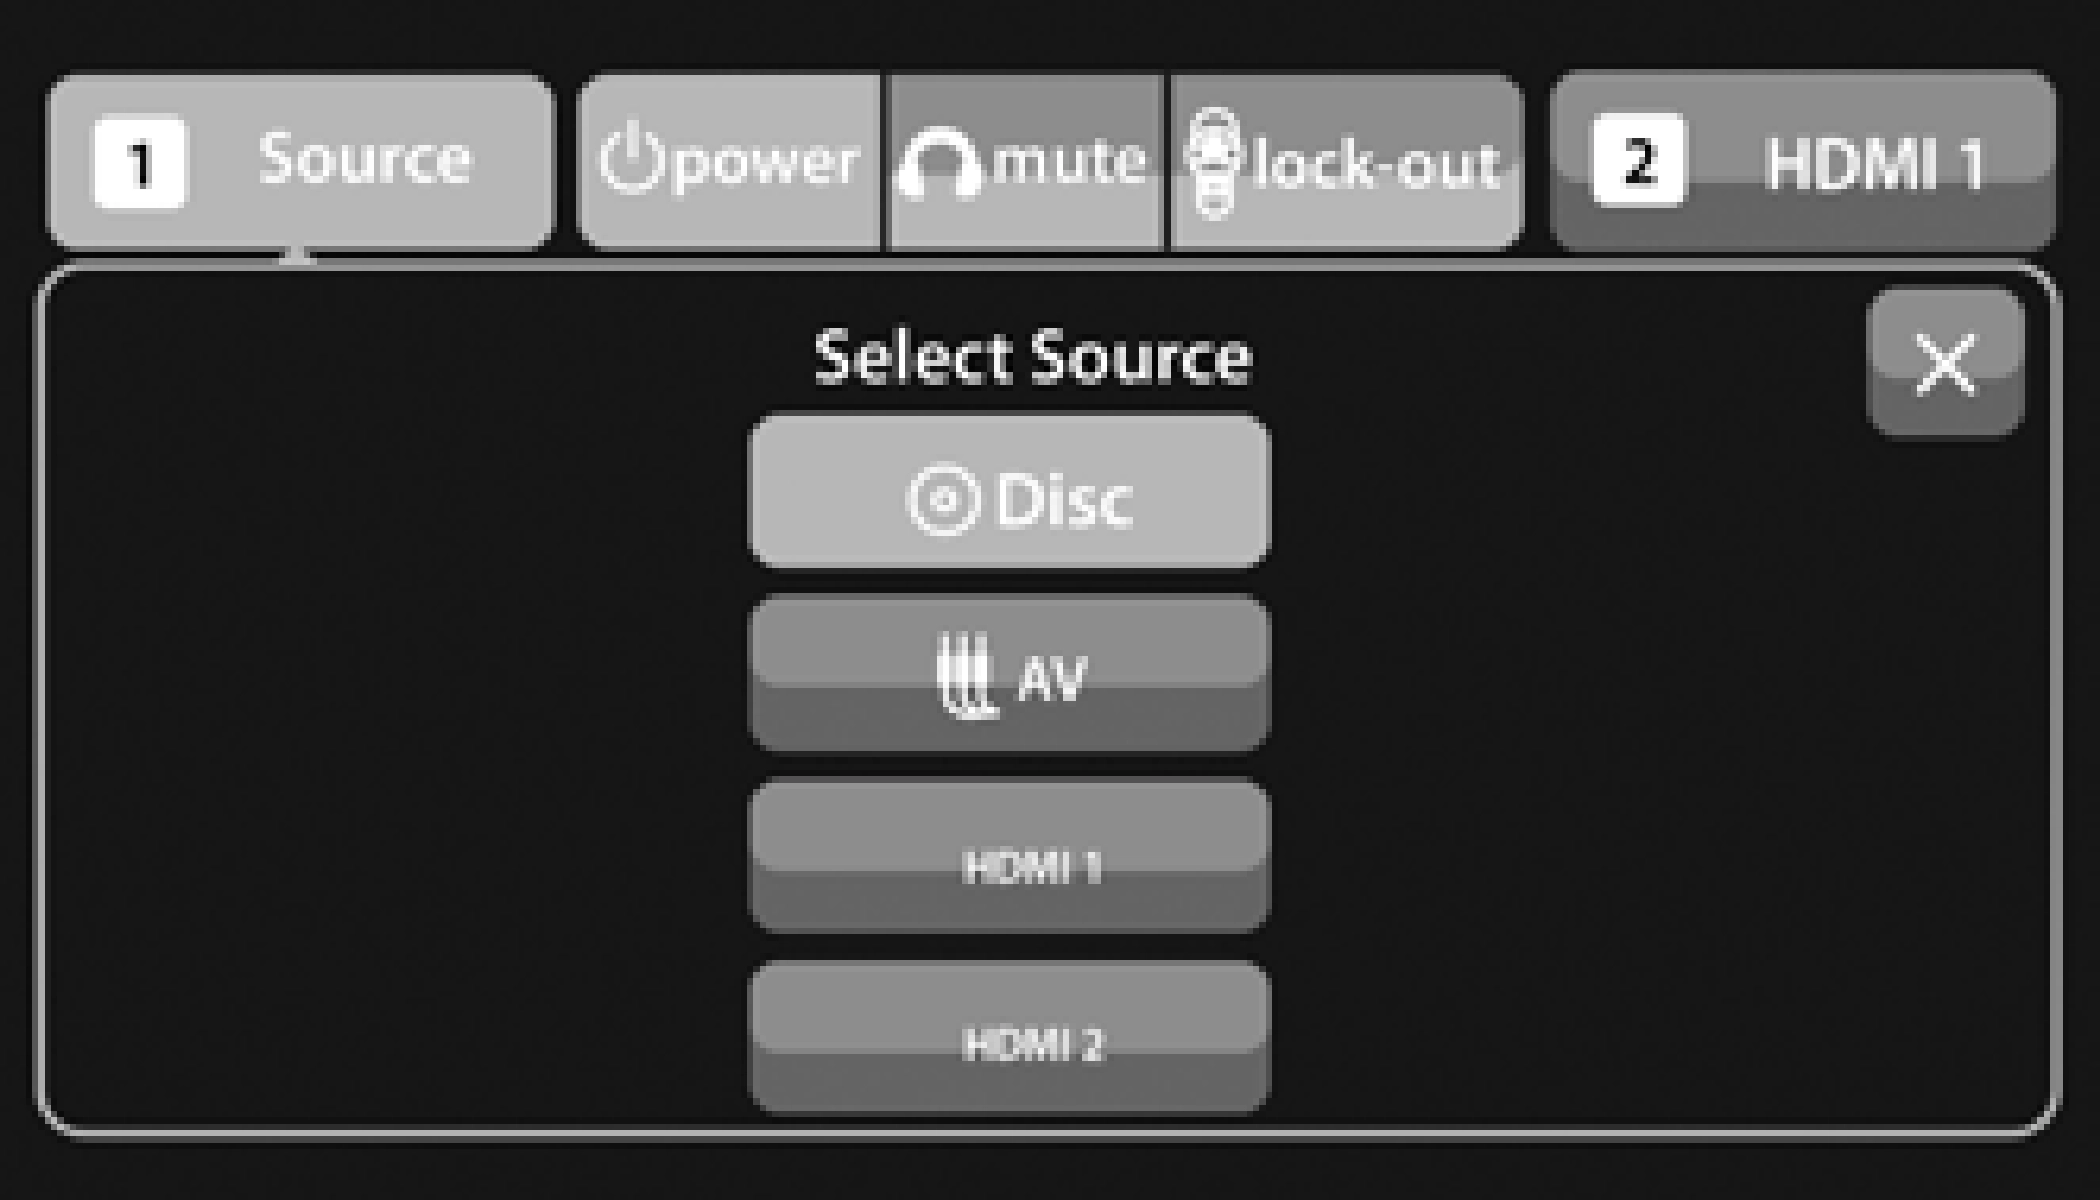
Indicates the current source for Screen 1/Channel 1. This button will be highlighted when it is being controlled by the front user. If this button is not highlighted, press the button to access controls for Screen 1/Channel 1 source.
Press to turn RSE On/Off.
Mute rear headphones for the current igni- tion cycle. Pressing mute again will unmute rear headphones.
Press to enable/disable remote control functions.
Indicates the current source for Screen 2/ Channel 2. This button will be highlighted when it is being controlled by the front user. If this button is not highlighted, press the button to access controls for Screen 2/ Channel 2 source.
Press this button to change to Full Screen Mode.
Press this button to change the cabin audio to the rear entertainment source currently shown on the Rear Media Control screen.
Press this button to change the source for the active (highlighted) rear Screen/Chan- nel on the Rear Media Control screen.
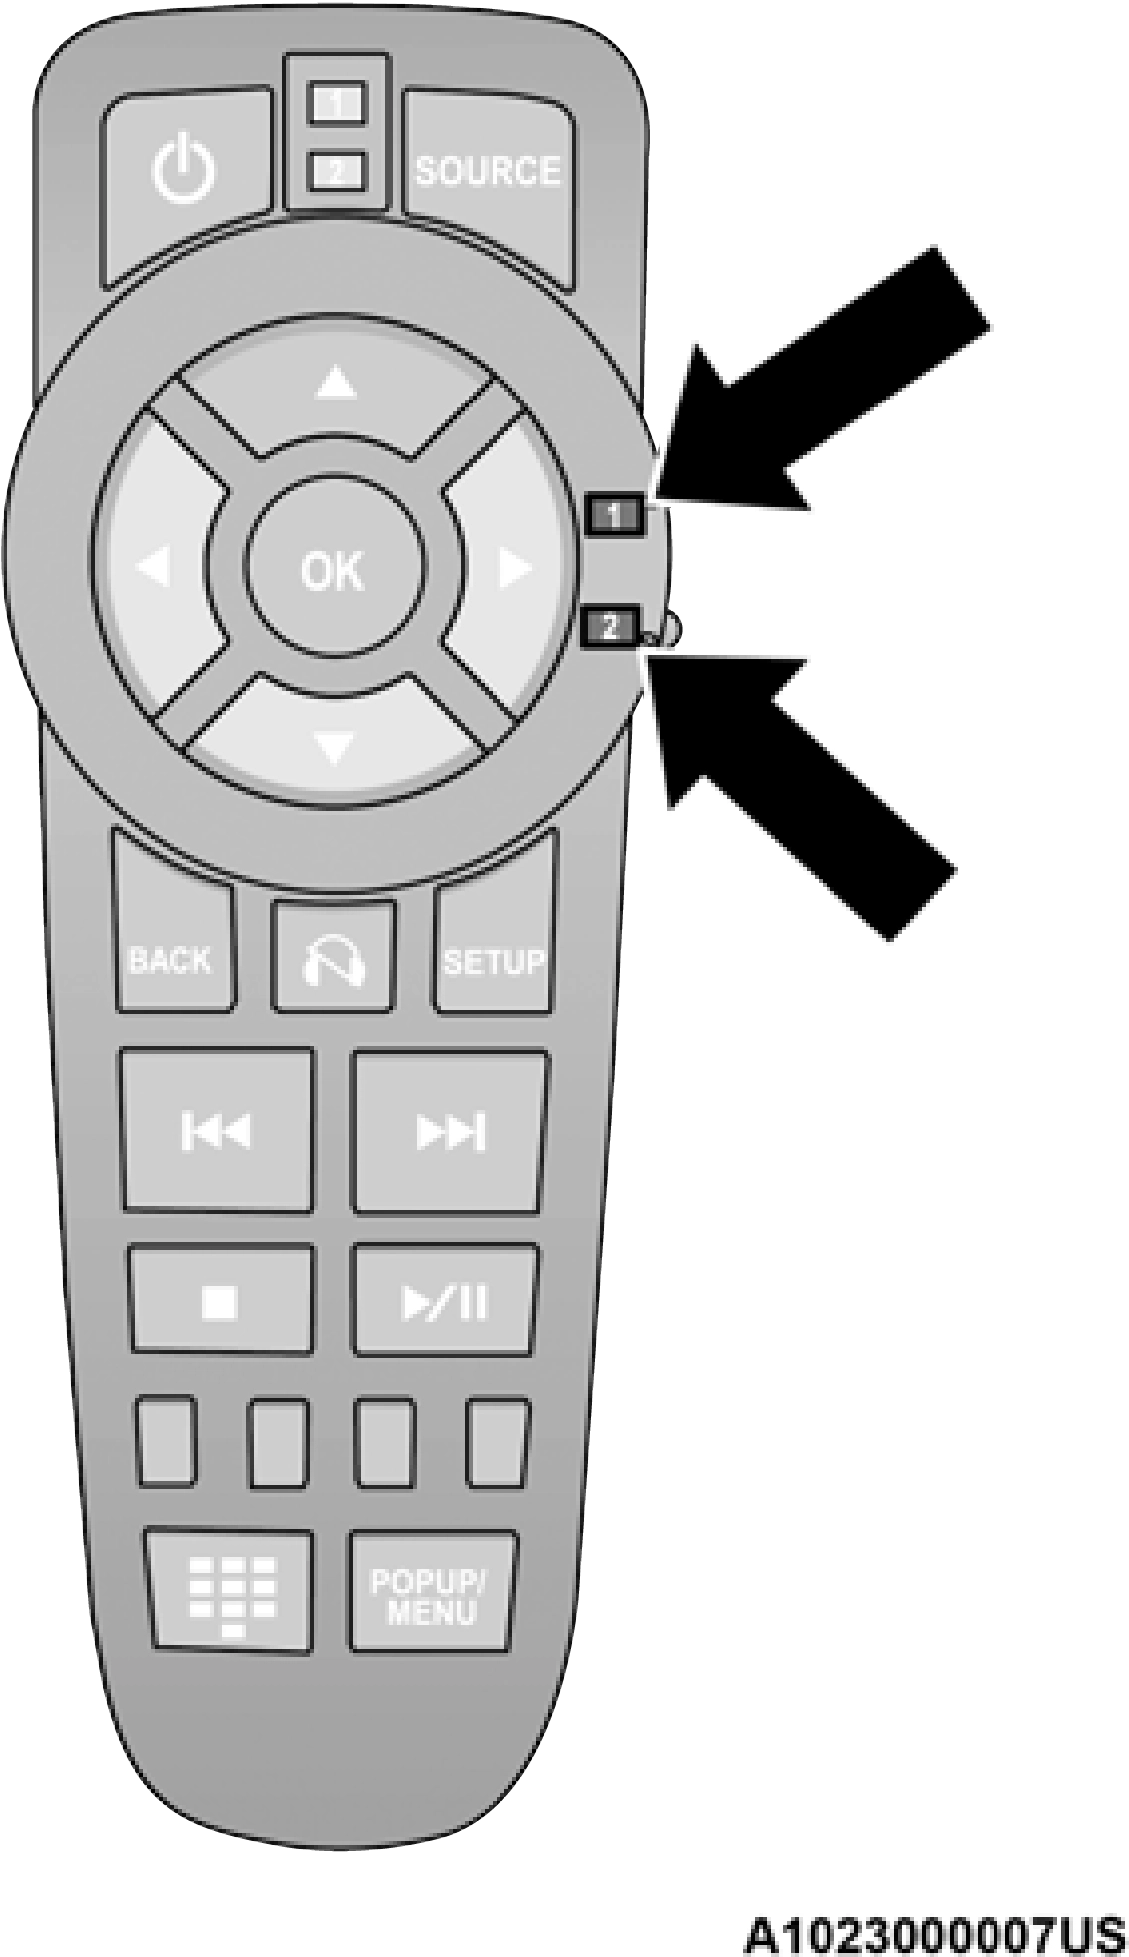
Using The Remote Control
Using The Touchscreen Radio
NOTE:
Pressing the screen on the radio while a DVD or Blu-ray™ Disc is playing brings up the basic remote control functions for DVD play such as scene selection, Play, Pause, FF, RW, and Stop. Pressing the X in the upper corner will turn off the remote control screen functions.
PLAY EXTERNAL DEVICE
Connect the external device to the Audio/Video RCA/HDMI input jacks located on the side of each seat.
These inputs enable the monitor to display 5
video directly from a video camera, connect video games, or play music directly from an MP3 player.
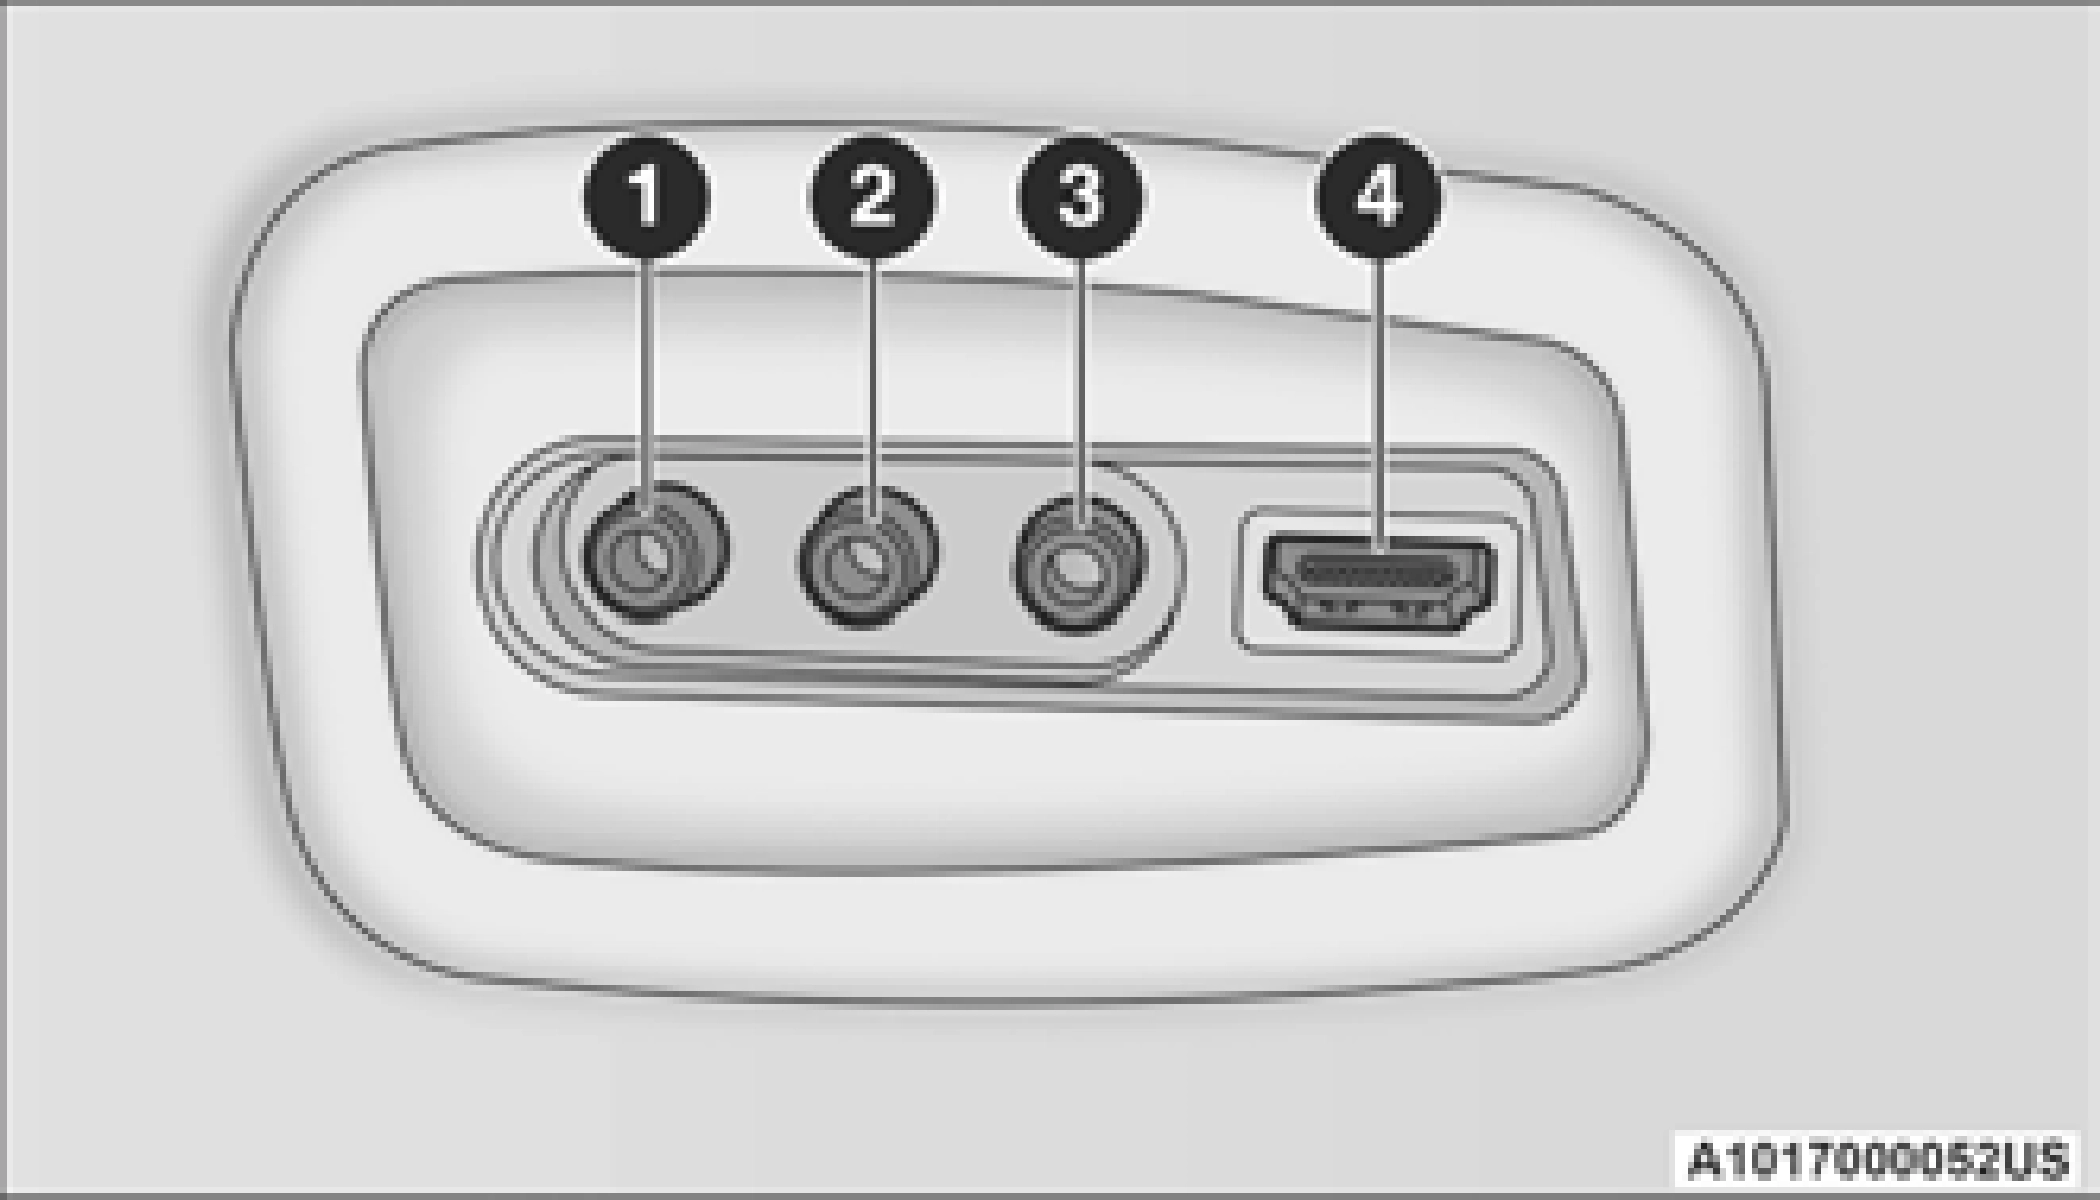
When connecting an external source to the AUX/HDMI input, be sure to follow the standard color coding for the audio/video jacks:
Certain high-end video games’ consoles may
exceed the power limit of the vehicle's Power Inverter.
IMPORTANT NOTES FOR DUAL VIDEO SCREEN SYSTEM
BLU-RAY™ DISC PLAYER REMOTE CONTROL
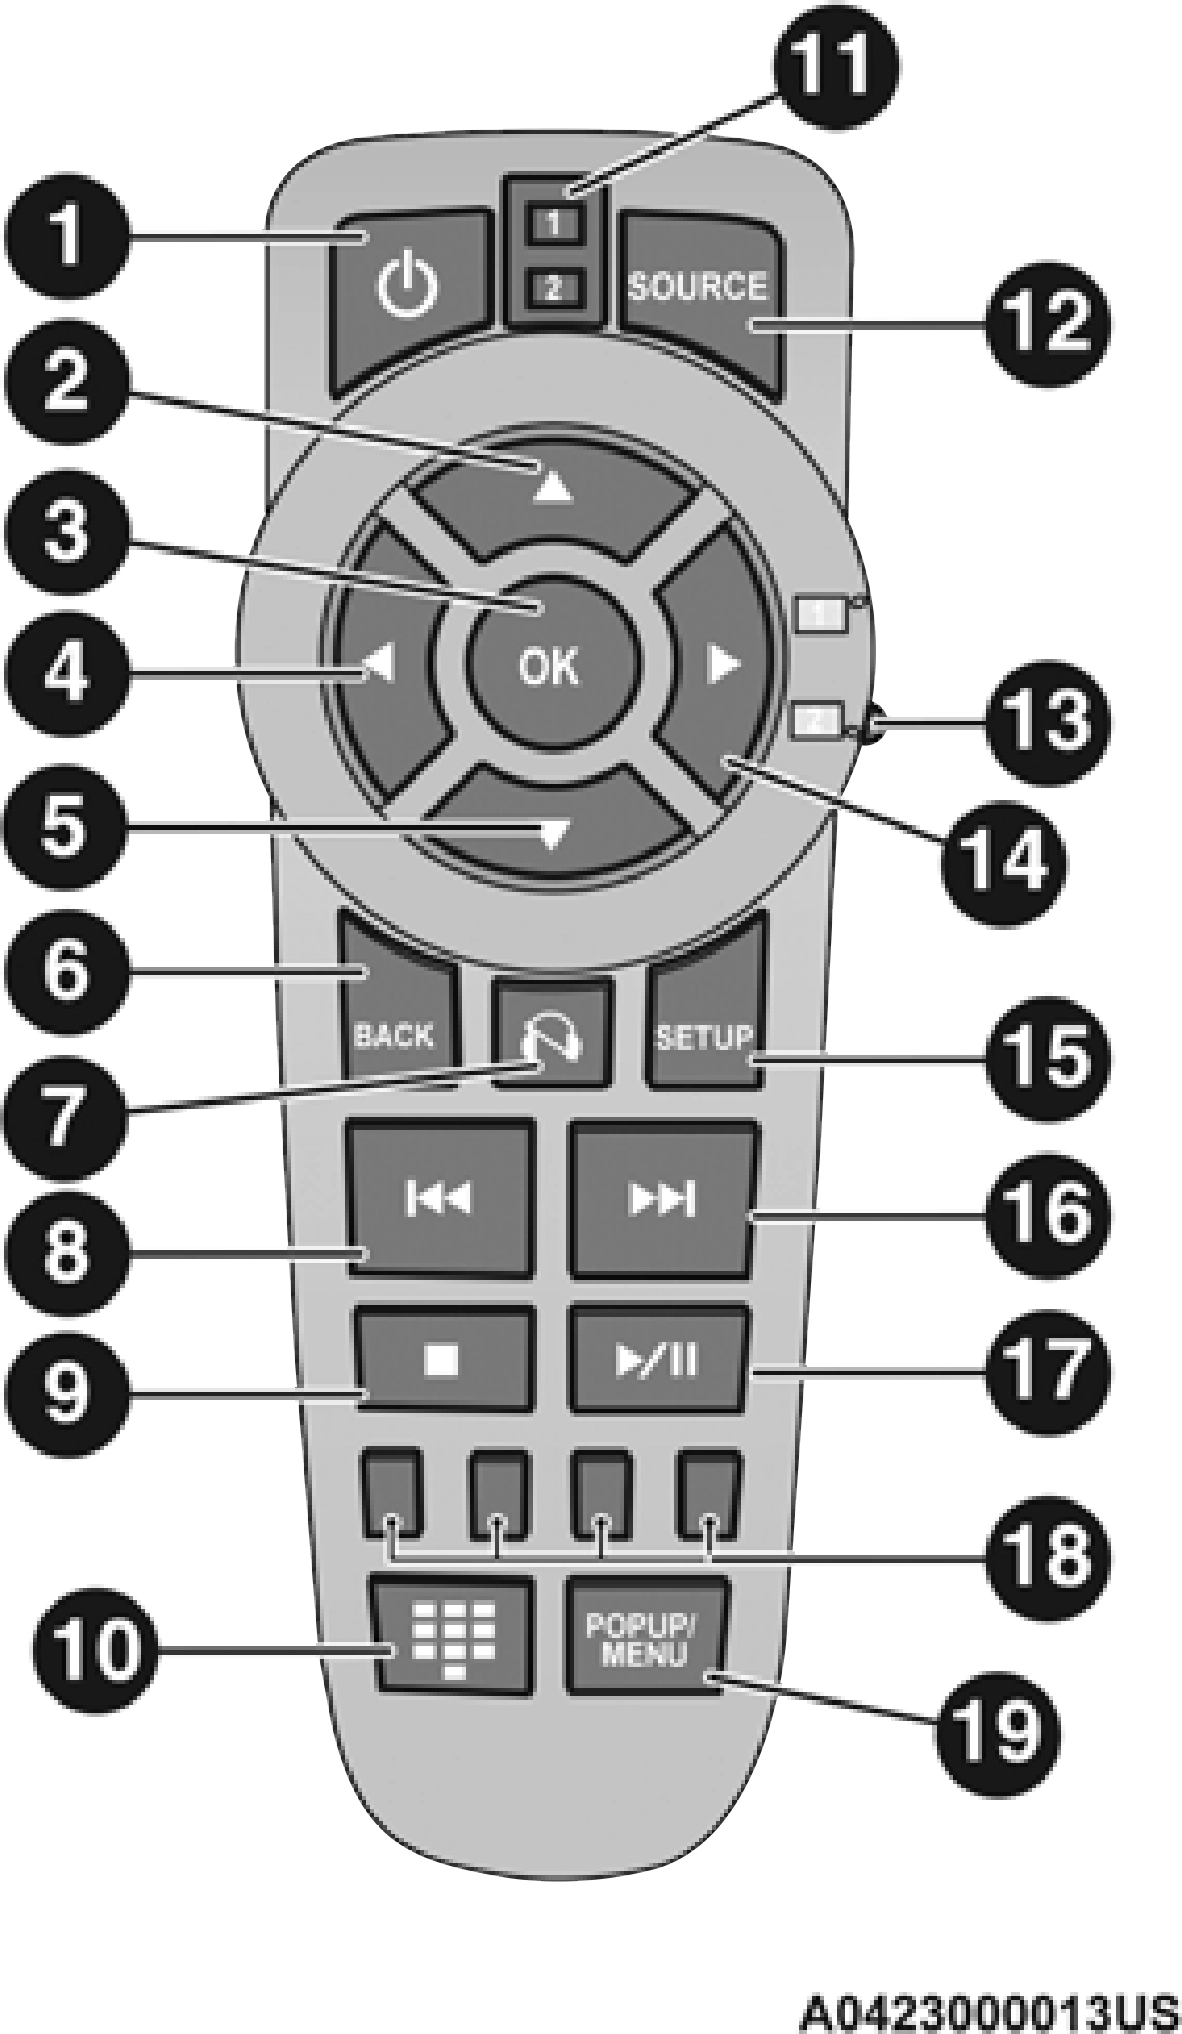
Controls And Indicators
 — Turns the screen and wireless headphone transmitter for the selected Channel on or off. To hear audio while the screen is closed, push the Power button to turn the headphone transmitter on.
 — Push to navigate menus.
 — Push to navigate menus.
 — Push to navigate menus.
 — Mutes headphone audio.
 — Push and hold to fast rewind through the current audio track or video chapter.
 — Stops disc play.
 — Push to navigate chapters or titles.
 — When a button is pushed, the current channel or channel button is illuminated momentarily.
 — Push to navigate menus.
 — Push and hold to fast forward through the current audio track or video chapter.
 — Begin/resume or pause disc play.
HEADPHONES OPERATION
The headphones receive two separate channels of audio using an infrared transmitter from the video screen.
If no audio is heard after increasing the volume control, verify that the screen is turned on, the channel is not muted, and the headphone channel selector switch is on the desired channel. If audio is still not heard, check that the batteries are charged.
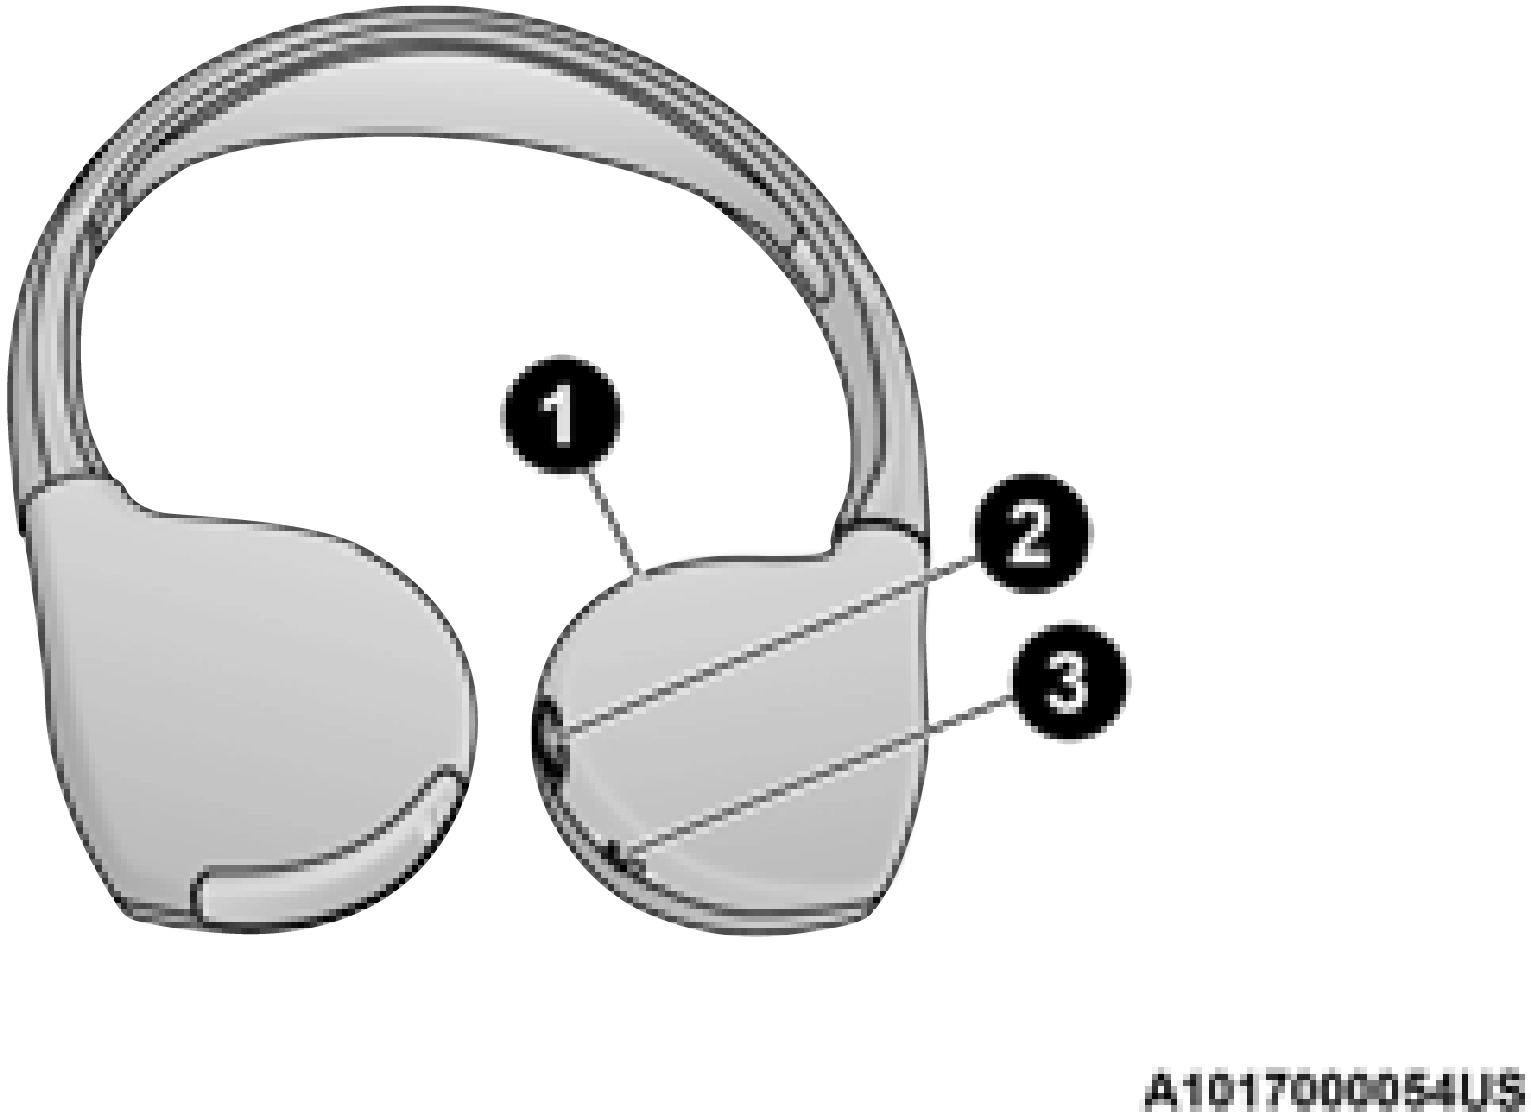
1 — Power Button 2 — Volume Control
3 — Channel Selection Switch
CONTROLS
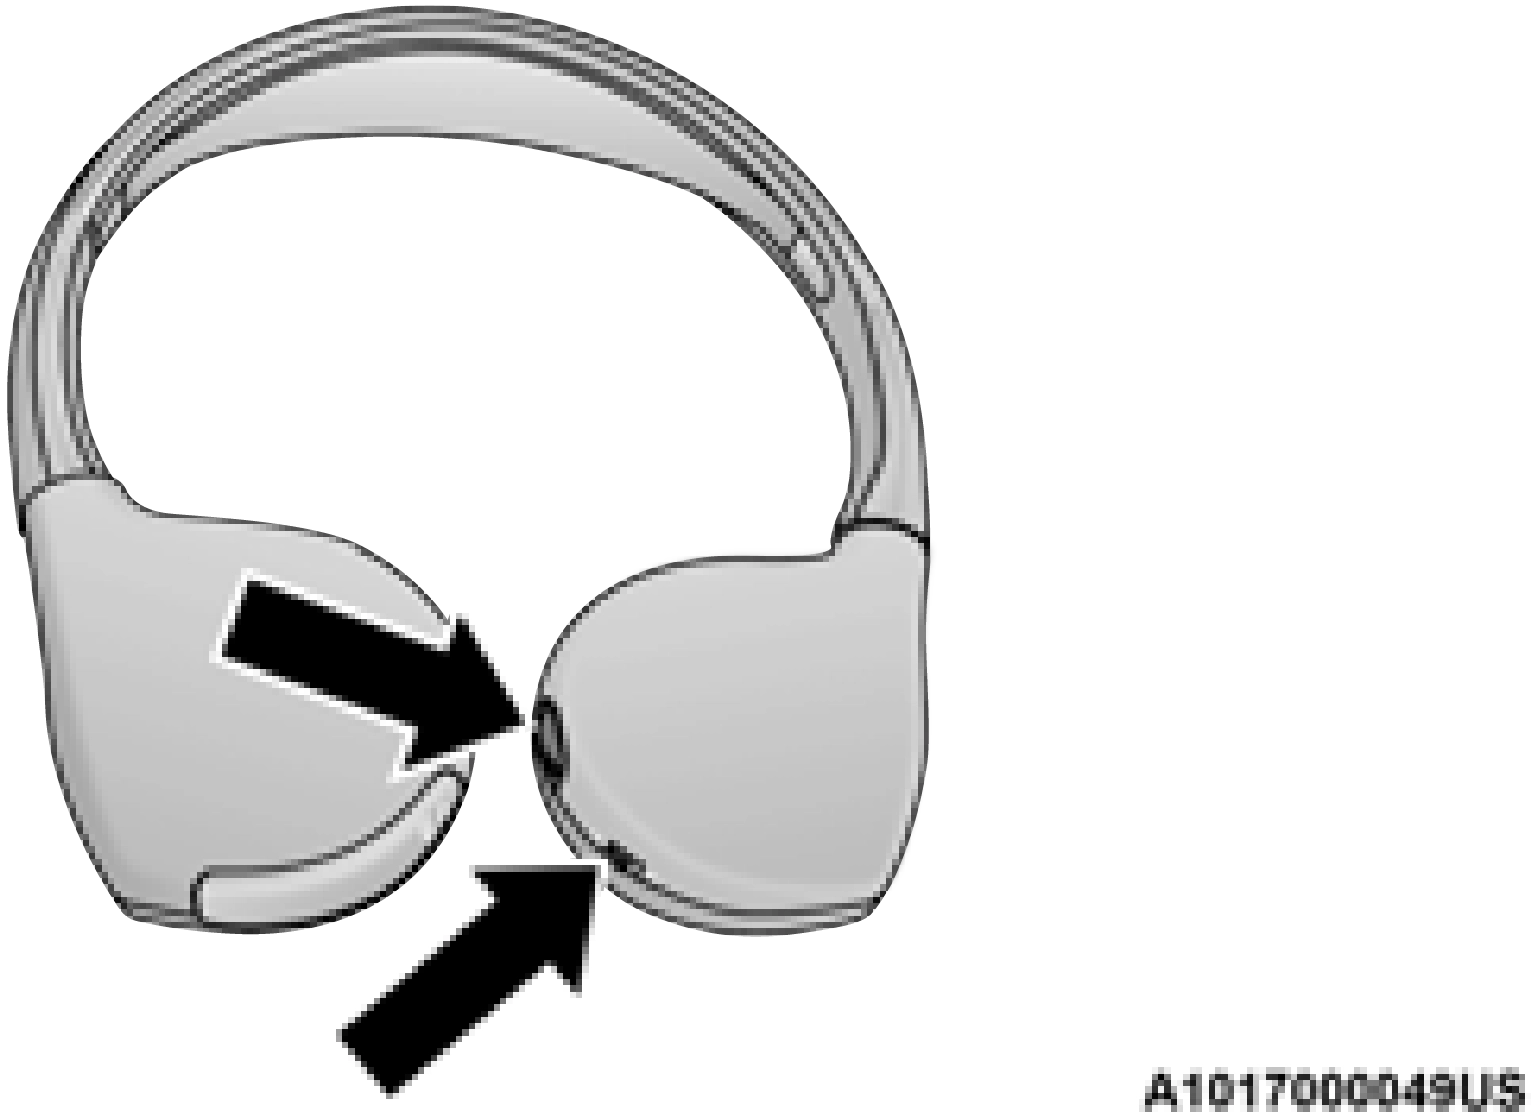
The headphone power indicator and controls are located on the right ear cup.
The rear video system must be turned on before sound can be heard from the headphones. To conserve battery life, the headphones will auto- matically turn off approximately three minutes after the rear video system is turned off.
5
screen selector switch is in the same position as the headphone selector switch.
When both the headphone and the remote control channel selector switches are on Channel 1, the Remote is controlling Channel 1 and the headphones are tuned to the audio on Channel 1.
When both the headphone and the remote control channel selector switches are on Channel 2, the remote is controlling Channel 2 and the headphones are tuned to the audio on Channel 2.
REPLACING THE HEADPHONE BATTERIES
Each set of headphones requires two AAA batteries for operation. To replace the batteries:
ACCESSIBILITY — IF EQUIPPED
Accessibility is a feature of the DVD/Blu-ray™ system that announces a function prior to performing the action page 171.
STEREO HEADPHONE LIFETIME LIMITED WARRANTY
Who Does This Warranty Cover? This warranty covers the initial user or purchaser ("you" or "your") of this particular Aptiv PLC (“Aptiv”) wireless headphone ("Product"). The warranty is not transferable.
How Long Does the Coverage Last? This warranty lasts as long as you own the Product.
What Does This Warranty Cover? Except as specified below, this warranty covers any Product that in normal use is defective in workmanship or materials.
What Does This Warranty Not Cover? This warranty does not cover any damage or defect that results from misuse, abuse, or modification of the Product other than by Aptiv. Foam earpieces, which will wear over time through normal use, are specifically not covered (replacement foam is available for a nominal charge). APTIV IS NOT LIABLE FOR ANY INJURIES OR DAMAGES TO PERSONS OR
PROPERTY RESULTING FROM THE USE OF, OR ANY FAILURE OR DEFECT IN, THE PRODUCT, NOR IS APTIV LIABLE FOR ANY GENERAL, SPECIAL, DIRECT, INDIRECT, INCIDENTAL, CONSEQUENTIAL, EXEMPLARY, PUNITIVE OR OTHER DAMAGES OF ANY KIND OR NATURE
WHATSOEVER. Some states and jurisdictions may not allow the exclusion or limitation of incidental or consequential damages, so the above limitation may not apply to you. This warranty gives you specific legal rights. You may also have other rights, which vary from jurisdiction to jurisdiction.
What Will Aptiv Do? Aptiv, at its option, will repair or replace any defective Product. Aptiv reserves the right to replace any discontinued Product with a comparable model. THIS WARRANTY IS THE SOLE WARRANTY FOR THIS PRODUCT, SETS FORTH YOUR EXCLUSIVE REMEDY REGARDING DEFECTIVE PRODUCTS, AND IS IN LIEU OF ALL OTHER WARRANTIES (EXPRESS OR IMPLIED), INCLUDING ANY WARRANTY FOR MERCHANTABILITY OR FITNESS FOR A PARTICULAR PURPOSE.
If you have any questions or comments regarding your Aptiv wireless headphones, please email [email protected] or phone: 888-293-3332.
When listening to a CD Audio or CD Data disc, pushing the remote control’s POP-UP/MENU button displays a list of all commands which control playback of the disc.
When watching a video source (Blu-ray™ Disc or DVD Video with the disc in Play mode, Aux Video, etc.), pushing the remote control’s SETUP button activates the Display Settings menu. These settings control the appearance of the video on the screen. The factory default settings are already set for optimum viewing, so there is no need to change these settings under normal circumstances.
To change the settings, push the remote control’s Navigation buttons (▴, ▾) to select an item, then push the remote control’s Navigation buttons (▸, ◂) to change the value for the currently selected item. To reset all values back to the original settings, select the Default Settings menu option and push the remote control’s ENTER/OK button.
Disc Features control the remote Blu-ray™ Disc player's settings of DVD being watched in the remote player.
Listening To Audio With The Screen Closed To listen to only the audio portion of the channel with the screen closed:
Set the audio to the desired source and channel.
Close the video screen.
To change the current audio mode, push the remote control’s Source button. This will automatically select the next available audio mode without using the Mode/Source Select menu.
When the screen is reopened, the video screen will automatically turn back on and show the appropriate display menu or media.
If the screen is closed and there is no audio heard, verify that the headphones are turned on (the On indicator is illuminated) and the headphone selector switch is on the desired channel. If the headphones are turned on, push the remote control’s power button to turn audio on. If audio is still not heard, check that the batteries are fully charged.
If the Blu-ray™ Disc player is unable to read the disc, a "Disc Error" message is displayed on the rear screen and Radio displays. A dirty, damaged, or incompatible disc format are all potential causes for a "Disc Error" message.
If a disc has a damaged track which results in audible or visible errors that persists for two seconds, the Blu-ray™ Disc player will attempt to continue playing the disc by skipping forward one to three seconds at a time. If the end of the
disc is reached, the Blu-ray™ Disc player will 5
return to the beginning of the disc and attempt to play the start of the first track.
The Blu-ray™ Disc player may shut down during extremely hot conditions, such as when the vehicle’s interior temperature is above 120°F (48.9°C). When this occurs, the player will display "High Temp" and will shut off the rear seat displays until a safe temperature is reached. This shutdown is necessary to protect the optics of the Blu-ray™ Disc player.
This product incorporates copyright protection technology that is protected by US patents and other intellectual property rights. Use of this copyright protection technology must be authorized by Macrovision, and is intended for home or other limited viewing uses otherwise authorized by Macrovision. Reverse engineering or disassembly is prohibited.
Dolby Digital and MLP Lossless Manufactured under license from Dolby Laboratories. "Dolby", "MLP Lossless", and the double-D symbol
 are trademarks of Dolby Laboratories. Confidential unpublished works. Copyright 1992-1997 Dolby Laboratories. All rights reserved.
Download Manual