Child safet
1-2. Child safety 51
Points to remember: P.51 Child restraint system: P.53
When using a child restraint sys- tem: P.54
Child restraint system installa- tion method
|
Points to remember |
The laws of all 50 states of the
U.S.A. as well as Canada now require the use of child restraint systems.
warnings, as well as the laws and regulations for child restraint systems.
|
|
|
When a child is riding
Observe the following precau- tions. Failure to do so may result in death or serious injury. For effective protection in auto- mobile accidents and sudden stops, a child must be properly restrained, using a seat belt or child restraint system which is correctly installed. For installa- tion details, refer to the opera- tion manual enclosed with the child restraint system. General installation instructions are pro- vided in this manual.
|
 WARNING
|
|
|
Toyota strongly urges the use of a proper child restraint system that conforms to the weight and size of the child, installed on the rear seat. According to accident statistics, the child is safer when properly restrained in the rear seat than in the front seat.
Holding a child in your or some- one else’s arms is not a substi- tute for a child restraint system. In an accident, the child can be crushed against the windshield or between the holder and the interior of the vehicle.
Handling the child restraint system
If the child restraint system is not properly fixed in place, the child or other passengers may be seri- ously injured or even killed in the event of sudden braking, sudden swerving, or an accident. If the vehicle were to receive a strong impact from an accident, etc., it is possible that the child restraint system has damage that is not readily visible. In such cases, do not reuse the restraint system.
Make sure you have complied with all installation instructions provided with the child restraint system manufacturer and that the system is properly secured.
Keep the child restraint system properly secured on the seat even if it is not in use. Do not store the child restraint system unsecured in the passenger compartment.
If it is necessary to detach the child restraint system, remove it from the vehicle or store it securely in the luggage com- partment.
|
 WARNING
1-2. Child safety 53
Confirm with the operation manual enclosed with the child restraint system about the installation of the child restraint system.
1
|
|
|
When using a child restraint system |
For the safety of a child, install a child restraint system to a rear seat. When installing the child restraint system to a front pas- senger seat is unavoidable, adjust the seat as follows and install the child restraint system.
|
|
1-2. Child safety 55
WARNING
If the head restraint interferes with the child restraint system installation and the head restraint can be removed, remove the head restraint.
1
|
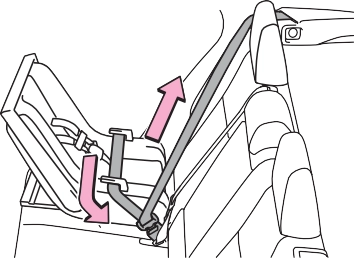
Child restraint system fixed with a seat belt |
A child restraint system for a small child or baby must itself be properly restrained on the seat with the lap portion of the lap/shoulder belt.
Install the child restraint system in accordance to the operation
manual enclosed with the child restraint system.
If there is a gap between the child restraint system and the seatback, adjust the seatback angle until good contact is achieved.
in lock mode. In lock mode, the belt cannot be extended.
|
|
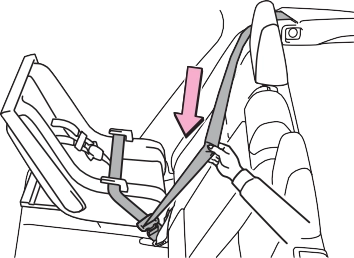
After the shoulder belt has retracted to a point where there is no slack in the belt, pull the belt to check that it cannot be extended.
|
|
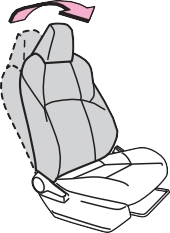
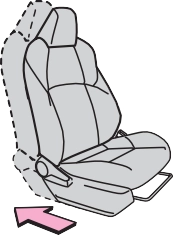
1 Adjust the seat.
When using the front passenger seat: If installing the child restraint system to the front passenger seat is unavoidable, refer to P.54 for front passenger seat adjustment.
When using the rear seat: If there is a gap between the child restraint system and the seatback, adjust the seatback angle until good con- tact is achieved.
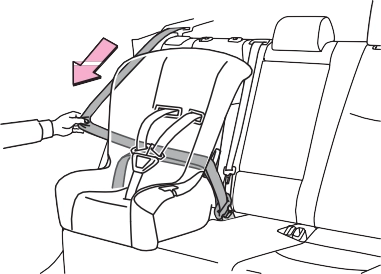
buckle. Make sure that the belt is not twisted.
1
|
|
After the shoulder belt has retracted to a point where there is no slack in the belt, pull the belt to
check that it cannot be extended.
removed, remove the head restraint. (P.231)
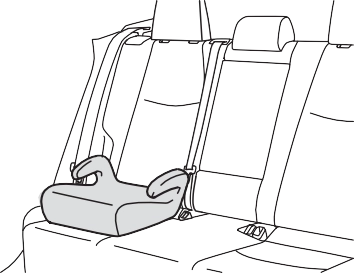
Booster type
|
|
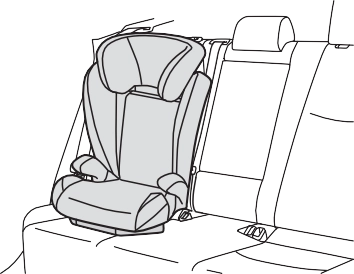
High back type
|
|
buckle. Make sure that the belt is not twisted.
Check that the shoulder belt is cor- rectly positioned over the child’s shoulder and that the lap belt is as low as possible. (P.29)
When releasing the buckle, the child restraint system may spring up due to the rebound of the seat cushion. Release the buckle while holding down the child restraint system.
Since the seat belt automatically reels itself, slowly return it to the stowing position.

1
|
|
|
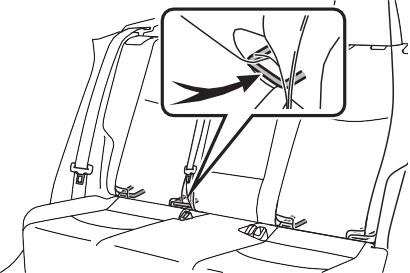
Child restraint system fixed with a child restraint LATCH anchor |
LATCH anchors are provided for the outboard rear seats.
|
|
Install the child restraint system in accordance to the operation manual enclosed with the child restraint system.
If there is a gap between the child restraint system and the seatback, adjust the seatback angle until good contact is achieved.
remove the head restraint. (P.231)
With rigid lower attachments
For owners in Canada: The symbol on a child
restraint system indicates A
With flexible lower attach- ments
3 Latch the hooks of the lower attachments onto the LATCH anchors.
For owners in Canada: The symbol on a child
the presence of a lower con- 1
nector system.
restraint system indicates A
the presence of a lower con- nector system.
There are no LATCH anchors behind the rear center seat. However, the inboard LATCH anchors of the outboard seats, which are 17.3 in. (440 mm) apart, can be used if the child restraint system manufacturer’s instructions permit use of those anchors with the anchor spacing stated.
Child restraint systems with rigid lower attachments cannot be installed in the center seat. This type of child restraint system can only be installed in the out- board seat.
The LATCH system conforms to FMVSS225 or CMVSS210.2.
Child restraint systems conforming to FMVSS213 or CMVSS213 speci- fications can be used.
This vehicle is designed to conform to SAE J1819.

|
Follow all installation instruc- tions provided by the child restraint system manufacturer.
Never attach two child restraint system attachments to the same anchor. In a collision, one anchor may not be strong enough to hold two child restraint system attachments and may break.
If the LATCH anchors are already in use, use the seat belt to install a child restraint system in the center seat. When securing some types of child restraint systems in rear seats, it may not be possible to properly use the seat belts in positions next to the child restraint without interfering with it or affecting seat belt effective- ness. Be sure your seat belt fits snugly across your shoulder and low on your hips. If it does not, or if it interferes with the child restraint, move to a differ- ent position. Failure to do so may result in death or serious injury.
If the seat is adjusted, reconfirm the security of the child restraint system.
|
|
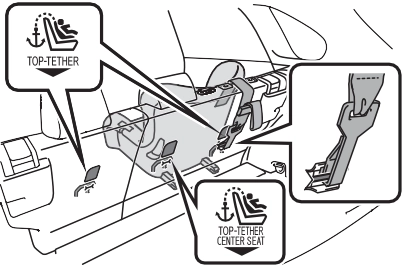
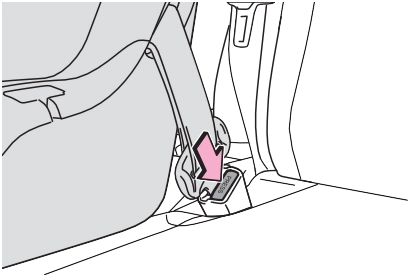
Using an anchor bracket (for top tether strap) |
Use anchor brackets when fix- ing the top tether strap.
Outboard rear seats
Outboard rear seats
1
Center rear seat
Make sure the top tether strap is securely latched. (P.59)
Install the child restraint system in accordance to the operation manual enclosed with the child restraint system.
restraint system installation, install the head restraint.
Center rear seat
If the head restraint interferes with your child restraint system, and the head restraint can be removed, remove the head restraint. (P.231)
Make sure the top tether strap is securely latched.
When installing the child restraint system with the head restraint being raised, be sure to have the top tether strap pass underneath the head restraint.
Top tether strap
The LATCH system conforms to FMVSS225 or CMVSS210.2.
Child restraint systems conforming to FMVSS213 or CMVSS213 speci- fications can be used.
This vehicle is designed to conform to SAE J1819.
1
Download Manual