Charging
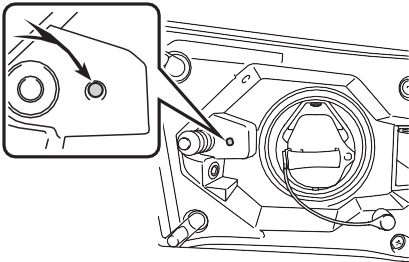
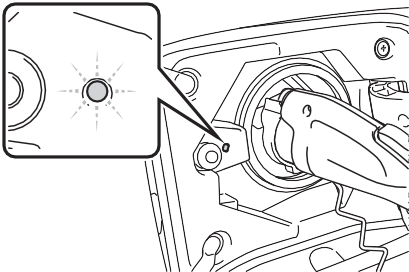
AC charging inlet light Charging indicator (P.100) AC charging inlet cap Charging port lid (P.100) AC charging cable (P.102) Charging port
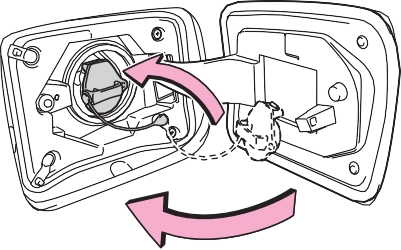
Press the central rear edge of the charging port lid (the loca- tion shown in the illustration) with the doors unlocked.
Push and take your hand away to slightly open the charging port lid. Then open the lid fully by hand.
When the doors are locked, the charging port lid is also locked. (P.107)
|
|
|
Illumination/flashing pat- tern |
Vehicle condition |
|
Illuminated |
Charging is in progress
Charging is possible
“Battery Heater” (P.115) is operating
“Battery Cooler” (P.116) is operating
|
|
Flashing (normally)* |
When charging schedule is registered (P.130) and AC charging cable is connected to vehicle |
|
Rapidly flashing* |
When charging cannot be carried out due to malfunction in a power source or the vehicle etc. (P.149) |
|
Not illuminated |
Charging connector is not inserted into AC charging inlet
When the charging schedule (P.130) is on standby
When charging is completed
|
*: Flashes for a certain period of time, and then turns off.
When a system malfunction occurs while charging or using the Remote Air Conditioning System, the charging indicator rapidly flashes for a certain period of time, and then turns off.
If this occurs, when a door is opened with the power switch off, a message is displayed on the multi-information display. When a message is displayed, follow the instructions displayed on the screen.
|
|
|
After removing the charging connector, securely install the AC charging inlet cap.
When using the AC charging cable and related parts
P.123 Precautions for low tempera- tures
In low temperatures, the AC charging cable and plug-cord may become hard. Therefore, make sure to not apply excessive force when they are hard. If excessive force is applied to the hardened AC charging cable and plug-cord, they may be damaged. |
 NOTICE
Plug-cord
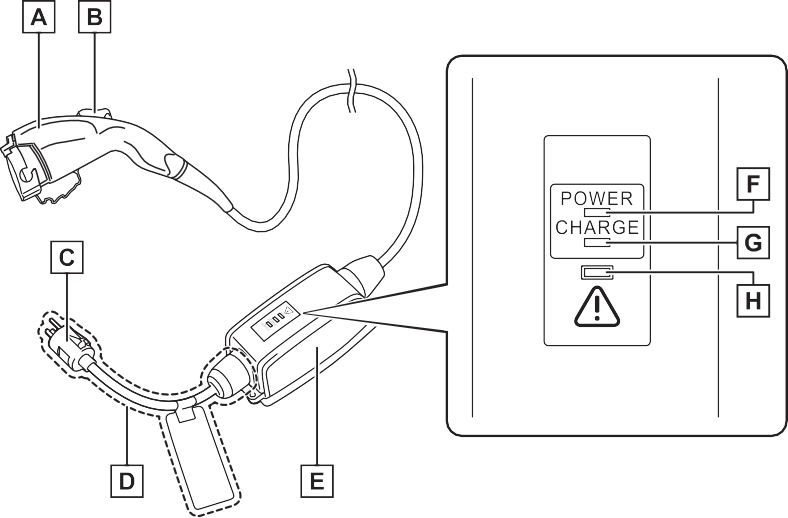
CCID (Charging Circuit Interrupting Device) Power indicator (P.104)
Charging indicator (P.104) Error warning indicator (P.104)
The CCID (Charging Circuit Interrupting Device) has the fol- lowing safety features.
If an electrical leakage is detected during charging, the power source will be automati- cally interrupted, thus prevent- ing fires or electrical shocks caused by electrical leakage.
If the power source is interrupted, the error warning indicator flashes.
If the power source is interrupted:
P.105
If a malfunction is found in the elec- trical leakage detection function as a result of the check, the error warning indicator flashes to inform the user. (P.105)
While charging, if heat is gener- ated due to looseness on the outlet side etc., this function suppresses heat by controlling the charging current.
The CCID (Charging Circuit Interrupting Device) is designed to prevent electrical current from being supplied to the charging connector when it is not con- nected to the vehicle, even if the plug is inserted into the outlet.
|
CCID (Charging Circuit Interrupting Device) indi- cators |
Power indicator
Illuminates when electricity is flow-
ing to the CCID (Charging Circuit Interrupting Device).
Illuminates when charging is in progress.
Flashes when there is an electrical leakage or when a malfunction occurs in the CCID (Charging Cir- cuit Interrupting Device).
When the error warning indicator is illuminated or flashing, temporarily remove the plug from the outlet and then reconnect it to check if the error indicator turns off.
If the error warning indicator turns off, charging is now possible.
If it does not turn off, perform the correction procedure in the following chart.
|
Status |
Power indi- cator |
Error warning indicator |
Cause/Correction procedure |
|
Charging sys- tem error |
Not illumi- nated |
Not illumi- nated or illu- minated |
An electrical leakage is detected and charging is canceled, or there is a mal- function in the AC charging cable. Consult your Toyota dealer |
|
Illuminated |
Flashes |
||
|
Plug tempera- ture detection malfunction |
Flashes |
Flashes |
There is a malfunction in the plug temperature detection part.*1 Consult your Toyota dealer |
|
Status |
Power indi- cator |
Error warning indicator |
Cause/Correction procedure |
|
Plug tempera- ture increase detection |
Flashes |
Not illumi- nated |
An increase in the tempera- ture of the plug is detected due to an improper connec- tion between the outlet and plug.*2 Check that the plug is securely connected to the outlet |
|
AC charging cable life span notice |
Illuminated |
Flashes |
The number of charges using the AC charging cable is nearing the end of its usable life span. Consult your Toyota dealer |
|
AC charging cable life span |
Illuminated |
Illuminated |
The number of charges using the AC charging cable has exceeded its usable number of charges. Consult your Toyota dealer |
*1: When this occurs, charging is carried out without a limited charging cur- rent.
*2: When this occurs, charging is carried out with a limited charging current.
|
Inspecting and maintain- ing the AC charging cable |
|
Locking and unlocking the charging port lid |
location shown in the illustra- tion) and open it.
The charging port lid will be locked when the lid is closed and the doors are locked using the smart key system or wire- less remote control.
If a door or charging port lid is not opened within approximately 60 seconds after the vehicle is unlocked, the security feature auto- matically locks the lid again when the doors are automatically locked. (P.199)
If the charging port lid is closed after the doors are locked, the lid will not be locked. In this case, close the lid and then lock the doors again.
If the charging port lid does not open when using the normal proce- dure, it can be opened in an emer- gency by performing the following steps.
The charging port lid is unlocked and can be opened.
*: Make sure to move in the direction shown in the illustration. Applying force in other directions may dam- age the emergency release lever.
This unlocking method is a tempo- rary correction procedure for emer- gency use only. If the problem persists, have the vehicle inspected by your Toyota dealer immediately.
|
Locking and unlocking the charging connector |
inlet. (The setting can be changed: P.109)
The charging connector will be
etc. after the charging connector is automatically locked.
*2: The charging connector can be unlocked by similar operations to that of “Auto Lock” (Default set- ting).
unlocked using the smart key system or wireless remote con- trol.
The method for locking and unlocking the charging connec- tor can be changed as follows
on the  screen on the multi- information display.
Refer to P.177 for details on how to change the settings.
*1: The charging connector will be unlocked if power supply is inter- rupted due to a power outage
The charging connector lock func- tion does not guarantee that theft of the AC charging cable will be pre- vented, and is not necessarily effec- tive for all mischiefs.
If the charging connector is locked while the doors are unlocked, lock and then unlock the doors to unlock the charging connector.
If the charging connector is not removed within approximately 30 seconds after the vehicle is unlocked, the security function auto- matically locks the connector again.
The charging connector lock set- tings cannot be changed when the AC charging cable is connected to the vehicle.
Check that the connector lock pin is not lowered.
If the connector lock pin is lowered, the connector lock is operating.
Unlock the doors using the smart key system or wireless remote con- trol and unlock the charging connec- tor lock and check that the connector lock pin is not lowered.
The charging connector can be unlocked by operating the emer- gency release lever.
The charging connector is unlocked and can be removed.
*: Make sure to move in the direction shown in the illustration. Applying force in other directions may dam- age the emergency release lever.
This method is a temporary correc- tion procedure for emergency use only. If the problem persists, have the vehicle inspected by your Toyota dealer immediately.
Do not operate the emergency release lever when the charging connector can be unlocked in the normal procedure.
|
|
|
When connecting the charging connector to the AC charging inlet
Do not insert hand into the con- nector lock portion.
A hand may be caught in the connector lock pin, resulting in an injury. |
 WARNING
|
|
|
Warnings for electrical faults
Make sure to observe the precau- tions in this Owner’s Manual when charging the vehicle. Failure to use a power source that fulfills the requirements, or failure to observe regulations while charging could lead to an acci- dent, possibly resulting in death or serious injury. |
 WARNING
|
Power sources |
NEMA 5-15R outlet
The illustration is an example shown for demonstration pur- poses, and may differ from the actual configuration.
For safe charging, the following charging equipment and settings are recommended.
When charging outdoors, connect the plug to a weatherproof outlet, and ensure that the plug remains waterproof while the plug is con- nected.
The upper limit of the charging cur- rent can be changed in “Vehicle Set-
tings” on the multi-information display.
hold .
press  .
.
The “Charging Settings” screen will be displayed.
press  .
.
The “Charging Current” screen will be displayed.
or “8A”, and then press  .
.
The maximum charging current during charging will be restricted
to 16A*1 or 8A.*2
If the breaker still trips while charging, even after changing the upper limit of the charging current, check if the connected power source meets the specified charging conditions. (P.111)
*1: Vehicles with 6.6 kW onboard traction battery charger only
*2: Restricting the charging current will lengthen the charging time.
Observe the following precau- tions.
If you do not follow them, fire, electrical shock or damage may occur, possibly resulting in death or serious injury.
The charging start time (or depar- ture time) and day can be set to carry out charging using the charging schedule at the desired date and time. (P.130)
The maximum charge amount in the hybrid battery (traction battery) charge mode is approximately 80% of the fully charged capacity for the charging from an external power source.
Estimated charging time*2, 3: Approximately 12 hours
Charging voltage: AC 240 V
Charging current*1: 16A
Estimated charging time*2, 3: Approximately 4 hours 30 minutes
Charging voltage: AC 240 V Charging current*1: 32A
Estimated charging time*2, 3: Approximately 2 hours 30 minutes
*1: This is the maximum value. Fur- thermore, the upper limit of the charging current can be changed in “Vehicle Settings”. (P.112)
*2: The time required to complete charging depends on conditions such as the remaining charge of the hybrid battery (traction bat- tery), the outside temperature and specifications of a charger (charging station).
*3: When using “My Room Mode”
(P.144), the time required for charging to complete may be longer or the charging may not be completed.
*4: If equipped
this vehicle.
This vehicle can be charged up to approximately 3.3 kW or 6.6 kW*.
However, depending on the used
charger or AC charging cable,
In the following situations, charging time may become longer than nor- mal:
*: Vehicles with 6.6 kW onboard traction battery charger only
DC Chargers cannot be used with
charging electricity may be limited.
*: Vehicles with 6.6 kW onboard traction battery charger only
|
Charging-linked functions |
When the AC charging cable is connected to the vehicle, electri- cal components such as the air conditioning system or audio system can be used using the external power source*.
*: The power of the hybrid battery (traction battery) may be used depending on the situation.
“Battery Heater” will operate when the “Battery Heater” of the “Charging Settings” on the multi- information display is on. (P.178)
This control operates after the AC charging cable remains con- nected to the vehicle for 3 days and “Battery Heater” automati- cally stops. It automatically insu- lates the hybrid battery (traction battery) in extremely low tem- peratures.
When the hybrid battery (trac- tion battery) is hot and the AC charging cable is connected to the vehicle, this function cools the hybrid battery (traction bat- tery) before charging is carried out.
may start again to charge the hybrid battery (traction battery).
charging.
In order to use EV mode or AUTO EV/HV mode, charge the hybrid battery (traction battery) at home before leaving.
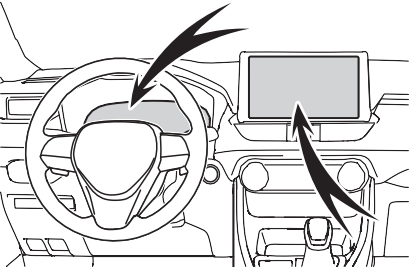
The charging schedule function (P.130) can be used to set the system to automatically fully charge the hybrid battery (traction battery) before your desired departure time. It is also possible to set the air con- ditioning to make the interior in a comfortable state before your desired departure time.
charge the hybrid battery (trac- tion battery).
If there are no charging facilities at your destination, the hybrid battery (traction battery) can be charged using the hybrid battery (traction battery) charge mode. (P.79)*
*: When using the hybrid battery (traction battery) charge mode while parked, make sure that no flammable objects are near the vehicle and the vehicle is parked in a well-ventilated area. (P.80)
Settings the charging schedule allows you to charge the hybrid bat- tery (traction battery) at the desired time such as late at night or early in the morning. Furthermore, the charging schedule can be set to automatically charge the hybrid bat- tery (traction battery) every day or at the same time on certain days. (P.130)
When a message is displayed, fol- low the instructions displayed on the screen. (P.152)
|
Checking information related to charging |
When any door is opened during charging, the current charging condition and approximate time remaining until charging is com- plete are displayed for a certain period of time.
When any door is opened with the power switch off after charging is complete, a mes- sage detailing the results of the charging is displayed for a while. Also, a message is displayed if an operation that stops charging
If approximately 100 seconds elapse after the power switch is turned to ON during charging, the power switch will automatically turn off and the display will disappear.
However, the vehicle differs greatly from standard household electrical goods in the following ways, and incorrect usage could cause fire or electric shock, pos- sibly leading to death or serious injury.
To charge properly, follow the procedure after reading the explanation below. Charging is intended to be carried out by licensed drivers only who prop- erly understand the charging procedure.
the AC charging cable without supervision. Also, keep the AC charging cable out of reach of infants.
If these light switches are turned on, then these features will con- sume electricity, and charging time will increase.
|
Inspecting the AC charging cable |
Before charging, make sure that each part of the AC charging cable is in good condition. (P.106)
The capacity of the hybrid battery (traction battery) will decline gradu- ally when the hybrid battery (traction battery) is in use. The rate at which it declines will differ in accordance with environmental conditions and the way in which the vehicle is used. Observing the following can help
suppress battery capacity decline.
After confirming that EV mode or AUTO EV/HV mode has switched to HV mode, turn the power switch off.
Also, if the hybrid battery (traction battery) capacity reduces, the dis- tance that can be driven in EV mode or AUTO EV/HV mode decreases. However, vehicle performance does not significantly become worse.
In the following situations, the remaining charge of the hybrid bat- tery (traction battery) after charging completes may be less than normal in order to protect the system (the EV driving range after the battery is fully charged may be shorter).*
When none of the above situations apply and there is a drastic drop in the remaining charge of the hybrid battery (traction battery) after
charging completes, have the vehi- cle inspected by your Toyota dealer.
*: When this occurs, even if the remaining charge display of the hybrid battery (traction battery) shows that it is fully charged, the remaining charge rapidly decreases faster than normal.
When the amount of power supplied by the charger is low or operation of the “Battery Heater”, etc., reduces the charging power sent to the hybrid battery (traction battery), the charging amount sent to the hybrid battery (traction battery) may decrease.
This device complies with Part 15 of the FCC Rules. Operation is subject to the following two conditions:
|
|
|
AC charging inlet
Do not disassemble, repair or modify the AC charging inlet. Doing so may lead to unforeseen accidents or serious injury. When the AC charging inlet needs to be repaired, consult your Toyota dealer. |
 WARNING
|
|
|
When using the AC charging cable and related parts
To prevent damage to the AC charging cable and related parts, observe the following precautions. When interrupting or canceling charging, remove the charging connector before removing the plug.
When removing the AC charging cable, check that the charging connector is unlocked.
|
 NOTICE
|
Do not forcefully pull the charging connector cap and AC charging inlet cap.
Do not apply a vibration to the charging connector while charging. Charging may be stopped.
Do not insert anything but the charging connector into the AC charging inlet.
When inserting the plug into or removing the plug from the out- let, make sure to hold the body of the plug.
Do not damage the AC charging inlet cap with a sharp object.
Do not forcefully pull the AC charging cable that is caught or entangled. If the cable is entan- gled, disentangle it before using.
|
|
Charging precautions |
|
When charging |
Make sure to hold the body of the plug and insert it firmly into the out- let.
Check that the power indicator on the CCID (Charging Circuit Inter- rupting Device) is illuminated. (If it is not illuminated, refer to P.147)
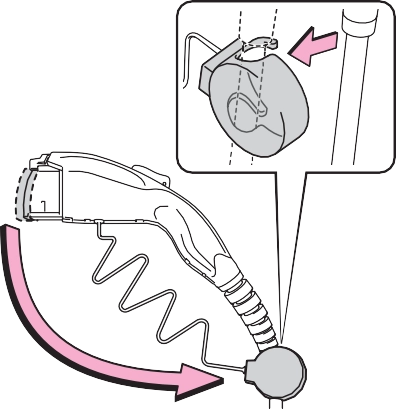
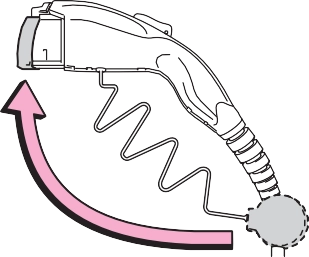
In order to reduce the load on the outlet and plug, when inserting the plug, use a string, etc. to hang the CCID (Charging Circuit Interrupting
Device) on a hook or equivalent.
|
|
The AC charging inlet light ( A
illuminate.
) will
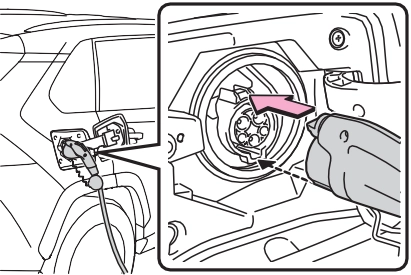
Align the guide position on the bot- tom of the charging connector, and push the charging connector straight into the AC charging inlet as far as possible.
Once a click sound is heard, check that the charging connector is securely locked.
When the charging connector is inserted straight as far as possible, it will automatically lock. (P.108)
|
|
Charging will not start if the
charging indicator does not illumi- nate when the charging connector is inserted. (P.105)
If the charging indicator is flashing, the charging schedule is registered. (P.130)
If the error warning indicator on the CCID (Charging Circuit Interrupting Device) flashes during charging, check P.125 and follow the correc- tion procedure.
The charging indicator will turn off when charging is completed.
The charging indicator will also turn off when charging is interrupted. In this case, refer to P.147.
|
|
The charging schedule (P.130) is registered and charging cannot be performed. To cancel charging using the charging schedule and start charging, perform any of the following procedures.
P.109
P.114
If the latch release button is pressed, charging will not begin even if the AC charging cable is connected.
Also, charging will be stopped if the latch release button is pressed and held for several seconds during charging. When restarting charging, reinsert the charging connector after pulling it out, and check that the charging indicator of the charging port illuminates.
P.115
When the power switch is turned to ON and the energy monitor is dis- played on the audio system screen, the charging connector is displayed on the energy monitor and the flow of electricity during charging is dis- played (P.187).
By installing a temperature sensor to the AC charging inlet, prevents parts from melting when the tem- perature rises due to foreign matter entering the charging connector.
When a certain temperature increase is detected, charging is stopped immediately and a mes- sage is displayed on the multi-infor- mation display. After the temperature has decreased, charging resumes by performing the operation to start charging again.
 NOTICE
Do not insert the plug into the AC charging inlet.
The AC charging inlet may be damaged.
Do not use private power genera- tors as a power source for charging.
Doing so may make charging unstable, the voltage may be insufficient, and the error warning indicator on the CCID (Charging Circuit Interrupting Device) of the AC charging cable may flash.
Due to the environment in which the power equipment is located, charging may be unstable due to noise, the voltage may be insuffi- cient, and the error warning indi- cator on the CCID (Charging Circuit Interrupting Device) of the AC charging cable may flash.
Cooling air intake vent for the onboard traction battery charger is installed under the rear seats.
Make sure to observe the follow- ing precautions regarding the cooling air intake vent. Failure to observe these precautions may result in a charging system mal- function.

The charging connector will be unlocked and the AC charging inlet light will illuminate when the doors are unlocked.
If the latch release button is pressed during charging (while the charging indicator is illuminated), charging will be interrupted.
|
|
Lock the doors to lock the charging port lid. (P.108)
|
|
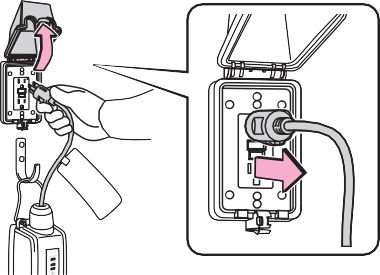
Hold the body of the plug when removing.
Make sure to put the cable away immediately after disconnecting. (P.129)
When leaving the plug inserted, inspect the plug and connector once a month to check if dirt or dust
has accumulated.
|
|
The level shown on the SOC (State of Charge) gauge (P.165) may drop slightly when the power switch is turned to ON, even if charging has been completed and the hybrid battery (traction battery) is fully charged. However, this does not indicate a malfunction.
Press the latch release button, check that the lever raises up, and then pull the charging connector towards you.
If the lever does not raise up even after the latch release button is pressed, the charging connector is locked. If this occurs, unlock the doors using the smart key system or wireless remote control to unlock the charging connector. (P.107)
P.110
Current date and time information is automatically set using GPS. How- ever, if GPS calibration of clock is turned off in the multimedia system settings, the date needs to be set on the multi-information display.
If the calendar settings check screen is displayed when an attempt was made to register a charge schedule, check that the cor- rect date is set. If it is incorrect, be sure to correct it.
If the calendar information is wrong, the charging schedule function will not operate normally.
One of the two following charging modes can be selected.
“Start”
“Departure”
Starts charging to finish at the set time.*3, 4
When this setting is selected, the air conditioning-linked func- tion can be used.
*1: Charging schedule function is performed in accordance with the clock in the multi-information display. Before registering the charging schedule, check the clock settings to the proper time.
*2: There might be a slight error in the timing when charging starts due to the state of the hybrid bat- tery (traction battery).
*3: When the system determines that there is no time to finish charging by the set scheduled departure time, it starts charging. Check the charging schedules.
*4: If sudden changes in tempera- ture or changes in the condition of the power source occur while charging, charging may not end exactly at the time estimated by the system.
When the charging mode is set to “Departure”, the vehicle air conditioning system (P.396) can be set to automatically oper- ate* according to the set time.
By adjusting the cabin temperature in advance, passengers can enjoy a pleasant interior immediately after entering the vehicle.
*: Operation starts approximately 20 minutes before the set depar- ture time.
It is possible to temporarily set the time of the next charging schedule without changing the registered repeated setting.*2
*1: The “Next Event” refers to the closest charging schedule from the current time among the regis- tered charging schedules.
Charging schedule is performed based on the “Next Event”.
*2: When “Next Event” is changed, the current charging schedule will be temporarily ignored and charging will not be carried out until the time specified by “Next Event”. (For example, when “Next Event” is set for 2 days later, even if items are registered on the charging schedule, charging will not be carried out until the time specified by “Next Event”.)
|
Registering the charging schedule |
|
|
Check the following items.
The charging start time is deter- mined based on the charging schedule at the time that the AC charging cable was connected.
Use an outlet that constantly sup- plies electricity. For outlets where the power is cut off due to a timer function, etc., charging may not be carried out according to plan if the power is cut off during the set time.
Even if multiple consecutive charging schedules are registered, the next charge will not be carried out according to the charging schedule until the AC charging cable is removed and reconnected after charging completes. Also, when the hybrid battery (traction battery) is fully charged, charging according to the charging schedule will not be carried out.
departure time. Therefore, the air conditioning will consume electric- ity and charging may not complete by the set departure time.
After applying to Toyota Apps, it is possible to use the smartphone application to change charging schedule settings.
For details about Toyota Apps, refer to http://www.toyota.com/connectedse rvices in the United States and http://www.toyota.ca/connected in Canada.
When the following operations are performed while the charging schedule is on standby, charging schedule is temporarily canceled and charging is started.
When the charging mode is set to “Departure”, charging schedule may be ignored due to the outside tem- perature and charging may start.
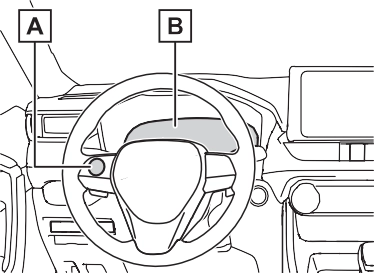
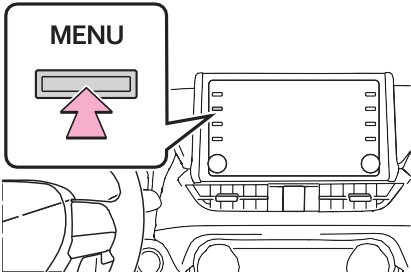
Meter control switches (P.171)
Multi-information display
When charging is carried out using the charging schedule, the hybrid
battery (traction battery) heating or cooling function may operate according to the temperature of the hybrid battery (traction battery).
 Press or of the meter control switches to select “Vehicle Settings”, and then
press and hold  .
.
press  .
.
The “Charging Settings” screen will be displayed.
may be shortened and “Battery Cooler” may not operate.
then press .
The “Charging Schedule” screen will be displayed.
then press  .
.
The “Scheduled Events” screen will
|
|
be displayed.
“Repeat” screen (step 9) is dis- played.
and then press  .
.
The “Charging Mode” screen will be displayed.
sor, and then press or to change the setting.
Set the desired charging mode and charging start (or departure) time.
When the charging mode is “Start”, this sets the charging start time.
When it is “Departure”, this sets the charging end time.
After changing the settings to the desired settings, press  .
.
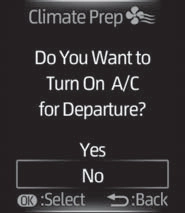
When the charging mode is set to “Departure”, the “Climate Prep” screen is displayed. When the charging mode is set to “Start”, the
Press or of the meter con- trol switches and select “Yes” or
“No”, and then press  .
.
Select “Yes” to turn on the air con- ditioning system and select “No” to turn it off.
The “Repeat” screen will be dis- played.
*: When the charging mode is set to “Start”, “Climate Prep” screen will not display.
|
|
select the desired day to acti- vate for the repeated setting,
 and then press .
Each time  is pressed, the repeated setting switches between on and off.
When set to on, the charging schedule is repeated on that day. It is possible to set more than one day to on.
If no days are set to on, charging is only carried out once according to the charging schedule for the next 24 hours.
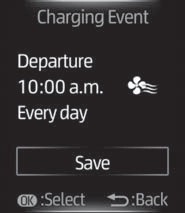
After changing the settings to the desired settings, select “Done”, and
then press  .
.
A screen where the settings can be saved will be displayed.
The settings will be saved.
If you wish to change the settings,
press  and perform the setting procedure again.
After setting operations are com- plete, when the AC charging cable is connected to the vehicle, charging will be carried out accord- ing to the charging schedule set-
tings.
|
|
A list of the registered charging schedule will be displayed.
|
|
then press  .
.
Each time  is pressed, the selected charging schedule switches between on and off.
When set to off, a charging sched- ule is ignored and charging accord- ing to the charging schedule is not
carried out. played.
A list of the registered charging schedule will be displayed.
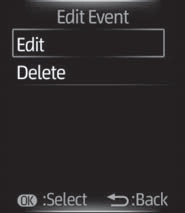
press and hold  .
.
The “Edit Event” screen will be dis-
item to operate, press  and perform the necessary operation.
|
|
Change the desired settings as described starting from step 7 of the “Registering the charging schedule” procedure. (P.133)
Press  to return to the previous screen.
A deletion confirmation screen will be displayed.
Press or of the meter con- trol switches to select “Yes”, and
then press  to delete the selected charging schedule.
To cancel deletion, select “No” and
then press  .
.
Press  to return to the previous screen.
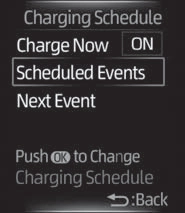
Operation on “Charging Schedule” screen
press  .
.
Each time  is pressed, “Charge Now” switches between on and off.
*: If “Closing Display” is not set to
“Charging Schedule” on the  screen of the multi-information display, the “Closing Display” is not displayed. In this case, check the settings on the multi-informa-
tion display.
The “Closing Display” screen is dis- played on the multi-information dis- play. (P.138)
 to set “Charge Now” to on.
Each time  is pressed, “Charge Now” switches between on and off.
*: When “Charge Now” is set to on or when using “My Room Mode” (P.144) etc., it is not possible to change the registered “Next Event”.
 .
.
The “Next Event” screen will be dis- played.
“Yes”, and then press  .
.
The confirmation message will be displayed on the screen.
Press  , and the “Charging Mode” screen will be displayed.
Press  to return to the previous screen.
Press  to return to the previous screen.
before the settings are confirmed
After charging completes, the “Next Event” displayed on the multi-infor- mation display will not change until the AC charging cable is removed, even after charging is performed according to the “Next Event” schedule.
Turning the setting of “Charge Now” on and then off can return the set- ting of “Next Event” to its original setting.
You can check the next charging schedule (“Next Event”) on the “Closing Display” screen* when “Closing Display” is set to “Charging
Schedule” on screen of the multi-information display and the power switch is turned off.
*: The “Closing Display” screen may
When the vehicle is in the following conditions, charging schedule set- ting operations are canceled.
not be displayed during charging.
|
|
The “Charging Schedule” screen will be displayed.
For details on how to operate the audio system screen, refer to “NAVIGATION AND MULTIMEDIA SYSTEM OWNER’S MANUAL”.
Charging schedules (calen- dar display)
Displays the week-long registered
charging schedule in a list using icons.
Press to add a new item to the charging schedule. (P.140)
Press to change or delete regis- tered items on the charging sched- ule. (P.141)
Press to set “Charge Now” to on. (P.142)
Press to close the “Charging Schedule” screen.
When an item is registered on the charging schedule, an icon is dis- played on the calendar.
*1: A row with a red line indicates the current time.
*2: When “Charge Now” (P.142) is set to on, the orange icon moves
to the position of the red line and changes to display “Charge Now”.
The “Edit Charging Event” screen will be displayed on the screen.
|
|

Charging mode
Press “Start” or “Departure” to set the desired charging mode.
When the charging mode is “Start”, set the charging start time (start time). When it is “Departure”, set the charging end time (departure time).
Press “+” or “-” to set the desired time.
Each time the button is pressed, the repeated setting for the selected day switches between on and off.
When turned on, the charging schedule is repeated on that day. It
is possible to turn more than one day on.
If no buttons are turned on, charging is only carried out once according to the charging schedule for the next 24 hours.
When the charging mode is set to “Departure”, the “Climate Prep” is displayed.
To operate the air conditioning sys- tem, press the “Climate Prep” but- ton to set the function to on.
Each time the button is pressed, the function switches between on and off.
The charging schedule is registered and an icon is added to the calen- dar.
To cancel registration of the charging schedule, press the return button.
After setting operations are com- plete, when the power switch is turned off and the AC charging cable is connected to the vehicle, charging is carried out according to the charging schedule settings.
The “Scheduled Events” screen will be displayed on the screen.
If the charging schedule you wish to change is not displayed on the screen, scroll the list up and down to display it.
Each time the button is pressed, the charging schedule switches between on and off.
The “Scheduled Events” screen will be displayed on the screen.
The settings screen will be dis- played on the screen.
It is also possible to display the “Edit Charging Event” screen by pressing the icon of the charging schedule you wish to change from those displayed on the calendar.
Change the desired settings as described in step 3 to step 4 of the “Registering the charging schedule” procedure. (P.140)
When a setting is changed, its icon on the calendar also changes.
Press “Delete”.
A deletion confirmation message will be displayed.
Press “Yes” to delete the selected charging schedule.
To cancel deletion, press “No” or the return button.
When a charging schedule is deleted, its icon is also deleted from the calendar.
Each time the button is pressed, “Charge Now” switches between on and off and the indicator on the but- ton turns on and off.
*: When “Charge Now” is turned on or when using “My Room Mode” (P.144) etc., the registered Next Event cannot be changed.
Next Event is displayed on the “Charging Schedule” screen with an orange icon.
A confirmation screen for the changes will be displayed.
The “Scheduled Events” screen will be displayed on the screen.
To cancel changing, press “No” or
the return button.
The charging schedule settings are saved and icons are added to the charging schedule.
To cancel changing Next Event, press the return button.
Event displayed on the display will not change until the AC charging cable is removed, even after charging is performed according to the Next Event schedule.
Turning the setting of “Charge Now” on and then off can return the set- ting of Next Event to its original set- ting.
When all the items in the charging schedule are turned off, icons are not displayed on the “Charging Schedule” screen (calendar dis- play).
The icons will be displayed when they are set to on using the “Sched- uled Events” screen.
When the vehicle is in the following conditions, charging schedule set- ting operations are canceled.
After charging completes, the Next
When “?” is pressed on the “Edit Charging Event” screen (P.141), an explanation of the setting item on the “Edit Charging Event” screen will be displayed.
|
|
|
Cautions performing the set- ting operation
As the hybrid system needs to be operating during setting up the display, ensure that the vehicle is parked in a place with adequate ventilation. In a closed area such as a garage, exhaust gases including harmful carbon monox- ide (CO) may collect and enter the vehicle. This may lead to death or a serious health hazard. |
 WARNING

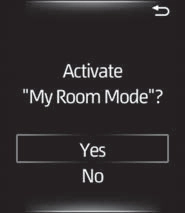
The setting screen of “My Room Mode” is displayed automatically on the multi-information display.
“Yes”, and then press  .
.
“My Room Mode” starts and sys- tems such as the air conditioning system and audio system can be used inside the vehicle.
When not using “My Room M select “No”, and then press .
e”,
|
|
When “My Room Mode” starts, the remaining charge display screen for the hybrid battery (traction battery) is displayed automatically on the multi-infor- mation display. The approxi- mate power balance (balance between electricity supply and consumption) while using “My Room Mode” can be checked from the color and size of the arrows.
Discharging status Charging status
When the electricity supply from the
AC charging cable is larger than the power consumption inside the vehi-
cle, becomes larger. When the power consumption is larger than
the electricity supply, becomes larger.
When the electricity supply and consumption are balanced (when
the power balance is judged to be
zero), and are displayed as the same size.
If “My Room Mode” is not turned on for approximately 100 seconds after the power switch is turned on during charging, the power switch will auto- matically turn off.
Any of the following may occur.
In this situation, the air condition- ing system cannot be used until the remaining charge of the hybrid battery (traction battery) increases. Turn the power switch off and use “My Room Mode” after the remaining charge of the hybrid battery (traction battery) is restored.
When “My Room Mode” starts while the charging schedule is on standby, charging schedules are ignored and charging starts.
When the power switch is turned on while the hybrid battery (traction battery) is fully charged and the charging connector that supplies power is connected, “Charging Port Lid is Open” is displayed on the multi-information display. In this
case, press  on the meter control switches to display the setting screen of “My Room Mode”, and then select “My Room Mode”.
When “My Room Mode” is used while the hybrid battery (traction battery) is fully charged, the electric power of the hybrid battery (traction battery) may be consumed. In this case, charging may be performed again.
When a message is displayed on the multi-information display while using or attempting to start “My Room Mode”, take the following cor- rection procedures.
There is insufficient remaining charge in the hybrid battery (traction battery) for starting “My Room Mode”.
Wait until the charge of the hybrid battery (traction battery) increases, then start “My Room Mode”.
The remaining charge in the hybrid battery (traction battery) is insuffi- cient.
Stop using “My Room Mode” and charge the hybrid battery (traction battery).
The power consumption inside the vehicle is greater than the power being charged to the hybrid battery (traction battery), and the remaining charge of the hybrid battery (traction battery) is low.*
*: The power balance status during “My Room Mode” can be checked from the remaining charge dis- play screen for the hybrid battery (traction battery) displayed on the multi-information display.
|
Likely cause |
Correction procedure |
|
Plug is not properly connected to outlet |
Check that the plug is properly con- nected to the outlet. |
|
Power is out |
After power is restored, carry out the charging procedure again. |
|
Building breaker is tripped and power is cut off |
Check that the breaker is connected and if there is no malfunction, check if the vehicle can be charged through another outlet. If charging is possible, the first outlet may have a malfunction. Contact the building or facility manager, or an electrician. |
|
Short circuit between CCID (Charging Circuit Interrupting Device) and plug |
Immediately stop charging and con- tact your Toyota dealer. |
|
Likely cause |
Correction procedure |
|
Electrical leakage detection function or self-diagnostic function operates and power is cut off |
When the voltage is insufficient, the error warning indicator may flash when there is noise interference. Perform a reset and connect to a proper power source. (P.105) If charging does not start, immedi- ately stop charging and contact your Toyota dealer. |
|
Likely cause |
Correction procedure |
|
The plug is not properly connected to the outlet |
Check whether the plug is properly connected to the outlet. |
|
Charging connector is not securely connected to AC charging inlet |
Check the connection status of the charging connector. When connecting the charging connector, make sure not to touch the latch release button. Insert the charging connector securely until you hear a click. The charging con- nector may not be connected cor- rectly if the latch release button is pressed while inserting.
After connecting the charging con- nector, check that the latch release button is not pressed and the charging indicator of the charging port is turned on.
If the charging indicator of the charging port does not illuminate, even though the charging connector is securely connected, there may be a malfunction in the system. Immedi- ately stop charging and contact your Toyota dealer. |
|
Likely cause |
Correction procedure |
|
Hybrid battery (traction battery) is already fully charged |
When the hybrid battery (traction battery) is fully charged, charging is not performed. |
|
The charger does not operate |
Please contact the facility manager when there is a problem with char- ger. |
|
Likely cause |
Correction procedure |
|
When charging indicator of the charging port flashes*: Charging schedule is registered |
When you wish to charge according to the charging schedule, wait until the set time. To start charging, set “Charge Now” to on. (P.137, 142) |
|
When charging indicator of the charging port rapidly flashes*: Mal- function occurred in an external power source or the vehicle |
Start the hybrid system and follow the instructions displayed by the message on the multi-information display. (P.152) |
*: Refer to P.100 for details regarding charging indicator of the charging port illumination and flashing.
|
Likely cause |
Correction procedure |
|
Vehicle clock is not properly adjusted |
Check the clock settings and adjust it to the proper time. (P.169) |
|
The vehicle calendar is not set cor- rectly. |
Check the calendar setting and set it to the correct date. (P.177) |
|
Likely cause |
Correction procedure |
|
AC charging cable is not connected to vehicle |
Before using the charging schedule, connect the AC charging cable. |
|
Incorrect charging mode selected |
Check the charging mode setting. (P.130) When the charging mode is “Start”, charging starts at the set time, but when it is “Departure”, charging is completed by the set time. (The charging start time is automatically controlled by the system.) |
|
Likely cause |
Correction procedure |
|
Smartphone is outside its coverage area |
Check the signal strength. If the smartphone is outside its coverage area, move to a place with a better signal. |
*: In order to use the smartphone application, it is necessary to apply to Toyota Apps. For details about Toyota Apps, refer to http://www.toyota.com/connectedservices in the United States and http://www.toyota.ca/connected in Canada.
|
Likely cause |
Correction procedure |
|
“Charge Now” is set to on |
When charging according to the charging schedule, set “Charge Now” to off. (P.137, 142) |
|
Charging schedule is set to off |
Check that charging schedule is not set to off. (P.135, 136) |
|
Charging mode is set to “Departure” and schedule departure time is close to current time |
When the system determines that there is no time to finish charging by the set scheduled departure time, it starts charging. Check the charging schedules. |
|
Likely cause |
Correction procedure |
|
AC charging cable was removed and reinserted while charging indicator of the charging port was flashing |
If the AC charging cable is removed and reinserted while the charging indicator is flashing, the charging schedule is canceled (P.125). Temporarily remove the AC charging cable, and then reconnect it. |
|
The Remote Air Conditioning Sys- tem was operated |
When the Remote Air Conditioning System is operated, the system will start charging, even if the charging schedule is registered. To carry out charging using the charging sched- ule, stop the Remote Air Condition- ing System, and then reconnect the AC charging cable. |
|
“Battery Heater” (P.115) operated |
When the charging mode is set to “Departure”, “Battery Heater” may operate before charging starts. Check the status of the charging indicator of the charging port. (P.100) |
|
Outside temperature is low and hybrid battery (traction battery) warming control (P.116) operated (Alaska and Canada only) |
When hybrid battery (traction bat- tery) warming control operates, the charging schedules are ignored and charging starts. In order to protect the hybrid battery (traction battery), allow charging to continue. |
|
Likely cause |
Correction procedure |
|
Charging end time does not match estimated end time due to condition of power source or outside tempera- ture |
If sudden changes in temperature or changes in the condition of the power source occur while charging, charging may end earlier than the time estimated by the system. |
|
Likely cause |
Correction procedure |
|
“Climate Prep” is set to on |
When “Climate Prep” is set to on, the air conditioning operates until the set departure time. Therefore, charging may not com- plete by the set time due to charging conditions. To have the hybrid battery (traction battery) fully charged, allow charging to continue. |
|
Charging end time does not match estimated end time due to condition of power source or outside tempera- ture |
If sudden changes in temperature or changes in the condition of the power source occur while charging, charging may not end exactly at the time estimated by the system. |
|
Likely cause |
Correction procedure |
|
AC charging cable was connected after set time |
Connect the AC charging cable before the time set in “Start”. |
When this occurs, follow the instructions displayed on the screen.
|
Likely cause |
Correction procedure |
|
Charging connector is removed while charging |
When the charging connector is removed while charging, charging stops. If you want to fully charge the hybrid battery (traction battery), reconnect the charging connector. |
|
After the hybrid battery (traction bat- tery) is fully charged, the charging connector is removed while the hybrid battery (traction battery) is being recharged again because electricity-consuming functions* have been used and the remaining charge is now reduced. |
|
|
Charging connector is not securely connected |
Check the connection status of the charging connector. When connecting the charging connector, make sure not to touch the latch release button. Insert the charging connector securely until you hear a click. The charging con- nector may not be connected cor- rectly if the latch release button is pressed while inserting.
After connecting the charging con- nector, check that the latch release button is not pressed and the charging indicator of the charging port is turned on.
If charging cannot be carried out, even though the proper procedures were followed, have the vehicle inspected by your Toyota dealer. |
|
Latch release button of charging connector was pressed while charging |
When the latch release button is pressed while charging, charging stops. To continue charging, recon- nect the charging connector. |
*: Electricity is consumed when operating “Battery Heater” (P.115), the air conditioning-linked function (P.131) or Remote Air Conditioning System (P.405).
|
Likely cause |
Correction procedure |
|
Charging was stopped to protect the hybrid battery (traction battery) as it continued to remain hot for a certain period of time. |
Allow the hybrid battery (traction bat- tery) to cool down and perform charging again if the charging amount has not reached the desired amount. |
|
Likely cause |
Correction procedure |
|
Problem in power supply from exter- nal power source |
Check the following items. Plug is not disconnected
Power source indicator on the CCID (Charging Circuit Interrupting Device) is illuminated
The circuit breaker has tripped
If there is no problem with any of the above items, there may be a prob- lem with the outlet of the building. Contact an electrician and request an inspection. (Contact the facility manager of the charging station when there is a problem with charging station.) If charging cannot be carried out, even though there is no problem with the power source path, there may be a malfunction in the system. Have the vehicle inspected by your Toyota dealer. Furthermore, if the error warning indicator on the CCID (Charging Cir- cuit Interrupting Device) is flashing, there may be an electrical leakage. Consult your Toyota dealer. |
|
Likely cause |
Correction procedure |
|
Charger has stopped charging |
Charging may be canceled by an interruption of power supply depend- ing on specifications of a charger. Refer to the instructions provided with the charger. When charging is stopped using the charger
Equipment with charging schedule function
Equipment that is not compatible with the charging schedule func- tion of the vehicle
Check if it is possible to charge with the AC charging cable equipped to the vehicle. If charging cannot be carried out, even when using the genuine AC charging cable, consult your Toyota dealer. |
|
Likely cause |
Correction procedure |
|
Charger is not compatible with vehi- cle |
Check if it is possible to charge with the AC charging cable equipped to the vehicle. If charging cannot be carried out, even when using the genuine AC charging cable, consult your Toyota dealer. |
|
Charger has stopped charging |
|
Likely cause |
Correction procedure |
|
Problem in power supply from exter- nal power source |
Check the following items. Plug is securely inserted
Extension cord is not used and outlet is not overloaded
Connected to a dedicated power line
Electrical leakage has occurred or not
If there is no problem with any of the above items, there may be a prob- lem with the outlet of the building. Contact an electrician to request an inspection. If charging cannot be carried out, even though there is no problem with the power source path, there may be a malfunction in the system. Have the vehicle inspected by your Toyota dealer. |
|
Charger has stopped charging |
Check if it is possible to charge with the AC charging cable equipped to the vehicle. If charging cannot be carried out, even when using the genuine AC charging cable, consult your Toyota dealer. |
|
Likely cause |
Correction procedure |
|
Power is being consumed by electri- cal components of vehicle |
Check the following items, and then carry out charging again. If the headlights and audio are turned on, turn them off.
Turn the power switch off.
If charging cannot be carried out, even after performing the above, the auxiliary battery may not be suffi- ciently charged. Operate the hybrid system for approximately 15 minutes or more to charge the auxiliary bat- tery. |
|
Likely cause |
Correction procedure |
|
Malfunction occurred in charging system |
Have the vehicle inspected by your Toyota dealer. |
|
Likely cause |
Correction procedure |
|
The Hybrid battery (traction battery) warming control was operated (P.116) |
When the hybrid battery (traction battery) warming control operates, the charging schedule is not used and charging is performed. This is a control to protect the hybrid battery (traction battery), and not a malfunction. |
Vehicle status informa- tion and indicators
159
3
Warning lights and indicators
Download Manual