Mirrors
Always check that the inside and outside mirrors are properly adjusted before you start driving.
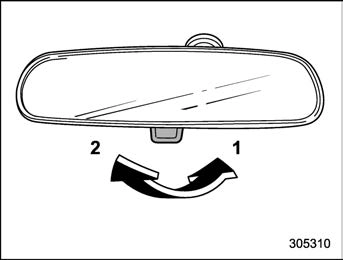
Push the tab on the mirror for normal use. To reduce glare from the headlights of the vehicle behind you, pull the tab to the antiglare position.
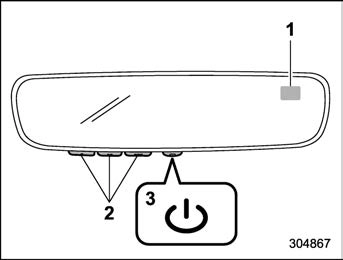
During nighttime driving, the auto-dimming feature senses distracting glare from vehicle headlights behind you and auto- matically dims to eliminate the glare and preserve your vision.
Press the “  ” switch to turn the auto- dimming feature on/off. The auto-dimming feature is enabled when the switch’s green LED indicator is on. The auto-dimming feature will default to on with each ignition cycle.
 ” switch for more than 3 seconds or until the display turns on/off. The compass feature will default to on with each ignition cycle.
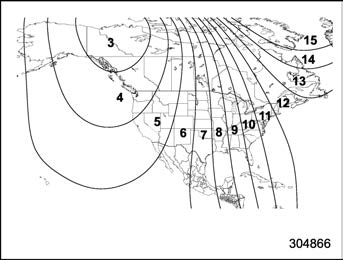
Compass calibration zones
 ” switch for more than 6 seconds or until a zone number appears in the display.
 ” switch again until your current location zone number appears. After you stop press- ing the switch, your new zone number will be saved. Within a few seconds, the display will show a compass direc- tion.
 ” switch for more than 9 seconds or until a “C” appears in the display. Once a “C” appears in the display, slowly drive the vehicle in circles until compass is cali- brated.
The HomeLink® Wireless Control System provides a convenient way to replace up to three hand-held radio-frequency remotes used to activate devices such as gate operators, garage door openers, entry door locks, security systems, and even home lighting. The below steps are gen- eric programming instructions; for Genie and Sommer garage door openers, please go directly to the HomeLink website. Additional information and programming videos can be found at www.HomeLink.com and www.youtube.com/HomeLinkGentex.
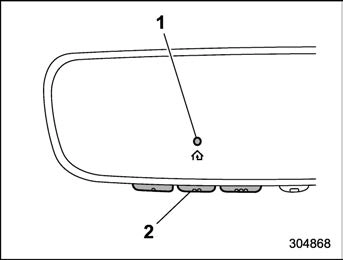
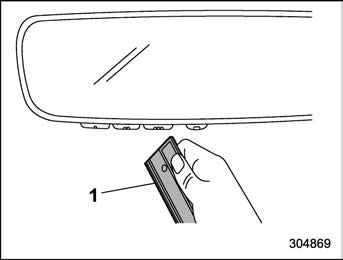
1) Garage door opener remote
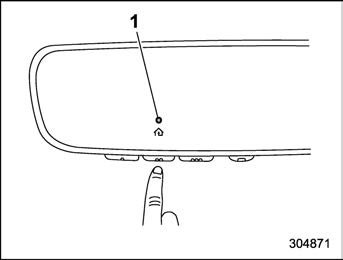

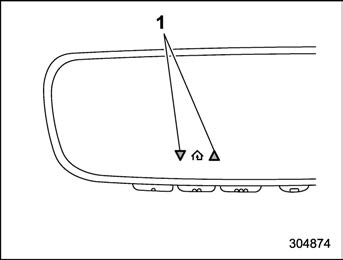
1) Status Indicators
P246.
In the event that there are still program- ming difficulties or questions, additional HomeLink information and programming videos can be found at www.HomeLink.com and www.youtube.com/HomeLinkGentex. For Genie and Sommer garage door openers please go directly to the HomeLink web- site.
Canadian radio-frequency laws require transmitter remote signals to “time-out” (or quit) after several seconds of transmis- sion, which may not be long enough for HomeLink to pick up the signal during programming. Similar to this Canadian law, some U.S. gate operators are de- signed to “time-out” in the same manner. The indicator LED on the hand-held remote will go off when the device times out, indicating that it has finished transmit- ting.
If you live in Canada or you are having difficulties programming a gate operator or garage door opener by using the program- ming procedures, replace “Programming a New HomeLink Button” step 3 with the following:
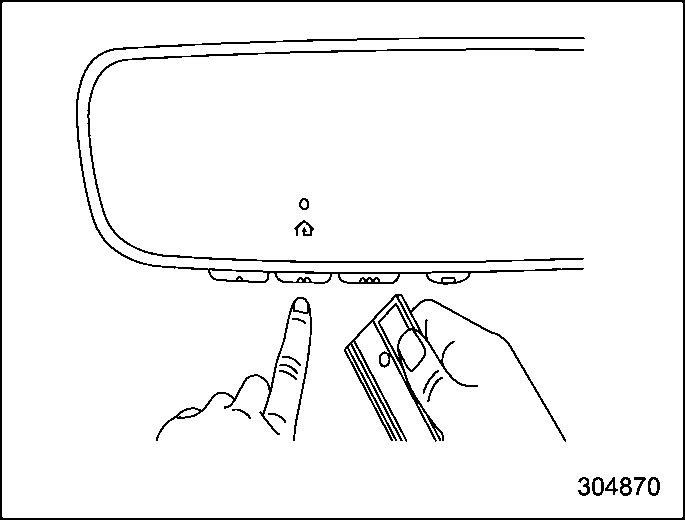
While the HomeLink indicator light is flashing orange, press and release (“cy- cle”) your device’s hand-held remote every two seconds until the HomeLink indicator light changes from orange to green. You may now release the hand-held remote button.
Proceed with “Programming a New HomeLink Button” step 4 to complete.
To operate, simply press and release the programmed HomeLink button. Activation will now occur for the trained device (i.e. garage door opener, gate operator, secur- ity system, entry door lock, home/office lighting, etc.). For convenience, the hand- held remote of the device may also be used at any time.
To erase programming from the three buttons (individual buttons cannot be erased but can be “reprogrammed” as outlined below), follow the step noted:
Press and hold the two outer HomeLink buttons for at least 10 seconds. The LED indicator will change from continuously lit to rapidly flashing. Release both buttons. Do not hold for longer than 20 seconds. HomeLink is now ready to be programmed at any time beginning with “Programming a New HomeLink Button” - step 1.
To program a previously trained button, follow these steps:
HomeLink has the capability of commu- nicating with your garage door opener. HomeLink can receive and display “clos- ing” or “opening” status messages from compatible garage door opener systems. At any time, HomeLink can also recall and display the last recorded status commu- nicated by the garage door opener to indicate your garage door being “closed” or “opened”.
HomeLink has the capability of receiving this communication from the garage door opener at a range up to 820 feet (250 m).
Range may be reduced by obstacles such as houses or trees. You may have to slow your vehicle speed to successfully receive the garage door opener communication.

Within five seconds after programming a new HomeLink button, both of HomeLink’s garage door status indicators will flash rapidly green indicating that the garage door two-way communication has been enabled. If your garage door status in- dicators flashed, two-way communication programming is complete.
If the garage door status indicators do not flash, additional HomeLink information and programming videos can be found
online at www.HomeLink.com and www.youtube.com/HomeLinkGentex.
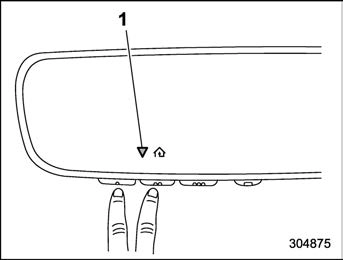
Recall and display (at any time) the last recorded garage door status message communicated to HomeLink by simulta- neously pressing HomeLink buttons 1 and 2 for two seconds. HomeLink will display the last recorded status for three seconds.
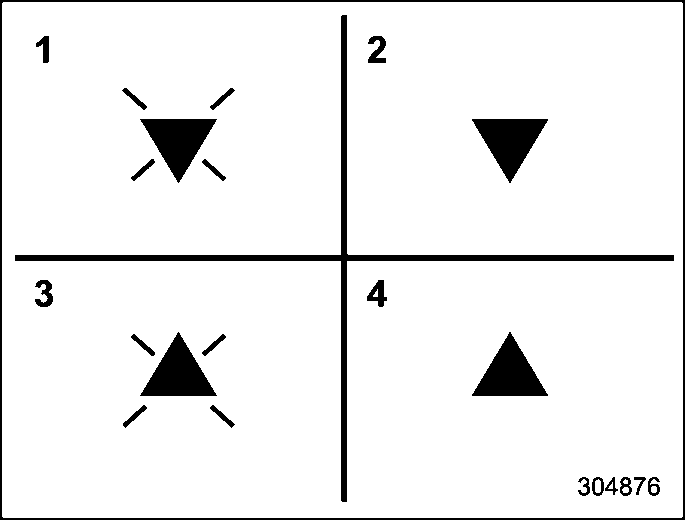
If two-way communication programming is successful, HomeLink will display the status of your garage door opener with arrow indicators.
In the event that there are still program- ming difficulties or questions, additional HomeLink information and programming videos can be found at www.HomeLink.com, www.youtube.com/HomeLinkGentex, or by calling the toll-free HomeLink-hotline at 1-800-355-3515.
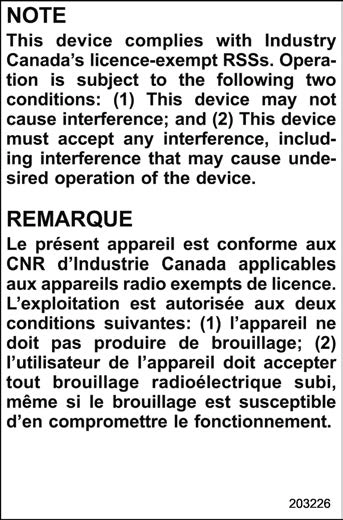
This device complies with part 15 of the FCC Rules. Operation is subject to the following two conditions: (1) This de- vice may not cause harmful interfer- ence, and (2) this device must accept any interference received, including interference that may cause undesired operation.
. Canada-spec. models
HomeLink® and the HomeLink® house are registered trademarks of Gentex Corpora- tion.
! Remote control mirror switch
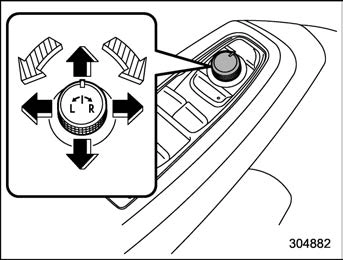
: Select side to adjust
: Direction control
The remote control mirrors operate only when the ignition switch is in the “ON” or “ACC” position.
The mirrors can also be adjusted manu- ally.
For details, refer to “Memory function (driver’s seat – if equipped)” P37.
! Reverse tilt-down feature (if equipped)
When backing up the vehicle, the front passenger’s side outside mirrors will turn downward automatically to provide better rear visibility.
The outside mirror surface will return to its original position when the following condi- tion are met.
– if equipped)” P37.
250 Defogger and deicer
To adjust the reverse tilt-down mirror angle, adjust the outside mirror using the remote control mirror switch while the reverse tilt-down operates. For details about how to adjust the outside mirror angle, refer to “Remote control mirror switch” P249.
The angle of the reverse tilt-down mirror can be registered. Register the position with button “1”, “2” or each of the access key fobs and retrieve the position.
For details about registration or retrieval of a position, refer to “Memory function (driver’s seat – if equipped)” P37.
Hold last position function:
The angle of the reverse tilt-down mirror can be set to the latest adjusted angle.
The hold last position function operates when the following condition are met.
1.18 in (30 mm) or more.
Download Manual