SEATS
Seats are a part of the Occupant Restraint system of the vehicle.
MANUAL FRONT SEAT ADJUSTMENT
Both front seats are adjustable forward or rearward. The manual seat adjustment handle is located under the seat cushion at the front edge of each seat.
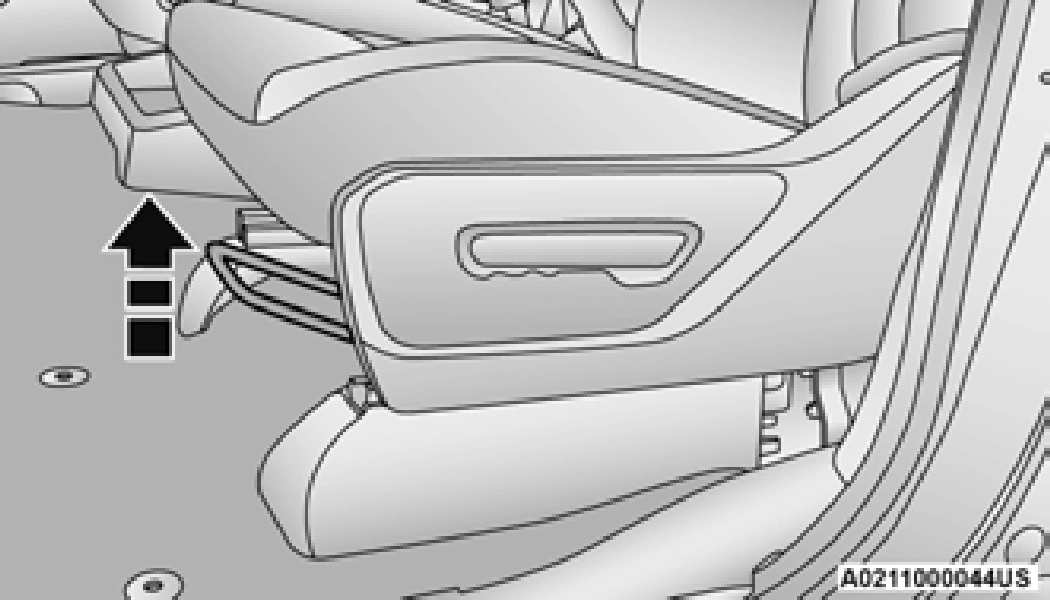
While sitting in the seat, pull up on the handle and slide the seat forward or rearward. Release the bar once you have reached the desired position. Then, using body pressure, move forward and rearward on the seat to be sure that the seat adjusters have latched.
The recline lever is located on the outboard side of the seat. To recline the seat, lean forward slightly, lift the lever, lean back to the desired position and release the lever. To return the seatback to its normal upright position, lean forward and lift the lever. Release the lever once the seat back is in the upright position.

40-20-40 Front Bench Seat — If Equipped
The seat is divided into three segments. The outboard seat portions are each 40% of the total width of the seat. If equipped, the back of the center portion (20%) easily folds down to provide an armrest/center storage compartment.
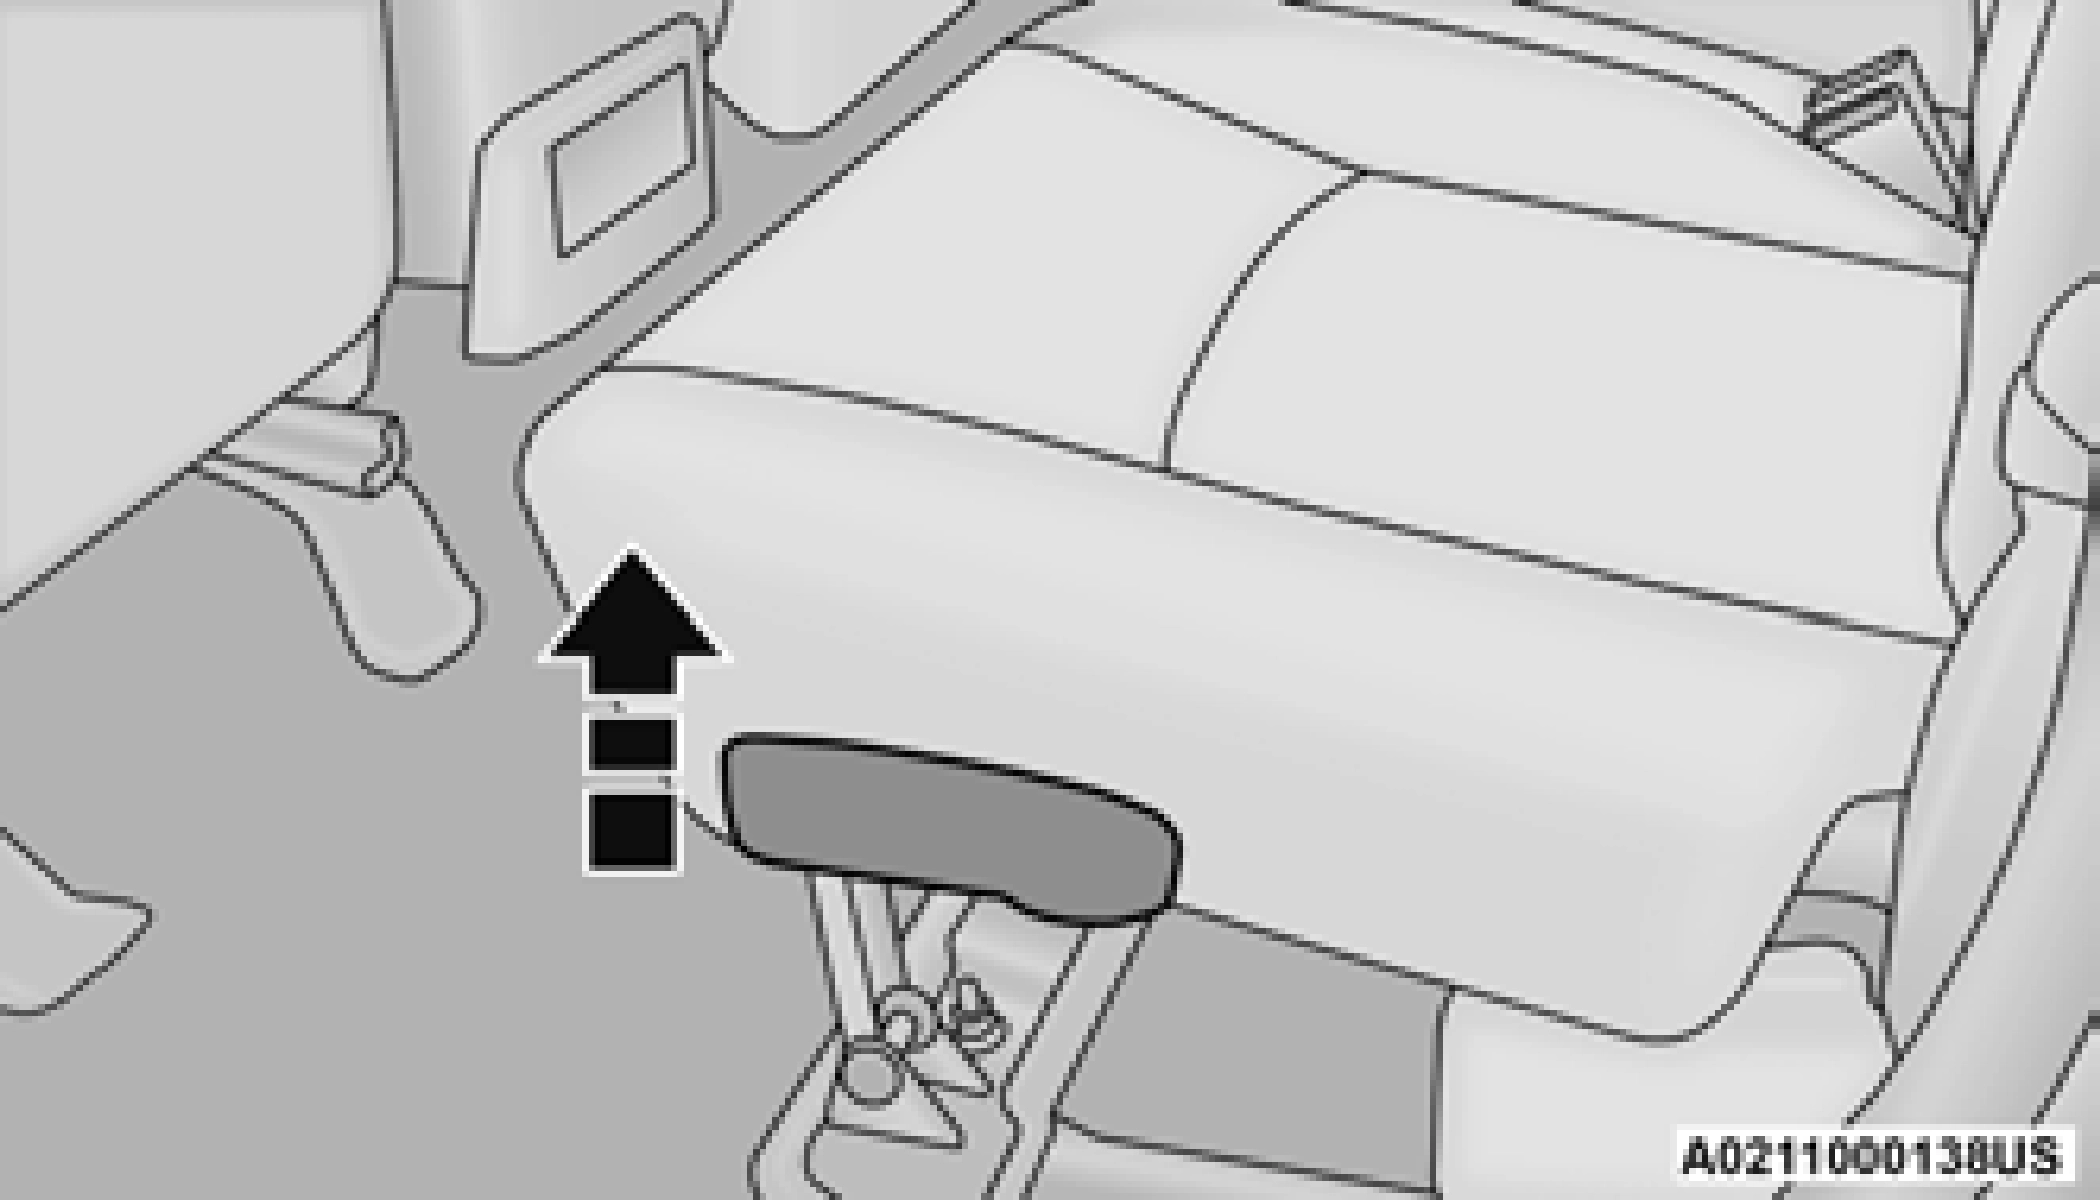
MANUAL REAR SEAT ADJUSTMENT
The recliner handle is located on the outside of the seat cushion. To adjust the seatback, lift upward on the handle, lean back on the seatback and when you reach the desired position, release the handle.
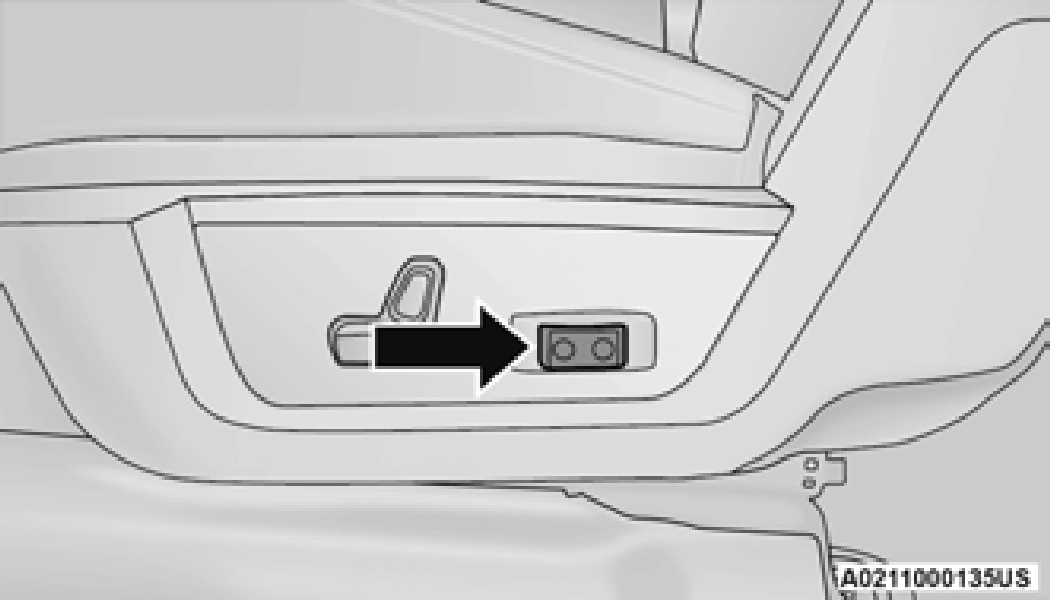
POWER DRIVER SEAT ADJUSTMENT — IF EQUIPPED
Some models may be equipped with an
eight-way power driver's seat. The power seat switches are located on the outboard side of the driver's seat cushion. There are two power seat switches that are used to control the movement of the seat cushion and the seatback.
2
The seat can be adjusted both forward and rearward by using the power seat switch. The seat will move in the direction of the switch. Release the switch when the desired position has been reached.
The height of the seats can be adjusted up or down by using the power seat switch. The seat will move in the direction of the switch. Release the switch when the desired position has been reached.
The angle of the seat cushion can be adjusted up or down using the power seat switch. The front of the seat cushion will move in the direction of the switch. Release the switch when the desired position has been reached.
The angle of the seatback can be adjusted forward or rearward by using the power seat switch. The seat will move in the direction of the switch. Release the switch when the desired position is reached.
(Continued)
Vehicles equipped with power driver or passenger seats may also be equipped with power lumbar. The power lumbar switch is located on the outboard side of the power seat. Push the switch forward to increase the lumbar support. Push the switch rearward to decrease the lumbar support.
Easy Entry/Exit Seat
This feature provides automatic driver’s seat positioning to enhance driver mobility when entering and exiting the vehicle.
The distance the driver’s seat moves depends on where you have the driver’s seat positioned when you place the ignition in the OFF position.
2.4 inches (60 mm) rearward if the driver’s seat position is greater than or equal to
2.7 inches (67.7 mm) forward of the rear stop. The seat will return to its previously set position when you place the ignition into the ACC or RUN position.
0.3 inches (7.7 mm) forward of the rear stop if the driver’s seat position is between
0.9 inches and 2.7 inches (22.7 mm and
67.7 mm) forward of the rear stop. The seat will return to its previously set position when you place the ignition to the ACC or RUN posi- tion.
When enabled in Uconnect Settings, Easy Entry and Easy Exit positions are stored in each memory setting profile page 34.
The Easy Entry/Exit feature is enabled or disabled through the programmable features in the Uconnect system page 258.
HEATED SEATS — IF EQUIPPED
On some models, the front and rear seats may be equipped with heaters located in the seat cushions and seat backs.
The heated seats control buttons are located on the center instrument panel below the touchscreen, and are also located within the climate or controls screen of the touchscreen.
If the vehicle is equipped with a 12-inch radio, there will only be control buttons through the touchscreen.
 once to turn the HI setting on.
 a second time to turn the MED setting on.
2
 a third time
to turn the LO setting on.
 a fourth time to turn the heating elements off.
For information on use with the Remote Start system, see page 23.
On some models, the two outboard rear seats are equipped with heated seats. The heated seat switches for these seats are located on the rear of the center console.
There are two heated seat switches that allow the rear passengers to operate the seats independently. You can choose from HI, MED,
LO, or OFF heat settings. Amber indicator lights in each switch indicate the level of heat in use.
 once to turn the HI setting on.
 a second time to turn the MED setting on.
 a third time to turn the LO setting on.
 a fourth time to turn the heating elements off.
VENTILATED SEATS — IF EQUIPPED
Located in the seat cushion are small fans that draw the air from the passenger compartment and move air through fine perforations in the
seat cover to help keep the driver and front passenger cooler in higher ambient temperatures. The fans operate at three speeds, HI, MED and LO.
The front ventilated seats control buttons are located on the center instrument panel below the touchscreen, and are also located within the climate or controls screen of the touchscreen.
If the vehicle is equipped with a 12-inch radio, there will only be control buttons through the touchscreen.
 once to choose HI.
 a second time to choose MED.
 a third time to choose LO.
 a fourth time to turn the ventilation off.
The engine must be running for the ventilated seats to operate.
For information on use with the Remote Start system, see page 23.
HEAD RESTRAINTS
Head restraints are designed to reduce the risk of injury by restricting head movement in the event of a rear impact. Head restraints should be adjusted so that the top of the head restraint is located above the top of your ear.
Do not reverse the head restraints (making the rear of the head restraint face forward) in an attempt to gain additional clearance to the back of your head.
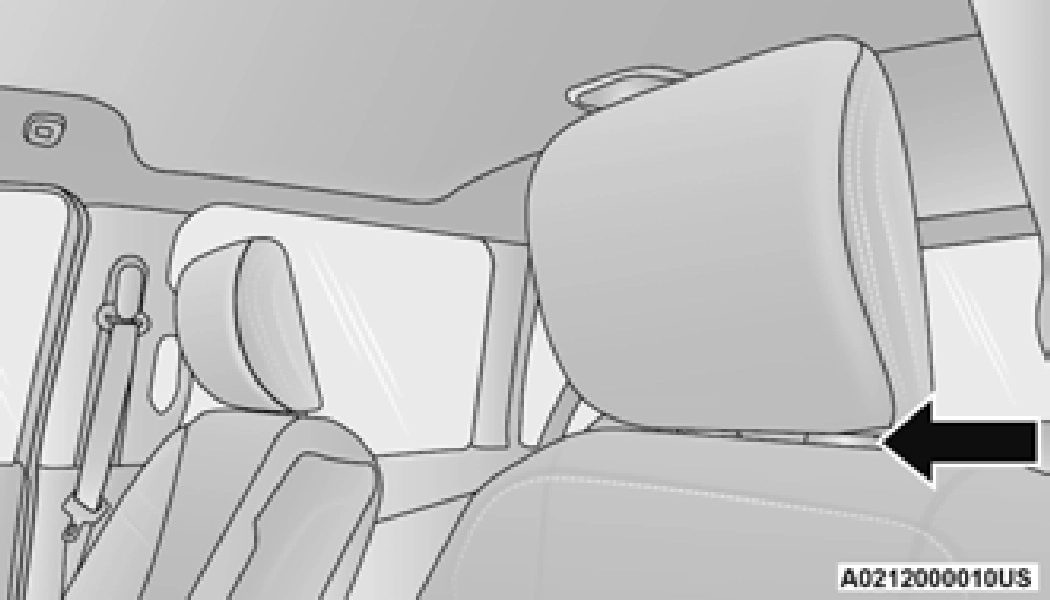
Four-Way Head Restraints — If Equipped Your vehicle may be equipped with front
four-way driver and passenger head restraints.
To raise the head restraint, pull upward on the head restraint. To lower the head restraint, push the adjustment button, located at the base of the head restraint, and push downward on the head restraint.
To adjust the head restraint forward, pull the top of the head restraint toward the front of the vehicle as desired and release. To adjust the head restraint rearward, pull the top of the head restraint to the forward most position and release. The head restraint will return to the rear most position.

NOTE:
Four-way head restraints have seven tilt/ locking positions. When pulling fully forward, the head restraint will spring back to the untilted, rearward most position when released.
Two-Way Head Restraints — If Equipped Your vehicle may be equipped with front
two-way driver and passenger head restraints.
To raise the head restraint, pull upward on the head restraint. To lower the head restraint, push the adjustment button, located at the base of head restraint, and push downward on the head restraint.
NOTE:
If your vehicle is equipped with a front bench seat, the center head restraint is not adjustable or removable.
2
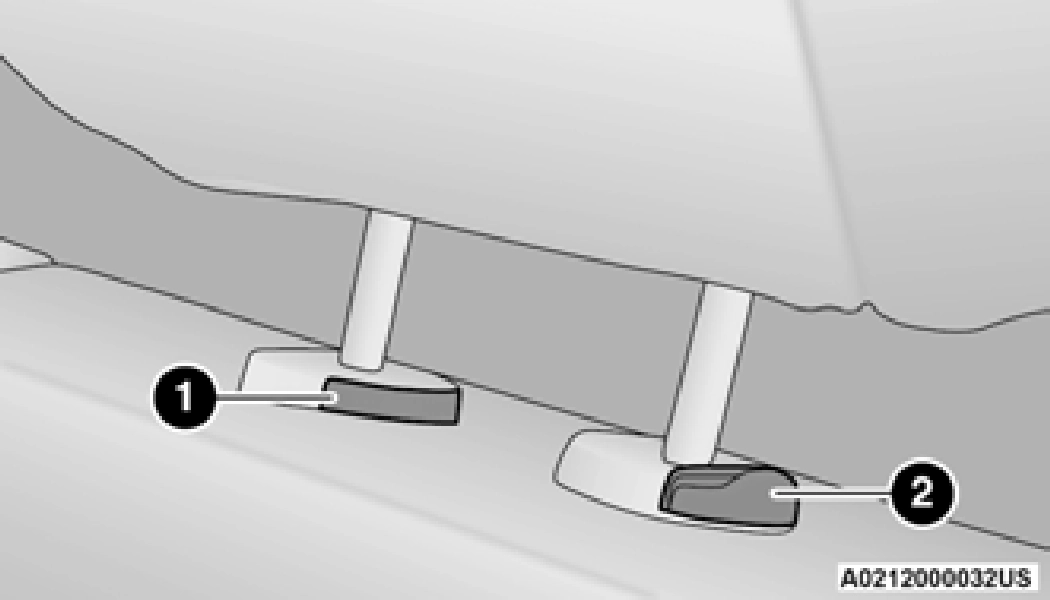
To remove the head restraint, push the adjustment button and the release button while pulling upward on the whole assembly. To reinstall the head restraint, put the head restraint posts into the holes and adjust it to the appropriate height.
To remove the head restraint, push the adjustment button and the release button while pulling upward on the whole assembly. To reinstall the head restraint, put the head restraint posts into the holes and adjust it to the appropriate height.
To remove outboard restraints, the rear seat bottom must be folded up.
The rear seats are equipped with adjustable and removable head restraints. To raise the head restraint, pull upward on the head restraint. To lower the head restraint, push the adjustment button located on the base of the head restraint and push downward on the head restraint.
180 degrees to the incorrect position in an attempt to gain additional clearance to the back of the head.
Download Manual