USB/mp3 control — if equipped
This feature allows a external USB device to be plugged into the USB port, located in the glove compartment. If equipped, there may also be two USB ports located on the lower trim piece right behind the driver’s sliding door that are for charging devices only.
iPod® control supports Mini, 4G, Photo, iPod® nano, 5G iPod® and iPhone® devices. Some iPod® software versions may not fully support the iPod® control features. Please visit Apple’s® website for software updates.
Note:
Connecting a consumer electronic audio device to the AUX port located in the radio faceplate, plays media, but does not use the MP3 control feature to control the connected device.
CONNECTING THE EXTERNAL USB DEVICE
Use the connection cable to connect a external USB device to the vehicle's USB connector port which is located in the glove compartment.
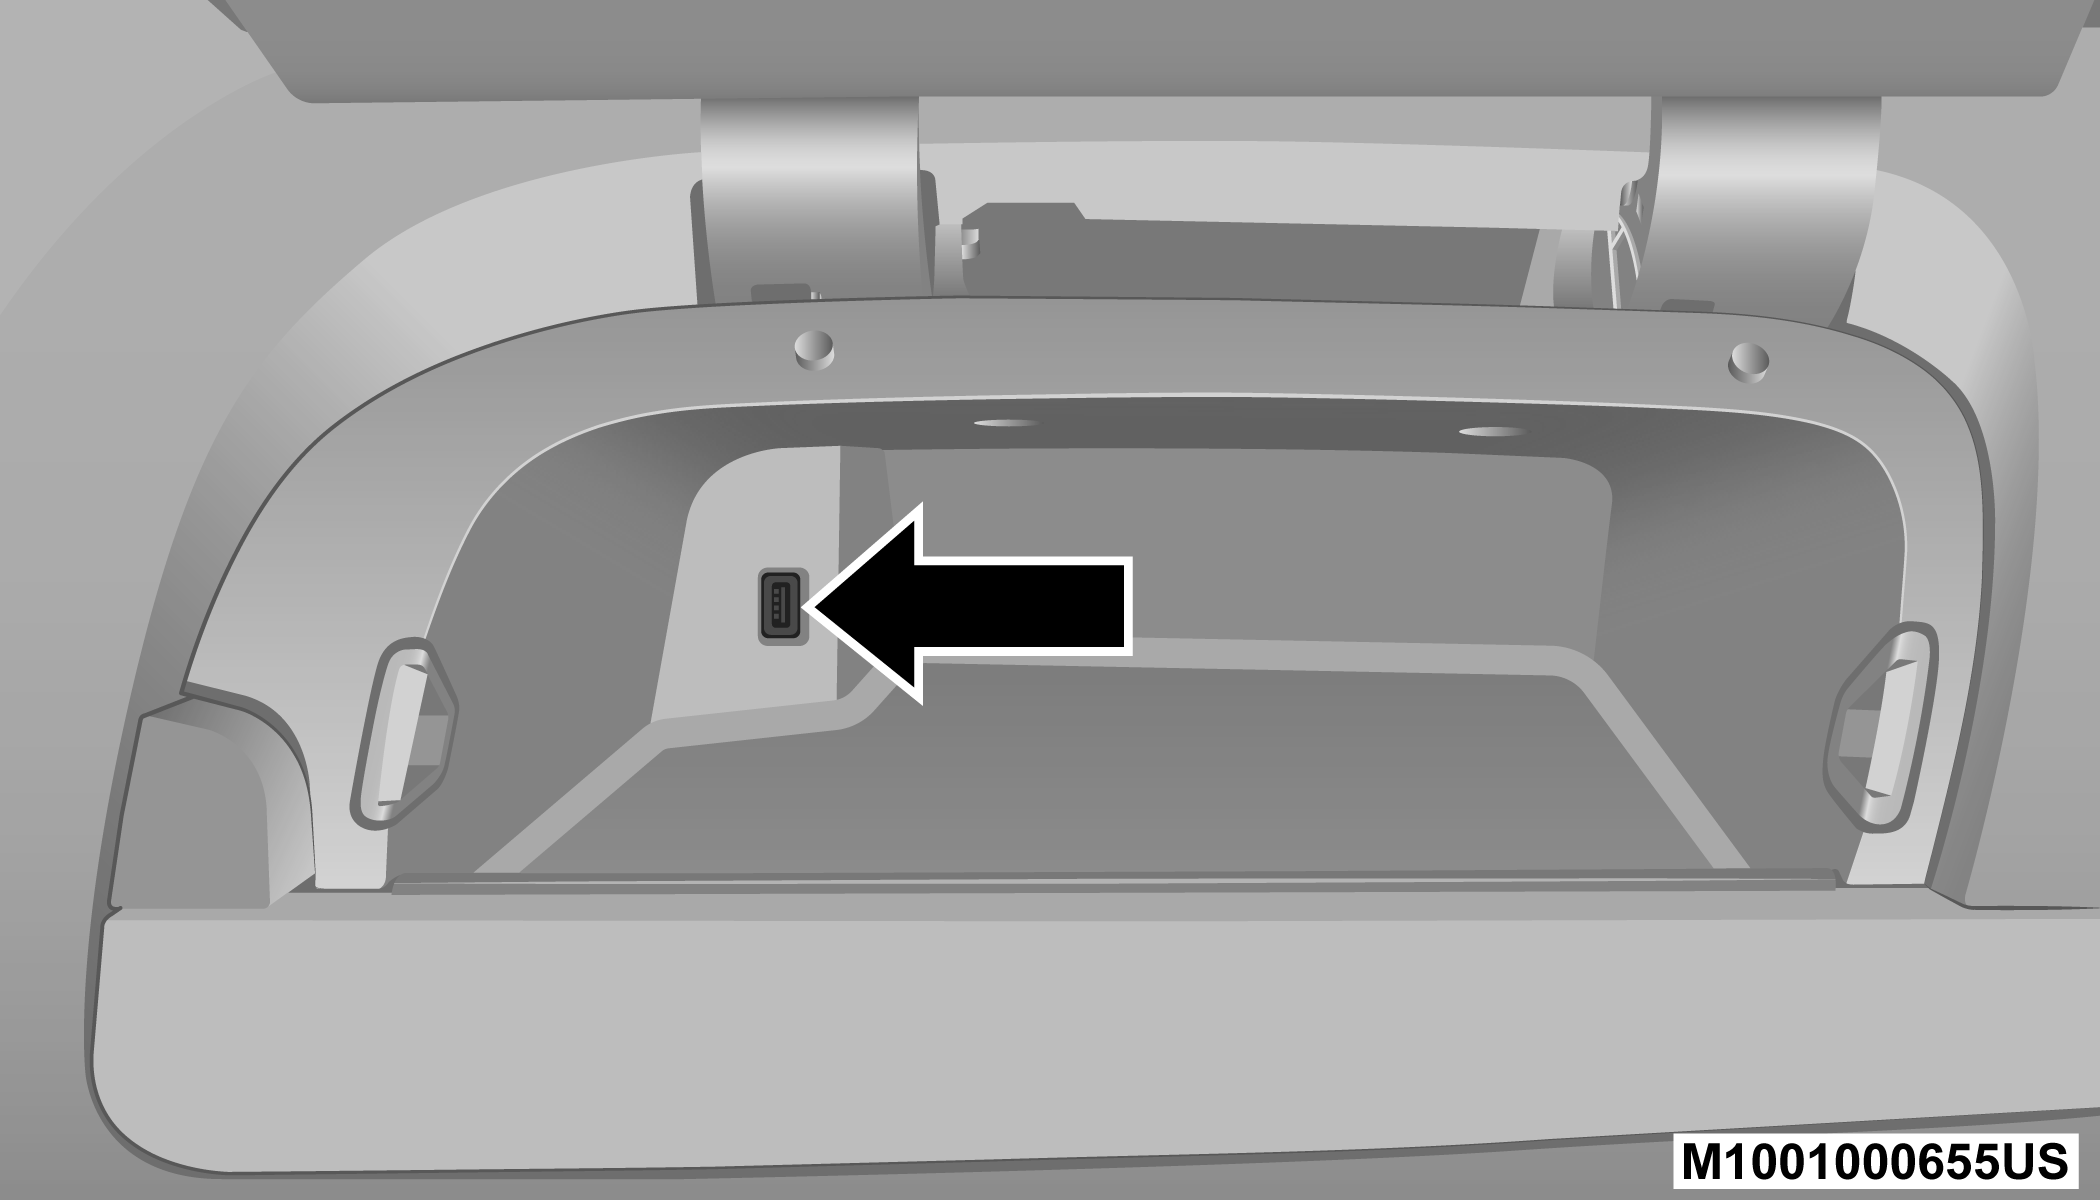
USB Port
Note:
The glove compartment will have a position where the consumer electronic audio device cable can be routed through without damaging the cable when closing the lid. This allows routing of the cable without damaging it while closing the lid. If a cut out is not available in the glove compartment, route the cable away from the lid latch and in a place that will allow the lid to close without damaging the cable.
Once the audio device is connected and synchronized to the vehicle's USB/MP3 control system (External USB device may take a few minutes to connect), the audio device starts charging and is ready for use by pushing radio buttons.
Note:
If the audio device battery is completely discharged, it may not communicate with the USB/MP3 control system until a minimum charge is attained. Leaving the audio device connected to the USB/MP3 control system may charge it to the required level.
USING THIS FEATURE
By using an external USB device to connect to the USB port:
-
The audio device can be played on the vehicle’s sound system, providing metadata (artist, track title, album, etc.) information on the radio display.
-
The audio device can be controlled using the radio buttons to Play, Browse, and List the audio device’s contents.
-
The audio device battery charges when plugged into the USB connector (if supported by the specific audio device).
CONTROLLING THE EXTERNAL USB DEVICE USING RADIO BUTTONS
To enter the AUX/USB/MP3 control mode and access a connected audio device, either push the Aux button on the radio faceplate or push the VR button and say "USB" or "Switch to USB." Once in the AUX/USB/MP3 control mode, audio tracks (if available from audio device) start playing over the vehicle's audio system.
PLAY MODE
When switched to AUX/USB/MP3 control mode, the external USB device automatically starts Play mode. In Play mode, the following buttons on the radio faceplate may be used to control the external USB device and display data:
-
Use the TUNE control knob to select the next or previous track.
-
Turning it clockwise (forward) by one click, while playing a track, skips to the next track or push the Voice Recognition (VR) button and say "Next Track".
-
Turning it counterclockwise (backward) by one click will jump to the previous track in the list or push the VR button and say "Previous Track".
-
-
Jump backward in the current track by pushing and holding the << RW button. Holding the << RW button long enough will jump to the beginning of the current track.
-
Jump forward in the current track by pushing and holding the FF >> button.
-
A single push backward << RW or forward FF >> will jump backward or forward respectively, for five seconds.
-
Use the << SEEK and SEEK >> buttons to jump to the previous or next track. Pushing the SEEK >> button during play mode will jump to the next track in the list, or push the VR button and say "Next or Previous Track."
-
While a track is playing, push the INFO button to see the associated metadata (artist, track title, album, etc.) for that track. Pushing the INFO button again jumps to the next screen of data for that track. Once all screens have been viewed, the last INFO button push will go back to the play mode screen on the radio.
-
Pushing the Repeat button will change the audio device mode to repeat the current playing track or push the VR button and say "Repeat On" or "Repeat Off".
-
Push the Scan button to use AUX/USB/MP3 device scan mode, which will play the first 10 seconds of each track in the current list and then forward to the next song. To stop Scan mode and start playing the desired track, when it is playing the track, push the Scan button again. During Scan mode, pushing the << SEEK and SEEK >> buttons will select the previous and next tracks.
-
RND button: Pushing this button toggles between Shuffle ON and Shuffle OFF modes for the external USB device, or push the VR button and say "Shuffle On" or "Shuffle Off." If the RND icon is showing on the radio display, then the shuffle mode is On.
LIST OR BROWSE MODE
During Play mode, pushing any of the buttons described below will bring up List mode. List mode enables scrolling through the list of menus and tracks on the audio device.
Tune control knob: The Tune control knob functions in a similar manner as the scroll wheel on the audio device or external USB device.
-
Turning it clockwise (forward) and counterclockwise (backward) scrolls through the lists, displaying the track detail on the radio display. Once the track to be played is highlighted on the radio display, push the Tune control knob to select and start playing the track. Turning the TUNE control knob fast will scroll through the list faster. During fast scroll, a slight delay in updating the information on the radio display may be noticeable.
In List mode, the radio Preset buttons are used as shortcuts to the following lists on the external USB device:
-
Preset 1 – Playlists
-
Preset 2 – Artists
-
Preset 3 – Albums
-
Preset 4 – Genres
-
Preset 5 – Audiobooks
-
Preset 6 – Podcasts
Pushing a PRESET button will display the current list on the top line and the first item in that list on the second line.
To exit List mode without selecting a track, push the same Preset button again to go back to Play mode.
List button: The List button will display the top level menu of the external USB device.
-
Turn the Tune control knob to list the top-menu item to be selected and push the Tune control knob. This will display the next sub-menu list item on the audio device, then follow the same steps to go to the desired track in that list. Not all external USB device sub-menu levels are available on this system.
Music Type button: The Music Type button is another shortcut button to the genre listing on your audio device.
WARNING:
Do not plug in or remove the iPod® or external USB device while driving. Failure to follow this warning could result in an accident.
CAUTION:
-
Leaving the iPod® or external USB device (or any supported device) anywhere in the vehicle in extreme heat or cold can alter the operation or damage the device. Follow the device manufacturer’s guidelines.
-
Placing items on the iPod® or external USB device, or connections to the iPod® or external USB device in the vehicle, can cause damage to the device and/or to the connectors.
BLUETOOTH® STREAMING AUDIO (BTSA)
Music can be streamed from your cellular phone to the Uconnect phone system.
Refer to the Uconnect Owner’s Manual Supplement for further information on Bluetooth® connectivity.
CONTROLLING BTSA USING RADIO BUTTONS
To enter BTSA mode, push either AUX button on the radio or push the VR  button and say “Bluetooth® Streaming Audio”.
PLAY MODE
When switched to BTSA mode, some audio devices can start playing music over the vehicle’s audio system, but some devices require the music to be initiated on the device first. Then, it will get streamed to the Uconnect phone system. Seven devices can be paired to the Uconnect phone system, but just one can be selected and played.
SELECTING A DIFFERENT AUDIO DEVICE
-
Push the Phone
 button to begin.
 -
After the "Ready" prompt and following the beep, say "Setup", then say "Select Audio Devices".
-
Say the name of the audio device or ask the Uconnect phone system to list the audio devices.
NEXT TRACK
Use the Seek Up button, or push the VR button on the radio and say “Next Track,” to jump to the next music track on your cellular phone.
PREVIOUS TRACK
Use the Seek Down button, or push the VR button on the radio and say “Previous Track,” to jump to the previous music track on your cellular phone.
BROWSE
Browsing is not available on a Bluetooth® Streaming Audio (BTSA) device. Only the current song that is playing will display info.
Download Manual