Vehicle Information Display
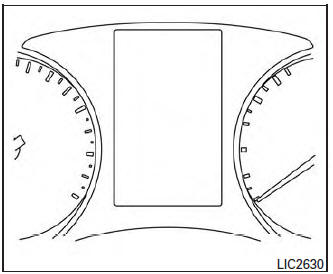
The vehicle information display is located to the left of the speedometer. It displays such items as:
- Vehicle settings
- Trip computer information
- Drive system warnings and settings (if so equipped)
- Cruise control system information
- NISSAN Intelligent Key® operation information
- Chassis Control
- Indicators and warnings
- Tire Pressure informati
How to use the vehicle information display
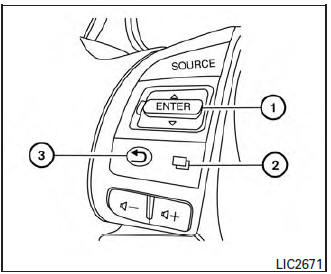
The vehicle information display can be changed using the buttons  and ENTER located on the steering wheel.
-
 — navigate through the items in vehicle information ENTER — change or select an item in the vehicle information display
 -
 — select/enter the Vehicle information menu items or to change from one display screen to the next (i.e. trip, TPMS, Fuel economy)
 -
 — go back to the previous menu
The ENTER and  buttons also control audio and control panel functions. For additional information, refer to “Steering wheel switch for audio control” in “Monitor, climate, audio, phone and voice recognition systems” section of this manual.
Startup display
When the vehicle in placed in the ON or ACC (if so equipped) position the screens that display in the vehicle information include:
- Active system status (if so equipped)
- Trip computer
- Tire pressure information
- Fuel economy
- Warnings
- Outside air temperature
- Odometer/Twin Trip Odometer
Warnings will only display if there are any present.
For additional information on warnings and indicators, refer to “Vehicle information display warnings and indicators” in this section.
To control what items display in the vehicle information display, refer to “Main menu selection” in this section.
Settings
The setting mode allows you to change the information displayed in the vehicle information display:
- Driver Assistance
- Clock
- Meter Settings
- Vehicle Settings
- Maintenance
- Alarm
- Tire Pressure
- Unit
- Language
- Factory Reset
Driver Assistance
To change the status, warnings or turn on or off any of the systems/warnings displayed in the “Driver Assistance” menu: Use the  button to select and the ENTER button to change a menu item:
- Driving Aids (if so equipped)
- Forward (FCW) On/Off (if so equipped)
- Lane (LDW) On/Off (if so equipped)
- Blind Spot (BSW) On/Off (if so equipped)
- Parking Aids (if so equipped)
- Moving Object On/Off (if so equipped)
- Chassis Control
- Trace Control – For additional information, refer to “Active Trace Control” in “Starting and Operating” section of this manual.
- Engine Brake – For additional information, refer to “Active Engine Brake” in “Starting and Operating” section of this manual.
Clock
For additional information on how to set the clock, refer to the “Monitor, climate, audio, phone and voice recognition systems” section of this manual or the separate Navigation Owner’s Manual.
Meter Settings
The meter settings allows the customer to choose from the various meter selections.
The meter settings can be changed using the  ,
,  , and the ENTER buttons.
Main Menu Selection
The items that display can be enabled/disabled when the ignition switch is placed in the ON position. To change the items that display.
Use the  button to select and the ENTER button to change a menu item:
- Trip Computer – For additional information, refer to “Trip Computer” in this section.
- Range
- Average Speed
- Fuel Economy
- Navigation (if so equipped)
- Audio/Satellite Radio (if so equipped)
- Driving Aids (if so equipped)
- Tire Pressures
- Chassis Control
- Warning Confirmation
Body Color
The color of the vehicle that displays in the vehicle information display when the ignition switch is placed in the ON position can be changed.
ECO Mode Settings
The following information can be enabled/disabled to display in the vehicle information display when the ignition switch is placed in the ON position.
From the “Main Menu Selection” select “ECO Mode Settings” to display the information when the ignition switch is placed in the ON position.
- Select “Display” then ”On” or “Off” to display “Pedal (if so equipped)” or “Inst.FE (Instant Fuel Economy)” in the vehicle information display when the ignition switch is placed in the ON position.
ECO Drive Report
The following information can be enabled/disabled to display in the vehicle information display when the ignition switch is placed in the ON position.
From the “Main Menu Selection” select “ECO Drive Report” to display the information when the ignition switch is placed in the ON position.
- Select “Display” then “On” or “Off” to display the information when the ignition switch is placed in the ON position. The ECO Drive Report is displayed when the ignition switch is in the OFF position.
Welcome Effects
The welcome screen display can be turned ON/OFF to display when the ignition switch is placed in the ACC (if so equipped) or ON position.
To enable/disable the welcome screen:
- Press the
 button.
 - Use the
 buttons to select “Settings”, and press ENTER.
 - Select “Welcome Effects” using the
 buttons and press ENTER to turn this function ON or OFF.
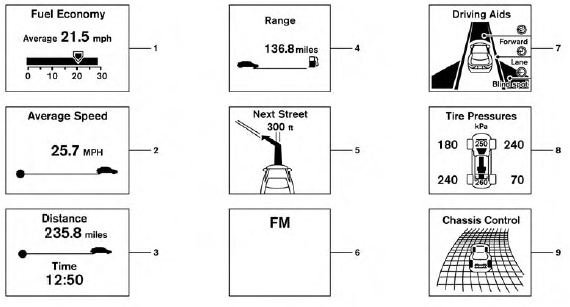
Trip Computer
The trip computer can be enabled/disabled to display in the vehicle information display when the ignition switch is placed in the ON position.
From the “Main Menu Selection” select “Trip Computer” to display in the vehicle information display when the ignition is placed in the ON position.
- Current fuel consumption and average fuel consumption (MPG, l (liter) /100km or km/l)
Current fuel consumption:
The current fuel consumption mode shows the current fuel consumption.
Average fuel consumption:
The average fuel consumption mode shows the average fuel consumption since the last reset.
Resetting is done by pushing the button for longer than one second.
The display is updated every 30 seconds. At about the first 1/3 mile (500 m) after a reset, the display shows “_ _”.
- Average speed (MPH or km/h)
The average speed mode shows the average vehicle speed since the last reset. Resetting is done by pushing the  button for longer than one second.
The display is updated every 30 seconds. At about the first 1/3 mile (500 m) after a reset, the display shows “_ _”.
- Elapsed time and trip odometer (mile or km)
Elapsed time:
The elapsed time mode shows the time since the last reset. Resetting is done by pushing the  button for longer than one second.
(The trip odometer is also reset at same time.)
Trip odometer:
The trip odometer mode shows the total distance the vehicle has been driven since the last reset.
Resetting is done by pushing the  button for longer than one second. (The elapsed time is also reset at same time.)
- Distance to empty (dte – mile or km)
The distance to empty (dte) mode provides you with an estimation of the distance that can be driven before refueling. The dte is constantly being calculated, based on the amount of fuel in the fuel tank and the actual fuel consumption.
The display is updated approximately every 30 seconds.
The dte mode includes a low range warning feature. If the fuel level is low, the warning is displayed on the screen.
When the fuel level drops even lower, the dte display wil change to “_ _”.
- If the amount of fuel added is small, the display just before the ignition switch is pushed to the OFF position may continue to be displayed.
- When driving uphill or rounding curves, the fuel in the tank shifts, which may momentarily change the display.
- Navigation (if so equipped)
When the route guidance is set in the navigation system, this item shows the navigation route information.
- Audio
The audio mode shows the status of audio information.
- Driving aids (if so equipped)
The driving aids mode shows the operating condition for the following systems.
- Lane Departure Warning (LDW)
- Blind Spot Warning (BSW)
- Forward Collision Warning (FCW)
For additional information, refer to “Blind Spot Warning (BSW) system /Lane Departure Warning (LDW) system”and “Forward CollisionWarning (FCW) system ” in “Starting and diving” section of this manual.
- Tire pressure
The tire pressure mode shows the pressure of all four tires while the vehicle is driven. The axle between the tires will also display the recommended tire pressure.
When the “Tire Pressure Low Add Air” or “Flat Tire Visit Dealer” (if so equipped) warning appears, the display can be switched to the tire pressure mode by pushing the  button.
The tire pressure unit can be changed in the TPMS setting under the Settings menu on the Vehicle Information Display. For additional information, refer to “Vehicle Information Display” in this section.
- Chassis control
When the Active Trace Control, Active Engine Brake, or the Active Ride Control is operated, it shows the operating condition. It also shows operating condition of hill start assist or the hill descent control. For additional information, refer to “Active Trace Control, Active Engine Brake, Active Ride Control, hill start assist or the hill descent control” in “Starting and Driving” section of this manual.
Vehicle Settings
The vehicle settings allows the customer to change settings for interior lights, turn signals, intelligent key settings, unlock settings and other vehicle settings.
The vehicle settings can be changed using the  ,
,  , and the ENTER buttons.
Welcome light (if so equipped)
The welcome light can be set to be ON or OFF.
From the Vehicle Settings menu, select “Welcome Light”. Use the ENTER button to turn this feature ON or OFF.
Auto Room Lamp
The interior lights can be set to be ON or OFF if any door is unlocked. From the Vehicle Settings menu, select “Auto Room Light”. Use the ENTER button to turn this feature ON or OFF.
Light Sensitivity (if so equipped)
The light sensitivity can be set to illuminate earlier based on the brightness outside the vehicle.
From the Vehicle Settings menu, select “Light Sensitivity”. Use the ENTER button to change the sensitivity.
Light Off Delay (if so equipped)
The duration of the automatic headlights can be changed from 0 to 180 seconds. From the Vehicle Settings menu, select “Light Off Delay”. Use the ENTER button to change the duration.
3 Flash Pass
The 3 flash pass can be set to be ON or OFF.
From the Vehicle Settings menu, select “3 Flash Pass”. Use the ENTER button to turn this feature ON or OFF.
I-Key Door Lock
When this item is turned on, the request switch on the door is activated. From the Vehicle Settings menu, select “I-Key Door Unlock”. Use the ENTER button to activate this function.
Selective-Unlock
When this item is turned on, only the driver’s door is unlocked first after the door unlock operation.
When the door handle request switch on the driver’s or front passenger’s side door is pushed to be unlocked, only the corresponding door is unlocked first. All the doors can be unlocked if the door unlock operation is performed again within 1 minute. When this item is turned to off, all the doors will be unlocked after the door unlock operation is performed once. From the Vehicle
Settings menu, select “Selective Unlock”. Use the ENTER button to activate this function.
Answer back horn
When the answer back horn is on, the horn will chirp and the hazard indicators will flash once when locking the vehicle with the Intelligent Key.
Speed Dependent
The speed dependent feature can be set to be ON or OFF. From the Vehicle Settings menu, select “Speed Dependent”. Use the ENTER button to turn this feature ON or OFF.
Reverse Link
The reverse link feature can be set to be ON or OFF. From the Vehicle Settings menu, select “Reverse Link”. Use the ENTER button to turn this feature ON or OFF.
Drip Wipe
The drip wipe feature can be set to be ON or OFF. From the Vehicle Settings menu, select “Drip Wipe”. Use the ENTER button to turn this feature ON or OFF.
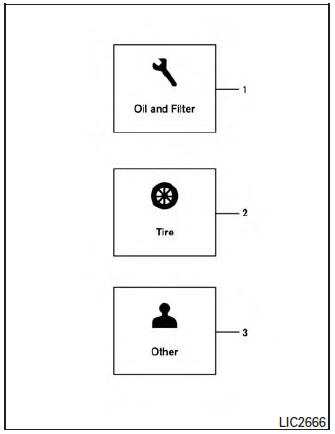
- scheduled service: oil and oil filter
- tires
- other
Maintenance
The maintenance mode allows you to set alerts for the reminding of maintenance intervals. To change an item:
- Press the
 button.
 - Use the
 button until “Settings” is selected.
 - Select “Maintenance” using the
 button and press ENTER.
Oil and Filter
This indicator appears when the customer set distance comes for changing the engine oil and filter. You can set or reset the distance for checking or replacing these items. For scheduled maintenance items and intervals, see your “NISSAN Service and Maintenance Guide.”
Tire
This indicator appears when the customer set distance is reached for replacing tires. You can set or reset the distance for replacing tires.
| WARNING
The tire replacement indicator is not a substitute for regular tire checks, including tire pressure checks. For additional information, refer to “Changing Wheels and Tires” in “Maintenance & Do- It- Yourself” section of this manual. Many factors including tire inflation, alignment, driving habits and road conditions affect tire wear and when tires should be replaced. Setting the tire replacement indicator for a certain driving distance does not mean your tires will last that long. Use the tire replacement indicator as a guide only and always perform regular tire checks. Failure to perform regular tire checks, including tire pressure checks could result in tire failure. Serious vehicle damage could occur and may lead to a collision, which could result in serious personal injury or death. |
Other
This indicator appears when the customer set distance is reached for checking or replacing maintenance items other than the engine oil, oil filter and tires. Other maintenance items can include such things as air filter or tire rotation. The distance for checking or replacing the items can be set or reset.
Alarm
This setting allows the customer to set alarms for outside temperature and a timer alert.
- Press the
 button.
 - Use the
 button until “Settings” is selected, and press ENTER.
 - Select “Alarm” using the
 button and press ENTER.
Outside Temperature
This setting allows the customer to enable/disable the alert for low outside temperature in the vehicle information display.
- Use the
 button to select “Outside Temperature”.
 - Press the ENTER button to turn ON/OFF the outside temperature in the vehicle information display.
Timer Alert
This setting allows the driver to set an alert to notify a set time has been reached.
- Use the
 button to select “Timer Alert”.
 - Press the ENTER button.
- To change the timer amount, use the
 button and the ENTER button to save the selected time amount.
Navigation (if so equipped)
This setting allows the customer to enable/disable the alert for navigation in the vehicle information display.
- Use the
 buttons to select “Navigation”.
 - Press the ENTER button to turn ON/OFF the alert.
Phone (if so equipped)
This setting allows the customer to enable/disable the alert for navigation in the vehicle information display.
- Use the
 buttons to select “Phone”.
 - Press the ENTER button to turn ON/OFF the alert.
Mail (if so equipped)
This setting allows the customer to enable/disable the alert for navigation in the vehicle information display.
- Use the
 buttons to select “Mail”.
 - Press the ENTER button to turn ON/OFF the alert.
Units
The units that are shown in the vehicle information display can be changed:
- Mileage
- Tire pressures
- Temperature
Use the  ,
,  , and the ENTER buttons to select and change the units of the vehicle information display. The units of the navigation screen can be changed independently of the vehicle information display. For vehicles equipped with Navigation, refer to “How to use the
  button” in the “Monitor, climate, audio, phone and voice recognition systems” section of this manual.
Mileage
The unit for the mileage that displays in the vehicle information display can be changed to:
- miles, MPG
- km/h, km/l
- km/h, l/100km
Use the and the ENTER buttons to select and change the unit.
Tire Pressures
The unit for tire pressure that displays in the vehicle information display can be changed to:
- psi
- kPa
- bar
- Kgf/cm2
Use the and the ENTER buttons to select and change the unit.
Temperature
The temperature that displays in the vehicle information display can be changed from:
- °F (Fahrenheit)
- °C (Celsius)
Use the ENTER button to toggle choices.
Language
The language of the vehicle information display can be changed to:
- US English
- French
- Spanish
Use the , , and the ENTER buttons to select and change the language of the vehicle information display. The language of the center display/navigation can be changed independently of the vehicle information display. For vehicles not equipped with Navigation refer to “ENTER/SETTING button:” and vehicles equipped with Navigation refer to “How to use the button” in the “Monitor, climate, audio, phone and voice recognition systems” section of this manual.
Factory Reset
The settings in the vehicle information display can be reset back to the factory default. To reset the vehicle information display:
- Press the button.
- Use the buttons to select “Settings”, and press the ENTER button.
- Select “Factory Reset” using the buttons and press the ENTER button.
- Select “YES” to return all settings back to default by pressing the ENTER butto
Vehicle information display warnings and indicators
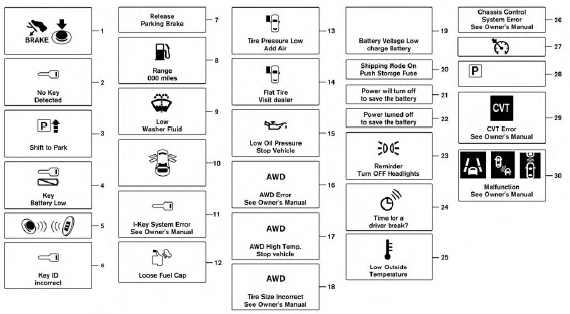
- Engine start operation
- No Key Detected (if so equipped)
- Shift to Park
- Key battery low (if so equipped)
- Engine start operation for Intelligent Key system (if I-Key battery level is low) (if so equipped)
- Key ID Incorrect (if so equipped)
- Release parking brake
- Low Fuel
- Low Washer Fluid
- Door/Liftgate Open
- I-Key System Error: See Owner’s Manual (if so equipped)
- Loose Fuel Cap
- Tire Pressure Low – Add Air
- Flat Tire – Visit Dealer (if so equipped)
- Low Oil Pressure Stop Vehicle
- All Wheel Drive (AWD) Error: See Owner’s Manual (if so equipped)
- All Wheel Drive (AWD) High Temp. Stop Vehicle (if so equipped)
- All Wheel Drive (AWD) Tire Size Incorrect See Owner’s Manual (if so equipped)
- Battery Voltage Low Charge Battery
- Extended storage fuse
- Power will turn off to save the battery
- Power turned off to save the battery
- Reminder: Turn OFF headlights
- Timer Alert – Time for a driver break?
- Low Outside Temperature
- Chassis Control System Error: See Owner’s Manual
- Cruise indicators
- Transmission Shift Position Indicator
- CVT Error See Owner’s Manual
- Malfunction See Owner’s Manual
Engine start operation
This indicator appears when the shift lever is in the P (Park) position.
This indicator means that the engine will start by pushing the ignition switch with the brake pedal depressed. You can start the engine in any position of the ignition switch.
No Key Detected (if so equipped)
This warning appears when the Intelligent Key is left outside the vehicle with the ignition switch in the ON position. Make sure the Intelligent Key is inside the vehicle.
For additional information about the Intelligent Key, refer to “NISSAN Intelligent Key®” in the “Pre-driving checks and adjustments” section of this manual.
Shift to Park
This warning illuminates when the ignition switch is in the ACC (if so equipped) or OFF position and the shift lever is in any position other than P (Park) position. Also, a chime sounds when the ignition switch is in the OFF position.
If this warning illuminates, move the shift lever to the P (Park) position or start the engine.
Key Battery Low (if so equipped)
This indicator illuminates when the Intelligent Key battery is running out of power.
If this indicator illuminates, replace the battery with a new one. For additional information, refer to “Battery replacement” in the “Maintenance and do-it-yourself” section of this manual.
Engine start operation for Intelligent Key system (if I-Key battery is low) (if so equipped)
This indicator appears when the battery of the Intelligent Key is low and when the Intelligent Key system and the vehicle are not communicating normally.
If this appears, touch the ignition switch with the Intelligent Key while depressing the brake pedal.
For additional information, refer to “NISSAN Intelligent Key® battery discharge” in the “Starting and driving” section of this manual.
Key ID Incorrect (if so equipped)
This warning appears when the ignition switch is placed from the OFF position and the Intelligent Key is not recognized by the system. You cannot start the engine with an unregistered key.
For additional information, refer to “NISSAN Intelligent Key®” in the “Pre-driving checks and adjustments” section of this manual.
Release Parking Brake
This warning illuminates in the message area of the vehicle information display when the parking brake is set and the vehicle is driven.
Low Fuel
This warning illuminates when the fuel level in the fuel tank is getting low. Refuel as soon as it is convenient, preferably before the fuel gauge reaches 0 (Empty). There will be a small reserve of fuel in the tank when the fuel gauge needle reaches 0 (Empty).
Low Washer Fluid
This warning illuminates when the windshieldwasher fluid is at a low level. Add windshieldwasher fluid as necessary. For additional information, refer to “Windshield-washer fluid” in the “Maintenance and do-it-yourself” section of this manual.
Door/liftgate Open
This warning illuminates when a door has been opened when the engine is running.
I-Key System Error: See Owner’s Manual (if so equipped)
After the ignition switch is pushed to the ON position, this light comes on for about 2 seconds and then turns off.
The I-Key System Error message warns of a malfunction with the Intelligent Key system. If the light comes on while the engine is stopped, it may be impossible to start the engine.
If the light comes on while the engine is running, you can drive the vehicle. However in these cases, contact a NISSAN dealer for repair as soon as possible.
Loose Fuel Cap
This warning appears when the fuel-filler cap is not tightened correctly after the vehicle has been refueled. For additional information, refer to “Fuel-filler cap” in the “Pre-driving checks and adjustments” section of this manual.
Tire Pressure Low - Add Air warning
This warning appears when the low tire pressure warning light in the meter illuminates and low tire pressure is detected. If this warning appears, stop the vehicle and adjust the tire pressures of all four tires to the recommended COLD tire pressure shown on the Tire and Loading Information label. For additional information, refer to “Low tire pressure warning light” in this section and “Tire Pressure Monitoring System (TPMS)” in the “Starting and driving” section of this manual.
Flat Tire – Visit dealer (if so equipped)
This warning appears when the low tire pressure warning light in the meter illuminates and one or more flat tires are detected while driving. A chime also sounds for approximately 10 seconds.
Low Oil Pressure Stop Vehicle
This warning appears in message area of the vehicle information display if low oil pressure is detected. This gauge is not designed to indicate low oil level. The low oil pressure warning is not designed to indicate a low oil level. Use the dipstick to check the oil level. For additional information, refer to “Engine oil” in the “Maintenance and do-it-yourself” section of this manual.
All-Wheel Drive (AWD) Error See Owner’s Manual (if so equipped)
This warning appears when the all-wheel drive system is not functioning properly while the engine is running.
All-Wheel Drive (AWD) High Temp. Stop Vehicle (if so equipped)
This warning may appear while trying to free a stuck vehicle due to increased oil temperature.
The driving mode may change to Two-Wheel Drive (2WD). If this warning is displayed, stop the vehicle with the engine idling, as soon as it is safe to do so. Then if the warning turns off, you can continue driving.
All-Wheel Drive (AWD) Tire Size Incorrect See Owner’s Manual (if so equipped)
This warning may appear if there is a large difference between the diameters of the front and rear wheels. Pull off the road in a safe area, with the engine idling. Check that all the tire sizes are the same, that the tire pressure is correct and that the tires are not excessively worn.
Battery Voltage Low Charge Battery
This warning appears when the battery is low and needs to be charged.
Extended storage fuse
This warning may appear if the extended storage fuse switch is not pushed in (switched on). When this warning appears, push in (switch on) the extended storage fuse switch to turn off the warning. For additional information, refer to “Fuses” in the “Maintenance and do-it-yourself” section of this manual.
Power will turn off to save the battery
This warning appears in message area of the vehicle information display after a period of time if the shift lever has not moved from the P (Park) position.
Power turned off to save the battery
This warning appears after the ignition switch is automatically turned off to save the battery.
Reminder: Turn OFF headlights
This warning appears when the headlights are left in the ON position when exiting the vehicle.
Place the headlight switch in the OFF or AUTO position. For additional information, refer to “Headlight and turn signal switch” in this section.
Timer Alert – Time for a driver break?
This indicator appears when the set time is reached. The time can be set up to 6 hours. For setting the timer, refer to “Timer alert” in this section.
Low Outside Temperature
This warning appears if the outside temperature is below 37°F (3°C). The temperature can be changed to display in Celsius or Fahrenheit. For additional information, refer to “Temperature” in this section.
Chassis Control System Error: See Owner’s Manual
This warning appears if the chassis control module detects an error in the chassis control system.
Have the system checked by a NISSAN dealer.
For additional information, refer to “Chassis Control” in the “Starting and driving” section of this manual.
Cruise indicators
This indicator shows the cruise control system statu
When cruise control is activated, a green circle will illuminate to indicate it is set. The vehicle information display will also display the speed the cruise control was set at. If you accelerate past the set speed, the speed will blink until you either cancel cruise control or go back to the set speed.
If cruise control is on and cancelled, the speed will be displayed to show the speed the vehicle will return to if the resume button his activated.
Transmission position indicator
This indicator shows the transmission shift position.
CVT Error: See Owner’s Manual
This warning illuminates when the there is a problem with the CVT system. If this warning comes on, have the system checked by a NISSAN dealer.
Malfunction See Owner’s Manual
This warning appears when the Blind Spot Warning/Lane Departure Warning or Forward Collision Warning systems are not functioning properly.
Download Manual