Flat tire
Tire Pressure Monitoring System (TPMS)
This vehicle is equipped with TPMS. It monitors tire pressure of all tires except the spare. When the low tire pressure warning light is lit, and the Tire Pressure Low - Add Air warning appears in the vehicle information display, one or more of your tires is significantly under-inflated. If equipped, the system also displays pressure of all tires (except the spare tire) on the display screen by sending a signal from a sensor that is installed in each wheel. If the vehicle is being driven with low tire pressure, the TPMS will activate and warn you of it by the low tire pressure warning light. This system will activate only when the vehicle is driven at speeds above 16 mph (25 km/h). For additional information, refer to “Warning/indicator lights and audible reminders” in the “Instruments and controls” section and “Tire Pressure Monitoring System (TPMS)” in the “Starting and driving” section of this manual.
WARNING
|
Run-flat tires (if so equipped)
Run-flat tires are those tires that can be used temporarily if they are punctured. For additional information, refer to “Run-flat tires” in “Maintenance and do-it-yourself.” For additional information, refer to the tire safety information in the Warranty Information Booklet.
WARNING
|
CAUTION
|
Changing a flat tire
If you have a flat tire, follow the instructions below:
Stopping the vehicle
- Safely move the vehicle off the road and away from traffic.
- Turn on the hazard warning flashers.
- Park on a level surface and apply the parking brake. Move the shift lever to P (Park).
- Turn off the engine.
- Raise the hood to warn other traffic and to signal professional road assistance personnel that you need assistance.
- Have all passengers get out of the vehicle and stand in a safe place, away from traffic and clear of the vehicle.
WARNING
|

- Blocks
- Flat tire
Blocking wheels
Place suitable blocks at both the front and back of the wheel diagonally opposite the flat tire to prevent the vehicle from moving when it is jacked up.
| WARNING
Be sure to block the wheel as the vehicle may move and result in personal injury. |
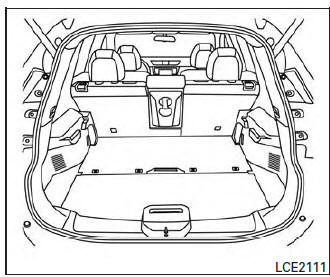
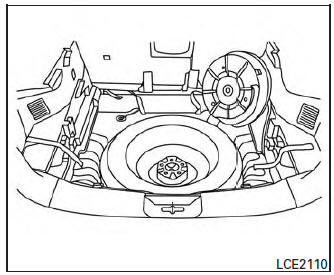
Getting the spare tire and tools (if so equipped)
Open the rear liftgate. Remove the Divide-n-Hide floor. For additional information, refer to “Dividen- Hide adjustable floor” in the “Instruments and Controls” section of this manual.
Lift the floorboard.
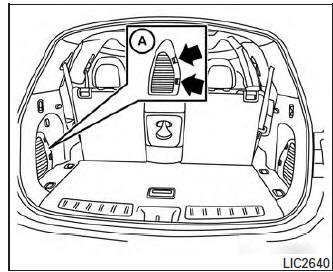
- The jack and tool kit are located in the storage compartment to the left.
- Remove the storage door by pressing the two release tabs A simultaneously.
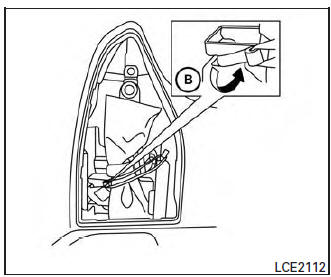
- Unhook the clip B restraining the jack and tool kit.
- Remove the tool kit.
- Remove the jack.
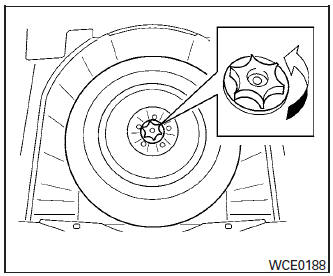
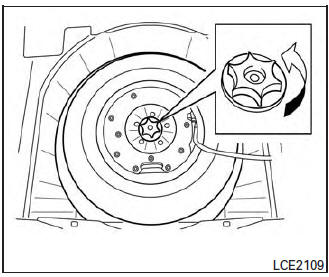
- To loosen the bolt, turn counterclockwise.
- Once loosened, remove the bolt.
- Remove the spare tire.
- Once the flat tire is exchanged with the spare tire, store the flat tire where the spare tire was located.
- Turn the bolt clockwise to tighten.
Changing the spare tire with BOSE® sub-woofer (if so equipped)
- To loosen the bolt, turn counterclockwise.
- Once loosened, remove the bolt.
- Place the sub-woofer in the upper right corner of the trunk, leaning against the 2nd row passenger side seat.
- Remove the spare tire.
- Once the flat tire is exchanged with the spare tire, store the flat tire where the spare was located.
- Place the sub-woofer inside the flat tire.
- Turn the bolt clockwise to tighten.
Jacking up vehicle and removing the damaged tire
WARNING
|
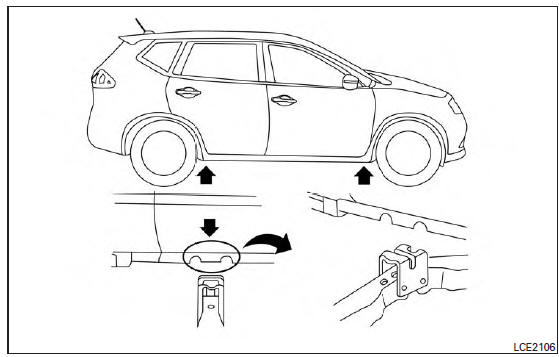
Always refer to the proper illustrations for the correct placement and jack-up points for your specific vehicle model and jack type.
Carefully read the caution label attached to the jack body and the following instructions.
- Loosen each wheel nut 1 or 2 turns by turning counterclockwise with the wheel nut wrench. Do not remove the wheel nuts until the tire is off the ground.
- Place the jack directly under the jack-up point as illustrated so the top of the jack contacts the vehicle at the jack-up point.
Align the jack head between the 2 notches in the front or the rear as shown. Also fit the groove of the jack head between the notches as shown.
The jack should be used on firm and level ground.
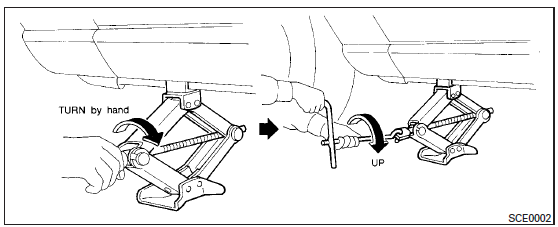
- To lift the vehicle, securely hold the jack lever and rod with both hands. Carefully raise the vehicle until the tire clears the ground. Remove the wheel nuts, and then remove the tire.
Installing the spare tire (if so equipped)
The spare tire is designed for emergency use. For additional information, refer to “Wheels and tires” in the “Maintenance and do-it-yourself” section of this manual.
- Clean any mud or dirt from the surface between the wheel and hub.
- Carefully put the spare tire on and tighten the wheel nuts finger tight.
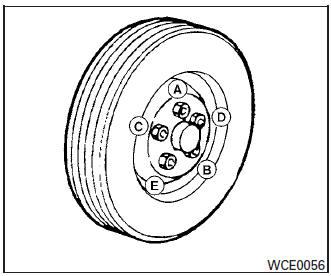
- With the wheel nut wrench, tighten wheel nuts alternately and evenly as illustrated until they are tight ( A , B , C , D , E ).
- Lower the vehicle slowly until the tire touches the ground. Then, with the wheel nut wrench, tighten the wheel nuts securely in the sequence illustrated ( A , B , C , D , E ). Lower the vehicle completely.
- Securely store the jacking equipment in the vehicle. When storing the tool kit, it is requested to tighten the bag securely with the attached band to prevent movement of the tools, otherwise noise may occur.
WARNING
|
As soon as possible, tighten the wheel nuts to the specified torque with a torque wrench.
Wheel nut tightening torque:
83 ft-lb (113 N·m)
The wheel nuts must be kept tightened to specification at all times. It is recommended that wheel nuts be tightened to specifications at each lubrication interval.
Adjust tire pressure to the COLD pressure.
COLD pressure: After vehicle has been parked for 3 hours or more or driven less than 1 mile (1.6 km).
COLD tire pressures are shown on the tire and loading information label affixed to the driver side center pillar.
Download Manual