Installing front license plate
Installing front license plate
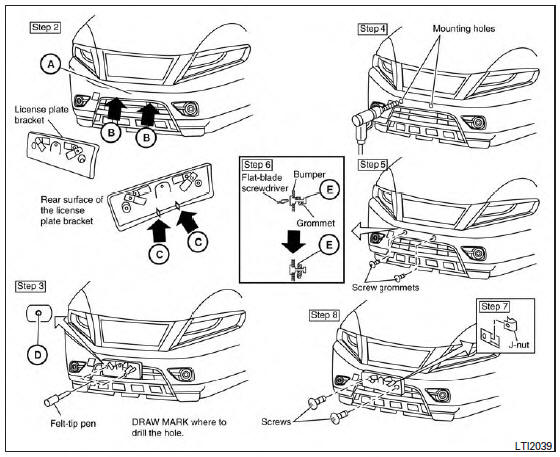
Use the following steps to mount the front license plate:
Before mounting the license plate, confirm that the following parts are enclosed in the plastic bag:
- License plate bracket
- License plate bracket (J-nut) screws x 2
- License plate screws x 2
- Screw grommets x 2
- Park the vehicle on flat, level ground.
- Locate the center position A as illustrated.
Line up the license plate bracket under the top of the front bumper B with the tabs C .
Hold the license plate bracket in place.
- Mark the center of the hole D with a felt-tip pen.
- Carefully drill two pilot holes using a 0.39 in (10 mm) drill bit at the marked locations. (Be sure that the drill only goes through the bumper fascia.)
- Insert the grommets into the holes in the bumper fascia.
- Insert a small flat-bladed screwdriver into the grommet hole to turn the threaded part of the grommet 90° E .

Mark the center of the hole F on both sides with a felt-tip pen. Remove the bracket from the bumper, and then open 0.79 in (20 mm) diameter holes on the bumper using the marks F as a center.
- Insert a J-nut into the license plate bracket before placing the license plate bracket on the fascia.
- Install the license plate bracket with screws.
- Install the license plate with bolts that are no longer than 0.55 in (14 mm).
Download Manual