Bluetooth® streaming audio without Navigation System (if so equipped)
If you have a compatible Bluetooth® audio device that is capable of playing audio files, the device can be connected to the vehicle’s audio system so that the audio files on the device play through the vehicle’s speakers.
Connecting Bluetooth® audio
To connect your Bluetooth® audio device to the vehicle, follow the procedure below:
- Press the ENTER/SETTING button.
- Select the “Bluetooth” key.
- Select the “Add Phone or Device” key. This same screen can be accessed to remove, replace or select a different Bluetooth® device.
- The system acknowledges the command and asks you to initiate connecting from the phone handset. The connecting procedure of the cellular phone varies according to each cellular phone model. For additional information, refer to the cellular phone Owner’s Manual for details. You can also visit www.nissanusa.com/bluetooth or www.nissan.ca.com/bluetooth for instructions on connecting NISSAN recommended cellular phones.
Audio main operation
To switch to the Bluetooth® audio mode, press the MEDIA button repeatedly until the Bluetooth® audio mode is displayed on the screen.
The controls for the Bluetooth® audio are displayed on the screen. Use the Preset 3 button for play and the Preset 4 button for pause.
Bluetooth® streaming audio with Navigation System
If you have a compatible Bluetooth® audio device that is capable of playing audio files, the device can be connected to the vehicle’s audio system so that the audio files on the device play through the vehicle’s speakers.
Connecting Bluetooth® audio
To connect your Bluetooth® audio device to the vehicle, follow the procedure below:
- Press the [
 ] button.
 - Touch the “Settings” key.
- Touch the “Phone & Bluetooth” key.
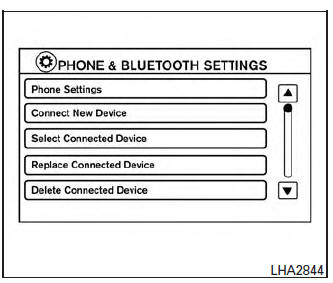
- Touch the “Connect New Device” key.
- The system acknowledges the command and asks you to initiate connecting from the phone handset. The connecting procedure of the cellular phone varies according to each cellular phone model. For additional information, refer to the cellular phone Owner’s Manual for details. You can also visit www.nissanusa.com/bluetooth or www.nissan.ca.com/bluetooth for instructions on connecting NISSAN recommended cellular phones.
Audio main operation
To switch to the Bluetooth® audio mode, press the AUX button repeatedly until the Bluetooth® audio mode is displayed on the screen.
The controls for the Bluetooth® audio are displayed on the screen.
CD care and cleaning
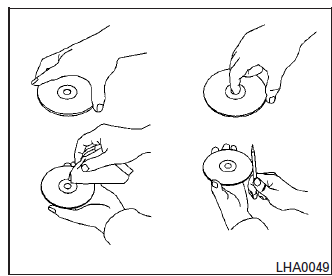
- Handle a CD by its edges. Do not bend the disc. Never touch the surface of the disc.
- Always place the discs in the storage case when they are not being used.
- To clean a disc, wipe the surface from the center to the outer edge using a clean, soft cloth. Do not wipe the disc using a circular motion.
- Do not use a conventional record cleaner or alcohol intended for industrial use.
- A new disc may be rough on the inner and outer edges. Remove the rough edges by rubbing the inner and outer edges with the side of a pen or pencil as illustrated.
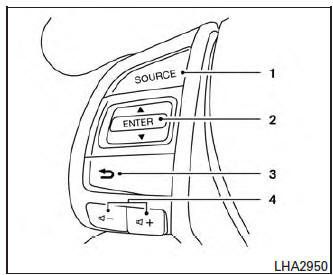
- Source select and power on switch
- Menu control switch/ENTER button
-
 (Back) switch
 - Volume control switc
Steering wheel switch for audio control
SOURCE select switch
With the ignition switch in the ACC or ON position, push the SOURCE switch to turn the audio system on.
Push the source select switch to change the mode in the following sequence:
AM→FM1→FM2→SXM1 (satellite radio, if so equipped) → SXM2 (satellite radio, if so equipped)→ SXM3 (satellite radio, if so equipped) → CD*→USB/iPod®*→Bluetooth® Audio*→Audio App*→ AUX* → AM.
* These modes are only available when compatible media storage is inserted into the device or connected to the system.
Volume control switch
Push the volume control switch to increase or decrease the volume.
 Menu control switch/ENTER button
While the display is showing a map or audio screen, tilt the Menu Control switch upward or downward to select a station, track, CD or folder.
For most audio sources, tilting the switch up/down for more than 1.5 seconds provides a different function than a tilting up/down for less than 1.5 seconds.
M and FM
- Tilt up/down for less than 1.5 seconds to increase or decrease the preset station.
- Tilt up/down for more than 1.5 seconds to seek up or down to the next station.
- Press the ENTER button to show the list of preset stations.
SXM (if so equipped)
- Tilt up/down for less than 1.5 seconds to increase or decrease the preset station.
- Tilt up/down for more than 1.5 seconds to go to the next or previous channel.
- Press the ENTER button to show the SXM Menu.
iPod®
- Tilt up/down for less than 1.5 seconds to increase or decrease the track number.
- Press the ENTER button to show the iPod Menu.
CD
- Tilt up/down for less than 1.5 seconds to increase or decrease the track number.
- Tilt up/down for more than 1.5 seconds to increase or decrease the folder number (if playing compressed audio files).
- Press the ENTER button to show the CD Menu.
USB
- Tilt up/down for less than 1.5 seconds to increase or decrease the track number.
- Tilt up/down for more than 1.5 seconds to increase or decrease the folder number.
- Press the ENTER button to show the USB Menu.
Bluetooth® Audio
- Tilt up/down for less than 1.5 seconds to skip ahead or back to the next song.
- Tilt up/down for more than 1.5 seconds to reverse or fast forward the current song.
AUX
- Press the ENTER button to show the AUX Menu.
Antenna
The antenna cannot be shortened, but can be removed. When you need to remove the antenna, turn the antenna rod counterclockwise.
To install the antenna rod, turn the antenna rod clockwise and hand tighten.
CAUTION
|
Download Manual