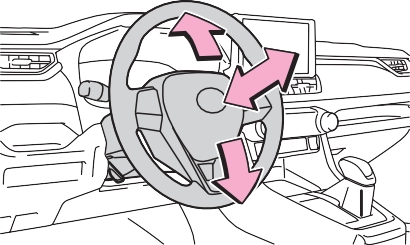
Adjusting the steering wheel and mirrors
Steering wheel
After adjustment, pull the lever up to secure the steering wheel.
|
|
|
|
|
Caution while driving
Do not adjust the steering wheel while driving. Doing so may cause the driver to mishandle the vehicle and cause an accident, resulting in death or serious injury. |
 WARNING
*: If equipped
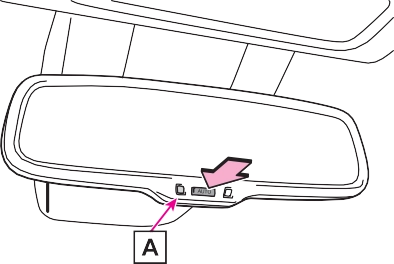
Adjust the height of the rear view mirror by moving it up and down.
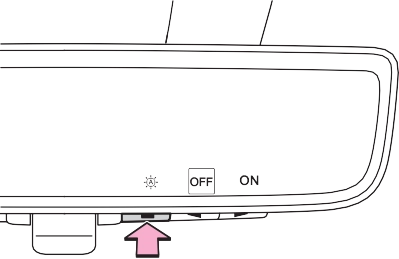
Responding to the level of brightness of the headlights of vehicles behind, the reflected light is automatically reduced.
Changing automatic anti-glare function mode on/off
When the automatic anti-glare func-
tion is in ON mode, the indicator illuminates.
The function will set to ON mode each time the engine switch is turned to ON.
Pressing the button turns the func- tion to OFF mode. (The indicator
also turns off.)
|
|
Vehicles with garage door opener
|
|

To ensure that the sensors operate properly, do not touch or cover them.
Vehicles without garage door opener
Vehicles with garage door opener
*: If equipped

Indicates that the camera is operat- ing normally.
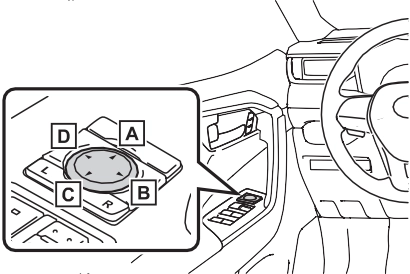
Displays icons, adjusting gauge, etc. (P.147)
Press to change the setting of the item you want to adjust.
Press to display the icon display area and select the item you want to adjust.
Operate to change between digital mirror mode and optical mirror mode.
|
|

 will illuminate in this mode.
Turns off the display of the Digital Rear-view Mirror allows it to be used as an optical mirror.
The engine switch is turned to ON.
When the engine switch is changed from ON to OFF or ACC, the image will disappear after several seconds.
is closed.
If it is difficult to see the displayed image or flickering bothers you, change to optical mirror mode.
This is not a malfunction.
If the symbol shown in the illustra- tion is displayed when using the Digital Rear-view Mirror in digital mirror mode, the system may be malfunctioning. The symbol will dis- appear in a few seconds. Operate the lever, change to optical mirror mode and have the vehicle inspected by your Toyota dealer.
The icons will be displayed.
Change to optical mirror mode, adjusting the height of the rear view mirror by moving it up and down.
Settings of the display in the dig- ital mirror mode, on/off operation of the automatic anti-glare func- tion, etc. can be changed.
1 Press the menu button.
The icons will disappear if a button is not operated for approximately 5 seconds or more.
|
Icons |
Settings |
|
|
Select to adjust the bright- ness of the display. |
|
|
Select to adjust the area displayed up/down. |
|
|
Select to adjust the area displayed to the left/right. |
|
Select to adjust the angle of the displayed image. |


The setting display will be dis- played.
|
|
*: This is a function for the optical mirror mode, however, the setting can also be changed while using the digital mirror mode.
When using the digital mirror mode
P.147
When using the optical mirror mode
The icons will be displayed.
 Press the menu button repeatedly and select .
The icons will disappear if a button is not operated for approximately 5 seconds or more.
To prevent the light sensors from malfunctioning, do not touch or cover them.
 Clean the mirror surface gently
using a soft dry cloth.
If the camera lens is dirty, the displayed image may not be clear. In this case, clean it with a soft cloth dampened with water or a swab.
The camera for the Digital Rear- view Mirror is located as shown.
If the symptom is not resolved by the solution, have the vehicle inspected by your Toyota dealer.
|
Symptom |
Likely cause |
Solution |
|
The image is difficult to see. |
The mirror surface is dirty. |
Clean the mirror surface gently, using a soft dry cloth. |
|
Sunlight or headlights are shining directly into the Digital Rear-view Mirror. |
Change to optical mirror mode. (If the light is coming through the moon roof [if equipped] or panoramic moon roof [if equipped], close the sunshade or electronic sunshade.) |
|
|
The vehicle is in a dark area.
The vehicle is near a TV tower, broadcast- ing station, electric power plant, or other location where strong radio waves or electri- cal noise may be pres- ent.
The temperature around the camera is extremely high/low.
The ambient tempera- ture is extremely low.
It is raining or humid.
Sunlight or headlights are shining directly into the camera lens.
The vehicle is under fluorescent lights, sodium lights, mer- cury lights, etc.
Exhaust gas is obstructing the cam- era.
|
Change to optical mirror mode. (Change back to digital mirror mode when the conditions have improved.) |
|
Symptom |
Likely cause |
Solution |
|
The image is difficult to see. |
The luggage in the lug- gage compartment is reflected off the rear win- dow glass and obstruct- ing the camera. |
Change to optical mir- ror mode.
Move the luggage to a position where it does not obstruct the cam- era or cover it with a black cloth to reduce the amount it is reflected off the rear window glass.
|
|
The rear window glass is fogged up. |
Change to optical mirror mode. After defogging the rear window using the rear window defogger (P.517), use the digi- tal mirror mode again. |
|
|
The outside of the rear window glass is dirty. |
Use the rear window wiper to remove dirt. |
|
|
The inside of the rear window glass is dirty. |
Wipe the inside of rear window glass with a damp soft cloth. |
|
|
The image is out of alignment. |
The back door is not fully closed. |
Fully close the back door. |
|
The camera or its sur- rounding area has received a strong impact. |
Change to optical mirror mode and have the vehi- cle inspected by your Toyota dealer. |
|
|
The display is dim and
|
The system may be mal- functioning. |
Change to optical mirror mode and have the vehi- cle inspected by your Toyota dealer. |
|
|
 is displayed.
 goes off.
|
Symptom |
Likely cause |
Solution |
|
|
The Digital Rear-view Mirror is extremely hot. (The display will gradu- ally become more dim. If the temperature contin- ues to increase, the Digi- tal Rear-view Mirror will turn off.) |
Reducing the cabin tem- perature is recom- mended to reduce the temperature of the mir- ror. ( If does not disap- pear even though the mirror is cool, have the vehicle inspected by your Toyota dealer. |
|
The lever cannot be operated properly. |
The lever may be mal- functioning. |
Change to optical mirror mode and have the vehi- cle inspected by your Toyota dealer. (To change to optical mirror mode, press and hold the menu button for approximately 10 sec- onds.) |
 is displayed.
 will disappear when the mirror becomes cool.)
1 To select a mirror to adjust,
press the switch.
The outside rear view mirrors can be cleared using the mirror defog- gers. Turn on the rear window defogger to turn on the outside rear view mirror defoggers.
(P.511, 517)

2 To adjust the mirror, press
the switch.
|
|
Up Right Down Left
The engine switch is in ACC or ON.
Operating the switch moves the side windows as follows:
Download Manual