Uconnect settings
The Uconnect system uses a combination of buttons on the touchscreen and buttons on the faceplate located on the center of the instrument panel that allows you to access and change the Customer Programmable Features.
CUSTOMER PROGRAMMABLE FEATURES — RADIO 4.3 SETTINGS
In this mode the Uconnect system allows you to access programmable features that may be equipped such as Display, Clock, Safety & Driving Assistance, Lights, Doors & Locks, Auto-On Comfort & Remote Start, Engine Off Options, Audio, Phone/Bluetooth®, and SiriusXM® Setup through buttons on the faceplate and touchscreen.
Note:
Only one touchscreen area may be selected at a time.
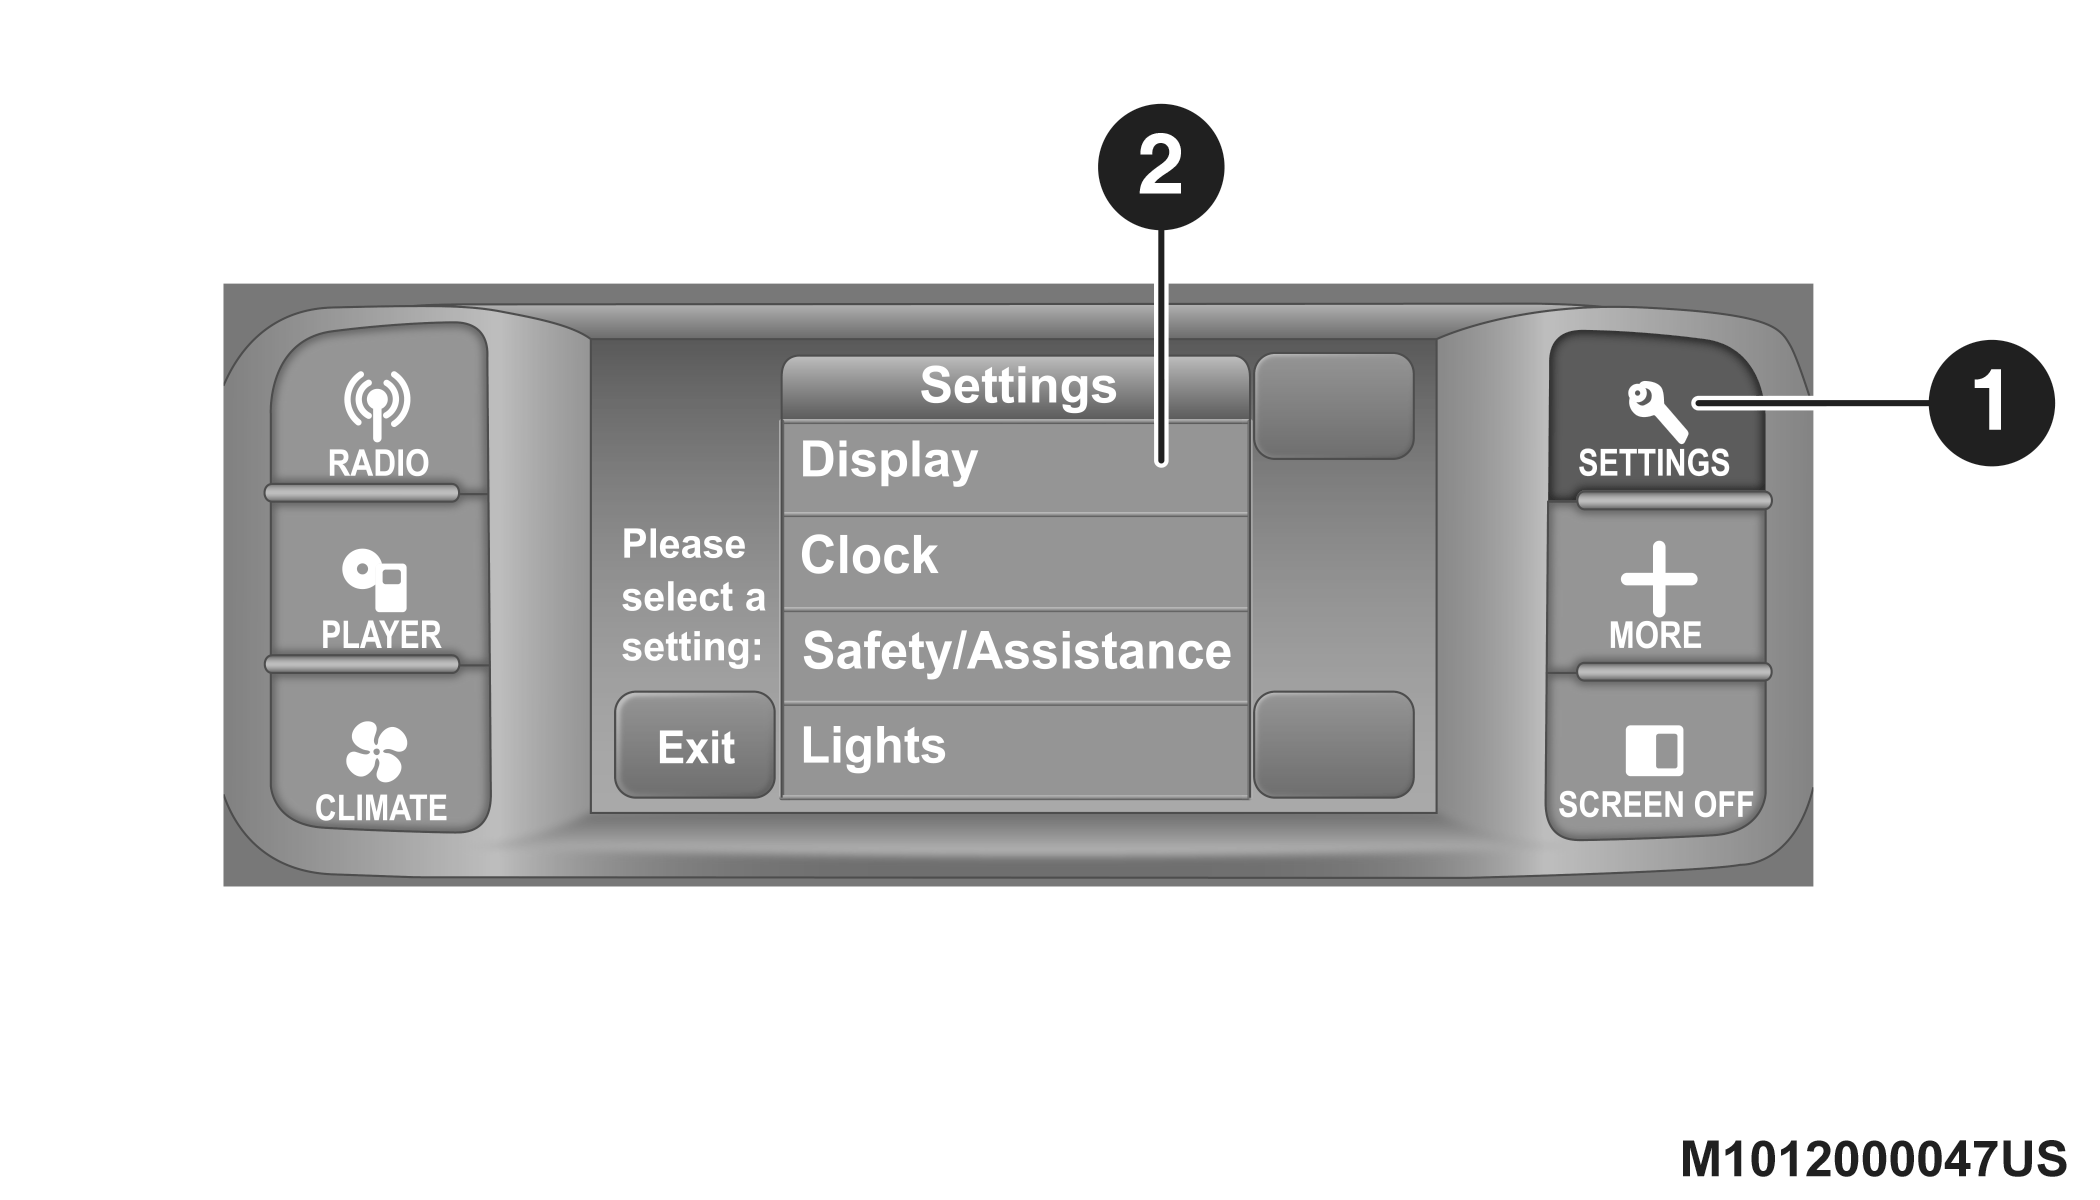
Radio 4.3 Buttons On The Faceplate and Touchscreen
|
1 — Uconnect Buttons On The Faceplate |
|
2 — Uconnect Buttons On The Touchscreen |
Push the SETTINGS button on the faceplate to access the Settings screen, use the Page Up or Page Down buttons on the touchscreen to scroll through the following settings. Press the desired setting button on the touchscreen to change the setting using the description shown on the following pages for each setting.
DISPLAY
After pressing the Display button on the touchscreen, the following settings will be available:
|
Setting Name |
Selectable Options |
||
|
Brightness |
+ |
– |
|
|
Note: The “Brightness” setting can also be adjusted by selecting any point on the scale between the + and – buttons on the touchscreen. |
|||
|
Mode |
Day |
Night |
Auto |
|
Language |
English |
Français |
Español |
|
Note: When in the “Language” feature, you may select one of three languages for all display nomenclature. |
|||
|
Units |
US |
Metric |
|
|
Voice Response |
Brief |
Long |
|
|
Touchscreen Beep |
On |
Off |
|
CLOCK
After pressing the Clock button on the touchscreen, the following settings will be available:
|
Setting Name |
Selectable Options |
|
|
Set Time and Format |
12 hr |
24 hr |
|
AM |
PM |
|
|
Note: Within the “Set Time and Format” setting, press the corresponding Arrow buttons on the touchscreen to adjust to the correct time. |
||
|
Show Time Status — If Equipped |
On |
Off |
|
Sync Time — If Equipped |
On |
Off |
SAFETY & DRIVING ASSISTANCE
After pressing the Safety & Driving Assistance button on the touchscreen, the following settings will be available:
|
Setting Name |
Selectable Options |
||
|
Rear Park Assist — If Equipped |
Off |
Sound Only |
Sound & Display |
|
Note: The Rear Park Assist system scans for and alerts the driver of objects behind the vehicle when the transmission gear selector is in REVERSE and the vehicle speed is less than 11 mph (18 km/h). |
|||
|
ParkView Backup Camera |
On |
Off |
|
|
Note: Your vehicle may be equipped with the ParkView Back Up Camera that allows you to see an on-screen image of the rear surroundings of your vehicle whenever the gear selector is put into REVERSE. The image will be displayed on the radio touchscreen display along with a caution note to “check entire surroundings” across the top of the screen. After five seconds, this note will disappear. The ParkView camera is located on the rear of the vehicle above the rear license plate. |
|||
|
Hill Start Assist — If Equipped |
On |
Off |
|
LIGHTS
After pressing the Lights button on the touchscreen, the following settings will be available:
|
Setting Name |
Selectable Options |
|
|
Headlight Off Delay — If Equipped |
0 sec |
30 sec |
|
60 sec |
90 sec |
|
|
Note: When the “Headlight Off Delay” feature is selected, it allows the adjustment of the amount of time the headlights remain on after the engine is shut off. |
||
|
Headlights With Wipers — If Equipped |
On |
Off |
|
Headlight Illuminated Approach |
0 sec |
30 sec |
|
60 sec |
90 sec |
|
|
Note: When this feature is selected, it allows the adjustment of the amount of time the headlights remain on after the doors are unlocked with the key fob. |
||
|
Auto High Beams — If Equipped |
On |
Off |
|
Note: When the “Automatic High Beams” is selected, the high beam headlights will activate/deactivate automatically under certain conditions. |
||
|
Daytime Running Lights |
On |
Off |
|
Note: When the “Daytime Running Lights” feature is selected, the daytime running lights can be turned On or Off. This feature is only available if allowed by law in the country of the vehicle purchase. |
||
|
Steering Directed Lights — If Equipped |
On |
Off |
|
Note: When the “Steering Directed Lights” feature is selected, the headlights will turn relative to a change in direction of the steering wheel. |
||
|
Flash Lights With Lock |
On |
Off |
DOORS & LOCKS
After pressing the Doors & Locks button on the touchscreen, the following settings will be available:
|
Setting Name |
Selectable Options |
|
|
Auto Door Locks |
On |
Off |
|
Note: The “Auto Door Locks” feature locks all doors automatically when the vehicle reaches a speed of 15 mph (24 km/h). |
||
|
Auto Unlock On Exit |
On |
Off |
|
Note: When the “Auto Unlock On Exit” feature is selected, all doors will unlock when the vehicle is stopped and the transmission is in the PARK or NEUTRAL position and the driver's door is opened. |
||
|
Flash Lights With Lock |
On |
Off |
|
Sound Horn With Lock |
On |
Off |
|
Sound Horn With Remote Start |
On |
Off |
|
Passive Entry (Keyless Enter-N-Go) — If Equipped |
On |
Off |
|
Remote Door Unlock Order |
Driver |
All |
|
Note: When “Driver” is programmed, only the driver's door will unlock on the first push of the key fob unlock button. You must push the key fob unlock button twice to unlock the passengers’ doors. When “All” is programmed, all of the doors will unlock on the first press of the key fob unlock button. If “All” is programmed, all doors will unlock no matter which Passive Entry equipped door handle is grasped. If “Driver” is programmed, only the driver’s door will unlock when the driver’s door is grasped. Touching the handle more than once will only result in the driver’s door opening once. If the driver’s door is opened, the interior door lock/unlock switch can be used to unlock all doors (or use the key fob). |
||
AUTO-ON COMFORT & REMOTE START
After pressing the Auto-On Comfort & Remote Start button on the touchscreen, the following setting will be available:
|
Setting Name |
Selectable Options |
|
|
Auto-On Driver Heated Seat & Steering Wheel With Vehicle Start — If Equipped |
On |
Off |
|
Note: When this feature is selected, the driver’s heated seat and heated steering wheel (if equipped) will automatically turn on when temperatures are below 40°F (4.4°C). |
||
ENGINE OFF OPTIONS
After pressing the Engine Off Options button on the touchscreen, the following settings will be available:
|
Setting Name |
Selectable Options |
|
|
Engine Off Power Delay |
0 sec |
45 sec |
|
5 min |
10 min |
|
|
Note: When the “Engine Off Power Delay” feature is selected, the power window switches, radio, Uconnect phone system (if equipped), DVD video system (if equipped), power sunroof (if equipped), and power outlets will remain active for up to 10 minutes after the ignition is cycled to OFF. Opening either front door will cancel this feature. |
||
|
Headlight Off Delay |
0 sec |
30 sec |
|
60 sec |
90 sec |
|
|
Note: When the “Headlight Off Delay” feature is selected, it allows the adjustment of the amount of time the headlights remain on after the engine is shut off. |
||
AUDIO
After pressing the Audio button on the touchscreen, the following setting will be available:
|
Setting Name |
Selectable Options |
||||
|
Equalizer |
Bass |
Mid |
Treble |
||
|
Note: When in this display you may adjust the “Bass”, “Mid”, and “Treble” settings. Adjust the settings with the + and – setting buttons on the touchscreen or by selecting any point on the scale between the + and – buttons on the touchscreen. Bass/Mid/Treble also allow you to simply slide your finger up or down to change the setting as well as press directly on the desired setting. |
|||||
|
Balance/Fade |
Up Arrow Button |
Down Arrow Button |
Left Arrow Button |
Right Arrow Button |
Center C Button |
|
Note: When in this display you may adjust the “Balance/Fade” of the audio by using the Arrow button on the touchscreen to adjust the sound level from the front and rear or right and left side speakers. Press the Center C Button on the touchscreen to reset the balance and fade to the factory setting. |
|||||
|
Speed Adjusted Volume |
Off |
1 |
2 |
3 |
|
|
Music Info Cleanup |
On |
Off |
|||
|
Note: The “Music Info Cleanup” feature helps organize music files for optimized music navigation. |
|||||
|
Surround Sound — If Equipped |
On |
Off |
|||
PHONE/BLUETOOTH®
After pressing the Phone/Bluetooth® button on the touchscreen, the following settings will be available:
|
Setting Name |
Selectable Options |
|
|
Paired Phones |
List of Paired Phones |
|
|
Note: This feature shows which phones are paired to the Phone/Bluetooth® system. For further information, refer to the Uconnect Owner’s Manual Supplement. |
||
SIRIUSXM® SETUP
After pressing the SiriusXM® Setup button on the touchscreen, the following settings will be available:
|
Setting Name |
Selectable Options |
|
Channel Skip |
List of Channels |
|
Note: SiriusXM® can be programmed to designate a group of channels that are the most desirable to listen to or to exclude undesirable channels while scanning. This feature allows you to select the channels you would like to skip. |
|
|
Subscription Info |
Sirius ID |
|
Note: New vehicle purchasers or lessees will receive a free limited time subscription to SiriusXM® Satellite Radio with your radio. Following the expiration of the free services, it will be necessary to access the information on the Subscription Information screen to re-subscribe.
|
|
CUSTOMER PROGRAMMABLE FEATURES — UCONNECT 3/3 NAV SETTINGS
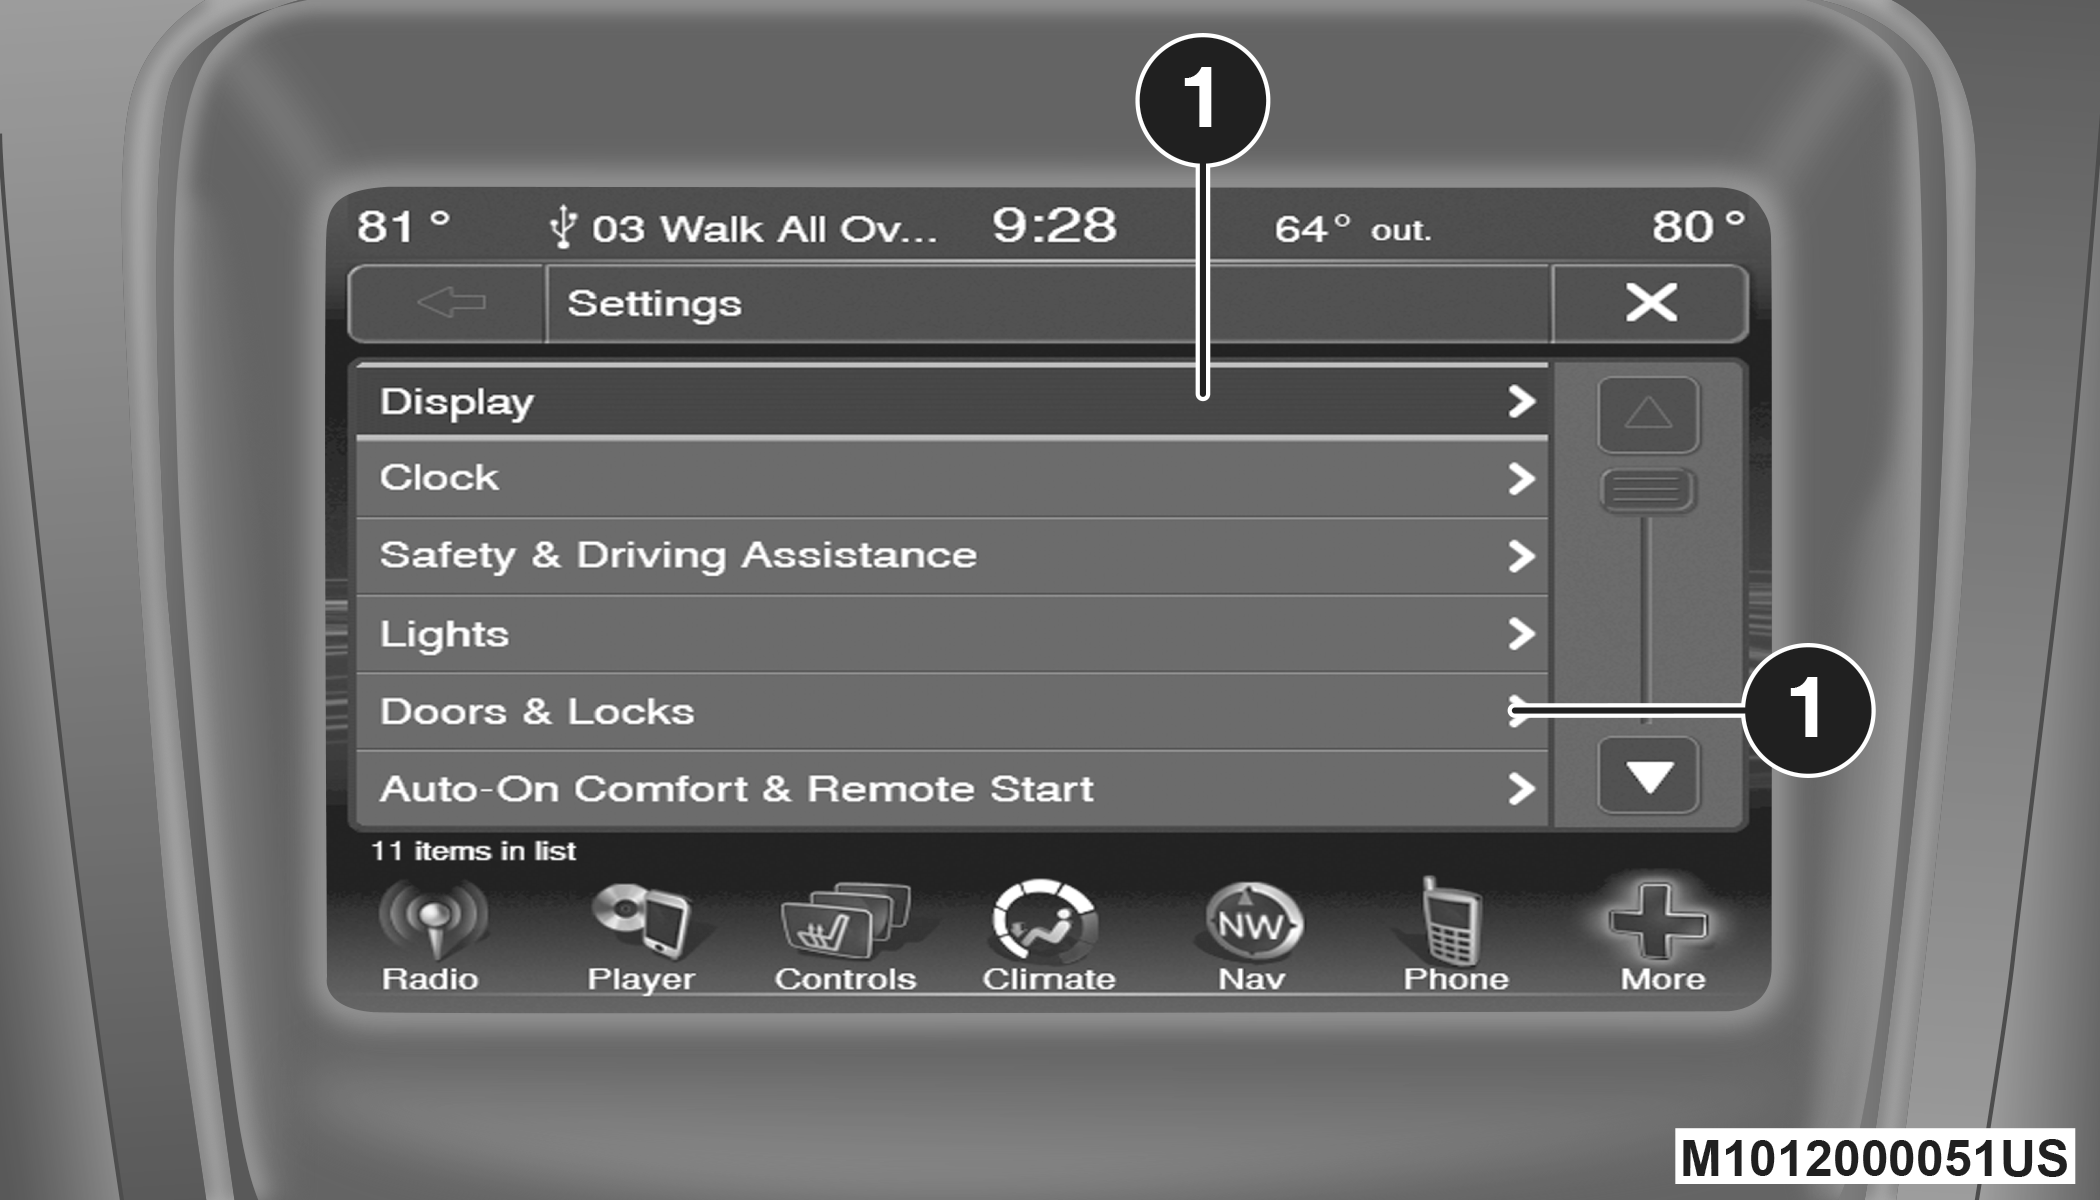
Uconnect 3/3 NAV Buttons On The Touchscreen
|
1 - Buttons On The Touchscreen |
Press the More button on the touchscreen, then press the Settings button on the touchscreen to display the menu setting screen. In this mode the Uconnect system allows you to access programmable features that may be equipped such as Display, Accessibility (if equipped), Clock, Safety & Driving Assistance, Lights, Doors & Locks, Auto-On Comfort & Remote Start, Engine Off Options, Audio, Phone/Bluetooth®, and SiriusXM® Setup.
Note:
Only one touchscreen area may be selected at a time.
When making a selection, press the button on the touchscreen to enter the desired mode. Once in the desired mode, press and release the preferred setting until a check mark appears next to the setting, showing that setting has been selected.
Once the setting is complete press the Back Arrow button on the touchscreen to return to the previous menu or press the X button on the touchscreen to close out of the settings screen. Pressing the Up or Down Arrow buttons on the touchscreen on the right side of the screen will allow you to toggle up or down through the available settings.
DISPLAY
After pressing the Display button on the touchscreen, the following settings will be available:
|
Setting Name |
Selectable Options |
||||||||||
|
Display Mode |
Day |
Night |
Auto |
||||||||
|
Display Brightness with Headlights ON |
– |
+ |
|||||||||
|
Note: To make changes to the "Display Brightness with Headlights ON" setting, the headlights must be on and the interior dimmer switch must not be in the "party" or "parade" position. |
|||||||||||
|
Display Brightness with Headlights OFF |
– |
+ |
|||||||||
|
Note: To make changes to the "Display Brightness with Headlights OFF" setting, the headlights must be off and the interior dimmer switch must not be in the "party" or "parade" position. |
|||||||||||
|
Set Language |
Selectable Languages |
||||||||||
|
Note: When the “Set Language” feature is selected, you may select one of multiple languages (English / Français / Español) for all display nomenclature, including the trip functions and the navigation system (if equipped). Press the Set Language button on the touchscreen, then press the desired language button on the touchscreen until a check mark appears next to the language, showing that setting has been selected. |
|||||||||||
|
Units |
US |
Metric |
|||||||||
|
Voice Response Length |
Brief |
Detailed |
|||||||||
|
Touchscreen Beep |
On |
Off |
|||||||||
|
Control Screen Time-Out — If Equipped |
On |
Off |
|||||||||
|
Navigation Turn-by-Turn In Cluster — If Equipped |
On |
Off |
|||||||||
|
Note: When the “Navigation Turn-by-Turn In Cluster” feature is selected, the turn-by-turn directions appears in the instrument cluster display as the vehicle approaches a designated turn within a programmed route. |
|||||||||||
|
Fuel Saver Display In Cluster — If Equipped |
On |
Off |
|||||||||
|
Note: The “Fuel Saver Display In Cluster” feature turns the “ECO” message on and off in the instrument cluster display. |
|||||||||||
ACCESSIBILITY — IF EQUIPPED
After pressing the Accessibility button on the touchscreen, the following settings will be available:
|
Setting Name |
Selectable Options |
|
|
Read Back Main Cabin |
On |
Off |
|
Note: This feature announces a function prior to performing the action selected when using DVD functions, when it is activated. For example, when activated, and the Play button is selected, the system will announce “Play button selected”, and then once pressed again the Play button will perform its action. |
||
|
Read Back Rear Headphones |
On |
Off |
CLOCK
After pressing the Clock button on the touchscreen, the following settings will be available.
|
Setting Name |
Selectable Options |
|
|
Sync Time With GPS — If Equipped |
On |
Off |
|
Set Time Hours |
- |
+ |
|
Note: This feature will allow you to adjust the hours. The Sync Time With GPS button on the touchscreen must be unchecked. |
||
|
Set Time Minutes |
- |
+ |
|
Note: This feature will allow you to adjust the minutes. The Sync Time With GPS button on the touchscreen must be unchecked. |
||
|
Time Format |
12 hrs |
24 hrs |
|
Show Time In Status Bar — If Equipped |
On |
Off |
SAFETY & DRIVING ASSISTANCE
After pressing the Safety & Assistance button on the touchscreen, the following settings will be available:
|
Setting Name |
Selectable Options |
||
|
Park Assist — If Equipped |
Off |
Sound Only |
Sounds + Display |
|
Note: The Park Assist system scans for, and then alerts the driver of, objects behind the vehicle when the transmission gear selector is in REVERSE and the vehicle speed is less than 11 mph (18 km/h). |
|||
|
Park Assist Volume |
Low |
Med |
High |
|
ParkView Backup Camera — If Equipped |
On |
Off |
|
|
Note: Your vehicle may be equipped with the ParkView Backup Camera that allows you to see an on-screen image of the rear surroundings of your vehicle whenever the gear selector is put into REVERSE. The image will be displayed on the radio touchscreen display along with a caution note to “check entire surroundings” across the top of the screen. After five seconds, this note will disappear. The ParkView camera is located on the rear of the vehicle above the rear license plate. |
|||
|
Hill Start Assist — If Equipped |
On |
Off |
|
LIGHTS
After pressing the Lights button on the touchscreen, the following settings will be available:
|
Setting Name |
Selectable Options |
|
|
Headlight Off Delay |
0 sec |
30 sec |
|
60 sec |
90 sec |
|
|
Note: When the “Headlight Off Delay” feature is selected, it allows the adjustment of the amount of time the headlights remain on after the engine is shut off. |
||
|
Headlight Illuminated On Approach |
0 sec |
30 sec |
|
60 sec |
90 sec |
|
|
Note: When the “Headlight Illumination On Approach” feature is selected, it allows the adjustment of the amount of time the headlights remain on after the doors are unlocked with the key fob. |
||
|
Headlights With Wipers — If Equipped |
On |
Off |
|
Auto Dim High Beams— If Equipped |
On |
Off |
|
Note: When the “Auto Dim High Beams” feature is selected, the high beam headlights activate/deactivate automatically under certain conditions. |
||
|
Daytime Running Lights |
On |
Off |
|
Note: When the “Daytime Running Lights” feature is selected, the daytime running lights can be turned On or Off. This feature is only available if allowed by law in the country of the vehicle purchase. |
||
|
Steering Directed Headlights — If Equipped |
On |
Off |
|
Note: The “Steering Directed Headlights” feature causes the headlights to turn relative to a change in direction of the steering wheel. |
||
|
Flash Headlights With Lock |
On |
Off |
DOORS & LOCKS
After pressing the Doors & Locks button on the touchscreen, the following settings will be available:
|
Setting Name |
Selectable Options |
||
|
Auto Door Locks — If Equipped |
On |
Off |
|
|
Note: When the “Auto Door Locks” feature is selected, all doors will lock automatically when the vehicle reaches a speed of 12 mph (20 km/h). |
|||
|
Auto Unlock On Exit |
On |
Off |
|
|
Note: When this feature is selected, all doors will unlock when the vehicle is stopped, the transmission is in the PARK or NEUTRAL position and the driver's door is opened. |
|||
|
Flash Lamps With Lock |
On |
Off |
|
|
Sound Horn With Lock |
On |
Off |
|
|
Sound Horn With Remote Start |
On |
Off |
|
|
1st Press Of Key Fob Unlocks |
Driver Door |
All Doors |
|
|
Note: When "Driver Door" is programmed with 1st Press Of Key Fob Unlocks, only the driver's door will unlock with the first press of the key fob unlock button. You must press the key fob unlock button twice to unlock the passengers’ doors. When "All Doors" is programmed for 1st Press Of Key Fob Unlocks, all doors will unlock on the first press of the key fob unlock button. If the vehicle is programmed 1st Press Of Key Fob Unlocks “All Doors,” all doors will unlock no matter which Passive Entry equipped door handle is grasped. If 1st Press Of Key Fob Unlocks “Driver Door” is programmed, only the driver’s door will unlock when the driver’s door is grasped. With Passive Entry, if 1st Press Of Key Fob Unlocks “Driver Door” is programmed, touching the handle more than once will result in only the driver’s door opening. If “Driver Door” is selected, once the driver door is opened, the interior door lock/unlock switch can be used to unlock all doors (or use key fob). |
|||
|
Passive Entry — If Equipped |
On |
Off |
|
|
Note: The “Passive Entry” feature allows you to lock and unlock the vehicle’s door(s) without having to push the key fob lock or unlock buttons. |
|||
AUTO-ON COMFORT & REMOTE START
After pressing the Auto-On Comfort & Remote Start button on the touchscreen, the following settings will be available:
|
Setting Name |
Selectable Options |
|
|
Sound Horn With Remote Start |
On |
Off |
|
Auto-On Driver Heated Seat & Steering Wheel With Vehicle Start — If Equipped |
On |
Off |
|
Note: When this feature is selected the driver’s heated seat and heated steering wheel (if equipped) will automatically turn on when temperatures are below 40°F (4.4°C). |
||
ENGINE OFF OPTIONS
After pressing the “Engine Off Options” button on the touchscreen, the following settings will be available:
|
Setting Name |
Selectable Options |
|
|
Engine Off Power Delay |
0 sec |
45 sec |
|
5 mins |
10 mins |
|
|
Note: When the “Engine Off Power Delay” feature is selected, the power window switches, radio, Uconnect phone system (if equipped), DVD video system (if equipped), power sunroof (if equipped), and power outlets will remain active for up to 10 minutes after the ignition is cycled to OFF. Opening either front door will cancel this feature. |
||
|
Headlight Off Delay |
- |
+ |
|
Note: When the “Headlight Off Delay” feature is selected, it allows the adjustment of the amount of time the headlights remain on after the engine is shut off. Press the + or - buttons to transition from 0 seconds to 30, 60, or 90 seconds. |
||
AUDIO
After pressing the Audio button on the touchscreen, the following settings will be available.
|
Setting Name |
Selectable Options |
||||
|
Balance/Fade |
Front Button |
Rear Arrow Button |
Left Arrow Button |
Right Arrow Button |
Center C Button |
|
Note: When in this display you may adjust the “Balance/Fade” of the audio by using the Arrow button on the touchscreen to adjust the sound level from the front and rear or right and left side speakers. Press the Center C button on the touchscreen to reset the balance and fade to the factory setting. |
|||||
|
Equalizer |
Bass |
Mid |
Treble |
||
|
Note: When in this display you may adjust the “Bass”, “Mid”, and “Treble” settings. Adjust the settings with the + and – setting buttons on the touchscreen or by selecting any point on the scale between the + and – buttons on the touchscreen. Bass/Mid/Treble also allow you to simply slide your finger up or down to change the setting as well as press directly on the desired setting. |
|||||
|
Speed Adjusted Volume |
Off |
1 |
2 |
3 |
|
|
Music Info Cleanup |
On |
Off |
|||
|
Note: The “Music Info Cleanup” feature helps organize music files for optimized music navigation. |
|||||
|
Auto Play |
On |
Off |
|||
|
Note: When the “Auto Play” feature is on, music will begin playing music automatically whenever an audio device is connected and recognized. |
|||||
PHONE/BLUETOOTH®
After pressing the Phone/Bluetooth® button on the touchscreen, the following settings will be available:
|
Setting Name |
Selectable Options |
|
|
Paired Phones |
List of Paired Phones |
|
|
Note: This feature shows which phones are paired to the Phone/Bluetooth® system. For further information, refer to the Uconnect Owner’s Manual Supplement. |
||
|
Paired Audio Sources |
List Of Paired Audio Sources |
|
|
Note: This feature shows which audio sources are paired to the Phone/Bluetooth® system. For further information, refer to the Uconnect Owner’s Manual Supplement. |
||
SIRIUSXM® SETUP
After pressing the SiriusXM® Setup button on the touchscreen, the following settings will be available:
|
Setting Name |
Selectable Options |
|
Channel Skip |
List Of Channels |
|
Note: SiriusXM® can be programmed to designate a group of channels that are the most desirable to listen to or to exclude undesirable channels while scanning. This feature allows you to select the channels you would like to skip. |
|
|
Subscription Info |
Sirius ID |
|
Note: New vehicle purchasers or lessees will receive a free limited time subscription to SiriusXM® Satellite Radio with your radio. Following the expiration of the free services, it will be necessary to access the information on the Subscription Information screen to re-subscribe.
SiriusXM® Travel Link is a separate subscription. |
|
Download Manual