Fuses
 Introduction to the subject
In this chapter you will find information on the following subjects:
Due to ongoing development of the vehicle, configuration-dependent allocation of fuses and the combined fuse protection of multiple loads with one fuse, an up-to-date overview of the fuse location per load is not possible at the time of printing. Detailed information regarding fuse box layout is available from authorized Volkswagen dealers and authorized Volkswagen Service Facilities.
In general, one fuse can protect several loads. One load can also be protected by several fuses.
Find out why the fuse blew and correct the problem before replacing a blown fuse. If a newly replaced fuse blows again after a short time, the electrical system should be checked by an authorized Volkswagen dealer or an authorized Volkswagen Service Facility.
More information:
- Working in the engine compartment
 WARNING
High voltage systems in the engine compartment can cause electrical shocks, severe burns, and even death!
- Never touch ignition cables. Never touch other components of the high voltage electronic ignition system.
- Avoid short circuits in the electrical system.
WARNING
Using the wrong fuse, using a blown fuse that has been repaired, and using metal objects in place of fuses to complete the electrical connection in the circuit can cause fires and serious personal injury.
- Never replace a fuse with one that has a higher amp rating. Replace a blown fuse only with a fuse of the same amperage (same color and same imprint) and same overall size.
- Never repair fuses.
- Never replace fuses with a metal strip, a paper clip, or a similar object.
 NOTE
NOTE
- To help prevent damage to the electrical system, switch off all lights and accessories, switch off the ignition, and remove the key from the ignition switch before replacing a fuse.
- If a fuse is replaced with a fuse with higher amperage, this can also cause damage at different locations in the electrical system.
- Open fuse boxes must be protected from dirt and moisture. Dirt and moisture in fuse boxes can cause damage to the electrical system.
Fuses in the vehicle
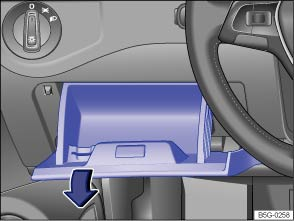
Fig. 181 On the driver side in the instrument panel: Fuse box cover.
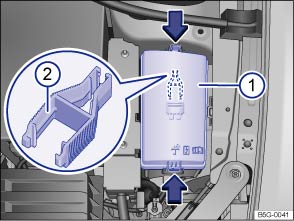
Fig. 182 In the engine compartment: Fuse box cover ① with tweezers ②.
Read and follow the introductory information and safety information first
Replace a blown fuse only with a fuse of the same amperage (same color and same imprint) and same overall size.
Fuse types
- Regular blade fuse (ATO®).
- Mini blade fuse (MINI®).
- Cartridge fuse (JCASE®).
Fuse color coding
| Color | Current strength in amps (ATO®/MINI®) |
Current strength in amps (JCASE®) |
|---|---|---|
| Black | 1 | — |
| Light brown | 5 | — |
| Brown | 7.5 | — |
| Red | 10 | 50 |
| Blue | 15 | 20 |
| Yellow | 20 | 60 |
| White or clear | 25 | — |
| Green | 30 | 40 |
| Orange | 40 | — |
| Pink | 30 | 30 |
Opening the fuse box in the instrument panel
- Pull the lower part of the cover in the direction of the arrow and remove the cover from the bottom. This action may require moderate force.
- To install, guide the cover from the bottom into the instrument panel and push in the direction opposite to the arrow until you can hear it latch into place.
Opening the fuse box in the engine compartment
- Open the engine hood
.
- Move the release tabs in the direction of the arrows to unlock the fuse box cover ①.
- Remove the cover upward.
- To install push the cover onto the fuse box. The locking tabs must latch with an audible click.
In some vehicles, there are plastic tweezers for removing fuses on the inside of the fuse box cover .
NOTE
- To help prevent vehicle damage, be careful when removing fuse box covers and be sure to reinstall them properly.
- Open fuse boxes must be protected from dirt and moisture. Dirt and moisture in fuse boxes can cause damage to the electrical system.

The vehicle contains other fuses in addition to those mentioned in this section. Have these fuses replaced by an authorized Volkswagen dealer or an authorized Volkswagen Service Facility.
Replacing blown fuses
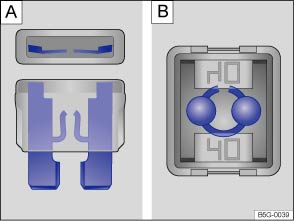
Fig. 183 Blown fuse: A: Blade fuse. B: JCASE® fuse.
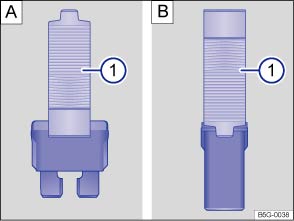
Fig. 184 Removing or installing a blade fuse with the plastic tweezers: A: Blade fuse. B: JCASE® fuse.
Read and follow the introductory information and safety information first
Preparations
- Switch off the headlights, the ignition, and all electrical consumers.
- Open the appropriate fuse box .
Identifying a blown fuse
- Shine a flashlight on the fuse. This makes it easier to tell if the fuse has blown.
- A blown blade fuse (ATO®, MINI®) has metal strips that have burned through, which you can see through the transparent housing from above and from the side A.
- A blown cartridge fuse (JCASE®) has metal strips that have burned through, which you can see through the transparent housing from above B.
Replacing a fuse
In some vehicles, there are plastic tweezers for removing blade fuses on the inside of the fuse box cover in the engine compartment.
- Open the fuse box cover in the engine compartment and remove the plastic tweezers.
- Depending on the type of fuse, slide the tweezers A ① or B ① onto the fuse from the side.
- Pull out the fuse.
- If the fuse is blown, replace the fuse with a new fuse of the same amperage (same color and same imprint) and same size .
- Clip the plastic tweezers back into the holder inside the fuse box cover.
- Replace the fuse box cover.
NOTE
If a fuse is replaced with a fuse with higher amperage, then damage can occur at various places in the electrical system.
Download Manual