Adjusting the seating position
 Introduction to the subject
In this chapter you will find information on the following subjects:
Number of seats
The vehicle has a total of 5 seating positions: 2 in front and 3 in the rear. Each seating position has a safety belt.
More information:
- Infotainment system
- Seat functions
- Safety belts
- Airbag system
- Child safety and child restraints
 WARNING
Improper seating positions increase the risk of severe or fatal injuries in a crash or other accidents, especially when the airbag deploys.
- All occupants must sit properly and be properly restrained at all times.
- Never let more people ride in the vehicle than there are seating positions with safety belts available.
- Always secure children in the vehicle with an approved and suitable restraint system appropriate for their age, weight, and height , .
- Always keep your feet on the floor in front of the seat. Never rest them on the seat, instrument panel, out of the window, etc. The airbag system and safety belt will not be able to protect you properly and can even increase the risk of injury in a crash.
WARNING
Always adjust seat, safety belts, and head restraints properly before driving and make sure that all passengers are properly restrained.
- Push the passenger seat as far back as possible. Always be sure that there are at least 10 inches (25 cm) between the front passenger's breastbone and the instrument panel.
- Always adjust the driver's seat and the steering wheel so that there are at least 10 inches (25 cm) between your breastbone and the steering wheel.
- Adjust the driver's seat so that you can easily push the pedals all the way to the floor while keeping your knee(s) slightly bent.
- If these requirements cannot be met for physical reasons, contact an authorized Volkswagen dealer or an authorized Volkswagen Service Facility to see whether adaptive equipment is available.
- Always hold the steering wheel on the outside of the steering wheel rim with your hands at the 9 o'clock and 3 o'clock positions to help reduce the risk of personal injury if the driver's airbag inflates.
- Never hold the steering wheel at the 12 o'clock position or with your hands at other places inside the steering wheel rim or on the steering wheel hub. Holding the steering wheel the wrong way can cause serious injuries to the hands, arms, and head if the driver's airbag inflates.
- Pointing the steering wheel toward your face decreases the ability of the driver's airbag to help protect you in a collision.
- Never drive with backrests reclined or tilted back farther than necessary to drive comfortably. The farther back the backrests are tilted, the greater the risk of injury caused by incorrect positioning of the safety belts and improper seating position.
- Never drive with the front seat passenger backrest tilted forward. If the front airbag deploys, the front backrest can be forced backward and injure passengers on the rear seat.
- Sit as far back as possible from the steering wheel and the instrument panel.
- Always sit upright with your back against the backrest with the front seats properly adjusted. Never lean against or place any part of your body too close to the area where the airbags are located.
- Rear seat passengers who are not properly seated and restrained are more likely to be seriously injured in a crash.
WARNING
Improper adjustment of the seats can cause accidents and severe injuries.
- Never adjust the seats while the vehicle is moving. Your seat may move unexpectedly and you could lose control of the vehicle. In addition, you will not be in the correct seating position while adjusting the seats.
- Adjust the front seat height, angle and longitudinal direction only if the seat adjustment area is clear.
- The adjustment of the front seats must not be restricted by things in the footwell in front or behind the seats.
WARNING
Some kinds of cigarette lighters can be lit unintentionally, or crushed causing a fire that can result in serious burns and vehicle damage.
- Always make sure that there are no lighters in the seat tracks or near other moving parts before adjusting the seats.
- Before closing a storage compartment, always make sure that no cigarette lighter can be activated, crushed, or otherwise damaged.
- Never leave a cigarette lighter in a storage compartment, on the instrument panel, or in other places in the vehicle. Heat buildup in the passenger and luggage compartment of a parked vehicle can result in temperatures in the vehicle that are much higher than the outside temperatures, particularly in summer. High temperatures could cause the cigarette lighter to catch fire.
Examples of improper seating positions
Read and follow the introductory information and safety information first
Not wearing or improperly fastening safety belts increases the risk of severe or fatal injuries. Safety belts can work only when they are properly positioned on the body. An improper seating position significantly impairs the protection provided by safety belts. This can cause severe or even fatal injuries. Improper seating positions also increase the risk of serious injury or death when an airbag deploys and strikes an occupant who is not in the proper seating position. The driver is responsible for all passengers and especially children riding in the vehicle.
The following are only some examples of seating positions that will increase the risk of serious injury or death.
Therefore, whenever the vehicle is moving:
- Never stand up in the vehicle.
- Never stand on the seats.
- Never kneel on the seats.
- Never ride with the seat backrest reclined.
- Never lean up against the instrument panel.
- Never lie down on the rear seat.
- Never sit on the edge of the seat.
- Never sit sideways.
- Never lean out the window.
- Never put your feet out the window.
- Never put feet on the instrument panel.
- Never rest your feet on the seat cushion or back of the seat.
- Never ride in the footwell.
- Never sit on the front or rear center armrest.
- Never ride without your safety belt properly fastened.
- Never ride in the luggage compartment.
WARNING
Contact with parts of the vehicle interior can cause serious personal injury in a crash.
- Always make sure that all vehicle occupants stay in a proper seating position and are properly restrained whenever the vehicle is moving.
- Improper seating positions increase the risk of serious and fatal injury, especially when an airbag deploys and strikes a passenger in an improper seating position.
Proper seating position
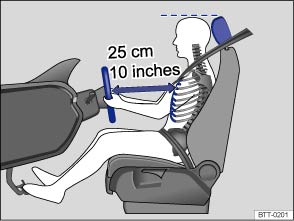
Fig. 32 The driver should never sit closer than 10 inches (25 cm) of the steering wheel.

Fig. 33 Proper safety belt positioning and head restraint adjustment.
Read and follow the introductory information and safety information first
The following describes the proper seating positions for the driver and front seat passenger.
If you have a physical impairment or condition that prevents you from sitting properly on the driver seat with the safety belt properly fastened and reaching the pedals, special modifications to your vehicle may be necessary. Only the proper seating position ensures optimum protection by the safety belt and airbag.
Contact your authorized Volkswagen dealer or authorized Volkswagen Service Facility or call the Volkswagen Customer CARE Center at 1-800-822-8987 for information about possible modifications to your vehicle.
For your own safety and to reduce injuries in the event of sudden braking maneuvers or accidents, Volkswagen recommends the following seating positions:
Applies to all vehicle occupants:
- Adjust head restraints so that the upper edge of the head restraint is at least at eye level or higher. Position the back of your head as close as possible to the head restraint and .
- Push the head restraint completely down for short people, even if the top of the head is then below the upper edge of the head restraint.
- Tall people should pull the head restraint all the way up.
- Adjust the seat backrest angle to an upright position so that your back is in full contact with it when the vehicle is moving.
- Always keep both feet on the floor and in the footwell whenever the vehicle is moving.
- Always adjust and fasten safety belts properly .
Driver – seat and steering wheel adjustment:
- Adjust the steering wheel so that there are at least 10 inches (25 cm) between the steering wheel and your breast bone . When adjusting the proper distance to the steering wheel, grasp the top of the steering wheel with your elbows slightly bent.
- Always hold the steering wheel on the outside of the steering wheel rim with your hands at the 9 o'clock and 3 o'clock positions to help reduce the risk of personal injury if the driver's airbag inflates.
- Never hold the steering wheel at the 12 o'clock position or with your hands at other places inside the steering wheel rim or on the steering wheel hub. Holding the steering wheel the wrong way can cause serious injuries to the hands, arms, and head if the driver's airbag inflates.
- Adjust the steering wheel so that the steering wheel cover points at your chest and not at your face. Pointing the steering wheel toward your face decreases the ability of the driver's airbag to help protect you in a collision.
- Adjust the driver's seat so that you can easily push the pedals all the way to the floor while keeping your knee(s) slightly bent.
- Adjust the seat height so that the top point of the steering wheel can be reached.
- Always keep both feet in the footwell so that you are in control of the vehicle at all times.
Passenger – front seat adjustment:
- Push the passenger seat as far back as possible in order to ensure optimum protection if the airbag is deployed.
Manual controls on the driver and front passenger seats
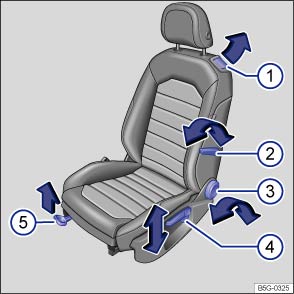
Fig. 34 Driver seat: Manual seat adjustment controls.
Read and follow the introductory information and safety information first
The controls on the front passenger seat mirror those on the driver seat.
The illustration and information in this section describes all possible seat controls. The number of controls may vary depending on the version of the seat.
There may be manual and electrical controls on the same seat.
| Function | Action | |
|---|---|---|
| ① | Fold the seat backrest forward or back into place (2-door vehicles only) | Folding forward: Pull lever and fold seat backrest forward. Push the seat forward at the same time. |
| Folding back into place: slide the seat back as far as it will go until it clicks into place. The backrest releases automatically and can be folded backwards. Engage the seat backrest in an upright position. | ||
| ② | Adjust the lumbar support | Push the lever forward or pull it backward. |
| ③ | Adjust the backrest angle. | Lean forward and turn the adjuster wheel forward or backward. If the vehicle has an electrical control for adjusting the backrest angle, see . |
| ④ | Adjust the seat height. | Pull the lever up or push it down. |
| ⑤ | Move the front seat forward or back. | Pull the lever up and move the front seat. The front seat must lock in place after the lever is released! |
Electrical controls on the driver and front passenger seats
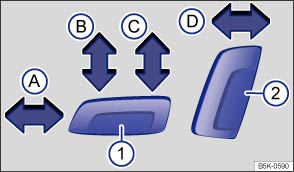
Fig. 35 Driver seat: Electrical controls to move the seat backward or forward, and adjust seat cushion height and backrest angle (if equipped).
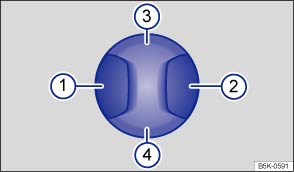
Fig. 36 Lumbar support control (if equipped).
Read and follow the introductory information and safety information first
If your vehicle is equipped with electrical controls for the front seats, the controls on the front passenger seat either mirror those on the driver seat or there may be different combinations of electrical and manual controls.
There may be manual and electrical controls on the same seat.
| Press the switch in the direction of the arrow : | ||
|---|---|---|
| ① | Ⓐ | Slide the seat forward or back. |
| Ⓑ | Adjust the seat cushion angle. | |
| Ⓒ | Raise or lower the seat cushion. | |
| ② | Ⓓ | Adjust the backrest angle. |
| Press the switch in the corresponding area : | ||
| ① or ② | Adjust the curve of the lumbar support. | |
| ③ or ④ | Adjust the height of the lumbar support. | |
WARNING
Improper use of electrical seat controls can cause serious personal injuries.
- The front seats in your vehicle can be electrically adjusted even when the vehicle key has been removed from the ignition or, on a vehicle with Keyless Access, even if there is no key in the vehicle.
- Never leave children and persons who need help in the vehicle alone because the unsupervised use of the electric seat adjustments can result in serious personal injury.
- Always make sure that no one is in the way while the front seats are being adjusted, or while calling up the stored memory settings for the front seats. In an emergency, stop automatic seat adjustment by pressing a seat adjustment switch.
 NOTE
NOTE
To help prevent damage to electrical parts in the seat, do not kneel on the front seats or apply concentrated pressure to a small area of the seat or backrest.

If the vehicle battery is too weak, the electrical seat adjustment controls may not work.
Starting the engine may stop seat adjustment.
When entering and exiting the vehicle, be careful not to come into contact with any switches that could change the seat adjustment.
Adjusting the front and rear head restraints

Fig. 37 Adjusting the front head restraints.
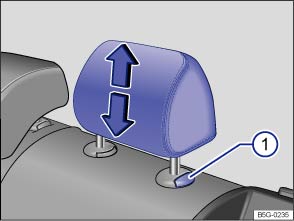
Fig. 38 Adjusting the rear head restraints.
Read and follow the introductory information and safety information first
All seats are equipped with head restraints. The rear center head restraint is designed only for the center seat on the rear bench. Therefore, only install the center head restraint in the center position.
There are notches in the head restraint guide rods so that the head restraint can lock into place. Only properly installed head restraints can lock into place at the adjustment range notches. In order to prevent inadvertent removal of the head restraints after installation, there are stops at the top and bottom of the adjustment range.
Adjusting the height
- Pull the head restraint up in the direction of the arrow, or push it down while pressing the button or .
- The head restraint must lock securely in the position selected.
Proper head restraint adjustment
Adjust head restraints so that the upper edge of the head restraint is at least at eye level or higher. Position the back of the head as close as possible to the head restraint.
Adjusting the head restraint for short people
Push the head restraint down as far as it will go, even if this means the person's head is still below the top edge of the head restraint. A small gap may remain between the head restraint and the backrest when the head restraint is all the way down.
Adjusting the head restraint for tall people
Pull the head restraint up as far as it will go.
WARNING
Driving without head restraints or with improperly adjusted head restraints increases the risk of serious injuries in a collision.
- Always drive with the head restraints in place and properly adjusted to help minimize the risk of neck injury in a crash.
- Every person in the vehicle must have a properly adjusted head restraint to minimize the risk of neck injury in a crash. Each head restraint must be adjusted according to the occupants' size so that the upper edge is even with the top of the person's head, but no lower than eye level. Always sit so that the back of your head is as close as possible to the head restraint.
- Never adjust head restraint while driving.
Removing and reinstalling the front head restraints
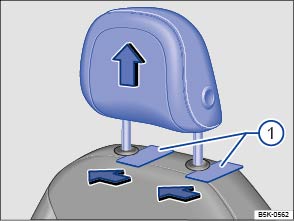
Fig. 39 Removing the front head restraints.
Read and follow the introductory information and safety information first
All seats are equipped with head restraints. For instructions on removing and reinstalling the rear head restraints, see .
Removing the front head restraints
- Sit in the back seat behind the head restraint you want to remove. Pull the head restraint all the way up . Recline the backrest with the head restraint so that there is enough overhead clearance to remove it.
- Slide a flat object, such as a plastic credit card, underneath the right side of the cap on the right-hand seat guide rod to unlock the head restraint.
- Push the flat object (plastic card) in against the guide rod to depress a release button located under the cap (not visible).
- Use one hand to hold the release button in with the flat object. With your other hand, lift the same guide rod slightly to expose a notch in the rod at the bottom (can be seen and felt with fingers). The right-hand guide rod is now released.
- To release the left-hand guide rod, press the flat object in (towards guide rod) and hold.
- Pull the head restraint out completely.
Installing the front head restraints
- Position head restraint properly over the head restraint guides of the respective seat backrest and insert the head restraint into the guides.
- Push the head restraint down .
- Adjust the head restraint according to the occupant's size .
WARNING
Driving without head restraints or with improperly adjusted head restraints increases the risk of serious injuries in a collision.
- Always drive with the head restraints in place and properly adjusted to help minimize the risk of neck injury in a crash.
- Always reinstall head restraints as soon as possible so that vehicle occupants are properly protected.
NOTE
When removing or reinstalling the head restraint, take care that the head restraint does not strike the headliner or other parts of the vehicle. The headliner or other parts of the vehicle could otherwise be damaged.
Removing and reinstalling the rear head restraints
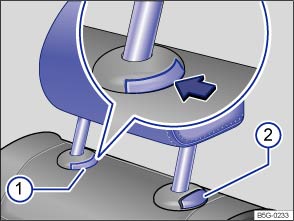
Fig. 40 Removing the rear head restraint (version A).
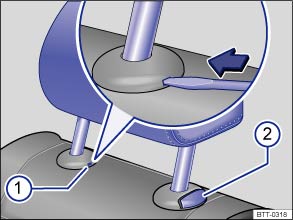
Fig. 41 Removing the rear head restraint (version B).
Read and follow the introductory information and safety information first
All seats are equipped with head restraints. The rear center head restraint is designed only for the center seat on the rear bench. Therefore, only install the center head restraint in the center position. For instructions on removing and reinstalling the front head restraints, see
Removing the rear head restraint (Version A)
- Unlock the backrest of the rear seat bench and fold it forward .
- Pull the head restraint all the way up .
- Push button in the direction of the arrow and hold it in this position.
- At the same time press button ② while a second person pulls out the head restraint completely.
- Fold the backrest of the rear seat bench back so that it locks securely.
Removing the rear head restraint (Version B)
- Unlock the backrest of the rear seat bench and fold it forward .
- Pull the head restraint all the way up .
- If necessary, press the flat blade of the screwdriver from the vehicle tool kit into the slit of the trim cap in the direction of the arrow and hold it in this position.
- At the same time press button ② while a second person pulls out the head restraint completely.
- Fold the backrest of the rear seat bench back so that it locks securely.
Reinstalling the rear head restraint (both versions)
- Unlock the backrest of the rear seat bench and fold it forward .
- Position head restraint properly over the head restraint guides of the respective seat backrest and insert the head restraint into the guides.
- Push the head restraint down while pressing button or .
- Fold the backrest of the rear seat bench back so that it locks securely.
- Adjust the head restraint according to the occupant's size .
WARNING
Driving without head restraints or with improperly adjusted head restraints increases the risk of serious injuries in a collision.
- Always drive with the head restraints in place and properly adjusted to help minimize the risk of neck injury in a crash.
- Always reinstall head restraints as soon as possible so that vehicle occupants are properly protected.
NOTE
When removing or reinstalling the head restraint, take care that the head restraint does not strike the headliner or other parts of the vehicle. The headliner or other parts of the vehicle could otherwise be damaged.
Adjusting the steering wheel position
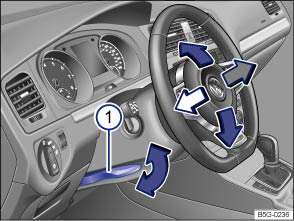
Fig. 42 Manual adjustment for the steering wheel position.
Read and follow the introductory information and safety information first
Adjust the steering wheel only when the vehicle is not moving.
- Push down on the lever .
- Adjust the steering wheel so that it can be held with hands at the 9 o'clock and 3 o'clock positions on the outside of the steering wheel rim and with the arms slightly bent at the elbow.
- Pull the lever up firmly until it is flush with the steering column .
WARNING
Improper use of the steering column adjustment feature can result in serious personal injury and even death.
- Always pull the lever firmly upward after adjusting the steering column so that the steering wheel does not change position suddenly while the vehicle is moving.
- Never adjust the steering column while the vehicle is moving. If you find that you need to adjust the steering wheel while driving, stop the vehicle in a safe place and make the proper adjustment.
- Never adjust the steering wheel so that it points toward your face. Always make sure that the steering wheel points toward your chest. Otherwise, the airbag system cannot protect you properly in the event of a crash.
- Always hold the steering wheel on the outside of the steering wheel rim with your hands at the 9 o'clock and 3 o'clock positions to help reduce the risk of serious personal injury if the driver's airbag inflates.
- Never hold the steering wheel at the 12 o'clock position or with your hands anywhere inside the steering wheel or on the steering wheel hub. Holding the steering wheel the wrong way increases the risk of severe injury to the arms, hands, and head if the driver airbag deploys.
Center armrest
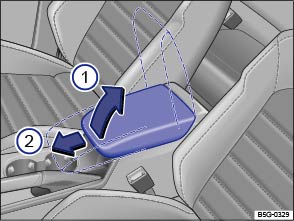
Fig. 43 Front center armrest.
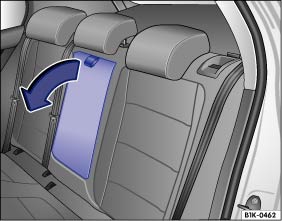
Fig. 44 Folding down the rear center armrest (arrow).
Read and follow the introductory information and safety information first
Front center armrest
There is a small storage compartment under the front center armrest .
To raise the center armrest, push the release button, pull the armrest up, and latch upward in the direction of the arrow .
To lower the center armrest, first lift it all the way up. Then you can push the center armrest down until it latches in place.
To move the center armrest forward and backward, pull it forward in the direction of the arrow ② or slide it backward until it clicks into place.
Rear center armrest
There may be a fold-down armrest in the backrest of the center rear seat .
To fold down, pull the loop in the direction of the arrow .
To fold up, push the center armrest up as far as it will go.
WARNING
The center armrest can restrict the driver's arm movement and cause crashes and serious personal injury.
- Always keep storage compartments in the center armrest closed while driving.
- Never let a passenger, especially a child, ride on the center armrest. Improper seating position can increase the risk of serious personal injury in a crash.
- Never put hot drinks or other liquids in the cup holders. Hot liquids can spill when the vehicle is moving as well as during braking or other sudden maneuvers.
Download Manual