Changing a wheel
 Introduction to the subject
In this chapter you will find information on the following subjects:
Change a wheel by yourself only if the vehicle is parked in a safe location, you are familiar with safety procedures and the technical steps, and you have proper tools available. Otherwise, get expert assistance.
The vehicle jack can only be safely used to change the wheel on a vehicle that has only one flat or damaged tire. If the vehicle does not have the support it needs from 3 fully inflated tires, the vehicle can fall off the jack. If more than 1 tire on the vehicle is flat or damaged, do not lift the vehicle with the vehicle jack. Instead, get expert assistance.
More information:
- Exterior views
- Vehicle key set
- Tires and wheels
- Tire Pressure Monitoring System (TPMS)
- In an emergency
- Vehicle tool kit
- Wheel trim
 WARNING
Changing a wheel, especially on the side of the road, can be dangerous. To help reduce the risk of serious personal injury:
- Always stop the vehicle as soon as it is safe to do so. Move the vehicle a safe distance off the road where it is safe to change the wheel.
- Always make sure that all passengers, especially children, are in a safe place outside the vehicle and away from the vehicle and traffic (such as behind a guard rail).
- Turn on the emergency flashers and set up another warning device about 25 yards (25 meters) behind the vehicle to warn approaching traffic.
- Change a wheel by yourself only if you are familiar with the necessary steps. Otherwise, get expert assistance.
- Always switch the engine off, firmly apply the parking brake, and shift the transmission into Park (P) (automatic transmission) or any gear (manual only) to help prevent the vehicle from moving suddenly and slipping off the jack.
- Always make sure that the ground is level and firm. If necessary, place the jack on a large and sturdy board or on a similar ground support.
- Always block the wheel diagonally opposite the wheel being changed with chocks or other similar things.
- If you are towing a trailer, always unhitch it from your vehicle before starting to change the wheel. Always apply the trailer brakes firmly and make sure the trailer cannot move unintentionally.
- Always use proper and undamaged tools when changing a wheel.
- Once a wheel is lifted off the ground, having the transmission in Park (P) or in gear will not prevent sudden vehicle movement.
- Always use a jack that has been approved by the manufacturer for your vehicle. Never use other jacks, even if they have been approved for use on other Volkswagen models.
- To reduce the risk of losing control, crashes, and serious personal injuries, never loosen the screws on rims with threaded rim rings.
- After changing a wheel, have the wheel bolt tightening torque checked with an accurate torque wrench.
- After changing a wheel or tire, reset the Tire Pressure Monitoring System .
Preparations for changing a wheel
Read and follow the introductory information and safety information first
Checklist
Getting ready to change a wheel. Follow these steps in the order listed here :

If you have a flat tire, move as far away from traffic as possible. Park the vehicle on a flat and level surface where no part of the hot catalytic converter and exhaust system can come into contact with flammable materials under the vehicle, such as dry grass, brush, spilled fuel, etc.
-
Firmly apply the parking brake to help prevent the vehicle from moving Braking and parking.
-
Automatic transmission: Shift the transmission into Park (P) Shifting.
-
Stop the engine and remove the key from the ignition switch Starting and stopping the engine.
-
Manual transmission: Engage a gear Shifting.
-
Have all passengers exit and go to a safe place, such as behind a guard rail.
-
Block the diagonally opposite wheel with chocks or other suitable things.
-
If towing a trailer: Unhitch the trailer from the vehicle and park the trailer properly.
-
If the luggage compartment is loaded: Remove the luggage.
-
Raise and secure the luggage compartment floor.
-
If applicable: Remove the subwoofer Removing the subwoofer.
-
Unscrew the fastening screw with washer counterclockwise and remove.
-
Take the spare or compact spare wheel and the vehicle tool kit out of the luggage compartment.
-
Take off the wheel covers Wheel trim.
WARNING
Disregarding the safety-related checklist may lead to accidents and serious personal injuries.
- Always review and follow the checklist. Follow accepted safety practices and use common sense.
Wheel bolts
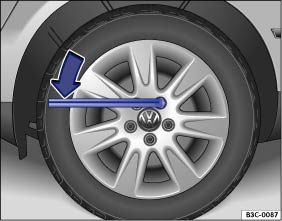
Fig. 176 Changing a wheel: Loosening the wheel bolts.
Read and follow the introductory information and safety information first
Loosen the wheel bolts only with the lug wrench that was supplied with the vehicle.
Loosen the wheel bolts only about 1 turn before lifting the vehicle with the jack.
If a wheel bolt does not come loose, carefully push the end of the lug wrench with your foot. Make sure you are standing firmly on the ground and hold on to the vehicle for support.
Loosening the wheel bolts
- Push the lug wrench over the wheel bolt all the way .
- Holding the lug wrench at the end, loosen the wheel bolt by turning it counterclockwise about 1 complete turn (360°) .
Important information regarding wheel bolts
The design of rims and wheel bolts is matched to the factory-installed wheels. If different wheels are installed, wheel bolts with the right length and bolt head shape must be used. The attachment of the wheels and function of the brake system depend on this.
It may not be possible to use wheel bolts from different vehicles of the same model.
Wheel bolt tightening torque
Correctly tightened bolts for steel and alloy wheel rims should have a torque of 88 ft-lbs (120 Nm). After changing a wheel, have the wheel bolt tightening torque checked right away with an accurate torque wrench.
Before you check the tightening torque, replace corroded and difficult-to-turn wheel bolts and clean the threads in the wheel hub.
Never grease or oil the wheel bolts and the threads in the wheel hubs. The bolts can come loose while driving if greased or oiled, even if tightened to the required torque.
WARNING
Improperly tightened wheel bolts can come loose while driving and cause you to lose control over the vehicle, resulting in accidents and serious injuries.
- Only use wheel bolts that belong your vehicle and to the wheel being installed.
- Never use different wheel bolts.
- Wheel bolts and wheel hub threads must always be clean, easy-to-turn and free of oil and grease.
- Only use the lug wrench that is supplied with the vehicle to loosen the wheel bolts.
- Loosen the wheel bolts only about 1 turn before lifting the vehicle with the jack.
- Never grease or oil the wheel bolts and the threads in the wheel hubs. The bolts can come loose while driving if greased or oiled, even if tightened to the required torque.
- Never loosen bolted connections on wheel rims with bolted rim rings.
- If the wheel bolts are not tightened to the proper torque, the wheel can come off the vehicle when it is moving. Extremely high torque can damage the wheel bolts and/or their threads.
Lifting the vehicle with the vehicle jack
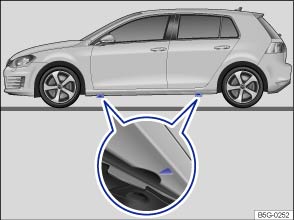
Fig. 177 Lift points for the jack.
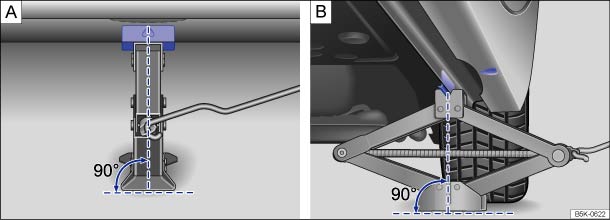
Fig. 178 Jack in position at the left rear lift point.
Read and follow the introductory information and safety information first
The jack must be positioned at one of the 4 lift points marked on the vehicle body (2 on each side as shown in ). You must use the lift point closest to the wheel being changed .
The vehicle may only be lifted by a jack positioned at one of the 4 jack lift points.
Checklist
For your own safety and that of your passengers, carry out the following steps in the order listed :
-
Find a level spot on firm ground for lifting the vehicle.
-
Switch off the engine. Automatic transmission: shift the transmission into Park (P)) Automatic transmission: Selector lever. Manual transmission only: shift into a gear Manual transmission: Gearshift lever. Then firmly apply the parking brake Braking and parking to help prevent the vehicle from moving.
-
If towing a trailer: Unhitch the trailer from the vehicle and park the trailer properly.
-
Straighten the steering wheel so that the front wheels point straight forward.
-
Block the diagonally opposite wheel with chocks or other suitable things.
-
Loosen the wheel bolts of the wheel to be changed Wheel bolts.
-
Find the jack lift point on the vehicle frame that is closest to the wheel to be changed.
-
Insert the crank ⑥ into the opening on the vehicle jack ④.
-
Crank up the jack so that it still just fits underneath the lift point.
-
Position the jack so that its base is directly underneath the lift point , making sure that the entire base of the jack rests securely on the ground.
-
Align the jack and wind up the jack claw at the same time, until the claw cradles the vertical rib underneath the vehicle (arrow).
-
Continue cranking up the jack until the wheel is just a little off the ground.
WARNING
Improper use of your vehicle jack can cause the vehicle to fall off the jack leading to serious personal injury. To help reduce the risk of serious personal injury:
- Use only jacks approved by Volkswagen for the vehicle. Other jacks might slip, even those approved for other Volkswagen models, but not for your vehicle.
- Always set up the jack on firm and level ground. The vehicle may slip off the jack if the jack is resting on soft or sloping ground. If necessary, place a sturdy board under the jack.
- On a hard, slippery surface (such as a tiled floor), use an anti-skid rubber mat or something similar to help prevent the jack from slipping.
- Position the jack only at the described vehicle lift points. Before you raise your vehicle, always make sure the jack claw properly grips the vertical rib under the sill so that the jack does not slip off when you are raising the vehicle .
- Never have any part of your body (such as your arm or leg) under the vehicle when it is supported by the jack. Never let other persons have any part of their body under the vehicle, either!
- If you must work under a vehicle raised on a floor jack, always make sure that the vehicle is safely supported on safety stands intended for that purpose that are strong enough to support the weight of the vehicle.
- Never lift the vehicle when it is tilted or inclined to one side or the engine is running.
- Never lift the vehicle when more than 1 tire is flat or damaged.
- Do not start the engine while the vehicle is supported by a jack. Engine vibrations may cause the vehicle to slip off the jack.
WARNING
Disregarding the safety-related checklist may lead to accidents and serious personal injuries.
- Always review and follow the checklist. Follow accepted safety practices and use common sense.
Removing the subwoofer
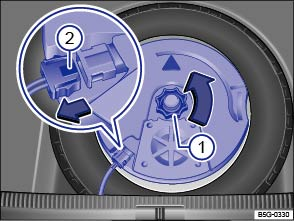
Fig. 179 Under the luggage compartment floor: Subwoofer (if equipped).
Read and follow the introductory information and safety information first
The subwoofer, if equipped, is located under the luggage compartment floor and must be removed to access the spare wheel.
Checklist
Follow these steps in the order listed:
-
Raise and secure the luggage compartment floor Storage.
-
Unscrew the handwheel ① in a counterclockwise direction (arrow).
-
To release the connector, press and hold the center tab down with one hand ②.
-
With the other hand, grasp the connector on both sides, and carefully pull the connector out of the socket in the direction of the arrow (magnified view). Put the electric cable aside.
-
Remove the subwoofer carefully and place in a clean storage location.
Checklist
-
Reinstall the subwoofer carefully back into the recess. The tip of the arrow symbol FRONT on the subwoofer must point toward the front of the vehicle
-
Insert the connector ② into the socket until it clicks into place.
-
Turn the handwheel ① clockwise to secure the subwoofer.
-
Carefully lower the luggage compartment floor back into place.
Changing a wheel
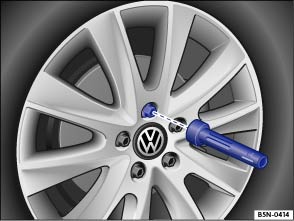
Fig. 180 Changing a wheel: Remove previously loosened wheel bolts using the screwdriver handle.
Read and follow the introductory information and safety information first
Removing the wheel
- Review the checklist .
- Loosen the wheel bolts .
- Lift the vehicle .
- Completely unscrew and remove the previously loosened wheel bolts using the hexagonal socket in the screwdriver handle . Place the wheel bolts on a clean surface.
- Remove the wheel.
Mounting a spare or compact spare wheel
If the tire is a unidirectional tire, be sure to install it in the proper rolling direction .
- Place the spare wheel or compact spare wheel on the axle.
- Screw in the wheel bolts clockwise and tighten them slightly using the hexagonal socket in the screwdriver handle.
- Lower the vehicle with the jack.
- Use the lug wrench to firmly tighten all wheel bolts (turn clockwise) . Do not tighten them in sequence! Tighten any wheel bolt to begin, then tighten the wheel bolt diagonally opposite the first bolt, and so forth.
- Install the wheel bolt caps, center wheel hubcap, or wheel cover, if any .
WARNING
Wheel bolts that are tightened or installed improperly can come loose, causing loss of vehicle control, a crash, and serious personal injury.
- Always keep wheel bolts and threads in the wheel hub clean and free of oil and grease. The wheel bolts must turn easily and must be tightened with the right torque.
- Use the hexagonal socket in the screwdriver handle only to turn the wheel bolts when they are loose, never to loosen them or tighten them firmly.
WARNING
Improper use of a compact spare wheel can cause loss of vehicle control, a crash or other accident, and serious personal injury.
- Never use a compact spare wheel if it is damaged or worn down to the wear indicators.
- Never drive faster than 50 mph (80 km/h) with a compact spare wheel. Avoid full-throttle acceleration, heavy braking, and fast cornering!
- Never drive more than 125 miles (200 km) with a compact spare wheel that is installed on the front axle (drive axle).
- Replace the compact spare with a normal wheel and tire as soon as possible. Compact spare tires are designed for brief use only.
After changing a wheel
Read and follow the introductory information and safety information first
- Clean the tools in the vehicle tool kit if necessary and stow them in the foam insert in the luggage compartment .
- Securely store the spare wheel, compact spare wheel, or the wheel you took off the vehicle in the luggage compartment.
- Have the wheel bolt tightening torque immediately checked with a torque wrench .
- Have the damaged wheel replaced as soon as possible.

The Tire Pressure Monitoring System must be recalibrated after each tire change .
Download Manual