INSTRUMENT CLUSTER DISPLAY
Your vehicle will be equipped with an instrument cluster display, which offers useful information to the driver. With the ignition in the OFF mode, opening/closing of a door will activate the display for viewing, and display the total miles, or kilometers, in the odometer. Your instrument cluster display is designed to display important information about your vehicle’s systems and features. Using a driver interactive display located on the instrument panel, your instrument cluster display can show you how systems are working and give you warnings when they are not. The steering wheel mounted controls allow you to scroll through the main menus and submenus. You can access the specific information you want and make selections and adjustments.
INSTRUMENT CLUSTER DISPLAY CONTROLS
The instrument cluster display features a driver interactive display that is located in the instrument cluster.
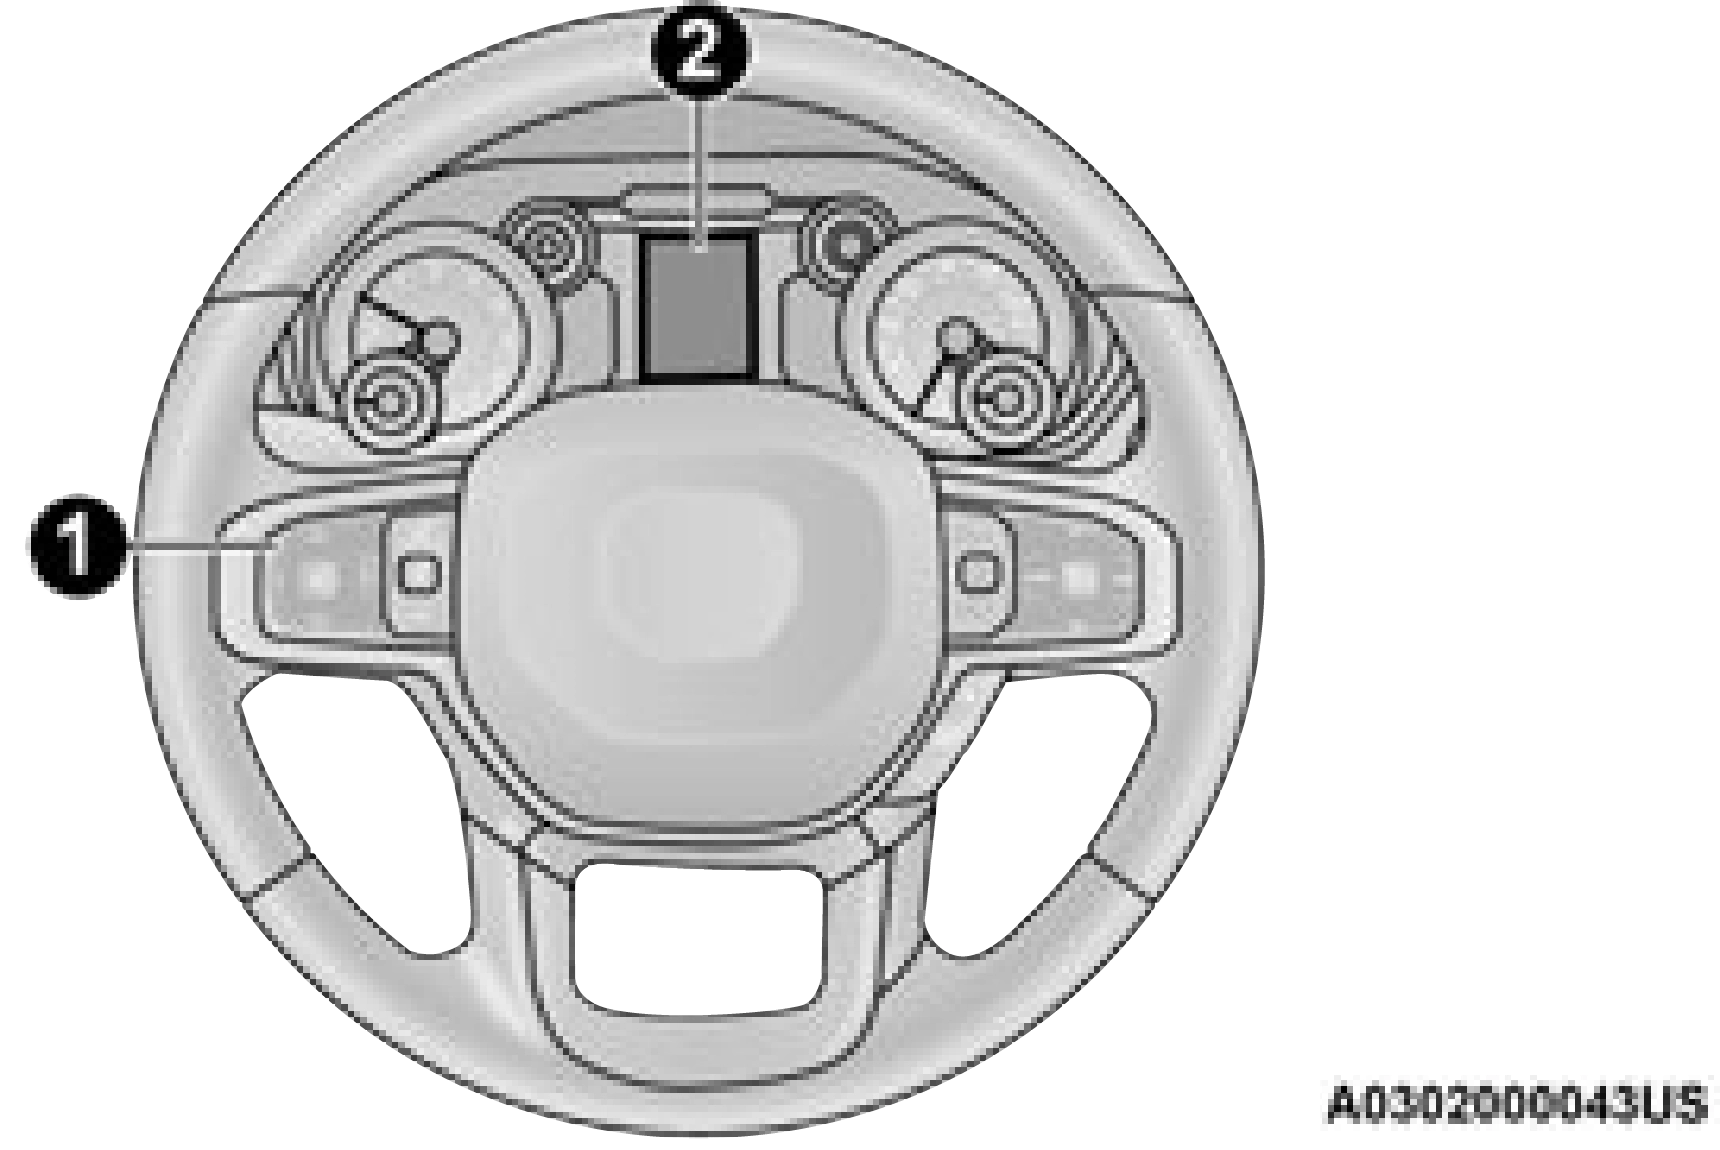
1 – Instrument Cluster Display Controls 2 – Instrument Cluster Display Screen
The instrument cluster display menu items may consist of the following:
The system allows the driver to select information by pushing the following instrument cluster display control buttons located on the left side of the steering wheel.
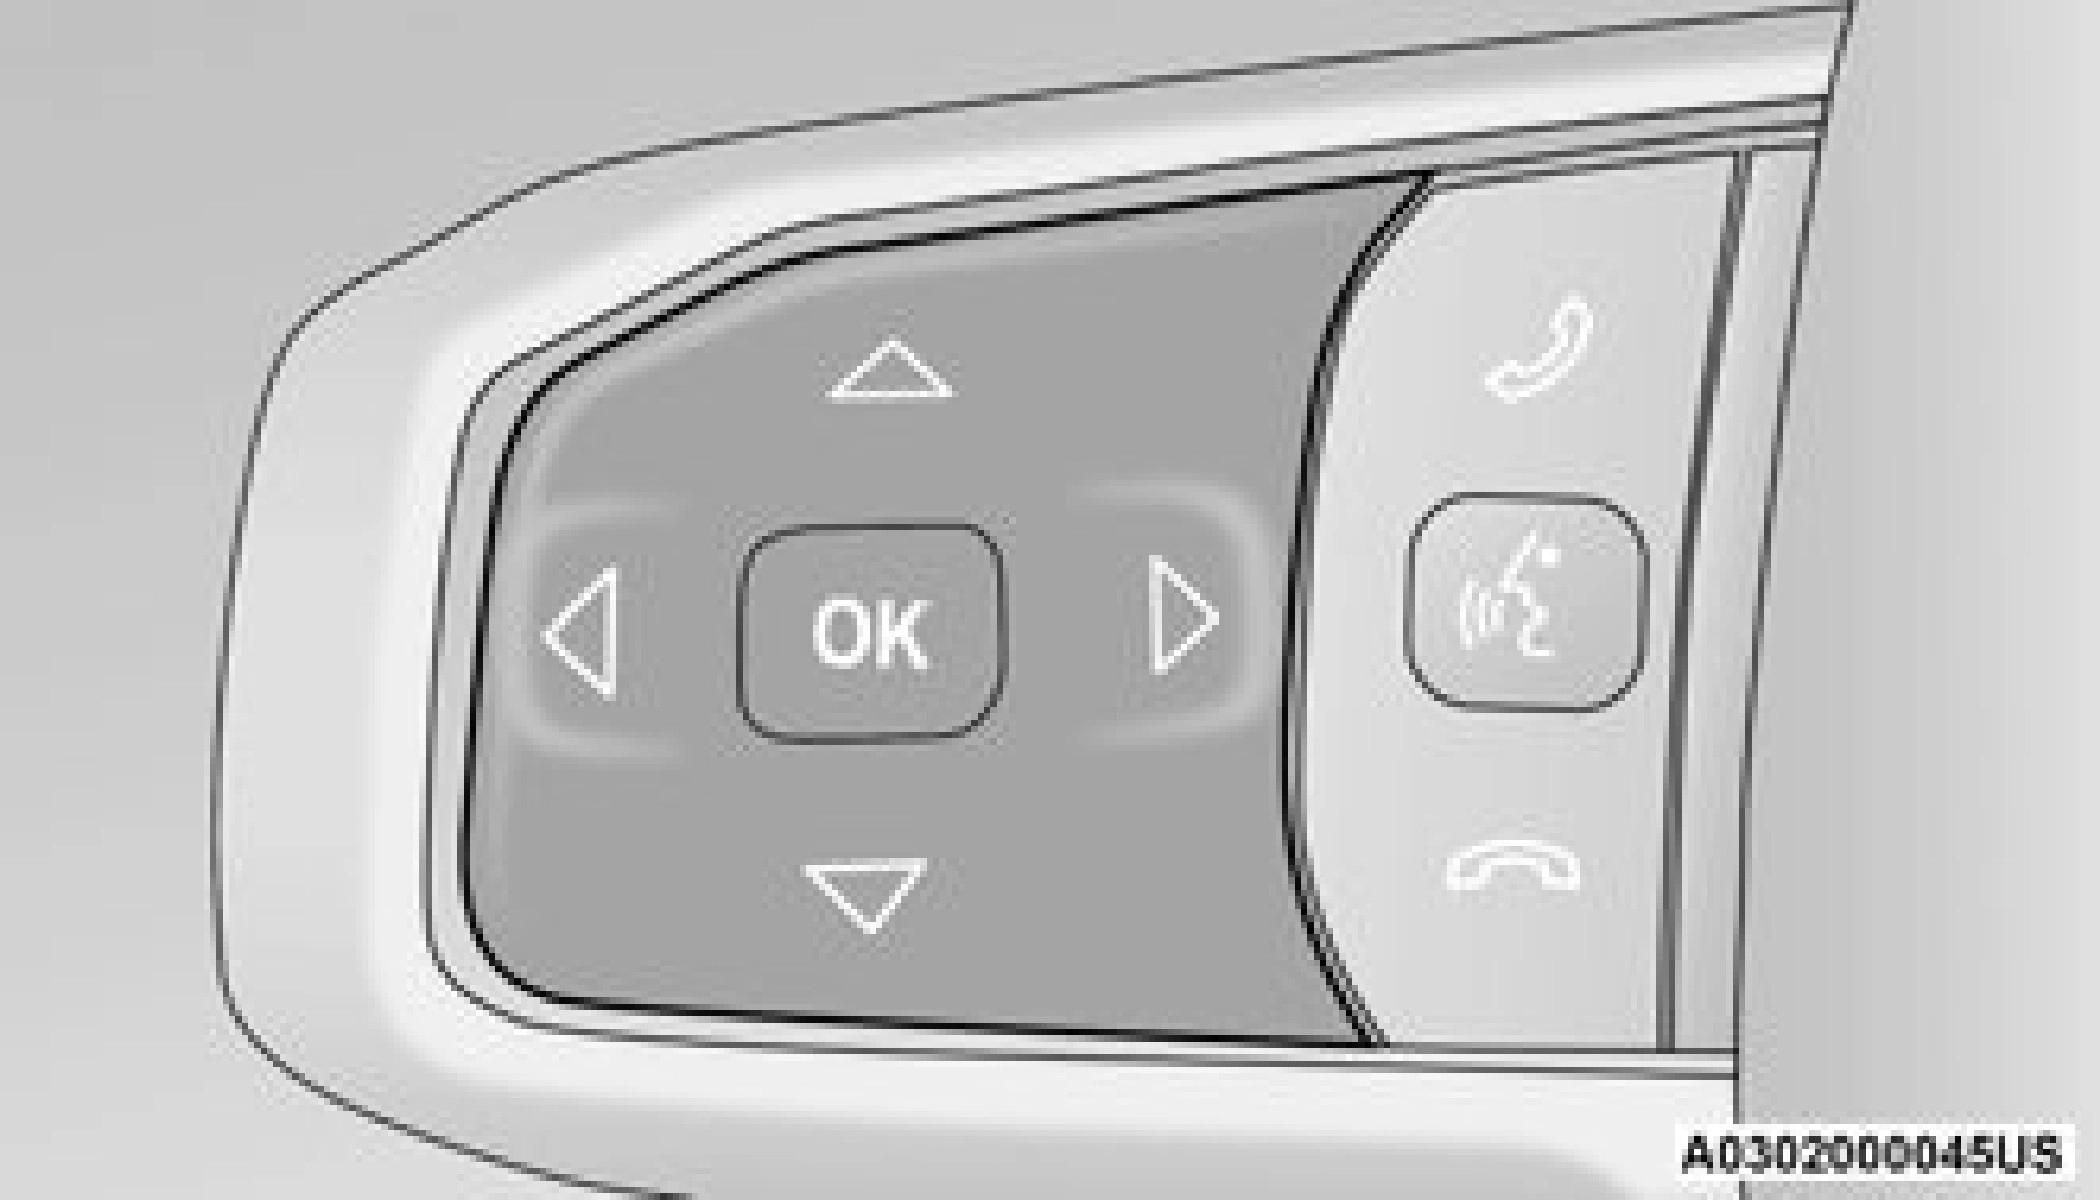

 Up And Down Arrow Buttons:

 Using the up or down arrow button allows you to cycle through the Main Menu Items.

 Left And Right Arrow Buttons:

 Using the left or right arrow button allows you to cycle through the submenu items of the Main menu item.


 Holding the up / down or left / right arrow buttons will loop the user through the currently selected menu or options presented on the screen.
For Digital Speedometer:
For Screen Setup:

 Pushing the OK button makes the selection and a confirmation screen will appear (returning the user to the first page of the submenu).
 Pushing the left arrow button will exit each submenu layer and return to the main menu.
OIL LIFE RESET
Your vehicle is equipped with an engine oil change indicator system. The “Oil Change Required” message will display in the instrument cluster display for five seconds after a single chime has sounded, to indicate the next scheduled oil change interval. The engine oil change indicator system is duty cycle based, which means the engine oil change interval may fluctuate, dependent upon your personal driving style.
Unless reset, this message will continue to display each time you place the ignition in the ON/RUN position. To turn off the message temporarily, push and release the OK or arrow buttons. To reset the oil change indicator system (after performing the scheduled maintenance), refer to the following procedure:
 Push and release the down arrow button to scroll downward through the main menu
to “Vehicle Info.” 3
 Push and release the right arrow button to access the ”Oil Life” screen.
 Push and release the up or down arrow button to exit the submenu screen.
If the indicator message illuminates when you start the vehicle, the oil change indicator system did not reset. If necessary, repeat this procedure.
DISPLAY MENU ITEMS
 Push and release the up or down arrow button until the desired selectable menu icon is highlighted in the instrument cluster display.
Speedometer

 Push and release the up or down arrow button until the speedometer menu item is highlighted in the instrument cluster display. Push and release the OK button to cycle the display between mph and km/h.

 Push and release the up or down arrow button until the Vehicle Info menu icon is displayed in the instrument cluster display.

 Push and release the left or right arrow button to scroll through the information submenus and push and release the OK button to select or reset the resettable submenus.


 Push and release the up or down arrow button until the Off-Road menu icon is displayed in the instrument cluster display. Push and release the left or right arrow button to scroll through the information submenus.
When vehicle speed becomes too high to display the pitch and roll, “- -” will display in place of the numbers, and the graphic will be greyed out. A message indicating the necessary speed for the feature to become available will also display.
The Driver Assist menu displays the status of the ACC and LaneSense systems.

 Push and release the up or down arrow button until the Driver Assist menu is displayed in the instrument cluster display.
The instrument cluster display displays the current Adaptive Cruise Control (ACC) system settings. The information displayed depends on ACC system status.
Push the Adaptive Cruise Control (ACC) on/off button (located on the steering wheel) until one of the following displays in the instrument cluster display:
When ACC is deactivated, the display will read “Adaptive Cruise Control Off.”
When ACC is activated but the vehicle speed setting has not been selected, the display will read “Adaptive Cruise Control Ready.”
Push the SET + or the SET- button (located on the steering wheel) and the following will display in the instrument cluster display:
When ACC is set, the set speed will display in the instrument cluster page 179.
The ACC screen may display once again if any ACC activity occurs, which may include any of the following:
The instrument cluster display displays the
current LaneSense system settings. The information displayed depends on LaneSense system status and the conditions that need to be met page 137.

 Push and release the up or down arrow button until the Fuel Economy menu item is highlighted in the instrument cluster display. Push and hold the OK button to reset Average Fuel Economy.

 Push and release the up or down arrow
button until the Trip menu item is highlighted in 3
the instrument cluster display. Push and

 release the right or left arrow button to enter the submenus of Trip A and Trip B. The Trip A or Trip B information will display the following:
Push and hold OK button to reset all information.

 Push and release the up or down arrow button until the Stop/Start icon/title is highlighted in the instrument cluster display. The screen will display the Stop/Start status.


 Push and release the up or down arrow button until the Trailer Tow menu item is highlighted in the instrument cluster display. Push and release the right or left arrow button to cycle through the following trailer tow information:

 Push and release the up or down arrow button until the Audio Menu icon/title is highlighted in the instrument cluster display. This menu will display the audio source information, including the Song name, Artist name, and audio source with an accompanying graphic.
When a call is incoming, a Phone Call Status pop-up will display on the screen. The pop-up will remain until the phone is answered or ignored.
The call status will temporarily replace the previous media source information displayed on the screen. When the pop-up is no longer displayed, the display will return to the last used screen.


 Push and release the up or down arrow button until the Messages Menu item is highlighted. This feature shows the number of stored warning messages. Push and release the right or left arrow button to cycle through stored messages.
NOTE:
The HUD feature Settings are available at any vehicle speed.


 Push and release the up or down arrow button until the Settings Menu icon/title is highlighted in the instrument cluster display. Push and release the left or right arrow button until the HUD Menu icon/title is highlighted in the instrument cluster display.Push and release the OK button to enter HUD. Use the up or down arrow button to select a setting, then push and release the OK button to adjust the setting.
The HUD basic settings (Brightness, Display Height and Non Custom layouts), are controlled through the Settings Screen in the Instrument Cluster page 114.

 Push and release the up or down arrow button until the Settings Menu Icon/Title is highlighted in the instrument cluster display. Push and release the OK button to enter the sub-menus and follow the prompts on the screen as needed. The Settings feature allows you to change what information is displayed in the instrument cluster as well as the location that information is displayed.
The Settings feature is only available when the vehicle speed is less than 5 mph.
DIESEL PARTICULATE FILTER (DPF)
MESSAGES 3
This engine meets all required diesel engine emissions standards. To achieve these emissions standards, your vehicle is equipped with a state-of-the-art engine and exhaust system. These systems are seamlessly integrated into your vehicle and managed by the Powertrain Control Module (PCM). The PCM manages engine combustion to allow the exhaust system’s catalyst to trap and burn Particulate Matter (PM) pollutants, with no input or interaction on your part.
Your vehicle has the ability to alert you to additional maintenance required on your vehicle or engine. Refer to the following messages that may be displayed on your instrument cluster:
20 minutes, you can remedy the condition in the particulate filter system and allow your diesel engine and exhaust after-treatment system to cleanse the filter to remove the trapped PM and restore the system to normal operating condition.
— This message indicates that the DPF
self-cleaning is completed. If this message is displayed, you will hear one chime to assist in alerting you of this condition.
— This messages indicates regeneration has been disabled due to a system malfunction. At this point the engine Powertrain Control Module (PCM) will register a fault code, the instrument panel will display a MIL light.
Failing to follow the oil change indicator, changing your oil and resetting the oil change indicator by 0 miles remaining will prevent the diesel exhaust filter from performing it's cleaning routine. This will shortly result in a Malfunction Indicator Light (MIL) and reduced engine power. Only an authorized dealer will be able to correct this condition.
DISPLAYS
When the appropriate conditions exist, the instrument cluster display displays the following messages:
DIESEL EXHAUST FLUID (DEF) WARNING MESSAGES
Your vehicle will begin displaying warning messages when the DEF level reaches a driving range of approximately 500 miles (800 km). If the following warning message sequence is ignored, your vehicle may not restart unless DEF is added with in the displayed mileage shown in the cluster message.
— This message will display when DEF driving range is less than 200 miles. It is also displayed at 150 miles and 100 miles. DEF fluid top off is required within the displayed mileage. The message will be displayed in the instrument cluster display during vehicle
start up with an updated distance mileage, 3
and it will be accompanied by a single chime.
Starting at 100 miles, remaining range will be continuously displayed while operating the vehicle. Chimes will also accompany the 75, 50 and 25 mile remaining distances. The DEF Low telltale will be on continuously until DEF fluid is topped off.
DIESEL EXHAUST FLUID (DEF) FAULT WARNING MESSAGES
There are different messages which are displayed if the vehicle detects that the DEF system has been filled with a fluid other than DEF, has experienced component failures, or when tampering has been detected.
When the DEF system needs to be serviced the following warnings will display:
dealer and have your vehicle serviced imme- diately. If not corrected in 30 miles, vehicle will enter the “Engine Will not restart in XXX mi Service DEF See dealer” warning stage and message.
50 miles of operation. It is also displayed at 150 miles, 125 miles and 100 miles. System service is required within the displayed mileage. The message will be displayed during vehicle start up with an updated distance mileage, and it will be accompanied by a single chime. Starting at 100 miles, remaining range will be continuously displayed while operating the vehicle.
Chimes will also accompany the 75, 50 and 25 mile remaining distances. We recom- mend you drive to the nearest authorized dealer and have your vehicle serviced imme- diately.
displayed when under 1 mile until engine will not start and each time the vehicle is started, and will be continuously displayed. The message will be accompanied by a single chime. Your Malfunction Indicator Light will be continuously illumined. We highly recom- mend you drive to the nearest authorized dealer if the message appears while engine is running.
BATTERY SAVER ON/BATTERY SAVER MODE MESSAGE — ELECTRICAL LOAD REDUCTION ACTIONS — IF EQUIPPED
This vehicle is equipped with an Intelligent Battery Sensor (IBS) to perform additional monitoring of the electrical system and status of the vehicle battery.
In cases when the IBS detects charging system failure, or the vehicle battery conditions are deteriorating, electrical load reduction actions will take place to extend the driving time and distance of the vehicle. This is done by reducing power to or turning off non-essential electrical loads.
Load reduction is only active when the engine is running. It will display a message if there is a risk of battery depletion to the point where the vehicle may stall due to lack of electrical supply, or will not restart after the current drive cycle.
When load reduction is activated, the message “Battery Saver On Some Systems May Have Reduced Power” will appear in the instrument cluster.
These messages indicate the vehicle battery has a low state of charge and continues to lose
electrical charge at a rate that the charging system cannot sustain.
The electrical loads that may be switched off (if equipped), and vehicle functions which can be affected by load reduction:
Loss of the battery charge may indicate one or more of the following conditions:
the capability of charging system. The charging system is still functioning properly.
+12 Volts, 115 Volts AC, USB ports) during
certain driving conditions (city driving,
towing, frequent stopping).
During a trip:
installed (additional lights, upfitter electrical accessories, audio systems, alarms) and review specifications if any (load and Ignition Off Draw currents).
tive trips and the evaluation of the vehicle and driving pattern did not help to identify the cause.
Download Manual