Changing a road wheel (if equipped)
 WARNING: If the tire pressure monitor sensor becomes damaged it may not function. WARNING: If the tire pressure monitor sensor becomes damaged it may not function. |
Note: The tire pressure monitoring system indicator light illuminates when the spare tire is in use. To restore the full function of the monitoring system, mount all road wheels equipped with tire pressure monitoring sensors on the vehicle.
Note: You should only use tire sealants in roadside emergencies as they may cause damage to the tire pressure monitoring system sensor.
If you get a flat tire when driving, do not apply the brake heavily. Instead, gradually decrease your speed. Hold the steering wheel firmly and slowly move to a safe place on the side of the road.
Have a flat serviced by an authorized dealer to prevent damage to the tire pressure monitoring system sensors. See Tire Pressure Monitoring System. Replace the spare tire with a road tire as soon as possible. During repairing or replacing of the flat tire, have an authorized dealer inspect the tire pressure monitoring system sensor for damage.
DISSIMILAR SPARE WHEEL AND TIRE ASSEMBLY INFORMATION
| WARNING: Failure to follow these guidelines could result in an increased risk of loss of vehicle control, injury or death. |
If you have a dissimilar spare wheel and tire, use it for temporary use only. This means that if you need to use it, you should replace it as soon as possible with a road wheel and tire assembly that is the same size and type as the road tires and wheels that originally came with your vehicle. If the dissimilar spare tire or wheel is damaged, replace it instead of repairing it.
IMPORTANT USE OF SPARE WHEEL
A DISSIMILAR SPARE WHEEL AND TIRE ASSEMBLY IS A SPARE WHEEL AND TIRE ASSEMBLY THAT IS DIFFERENT IN BRAND, SIZE OR APPEARANCE FROM THE ROAD TIRES AND WHEELS AND CAN BE ONE OF THREE TYPES:
| Types of Spare Wheels |
|---|
| T-type mini-spare.1 |
| Full-size dissimilar spare with label on wheel.2 |
| Full-size dissimilar spare without label on wheel. |
1This spare tire begins with the letter T for tire size and may have Temporary Use Only molded in the sidewall.
2This spare tire has a label on the wheel that states: THIS WHEEL AND TIRE ASSEMBLY FOR TEMPORARY USE ONLY.
DRIVING WITH A T-TYPE MINI-SPARE OR FULL-SIZE DISSIMILAR SPARE WITH LABEL ON WHEEL
Do not:
- Exceed 50 mph (80 km/h).
- Load the vehicle beyond maximum vehicle load rating listed on the Safety Compliance Label.
- Tow a trailer.
- Use snow chains on the end of the vehicle with the dissimilar spare tire.
- Use more than one dissimilar spare tire at a time.
- Use commercial car washing equipment.
- Try to repair the dissimilar spare tire.
Use of the above dissimilar spare wheel at any one wheel location can lead to impairment of the following:
- Handling, stability and braking performance.
- Comfort and noise.
- Ground clearance and parking at curbs.
- Winter weather driving capability.
- Wet weather driving capability.
- All-wheel driving capability, if applicable.
DRIVING WITH A FULL-SIZE DISSIMILAR SPARE WHEEL AND TIRE ASSEMBLY
Do not:
- Exceed 70 mph (113 km/h).
- Use more than one dissimilar spare wheel and tire assembly at a time.
- Use commercial car washing equipment.
- Use snow chains on the end of the vehicle with the dissimilar spare wheel and tire assembly.
Use of the above dissimilar spare wheel at any one wheel location can lead to impairment of the following:
- Handling, stability and braking performance.
- Comfort and noise.
- Ground clearance and parking at curbs.
- Winter weather driving capability.
- Wet weather driving capability.
- All-wheel driving capability.
Give additional caution to the following when driving with the full-size dissimilar spare wheel and tire assembly:
- Towing a trailer.
- Driving vehicles equipped with a camper body.
- Driving vehicles with a load on the cargo rack.
Drive cautiously when using a full-size dissimilar spare wheel and tire assembly and seek service as soon as possible.
CHANGING A ROAD WHEEL PROCEDURE
| WARNING: When one of the front wheels is off the ground, the transmission alone will not prevent the vehicle from moving or slipping off the jack, even if the transmission is in park (P). WARNING: To help prevent your vehicle from moving when changing a wheel, shift the transmission into park (P), set the parking brake and use an appropriate block or wheel chock to secure the wheel diagonally opposite to the wheel being changed. For example, when changing the front left wheel, place an appropriate block or wheel chock on the right rear wheel. WARNING: Do not work on your vehicle when the jack is the only support. If the vehicle slips off the jack, you or someone else could be seriously injured. WARNING: Check that the vehicle jack is not damaged or deformed and the thread is lubricated and clean. WARNING: Never place anything between the vehicle jack and your vehicle. WARNING: Never place anything between the vehicle jack and the ground. WARNING: Do not attempt to change a tire on the side of the vehicle close to moving traffic. Pull far enough off the road to avoid the danger of being hit when operating the jack or changing the wheel. WARNING: Park your vehicle so that you do not obstruct the flow of traffic or place yourself in any danger and set up a warning triangle. WARNING: The jack supplied with this vehicle is only intended for changing wheels. Do not use the vehicle jack other than when you are changing a wheel in an emergency. WARNING: Always use the jack provided as original equipment with your vehicle. If using a jack other than the one provided, make sure the jack capacity is adequate for the vehicle weight, including any vehicle cargo or modifications. If you are unsure if the jack capacity is adequate, contact the authorized dealer. WARNING: Use only the specified jacking points. If you use other positions, you may damage the body, steering, suspension, engine, braking system or the fuel lines. WARNING: Failure to follow these guidelines could result in an increased risk of loss of vehicle control, injury or death. |

Note: Do not allow passengers to remain in your vehicle when using the jack on the vehicle.
- Park on a level surface, set the parking brake and activate the hazard flashers.
- Place the transmission in park (P) and turn the engine off. For vehicles with a manual transmission, place the transmission in reverse (R) after you turn the engine off.
- Block both the front and rear of the wheel diagonally opposite the flat tire. For example, if the left front tire is flat, block the right rear wheel.
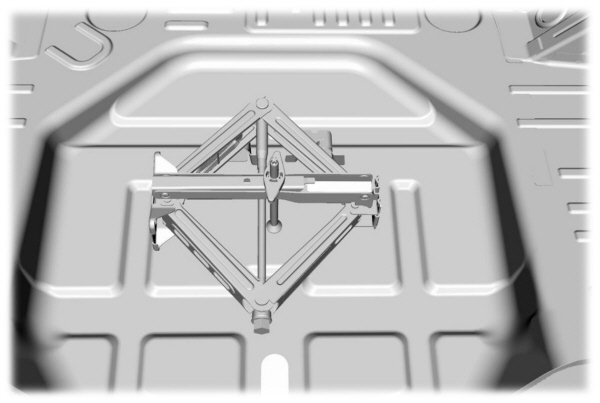
- The spare tire, jack, and wrench are in the spare tire compartment under the trunk load floor.
- Remove the spare tire bolt securing the spare tire by turning it counterclockwise.
- Remove the spare tire, jack, and wrench from the spare tire compartment.
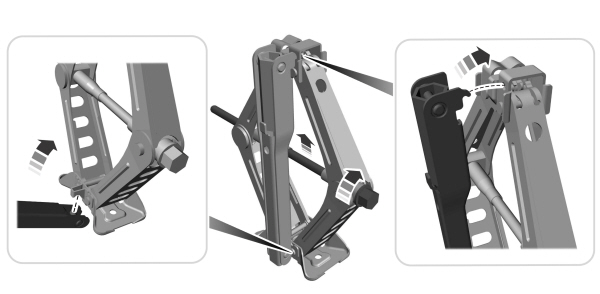
- Turn the hex nut on the jack counterclockwise to remove the lug wrench from the jack. This lowers the jack and loosens the mechanical lock.

- Unfold the wrench for use.

- If your vehicle has wheel trim covering the lug nuts, use the tool attached to the spare wheel retainer to remove the wheel trim.

- If jacking on the roadside shoulder, set the warning triangle upright on the shoulder in the direction of oncoming traffic if the vehicle has a warning triangle.
- Loosen each wheel lug nut one-half turn counterclockwise, but do not remove them until you raise the wheel off the ground.
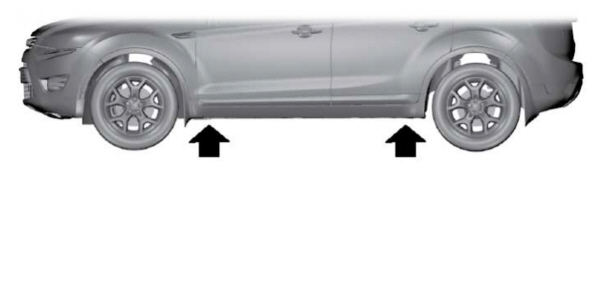
- You can identify the vehicle jacking points by the triangle markings on the molding as shown. The triangle marking may be on the side or the underside of the molding. On vehicles without moldings, a pair of arrows on the metal flange pointing to the jacking point between them identifies the jacking points. The warning label on the jack depicts the details.

- Place the jack at the jacking point next to the tire you are changing. Turn the jack handle clockwise until the wheel is completely off the ground.
- Remove the lug nuts with the lug wrench.
- Replace the flat tire with the spare tire, making sure the valve stem is facing outward. Reinstall the lug nuts until the wheel is snug against the hub. Do not fully tighten the lug nuts until you lower the wheel. If you are using the temporary tire, the lug nut washers do not appear to be flush with the rim. This is normal only when using the temporary spare tire.
- Lower the wheel by turning the jack handle counterclockwise.
- Remove the jack and fully tighten the lug nuts in the order shown. See Technical Specifications.

- To store the folded wrench on the jack, engage the bracket of the jack base on the wrench feature as shown. Swing the wrench upward and adjust the height of the jack until the pin engages the hole. Tighten the hex nut clockwise by hand until secure.
- Put the flat tire, jack and lug wrench away. Make sure the jack is fastened securely before you drive.
- Unblock the wheel and retrieve the warning triangle.
STOWING THE FLAT TIRE WITHOUT THE RETAINER STRAP

You can temporarily stow the full-size road wheel in the spare tire compartment.
- Lift the carpeted wheel cover at an angle to access the spare tire compartment.
- Place the wheel in the spare tire well with the valve stem facing down.
- Install the shorter jack retainer bolt to the jack bolt-down bracket through the center of the wheel. Finally, wind the wheel retainer down to secure the wheel in place.
- Place the jack and tools back into the spare tire compartment.
- Replace the carpeted wheel cover.
STOWING THE FLAT TIRE USING THE RETAINER STRAP (IF EQUIPPED)
You can temporarily stow the full-size road wheel in the spare tire compartment.
- Find the flat tire retainer strap tucked inside the jack channel.

- Locate the jack bolt-down bracket. Push the retainer strap through the jack bolt-down bracket.
- Put the jack and lug wrench away. Make sure you fasten the jack so it does not rattle when you drive.
- Stow the flat tire on the floor in the cargo area.
- Weave the retainer strap through the wheel openings.

- Secure the flat tire by tying a flat knot.
Download Manual