Instrument Cluster Display
Your vehicle is equipped with an instrument cluster display, which offers useful information to the driver. With the ignition in the OFF position, opening/closing of a door will activate the display for viewing, and display the total miles, or kilometers, in the odometer. Your instrument cluster display is designed to display important information about your vehicle’s systems and features. Using a driver interactive display located on the instrument panel, your instrument cluster display can show you how systems are working and give you warnings when they aren’t. The steering wheel mounted controls allow you to scroll through and enter the main menus and submenus. You can access the specific information you want and make selections and adjustments.
INSTRUMENT CLUSTER DISPLAY LOCATION AND CONTROLS
The instrument cluster display features a driver interactive display that is located in the instrument cluster.
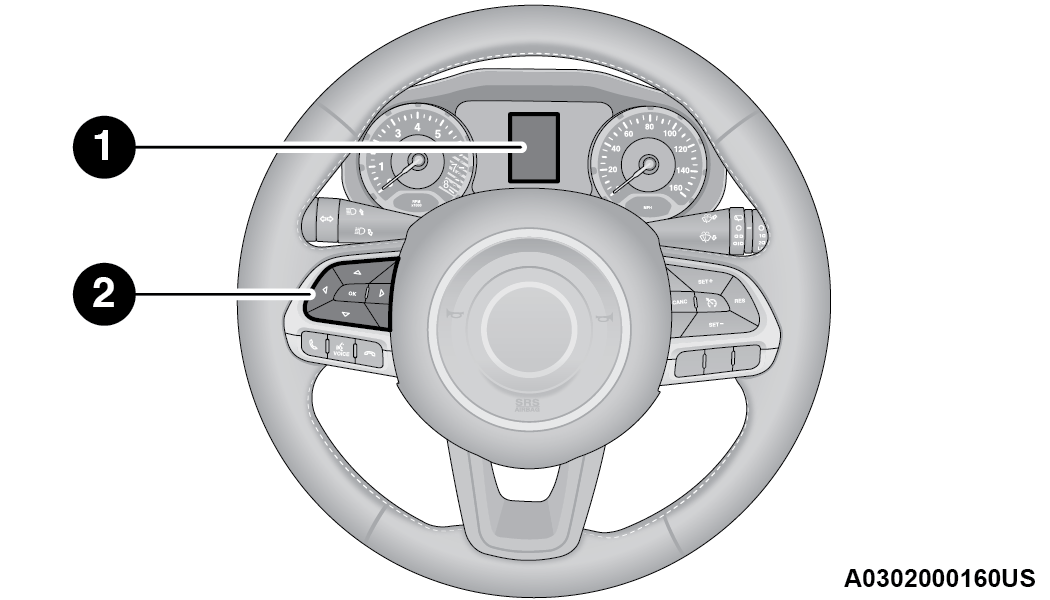
Instrument Cluster Display Location
|
1 — Instrument Cluster Display Locations |
|
2 — Instrument Cluster Display Controls |
Setting the system allows the driver to select information by pushing the following buttons mounted on the steering wheel:
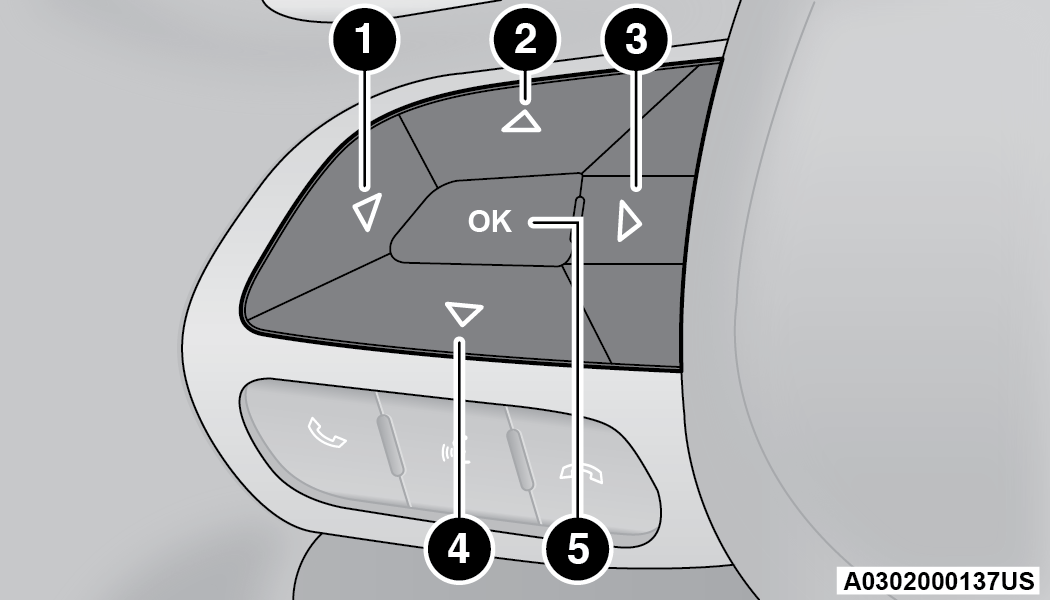
Instrument Cluster Display Control Buttons
|
1 — Left Arrow Button |
|
2 — Up Arrow Button |
|
3 — Right Arrow Button |
|
4 — Down Arrow Button |
|
5 — OK Button |
Push the left arrow button to return to the main menu from an info screen or submenu item.
Push and release the up arrow button to scroll upward through the main menu.
Push and release the right arrow button to access the information screens or submenu screens of a main menu item.
Push and release the down arrow button to scroll downward through the main menu.
Push the OK button to access/select the information screens or submenu screens of a main menu item. Push and hold the OK button for one second to reset displayed/selected features that can be reset.
OIL CHANGE RESET
Oil Change Due
Your vehicle is equipped with an engine oil change indicator system. The “Oil Change Due” message will display in the instrument cluster display for five seconds after a single chime has sounded to indicate the next scheduled oil change interval. The engine oil change indicator system is duty cycle based, which means the engine oil change interval may fluctuate, dependent upon your personal driving style.
Unless reset, this message will continue to display each time the ignition is cycled to the ON or RUN position. To reset the oil change indicator system (after performing the scheduled maintenance), refer to the following procedure:
-
Without pushing the brake pedal, push the ENGINE START/STOP button and cycle the ignition to the ON/RUN position (do not start the engine).
-
Fully push the accelerator pedal, slowly, three times within 10 seconds.
-
Without pushing the brake pedal, push the ENGINE START/STOP button once to return the ignition to the OFF position.
Note:
If the indicator message illuminates when you start the vehicle, the oil change indicator system did not reset. See an authorized dealer to have the oil life reset.
INSTRUMENT CLUSTER DISPLAY MENU ITEMS
Note:
The instrument cluster display menu items display in the center of the instrument cluster. Menu items may vary depending on your vehicle features.
SPEEDOMETER
Push and release the up or down
 arrow button until the speedometer is displayed in the instrument cluster display. Push and release the OK button to toggle units (mph or km/h) of the speedometer.
VEHICLE INFO
Push and release the upor downarrow button until “Vehicle Info” is highlighted in the instrument cluster display. Push and release the right arrow button and Coolant Temp will be displayed. Push the rightor left
 arrow button to scroll through the following information displays:
Tire Pressure — View the information relating to the Tire Pressure Monitoring System (If Equipped).
Coolant Temperature — View the engine coolant temperature.
Trans Temperature — View the trans oil temperature.
Oil Temperature — View the oil temperature.
Battery Voltage — View the voltage value (state of charge) of the battery.
Service — View the service status message(s) (If Equipped).
DRIVER ASSIST — IF EQUIPPED
Push and release the upor downarrow button until the Driver Assist menu title displayed is highlighted in the instrument cluster display.
LaneSense — If Equipped
The instrument cluster display displays the current LaneSense status and information. The information displayed depends on LaneSense system status and the conditions that need to be met .
FUEL ECONOMY
This menu item allows you to view the fuel economy of the vehicle. The following will display:
Range (Miles or km)
Current Consumption (mpg or L/100km or km/l)
Average Consumption (mpg or L/100km or km/l)
Reset procedure shown at the bottom of the display.
TRIP INFO
Push and release the upor downarrow button until the Trip menu title is displayed in the instrument cluster display. Toggle the leftor rightarrow button to select Trip A or Trip B. The Trip information will display the following:
Distance – Shows the total distance (mi or km) traveled for Trip A or Trip B since the last reset.
Average Fuel Economy – Shows the average fuel economy (MPG or L/100 km or km/L) of Trip A or Trip B since the last reset.
Elapsed Time – Shows the total elapsed time of travel since Trip A or Trip B has been reset.
Hold the OK button to reset feature information.
STOP/START – IF EQUIPPED
Push and release the upor downarrow button until the Stop/Start menu title is displayed in the instrument cluster display.
This menu shows messages related to Stop/Start. Only one message can be viewed at a time until the condition is cleared. When the Stop/Start is engaged (and the engine is off), the associated hardware telltale is turned on. Whenever a user pushes the Stop/Start button on the central stack, a pop-up message of the Stop/Start status will appear on the instrument cluster display.
AUDIO
Push and release the upor downarrow button until the Audio menu title is displayed in the instrument cluster display.
STORED MESSAGES
Push and release the upor downarrow button until the Messages Menu Icon is highlighted in the instrument cluster display. This feature shows the number of stored warning messages. Pushing the leftor rightarrow button will allow you to scroll through the stored messages.
SCREEN SETUP
This menu item allows you to change the position of the information on the display.
Display Gears (Vehicles With Reconfigurable Multi-Functional Display And Automatic Transmission)
By selecting this item, you can select the display mode, the particulars relating to the automatic transmission, and choose between the following options:
The right side of the display will show the letter concerning the automatic transmission gear selector (P,R,N or D) position. After approximately two seconds, the letter will be displayed in a central position.
The letters PRND will display on the right side, the position assumed by the gear selector will be highlighted in the display. During the operation in sequential mode (“AutoStick”), in place of the letter D, the gear will be will be displayed.
In The Upper Left/Top Right
The information relating to the following can be displayed:
External temperature
Ignition Button — If Equipped
Compass — If Equipped
Date (Month/Day)
Time (Hours/Minutes)
In the central area of the display, you can view all of the information previously listed as well as the following:
Compass — If Equipped
Speed Display — If Equipped
Date (Day/Month/Year)
Time
Compass — If Equipped
Ignition Button — If Equipped
External Temp — If equipped
Menu Item
Distance Traveled A (Trip A)
Distance Traveled B (Trip B)
Restore Default Settings
Selecting this item, and you can reset and restore the default settings.
SETTINGS
This menu item allows you to change the settings for the following:
Display
Units
Clock and Date
Security
Safety and Assistance
Lights
Doors and Locks
Note:
Some items may be displayed and managed through the Uconnect system.
Vehicles Equipped With Multi-functional Display Reconfigurable:
The following menu/submenu items are available in the cluster display.
“Vehicle Shut Off (If Equipped)”
By selecting the item “Vehicle Shut Off”, you can turn off the engine from the instrument cluster. This feature is available in the event of an ignition switch failure, and will display instructions for turning off the engine via the instrument cluster display controls.
“Display”
By selecting the “Display,” you can access the following setting:
Language: allows you to select the language in which to display the information/warnings.
“Units Of Measure”
By selecting the item “Units of Measure,” you can select the unit of measure to use for displaying various magnitudes.
Possible options are:
US
Metric
Custom
“Clock & Date”
By selecting the item, “Clock & Date” you can adjust the clock.
Possible options are:
Set Time: adjust hours/minutes
Set Format: adjust the time format “12h” (12 hours) or “24h” (24 hours)
Set Date: adjust day/month/year
“Security”
By selecting the item “Security,” you can make the following adjustments:
Set the vehicle speed limit, which the driver is notified through a visual and acoustic signaling (display of a message and a symbol on the display).
When the speed warning is set, the icon should remain visualized for the same duration time of the pop-up. If the driver exceeded the set speed, the icon should remain for however long the vehicle is over the set speed.
Driver may also turn the Speed Warning “OFF” should you choose not to use this feature.
This function is only viewable when the Seat Belt Reminder (SBR) system is active.
Activation/Deactivation of the Hill Start Assist system.
Front passenger air bag may be enabled or disabled.
“Lights”
By selecting the item “Lights,” you can make the following adjustments:
Headlight Off Delay: set the delay for headlight shutoff after engine shutoff
Headlight Sensitivity: adjust the sensitivity of headlight brightness
Daytime Running Lights: activate/deactivate the daytime running lights
Cornering lights: activate/deactivate the cornering lights (If Equipped)
Interior Ambient lights: adjust the level of interior ambient lights
Greeting Lights: activate / deactivate greeting lights
“Doors & Locks”
By selecting the item “Doors & Locks,” you can make the following adjustments:
Auto Door Lock: activate/deactivate the automatic locking of the doors with the vehicle moving
Auto Unlock On Exit: automatic unlocking of the doors when exiting the vehicle
Flash Light with Lock: activate the direction indicators when closing the doors
Sound Horn With Lock: activate/deactivate the horn when pushing the LOCK button on the key fob. The options are “Off,” “First Press,” and “Second Press”
Horn With Remote Start: activate/deactivate the horn at the Remote Starting of the engine with the key fob
Remote Door Unlock: allows you to open the driver door only on the first push of the UNLOCK button on the key fob
“Compass”
By selecting the item “Compass” you can make the following adjustments:
Compass Calibration
Compass Variance
Download Manual