Multi-terrain Monitor
The Multi-terrain Monitor displays the vehicle surroundings when driving at low speeds, thus assisting off-road driving and helping the driver to check the vehicle surroundings.
- By pressing the VIEW switch, the display can be shown, or the display image can be changed between the front screen, wide view front & side monitor screen, side-front simultaneous display monitor screen, side-rear simultaneous display monitor screen or rear screen. (The screens that can be selected differ depending on the shift position and the transfer mode.)
- By referring to the guidelines shown on the front monitor screen, you can decide a driving line while assessing the distance to obstacles ahead of the vehicle and confirm the projected path, and by using the wide view front & side monitors, the side-front simultaneous display monitor and the side-rear simultaneous display monitor to identify objects in the vicinity or course of the tires, you can drive while preventing the vehicle from becoming stuck unexpectedly.
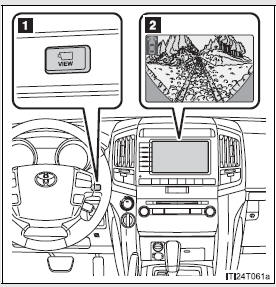
- VIEW switch
- Touch screen
- Switching the image
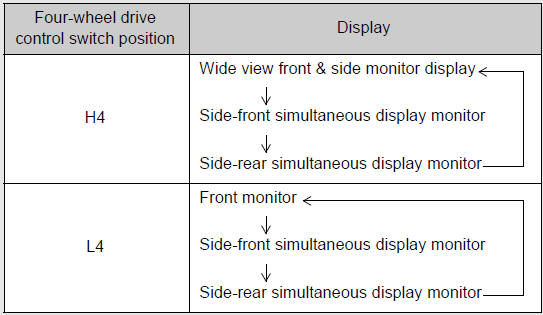
- When the shift lever is in “D”, “S” or “N”
Normal display mode: Press the VIEW switch to display the screen.
Automatic display mode: The screen is displayed automatically.
The screen will switch each time the VIEW switch is pressed. (The switching screen differs in accordance with the transfer range.)
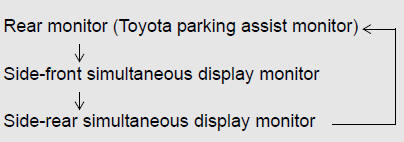
- When the shift lever is in “R”
If the shift lever is shifted to “R”, the rear monitor (Toyota parking assist monitor) will be displayed, and the screen will switch every time the VIEW switch is pressed.
- Automatic display mode
In this mode, the screen is switched automatically in response to vehicle speed and shift lever operation, in addition to screen switching by operating the VIEW switch.
Touch “AUTO” on the front or wide view front & side monitor screen.
The “AUTO” indicator will come on.
Touch “AUTO” again to return to normal display mode.
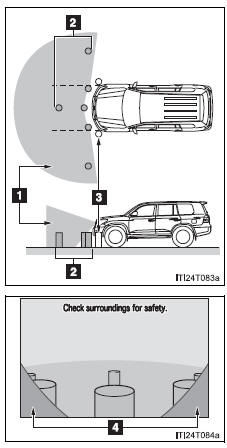
Range covered by each camera

- Front monitor*
- Side-front simultaneous display monitor*
- Side-rear simultaneous display monitor*
- Rear monitor
*:Range of wide view front & side monitor display (The monitor for side displays right side only.)
The illustration shown here is an example. As such, the actual visible area may be different. See P. 272 for information about the visual range of each camera.
Display
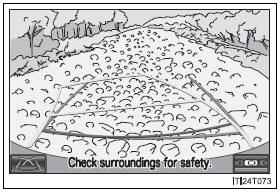
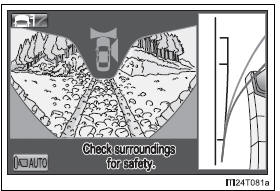
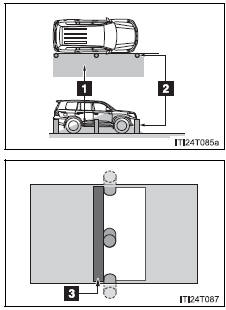
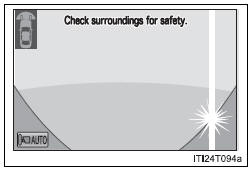
- Front monitor
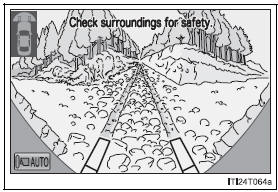
The image from the front camera is displayed. Use this monitor to help check the area in front of the vehicle for safety. Guidelines are shown to help determine the course.
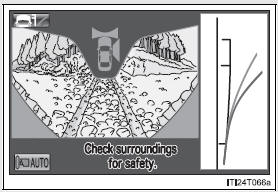
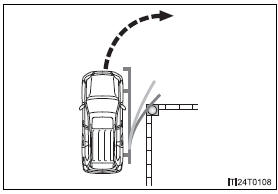
- Wide view front & side monitor display
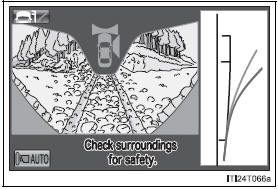
Images from the front and the sides of the vehicle are displayed.
This display is used to verify the situation at crossings with poor visibility, and to assist with safety confirmation when turning right.
Guidelines can also be displayed as a steering guide when turning right.
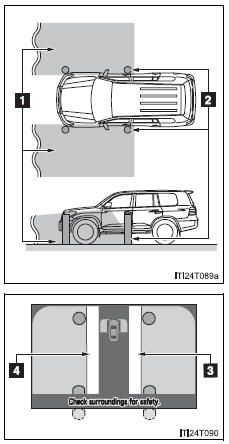
- Side-front simultaneous display monitor
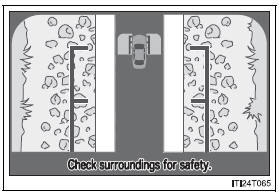
- Side-rear simultaneous display monitor
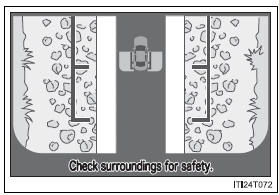
The image from both side cameras is displayed. Use this monitor to help check the area on both sides of the vehicle at the same time, and to check for objects near the tires or the sides of the vehicle. Guidelines showing an image of the vehicle width and the position of the rear tires are displayed.
- Rear monitor (Toyota parking assist monitor)
The image from the rear camera is displayed. For information regarding the Toyota parking assist monitor, refer to “Navigation System Owner’s Manual”.
Using the monitor
- Front monitor
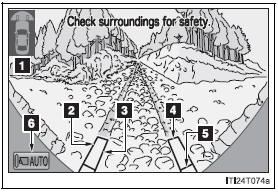
- Vehicle icon
Displays the image being shown by the front monitor.
- Trajectory line (outside)*
Indicates the outer path of the tire.
- Trajectory line (inside)*
Indicates the inner path of the tire.
- Distance guideline (yellow)
Shows the position about 3.3 ft.
(1 m) away from the front edge of the vehicle.
- Distance guideline (red)
Shows the position about 1.6 ft.
(0.5 m) away from the front edge of the vehicle.
- Automatic display mode
Switches the projected course mode
The trajectory lines move according to the steering wheel position.
*:While the Turn Assist function of Crawl Control is operating, the trajectory lines will be displayed as dotted lines. At this time, there may be a difference between the trajectory lines and the actual course of progression.
Wide view front & side monitor display

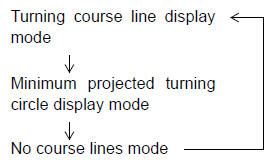
- Projected course line switching button
The course line display mode will change as follows each time the switch is touched.
When the shift lever is in “R”, display mode can not be changed.
- Vehicle icon
Displays the image being shown by the front monitor.
- Front wheel contact point
Shows the position of the vehicle’s front tire.
- Vehicle front edge line
Shows the position of the vehicle’s leading edge.
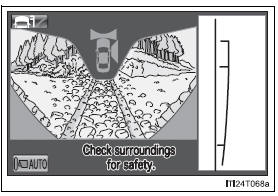
- Projected course line (yellow)
Displays a rough guide of the vehicle path that moves according to the steering wheel position.
Displayed along with the minimum projected turning circle.
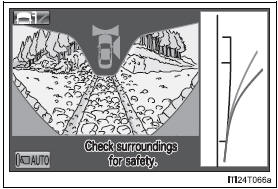
- Minimum projected turning circle (blue)
Displays the smallest turning circle projected by the system if the steering wheel is turned to full lock. Displayed when the steering wheel is turned to the right (further than 90° from straight ahead).
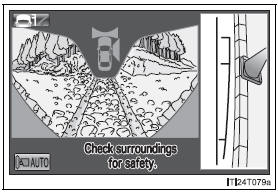
- Vehicle width line (blue)
Indicates the width of the vehicle including the outside rear view mirror.
- Rear wheel contact point
Shows the position of the vehicle’s rear tire.
- Automatic display mode
Switches the projected course mode
- Side-front simultaneous display monitor
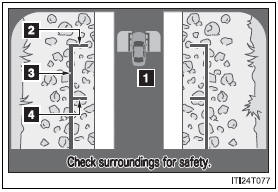
- Vehicle icon
Displays the image being shown by the side-front simultaneous display monitor.
- Vehicle front edge line
Shows the position of the vehicle’s front edge.
- Vehicle width line
Indicates the width of the vehicle including the outside rear view mirror.
- Front wheel contact point
Shows the position of the vehicle’s front tire.
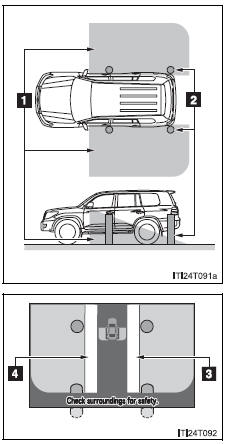
- Side-rear simultaneous display monitor
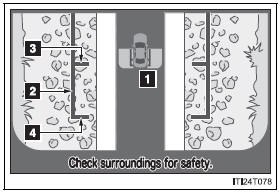
- Vehicle icon
Displays the image being shown by the side-rear simultaneous display monitor.
- Vehicle width line
Indicates the width of the vehicle including the outside rear view mirror.
- Rear wheel contact point
Shows the position of the vehicle’s rear tire.
- Vehicle rear edge line
Shows the position of the vehicle’s rear edge.
- Rear monitor (Toyota park assist monitor)
Refer to “Navigation System Owner’s Manual”.
Projected course line display mode (Wide view front & side monitor display)
- No course lines mode
Vehicle width line displayed.
- Minimum projected turning circle display mode

The minimum projected turning circle line is added to the no course lines mode.
- Turning course line display mode
The projected course line is added to the minimum projected turning circle mode.
- Switching projected course line display mode

Touch  .
.
- Using the vehicle width line & course line
- Vehicle width line
Use the vehicle width line to check the vehicle’s distance from objects such as curbstones etc.
As shown in the illustration, be sure that the vehicle width line does not overlap the object. If you also move the vehicle so that the vehicle width line and the object are parallel, you can park parallel to the object.
- Minimum projected turning circle & projected course line
Use the minimum projected turning circle & projected course line (when displayed) to check the vehicle’s path with relation to obstacles.
If the minimum projected turning circle line (blue) is over the obstacle as shown in the illustration, or the obstacle falls within the minimum projected turning circle, if you turn with the minimum possible turning circle, the vehicle may collide with the object.
When the projected course line (yellow) is displayed, be sure to operate the steering wheel so that the obstacle stays outside the projected course line until the vehicle has passed the object.
- The Multi-terrain Monitor can be operated when
- Normal display mode
The vehicle speed is less than approximately 7 mph (12 km/h).
- Automatic display mode
- When automatic display mode is selected
- When the shift lever is shifted to “D”, “S” or “N”
- When the shift lever is in “D”, “S” or “N” and the vehicle speed is below approximately 6 mph (10 km/h)
- Automatic system cancellation
In the following situations, the image is canceled automatically.
- When the vehicle speed exceeds approximately 7 mph (12 km/h).
After the vehicle speed exceeds approximately 7 mph (12 km/h), the image will continue to be displayed for a short time.
If the vehicle speed returns to below 7 mph (12 km/h) before the image extinguishes, the image will continue to be displayed.
- When “MAP” or another switch outside the screen has been pressed
- Interruption screens
An interruption screen is displayed when an obstacle is within the detection range of the intuitive parking assist.
- When the door mirrors are folded.
The screen will be turned off temporarily while the door mirrors are folding, and the screen will return to normal once folding has been completed.
- Displayed area
The area covered by the camera is limited. Objects which are close to either corner of the bumper or under the bumper cannot be seen on the screen.
The area displayed on the screen may vary depending on vehicle orientation or road conditions.
- Front camera
- Camera’s field of view
- Objects visible to the camera
- Objects not visible to the camera
- Parts of the vehicle (bumper, grille, etc.)
- Side camera (Wide view front & side monitor display)
- Camera’s field of view
- Objects visible to the camera
- Right side of vehicle
- Side camera (side-front simultaneous display monitor)
- Camera’s field of view
- Objects visible to the camera
- Right side of vehicle
- Left side of vehicle
- Side camera (side-rear simultaneous display monitor)
- Camera’s field of view
- Objects visible to the camera
- Right side of vehicle
- Left side of vehicle
- Rear camera
Refer to the “Navigation System Owner’s Manual”
- Multi-terrain Monitor cameras
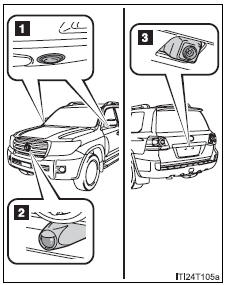
- Side cameras
- Front camera
- Rear camera
In the following cases, it may be difficult to see images on the screen even when the system is functioning correctly:
- The vehicle is in a dark area, such as at night.
- The temperature near the lens is extremely high or low.
- Water droplets are on the camera lens or humidity is high, such as when it rains.
- Foreign matter, such as snow and mud, adheres to the camera lens.
- The camera has scratches or dirt on it.
- The sun or headlights are shining directly into the camera lens.
- The camera lens is damaged by flying stones.
- Smear effect
If a bright light, such as sunlight reflected off the vehicle body, is picked up by the camera, a smear effect* characteristic to the camera may occur.
*: Smear effect - A phenomenon that occurs when a bright light is picked up by the camera; when transmitted by the camera, the light source will appear to have streaks of light emanating from it.
The streaks will also appear when the light source is in the vehicle icon area.
- Flicker effect
When the camera is used under fluorescent lights, sodium lights, mercury lights etc., the lights and the illuminated areas may appear to flicker.
- Display settings
Refer to the “Navigation System Owner’s Manual”
- If the message “System is initializing.” is displayed
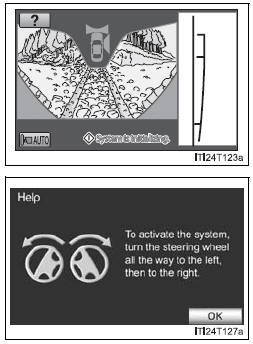
“System is initializing.” will be displayed on the screen under the following conditions:
- The battery has been reinstalled.
- The steering wheel has been moved while the battery was being reinstalled.
- Battery power is low.
- The steering sensor has been reinstalled.
- There is a malfunction in the signals being output by the steering sensor.
Initialize the system by performing either of the procedures below:
- Drive for a short period of time while keeping the steering wheel straight.
- Stop the vehicle, and turn the steering wheel as far as it will go to the left and right. On the system initialization screen, touch the “?” button to display the operating procedure.
If this does not resolve the symptom, have the vehicle inspected by your Toyota dealer.
| CAUTION
Observe the following precautions to avoid an accident that could result in death or serious injuries:
|
| CAUTION
|
| NOTICE
|
Download Manual