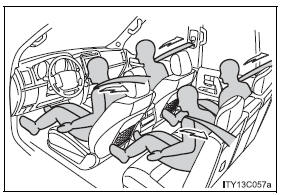
Adjustable components (seats, mirrors, steering wheel)
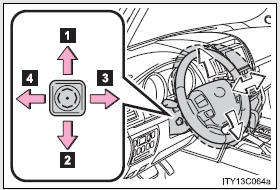
Front seats
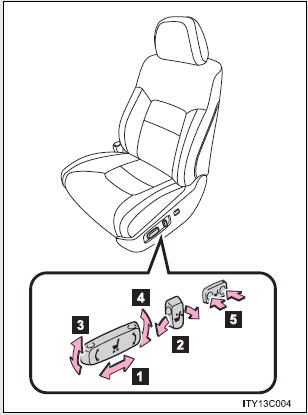
- Seat position fore/aft control switch
- Seatback angle control switch
- Seat cushion (front) angle control switch
- Vertical height control switch
- Lumbar support control switch (driver’s side only
Active head restraint
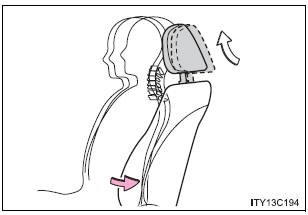
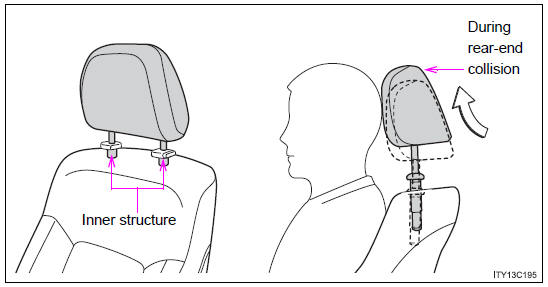
When the occupant’s lower back presses against the seatback during a rear-end collision, the head restraint moves slightly forward and upward to help reduce the risk of whiplash on the seat occupant.
- Active head restraint
Even small forces applied to the seatback may cause the head restraint to move. Pushing up a locked head restraint forcibly may make the inner structure of the head restraint appear. This does not indicate a problem.
| CAUTION
If the seat is too reclined, during an accident the lap belt may slide past the hips and apply restraint forces directly to the abdomen or your neck may contact the shoulder belt, increasing the risk of death or serious injury. Adjustments should not be made while driving as the seat may unexpectedly move and cause the driver to lose control of the vehicle. |
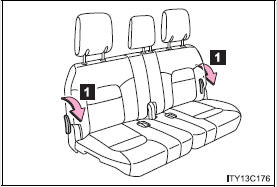
Rear seats
- Second seat
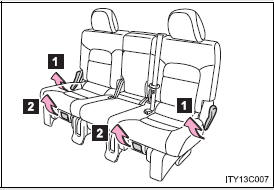
- Seatback angle adjustment lever
- Seat position adjustment lever
- Third seat
Tumbling the second seats and third seat entry
For easy access to the third seat, perform STEP 1
in “Tumbling the second seats”.
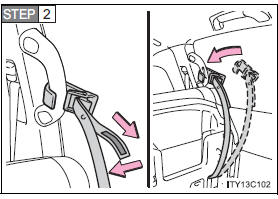
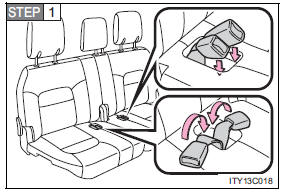
- Before tumbling the second seats
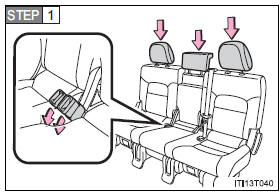
Stow the seat belt buckles and lower the head restraints to the lowest position.
Pass the outer seat belts through the seat belt hangers and secure the seat belt plates.
This prevents the shoulder belt from being damage.
Make sure that the seat belts are removed from the hangers before using them.
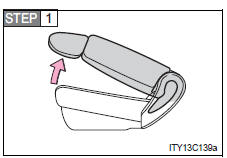
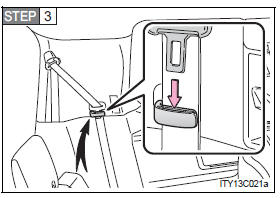
- Tumbling the second seats
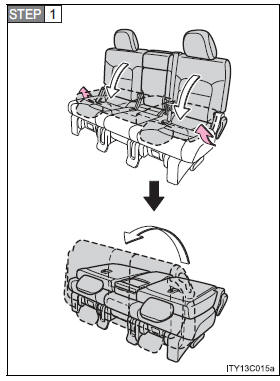
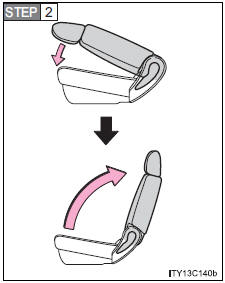
Fold down the seatback while pulling the seatback angle adjustment lever, and swing the whole seat up and forward.
Hook the holding strap to the assist grip and secure the seat by pulling its free end.
When returning the second seat to its original position, stow the holding strap.
Remove the seat hook covers from the back of the seat cushion, and install them on the seat hooks.
When returning the second seat to its original position, remove the seat hook covers from the floor and install them in the back of the seat cushion.
- If you cannot raise the left side seatback
Lift the seatback until it stops.
Lower the seatback a little then lift it again.
Folding up the third seats
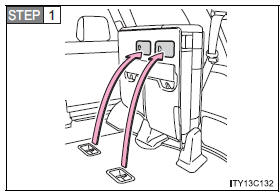
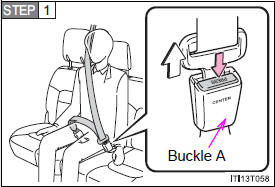
- Before folding up the third seats
Stow the seat belts buckles.
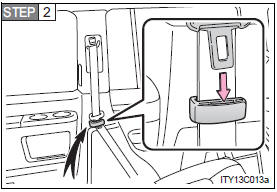
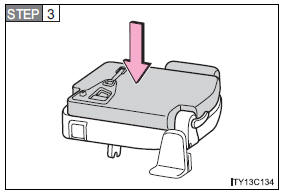
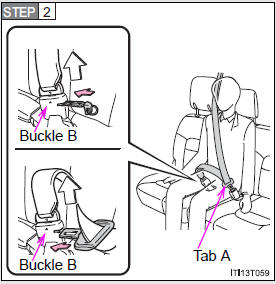
STEP 2
Stow the center head restraint in the seatback.
Pass the outer seat belts through the seat belt hangers and secure the seat belt plates.
This prevents the shoulder belt from being damage.
Make sure that the seat belts are removed from the hangers before using them.
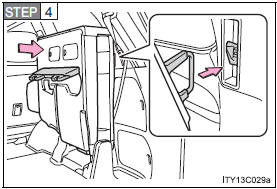
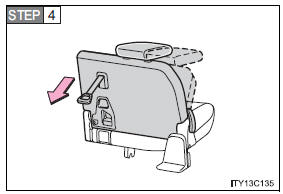
STEP 4
Stow the center seat belt tabs in the cover set in the roof.
- Folding up the third seats
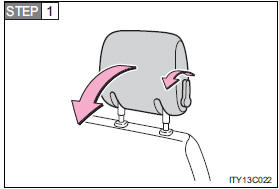
Fold down the head restraints while pulling the head restraint angle lever.
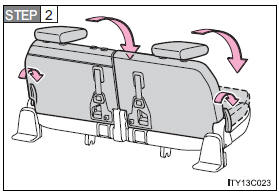
Push the seatback angle levers and fold the third seatbacks.
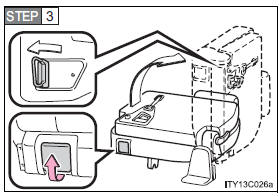
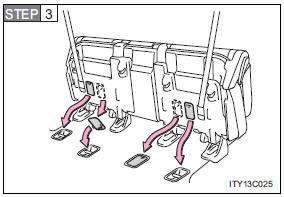
Pull the seat leg lock release levers.
The seat will rise, and the seatback striker will also automatically sit up.
Before raising, make sure that the handle on the rear of the seatback is secure.
Secure the seats by the strikers.
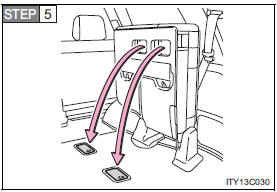
Remove the seat hook covers from the back of the seat cushion, and install them on the seat hooks.
- Returning the third seats
Remove the seat hook covers from the floor and install them into the back of the seat cushion.

Unlock the seats by pulling the stowed seat lock release levers and lower the seats to its original position.
Secure the seats by the strikers.
Pull the handle and raise the seatbacks.
Fix the handle securely in its original position after use

Raise the head restraints.
| CAUTION
Do not recline the seat more than necessary when the vehicle is in motion, to reduce the risk of sliding under the lap belt. If the seat is too reclined, during an accident the lap belt may slide past the hips and apply restraint forces directly to the abdomen or your neck may contact the shoulder belt, increasing the risk of death or serious injury.
Observe the following precautions. Failure to do so may result in death or serious injury.
Do not hang or attach anything on the seatback striker. |
| NOTICE
The seat belts and buckles must be stowed.
Make sure that the handle on the rear of the seatback has been secured. |
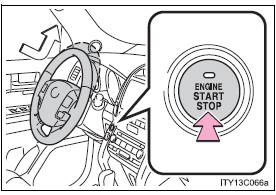
Driving position memory system
Your preferred driving position (the position of the driver’s seat, steering wheel and outside rear view mirrors) can be entered into the computer’s memory and recalled with the touch of a button. It is also possible to set this function to activate automatically when the doors are unlocked.
Three different driving positions can be entered into memory.
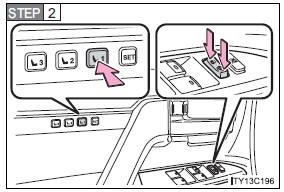
- Entering a position to memory
STEP 1
Turn the “ENGINE START STOP” switch to IGNITION ON mode.
STEP 2
Adjust the driver’s seat, steering wheel, and outside rear view mirrors to the desired positions.
While pressing the “SET” button, or within 3 seconds after the “SET” button is pressed, press and hold button “1”, “2” or “3” until the signal beeps.
If the selected button has already been preset, the previously recorded position will be overwritten.
- Recalling the memorized position
Check that the shift lever is set in “P”.
STEP 1
Turn the “ENGINE START STOP” switch to IGNITION ON mode.

Press button “1”, “2” or “3” to recall the desired position.
Linking driving position memory with door unlock operation
Record your driving position to button “1”, “2” or “3” before performing the following:
- Using the wireless remote control
STEP 1
Turn the “ENGINE START STOP” switch to OFF after closing the driver’s door.
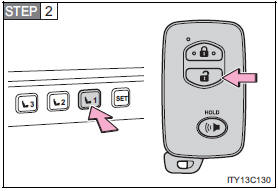
While pressing the desired button (“1”, “2” or “3”), press  on the wireless remote control until the signal beeps.
The driving position is recalled when the driver’s door is unlocked using the entry function or wireless remote control and the driver’s door is opened.
To prevent unintended triggering of the alarm, open and close a door once after a driving position has been recorded. (If a door is not opened within 60 seconds after is pressed, the doors will be locked again and the alarm will automatically be set.) In case that the alarm is triggered, immediately stop the alarm.
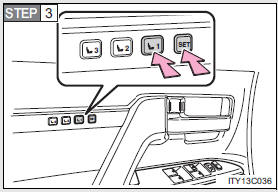
- Using the door lock switch
Carry only the key to which you want to link the driving position. If 2 or more keys are in the vehicle, the driving position cannot be linked properly.
STEP 1
Turn the “ENGINE START STOP” switch to OFF after closing the driver’s door.
While pressing the desired button (“1”, “2”, or “3”), press the lock or unlock side on the door lock switch until the signal beeps.
The driving position is recalled when the driver’s door is unlocked using the entry function or wireless remote control and the driver’s door is opened.
- Canceling the linked door unlock operation
STEP 1
Turn the “ENGINE START STOP” switch to OFF after closing the driver’s door.
STEP 2
Using the wireless remote control: While pressing “SET” button, press  button on the wireless remote control until the signal beeps.
Using the door lock switch: While pressing “SET” button, press the lock or unlock side on the door lock switch until the signal beeps.
- Retained accessory power
- Each memorized position (except for the steering wheel position) can be activated within 3 minutes after the driver’s door is opened, even if the “ENGINE START STOP” switch is turned off.
- Each memorized position (except for the steering wheel position) can be activated within 60 seconds after the driver’s door is closed, even if the “ENGINE START STOP” switch is turned off.
- To cancel seat position recall
Perform any one of the following operations.
- Press the “SET” button
- Press button “1”, “2” or “3”.
- Adjust the seat using the switches (only cancels seat position recall)
- Adjust the steering wheel using the tilt and telescopic steering control switch (only cancels steering wheel position recall)
- If the battery is disconnected
The memorized positions must be reset because the computer’s memory is erased when the battery is disconnected.
| CAUTION
Take care during seat adjustment that the seat does not strike the rear passenger or squeeze your body against the steering wheel. |
Head restraints
Head restraints are provided for all seats.
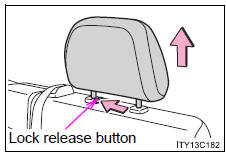
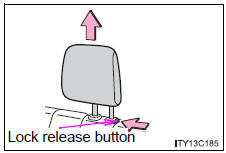
- Front seats
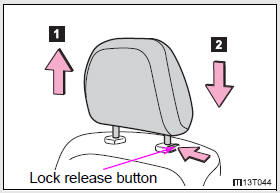
Vertical adjustment
- Up
- Down
Push the head restraint up or down while pressing the lock release button.
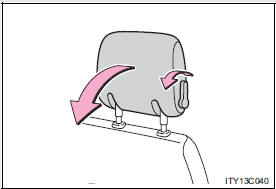
Angle adjustment
- Second seats
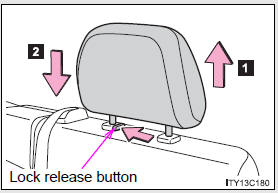
Vertical adjustment
- Up
Pull the head restraint up.
- Down
Press and hold the lock release button when lowering the head restraint.
- Third outboard seats
To fold
Pull the head restraint angle lever to fold the head restraint.
- Adjusting the height of the head restraints
Make sure that the head restraints are adjusted so that the center of the head restraint is closest to the top of your ears.
- Adjusting the second center seat head restraint
Always raise the head restraint one level from the stowed position when using.
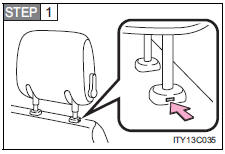
- Removing the head restraints
- Front seats
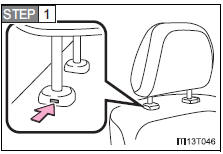
Push a flathead screwdriver into the slot.
The slot is located on the right side of the right head restraint anchor.
STEP 2
While pressing in the flathead screwdriver, pull up the head restraint.
- Second seats
Pull the head restraint up while pressing the lock release button.
- Third center seat
Pull the head restraint up while pressing the lock release button.
- Third outboard seats
Push a flathead screwdriver into the slot.
The slot is located on the left side of the left head restraint anchor.
STEP 2
While pressing in the flathead screwdriver, pull up the head restraint.
- Installing the head restraints
STEP 1
Align the head restraint with the installation holes.
STEP 2
Push down the head restraint to the lock position.
- When not using the third center seat head restraint
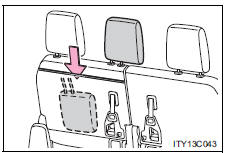
Open the zipper on the back of the third seat and stow the head restraint inside.
| CAUTION
Observe the following precautions regarding the head restraints. Failure to do so may result in death or serious injury.
|
Seat belts
Make sure that all occupants are wearing their seat belts before driving the vehicle.
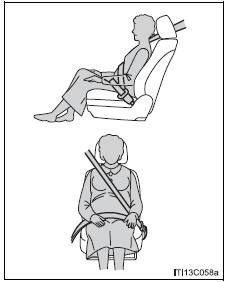
- Correct use of the seat belts
- Extend the shoulder belt so that it comes fully over the shoulder, but does not come into contact with the neck or slide off the shoulder.
- Position the lap belt as low as possible over the hips.
- Adjust the position of the seatback. Sit up straight and well back in the seat.
- Do not twist the seat belt.
- Fastening and releasing the seat belt
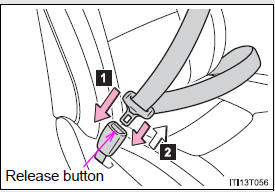
- Fastening the belt
Push the tab into the buckle until a clicking sound is heard.
- Releasing the belt
Press the release button.
- Fastening and releasing the third center seat belt
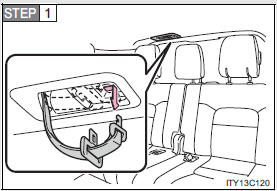
Pull out the tab
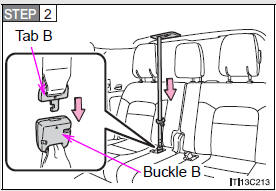
Push tab B into buckle B until a clicking sound is heard
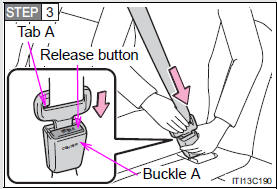
Push tab A into buckle A until a clicking sound is heard
To release, push the release button on buckle A.
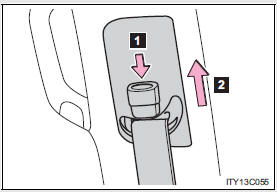
- Releasing and storing the third center seat belt
Push the release button on buckle A
Push either the mechanical key or tab A into buckle B
When releasing and storing the seat belt, hold the belt while winding it back gently
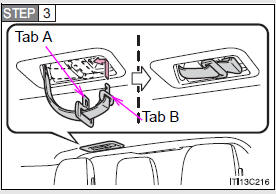
Put tabs A and B together and stow them in the holder
To reattach the seat belt, reverse the above procedure, pulling out the tabs and inserting tab B into buckle B
- Adjusting the height of the belt (front and second outboard seats)
- Down
- Up
Move the height adjuster up and down as needed until you hear a click.
Seat belt pretensioners (front and second outboard seats)
The pretensioner helps the seat belt to quickly restrain the occupant by retracting the seat belt when the vehicle is subjected to certain types of severe frontal collision or a vehicle rollover.
The pretensioner may not activate in the event of a minor frontal impact, a side impact or a rear impact.
Pre-collision seat belts (front seats of vehicles with pre-collision system)
- Brake-linked pre-collision system
If the system determines that emergency braking is being performed or the vehicle is out of control, the front seat belts will retract.
- Radar type pre-collision system
If the system determines that a collision is unavoidable, the front seat belts will retract before the collision.
- Emergency locking retractor (ELR)
The retractor will lock the belt during a sudden stop or on impact. It may also lock if you lean forward too quickly. A slow, easy motion will allow the belt to extend, and you can move around fully.
- Automatic locking retractor (ALR)
When a passenger’s shoulder belt is completely extended and then retracted even slightly, the belt is locked in that position and cannot be extended. This feature is used to hold the child restraint system (CRS) firmly.
To free the belt again, fully retract the belt and then pull the belt out once more.
- When the third center seat belt cannot be extended
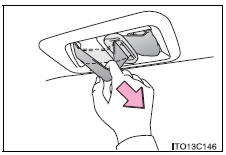
Put your fingers between the seat belt and the holder.
Pull the seat belt forcefully in the direction of the arrow and then release it to unlo
- Child seat belt usage
The seat belts of your vehicle were principally designed for persons of adult size.
- Use a child restraint system appropriately for the child, until the child becomes large enough to properly wear the vehicle’s seat belt.
- When the child becomes large enough to properly wear the vehicle’s seat belt, follow the instructions on P. 76 regarding seat belt usage.
- Replacing the belt after the pretensioner has been activated
If the vehicle is involved in multiple collisions, the pretensioner will activate for the first collision, but will not activate for the second or subsequent collisions.
- Seat belt extender

If your seat belts cannot be fastened securely because they are not long enough, a personalized seat belt extender is available from your Toyota dealer free of charge.
| CAUTION
Observe the following precautions to reduce the risk of injury in the event of sudden braking, sudden swerving or an accident. Failing to do so may cause death or serious injury.
Extend the shoulder belt completely over the shoulder and position the belt across the chest. Avoid belt contact over the rounding of the abdominal area. If the seat belt is not worn properly, not only a pregnant woman, but also the fetus could suffer death or serious injury as a result of sudden braking, sudden swerving or a collision.
Obtain medical advice and wear the seat belt in the proper way. |
 Obtain medical advice and wear the seat belt in the proper way. Women who are pregnant should position the lap belt as low as possible over the hips in the same manner as other occupants.
| CAUTION
Do not allow children to play with the seat belt. If the seat belt becomes twisted around a child’s neck, it may lead to choking or other serious injuries that could result in death. If this occurs and the buckle cannot be unfastened, scissors should be used to cut the belt.
Always make sure the shoulder belt is positioned across the center of your shoulder. The belt should be kept away from your neck, but not falling off your shoulder. Failure to do so could reduce the amount of protection in an accident and cause death or serious injuries in the event of a sudden stop, sudden swerve or accident.
|
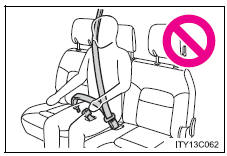 Do not use the third center seat belt with either buckle released. Fastening only one of the buckles may result in death or serious injury in case of sudden braking, sudden swerving or a collision.
| CAUTION
|
| NOTICE
When releasing the seat belt, press on the buckle release button on the extender, not on the seat belt. This helps prevent damage to the vehicle interior and the extender itself. |
Steering wheel
The steering wheel can be adjusted to a comfortable position while the “ENGINE START STOP” switch is in ACCESSORY or IGNITION ON mode.
- Up
- Down
- Toward the driver
- Away from the driver
Auto tilt away
When the “ENGINE START STOP” switch is OFF, the steering wheel returns to its stowed position by moving up and away to enable easier driver entry and exit.
Switching to ACCESSORY or IGNITION ON mode will return the steering wheel to the original position.
- One-touch adjustment of the steering position
A desired steering position can be entered to memory and recalled automatically by the driving position memory.
| CAUTION
Do not adjust the steering wheel. Doing so may cause the driver to mishandle the vehicle and an accident, resulting in death or serious injury. |
Inside rear view mirror
The rear view mirror’s position can be adjusted to enable sufficient confirmation of the rear view in accordance with the driver’s seating posture.
Adjusting the height of the rear view mirror
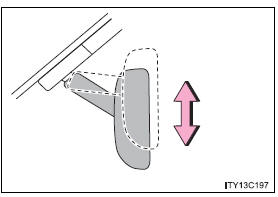
Adjust the height of the rear view mirror by moving it up and down.
Automatic anti-glare function
Responding to the level of brightness of the headlights of vehicles behind, the reflected light is automatically reduced.
Changing automatic anti-glare function mode ON/OFF
- ON
- OFF
When the automatic anti-glare function is in ON mode, the indicator illuminates.
The function will be set to ON mode each time the “ENGINE START STOP” switch is turned to IGNITION ON mode.
Pressing the button turns the function to OFF mode. (The indicator also turns off.)
- To prevent sensor error
To ensure correct functioning of the sensors, do not touch or cover the sensors.
| CAUTION
Do not adjust the position of the mirror. Doing so may lead to mishandling of the vehicle and an accident, or resulting in death or serious injury. |
Outside rear view mirrors
Mirror angle can be adjusted.
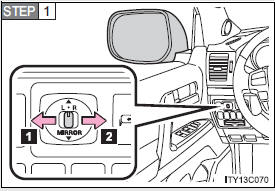
Select a mirror to adjust
- Left
- Right
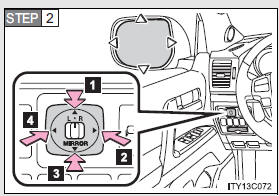
Adjust the mirror
- Up
- Right
- Down
- Left
Folding back the mirrors
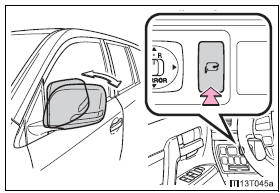
Press the switch
Pressing again will extended the mirrors.
- Mirror angle can be adjusted when
The “ENGINE START STOP” switch is in ACCESSORY or IGNITION ON mode.
- When the mirrors are fogged up
The outside rear view mirrors can be cleared using the mirror defoggers.
Turn on the rear window defogger to turn on the outside rear view mirror defoggers.
- Auto anti-glare function
When the anti-glare inside rear view mirror is set to auto mode, the outside rear view mirrors will activate in conjunction with the anti-glare inside rear view mirror to reduce reflected light.
- Linked mirror function when reversing
When the mirror select switch is in the “L” or “R” position, the outside rear view mirrors will automatically angle downwards when the vehicle is reversing in order to give a better view of the ground. To disable this function, move the mirror select switch to the neutral position (between “L” and “R”).
- One-touch adjustment of the mirror angle
A desired mirror face angle can be entered to memory and adjusted with the touch of a button.
| CAUTION
Observe the following precautions. Failing to do so may result in losing control of the vehicle and cause an accident, resulting in death or serious injury.
To avoid personal injury and mirror malfunction, be careful not to get your hand caught by the moving mirror.
Do not touch the rear view mirror surfaces, as they can become very hot and burn you. |
| NOTICE
Do not operate the control or scrape the mirror face. Use a spray de-icer to free the mirror. |
Download Manual