If you have a flat tire
Remove the flat tire and replace it with the spare provided.
- Before jacking up the vehicle
- Stop the vehicle on a hard, flat surface.
- Set the parking brake.
- Shift the shift lever to “P”.
- Stop the engine.
- Turn on the emergency flashers.
- Location of the spare tire, jack and tools
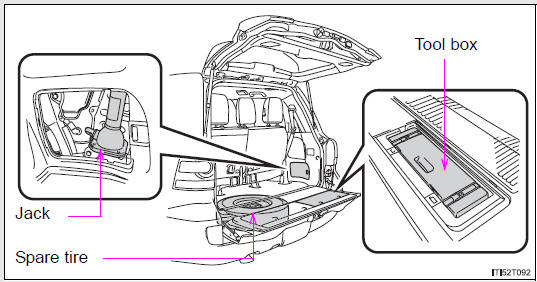
Taking out the jack
Remove the cover.
Unhook the rubber band and take out the jack.
- Loosen
- Tighten
Loosen and remove the jack.
Taking out the tool box
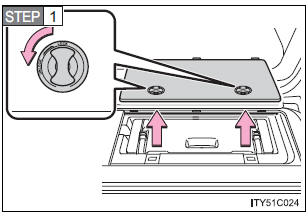
Remove the cover.
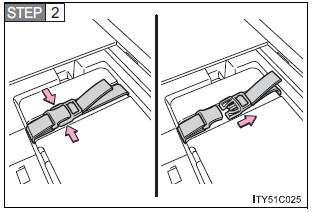
Take out the tool box.
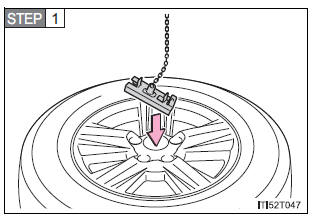
Taking out the spare tire
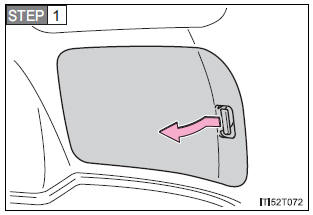
STEP 1
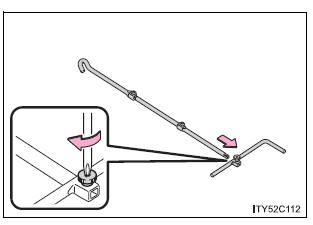
Assembling the jack handle.
Remove the jack handle and the jack extension bar from the tool box and assemble by following these steps.
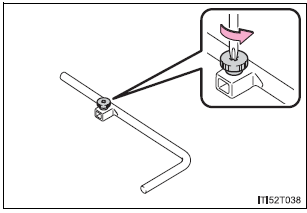
- Loosen the screw using a screwdriver
- Assemble the jack handle and the jack handle extension bar and tighten the screw.
Check that the screw is firmly tightened.
Open the cover.
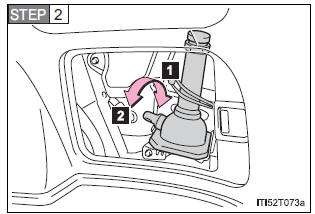
Insert the jack handle extension into the lowering screw.
- Lower
- Raise
Place a rag under the jack handle extension to protect the back door.
Lower the spare tire completely to the ground.
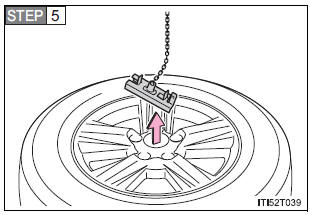
Pull out the spare tire and remove the holding bracket.
Replacing a flat tire
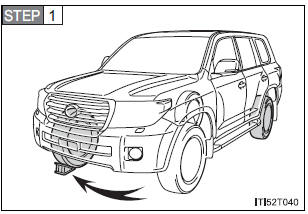
Chock the tires.

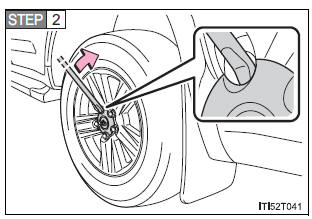
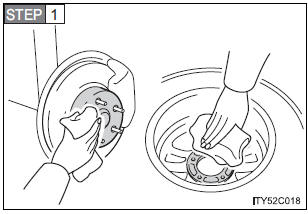
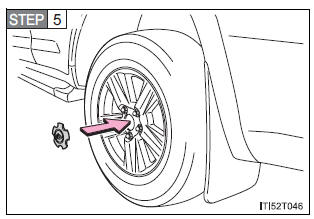
Pry off the wheel ornament, using the beveled end of the wheel ornament remover as shown.
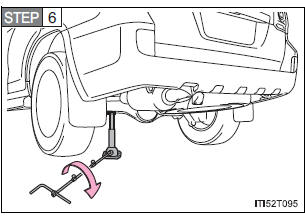
Slightly loosen the wheel nuts (one turn).
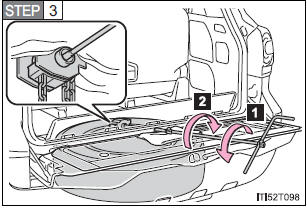
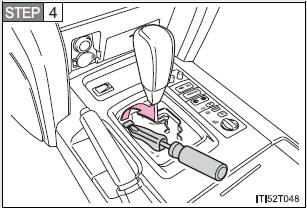
STEP 4
Assembling the jack handle.
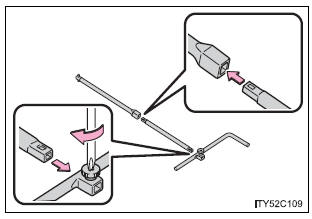
Remove the jack handle, jack extension bar and jack handle bar from the tool box and assemble by following these steps.
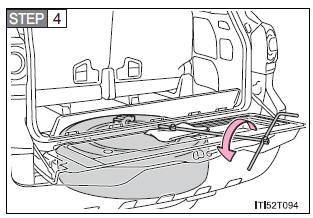
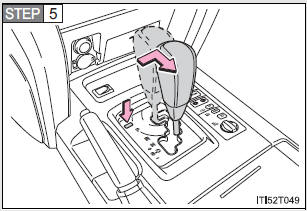
STEP 4
Assembling the jack handle.
Remove the jack handle, jack extension bar and jack handle bar from the tool box and assemble by following these steps.
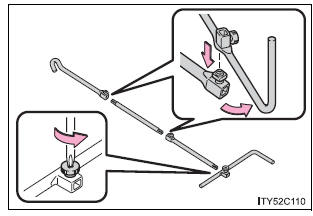
- Loosen the bolts and the screw using either the jack handle or a screwdriver.
- Assemble the jack handle extension bar and the jack handle bar and tighten the bolts.
Check that the bolts are firmly tightened.
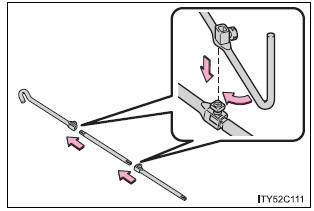
- Assemble the jack handle extension bar and the jack handle and tighten the screw.
Check that the screw is firmly tightened.
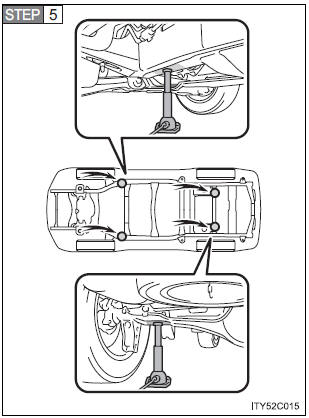
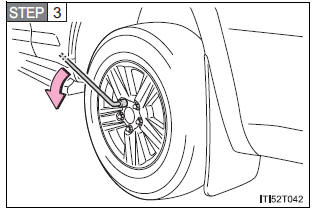
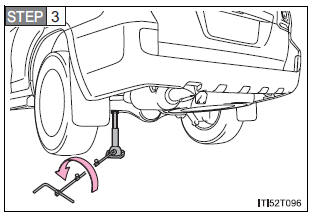
Position the jack at the jack points as shown.
Front - Under the chassis frame side rail Rear - Under the rear axle housing
Raise the vehicle until the tire is slightly raised off the ground.
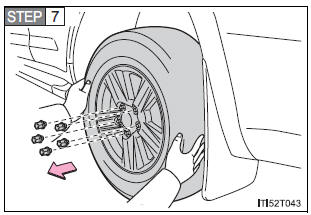
Remove all the wheel nuts and the tire.
When resting the tire on the ground, place the tire so that the wheel design faces up to avoid scratching the wheel surface.
Installing the spare tire
Remove any dirt or foreign matter from the wheel contact surface.
If foreign matter is on the wheel contact surface, the wheel nuts may loosen while the vehicle is in motion, and the tire may come off the vehicle.
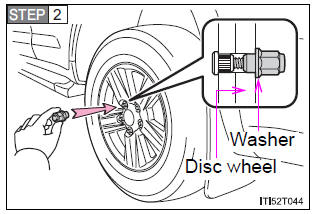
Install the spare tire and loosely tighten each nut by hand to approximately the same amount.
Turn the nut washers until they come into contact with the disc wheel.
Lower the vehicle.
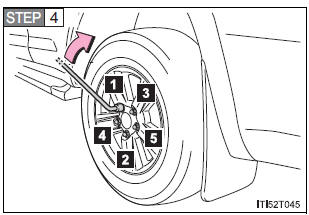
Firmly tighten each nut two or three times in the order shown in the illustration.
Tightening torque: 97 ft•lbf (131 N•m, 13.4 kgf•m)
Reinstall the wheel ornament.
Stowing the flat/spare tire, jack and tools
Lay down the tire with the outer side facing up, and install the holding bracket.
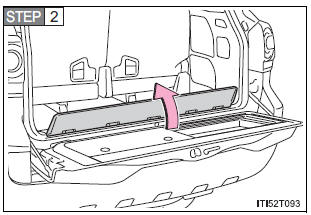
STEP 2
Raise the tire.
Pull the tire towards the rear of the vehicle when raising. After raising, visually check that tire is not interfering with components.
STEP 3
Stow the tools and jack securely, and replace all covers.
- After completing the tire change
The tire pressure warning system must be reset.
| CAUTION
Improper use of the tire jack may lead to death or serious injuries due to the vehicle suddenly falling off the jack.
Do not use it on other vehicles, and do not use other tire jacks for replacing tires on this vehicle.
Take particular care when lowering the vehicle to ensure that no one working on or near the vehicle may be injured.
Tighten all the jack handle bolts securely using a Phillips-head screwdriver, to prevent the extension parts from coming apart unexpectedly. |
| CAUTION
Failure to do so may result in serious injury:
After the vehicle has been driven the disc wheels and the area around the brakes will be extremely hot. Touching these areas with hands, feet or other body parts while changing a tire, etc. may result in burns.
|
| NOTICE
Do not continue driving with a flat tire. Driving even a short distance with a flat tire can damage the tire and the wheel beyond repair.
Ensure that there is no object caught between the tire and the vehicle underbody.
When removing or fitting the wheels, tires or the tire pressure warning valve and transmitter, contact your Toyota dealer as the tire pressure warning valve and transmitter may be damaged if not handled correctly.
When a tire is repaired with liquid sealants, the tire pressure warning valve and transmitter may not operate properly. If a liquid sealant is used, contact your Toyota dealer or other qualified service shop as soon as possible. Make sure to replace the tire pressure warning valve and transmitter when replacing the tire. |
If the engine will not start
If the engine still does not start after following the correct starting procedure or releasing the steering lock , confirm the following points.
- The engine will not start when the starter motor operates normally
One of the following may be the cause of the problem.
- There may not be sufficient fuel in the vehicle’s tank.
Refuel the vehicle.
- The engine may be flooded.
Try to restart the engine once more following correct starting procedures.
- There may be a malfunction in the engine immobilizer system.
- The starter motor turn over slowly, the interior lights and headlights are dim, or the horn does not sound or sounds at a low volume
One of the following may be the cause of the problem.
- The battery may be discharged.
- The battery terminal connections may be loose or corroded.
- The starter motor does not turn over
The engine starting system may be malfunctioning due to an electrical problem such as an open circuit or a blown fuse. However, an interim measure is available to start the engine.
- The starter motor does not turn over, the interior lights and headlights do not turn on, or the horn does not sound
One of the following may be the cause of the problem.
- One or both of the battery terminals may be disconnected.
- The battery may be discharged.
- There may be a malfunction in the steering lock system.
Contact your Toyota dealer if the problem cannot be repaired, or if repair procedures are unknown.
Emergency start function
When the engine does not start, the following steps can be used as an interim measure to start the engine if the “ENGINE START STOP” switch is functioning normally.
STEP 1
Set the parking brake.
STEP 2
Put the shift lever in “P”.
STEP 3
Set the “ENGINE START STOP” switch to ACCESSORY mode.
STEP 4
Press and hold the “ENGINE START STOP” switch about 15 seconds while depressing the brake pedal firmly.
Even if the engine can be started using the above steps, the system may be malfunctioning. Have the vehicle checked by your Toyota dealer.
If the shift lever cannot be shifted from P
If the shift lever cannot be shifted with your foot on the brake, there may be a problem with the shift lock system (a system to prevent accidental operation of the shift lever). Have the vehicle inspected by your Toyota dealer immediately.
The following steps may be used as an emergency measure to ensure that the shift lever can be shifted.
STEP 1
Set the parking brake.
STEP 2
Set the “ENGINE START STOP” switch to the ACCESSORY mode.
STEP 3
Depress the brake pedal.
Pry the cover up with a flathead screwdriver or equivalent.
Press the shift lock override button.
The shift lever can be shifted while the button is pressed.
If you lose your keys
New genuine Toyota keys can be made by your Toyota dealer using the other key and the key number stamped on your key number plate.
Download Manual