RearView Monitor (if so equipped)
When the shift lever is shifted into the R (Reverse) position, the monitor display shows the view to the rear of the vehicle.
| WARNING
Failure to follow the warnings and instructions for proper use of the RearView Monitor could result in serious injury or death.
|
CAUTION
There is a plastic cover over the camera.
Do not scratch the cover when cleaning dirt or snow from the cover.
How to read the displayed lines
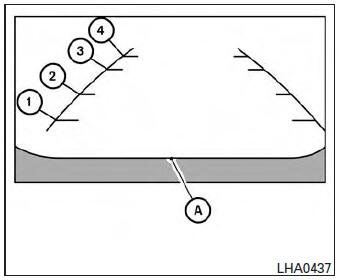
Guiding lines which indicate the vehicle width and distances to objects with reference to the vehicle body line A are displayed on the monitor.
Distance guide lines:
Indicate distances from the vehicle body.
- Red line 1 : approx. 1.5 ft (0.5 m)
- Yellow line 2 : approx. 3 ft (1 m)
- Green line 3 : approx. 7 ft (2 m)
- Green line 4 : approx. 10 ft (3 m)
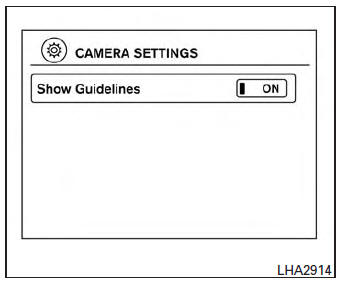
The on-screen guidelines can be set to on or off.
With the shift lever in the R (Reverse) position:
Press the CAMERA button to toggle the feature on and off.
With the shift lever in any position other than the R (Reverse) position:
- Press the CAMERA button.
- Touch the “Show Guidelines” key to toggle the feature on or off.
Difference between predicted and actual distances
The distance guide line and the vehicle width guide line should be used as a reference only when the vehicle is on a level, paved surface. The distance viewed on the monitor is for reference only and may be different than the actual distance between the vehicle and displayed objects.
Backing up on a steep uphill
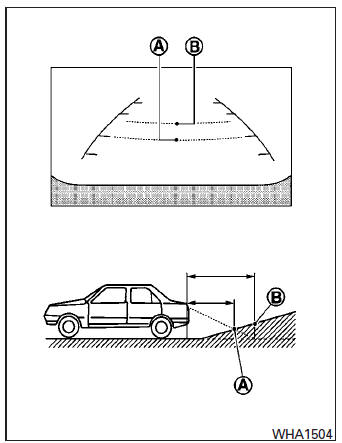
When backing up the vehicle up a hill, the distance guide lines and the vehicle width guide lines are shown closer than the actual distance.
For example, the display shows 3 ft (1.0 m) to the place A , but the actual 3 ft (1.0 m) distance on the hill is the place B . Note that any object on the hill is further than it appears on the monitor.
Backing up on a steep downhill
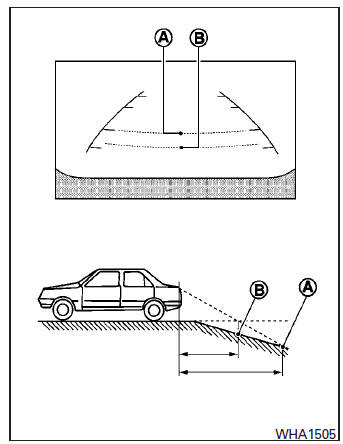
When backing up the vehicle down a hill, the distance guide lines and the vehicle width guide lines are shown farther than the actual distance.
For example, the display shows 3 ft (1.0 m) to the place A , but the actual 3 ft (1.0 m) distance on the hill is the place B . Note that any object on the hill is closer than it appears on the monitor.
Backing up behind a projecting object
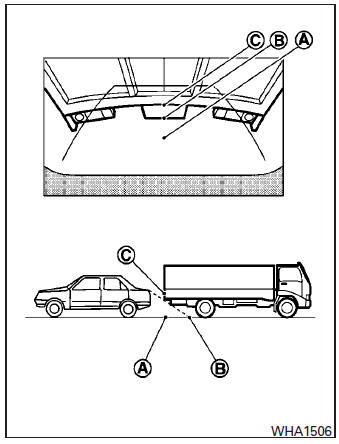
The position C is shown farther than the position B in the display. However, the position C is actually at the same distance as the position A .
The vehicle may hit the object when backing up to the position A if the object projects over the actual backing up course.
Adjusting the screen

Without Navigation System
The procedure for adjusting the quality of the screen differs depending on the type of screen present on the vehicle.
For vehicles without Navigation System:
- Press the ENTER/SETTING button.
- Turn the TUNE-SCROLL knob to highlight the “Brightness” or “Contrast” key.
- Press the ENTER/SETTING button.
- Adjust the level using the TUNE-SCROLL knob and then press the ENTER/SETTING button to apply the adjustment.
- Do not adjust the Brightness or Contrast of the RearView Monitor while the vehicle is moving.
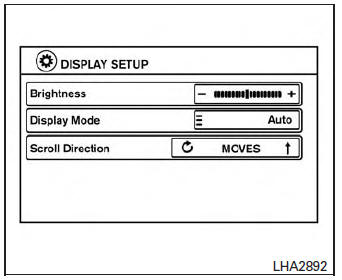
With Navigation System
For vehicles with Navigation System:
- Press the [
 ] button.
 - Touch the “Settings” key.
- Touch the “System” key.
- Touch the “Display” key.
- Touch the “Brightness” key and adjust the level to the desired setting.
- Do not adjust the display of the RearView Monitor while the vehicle is moving.
Operating tips
CAUTION
- Do not use alcohol, benzine or thinner to clean the camera. This will cause discoloration. To clean the camera, wipe with a cloth dampened with a diluted mild cleaning agent and then wipe with a dry cloth.
- Do not damage the camera as the monitor screen may be adversely affected.
- When the shift lever is shifted to R (Reverse), the monitor screen automatically changes to the RearView Monitor mode.
However, the radio can be heard.
- It may take some time until the RearView Monitor is displayed after the shift lever has been shifted to R (Reverse). Objects may be distorted momentarily until the RearView Monitor screen is displayed completely.
When the shift lever is returned to a position other than R (Reverse), it may take some time until the screen changes. Objects on the screen may be distorted until they are completely displayed.
- When the temperature is extremely high or low, the screen may not clearly display objects.
This is not a malfunction.
- When strong light directly enters the camera, objects may not be displayed clearly.
- Vertical lines may be seen in objects on the screen. This is due to strong reflected light from the bumper. This is not a malfunction.
- The screen may flicker under fluorescent light. This is not a malfunction.
- The colors of objects on the RearView Monitor may differ somewhat from those of the actual object
- When the contrast of objects is low at night, pressing the SETTING button or [
![]](https://www.nisentra.com/images/books/1/4/index.9.gif)
] button may not change the brightness. - Objects on the monitor may not be clear in a dark place or at night.
- If dirt, rain or snow attaches to the camera, the RearView Monitor may not display objects.
Clean the camera.
- Do not use body wax on the camera window.
If body wax does get on the cam
Download Manual