iPod®* player operation without Navigation System (if so equipped)
Connecting iPod®
| WARNING
Do not connect, disconnect or operate the USB device while driving. Doing so can be a distraction. If distracted you could lose control of your vehicle and cause an accident or serious injury. |
CAUTION
- Do not force the USB device into the USB port. Inserting the USB device tilted or up-side-down into the port may damage the port. Make sure that the USB device is connected correctly into the USB port.
- Do not grab the USB port cover (if so equipped) when pulling the USB device out of the port. This could damage the port and the cover.
- Do not leave the USB cable in a place where it can be pulled unintentionally.
Pulling the cable may damage the port.
Refer to your device manufacturer’s owner information regarding the proper use and care of the device.
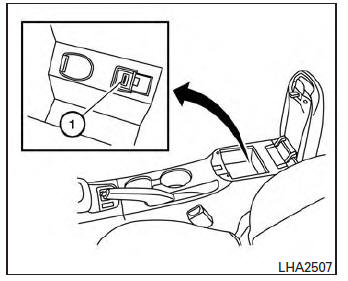
To connect an iPod® to the vehicle so that the iPod® can be controlled with the audio system controls and display screen, use the USB jack located in the center console 1 . Connect the iPod®-specific end of the cable to the iPod® and the USB end of the cable to the USB jack on the vehicle. If your iPod® supports charging via a USB connection, its battery will be charged while connected to the vehicle with the ignition switch in the ACC or ON position.
While connected to the vehicle, the iPod® may only be able to be operated by the vehicle audio controls.
To disconnect the iPod® from the vehicle, remove the USB end of the cable from the USB jack on the vehicle, then remove the cable from the iPod®.
* iPod® is a trademark of Apple Inc., registered in the U.S. and other countries.
Compatibility
The following models are compatible:
- iPod® 5th Generation (firmware version 1.3 or later)
- iPod® Classic (80GB) (firmware version 1.1.2PC or later)
- iPod® Classic (120GB) (firmware version 2.0.1PC or later)
- iPod® nano - 1st generation (firmware version 1.3.1 or later)
- iPod® nano - 2nd generation (firmware version 1.1.3 or later)
- iPod® nano - 3rd generation (firmware version 1.1.3PC or later)
- iPod® nano - 4th generation (firmware version 1.0PC or later)
- iPod® nano - 5th generation (8GB) (firmware version 1.0.2PC or later)
- iPod® nano - 5th generation (16GB) (firmware version 1.0.1PC or later)
- iPod® nano - 6th generation (8GB) (firmware version 1.2PC or later)
- iPod® nano - 6th generation (8GB) (firmware version 1.1PC or later)
- iPod® Touch - 1st generation (firmware version 2.2.1 or later)
- iPod® Touch - 2nd generation (firmware version 2.2.1 or later)
- iPod® Touch - 3rd generation (firmware version 3.1.3 or later)
- iPod® Touch - 4th generation (firmware version 4.3.5 or later)
- iPhone® 3G (firmware version 4.1 or later)
- iPhone® 3GS (firmware version 4.3 or later)
- iPhone® 4 (firmware version 5.0 or later)
- iPhone® 4S (firmware version 5.1 or later)
- iPad® (firmware version 4.3.2 or later)
- iPad® 2 (firmware version 4.3.3 or later)
Make sure that your iPod® firmware is updated to the version indicated above.
Audio main operation
Place the ignition switch to the ACC or ON position. Then, press the CD·AUX or iPod® MENU button repeatedly to switch to the iPod® mode.
If the audio system is turned off while the iPod® is playing, the iPod® plays when the audio system is turned back on.
If the audio system is off, pressing the CD·AUX or iPod® MENU button turns the audio system on and plays the iPod®.
If the audio system is on, the audio system automatically begins playing tracks from the iPod® when it is plugged into the jack.
iPod® MENU button:
Press the iPod® MENU button while the iPod® is connected to show the iPod® operation menu on the audio display. Scroll through the menu list using the TUNE·SCROLL control dial. Press ENTER to select a menu item. Items in the iPod® menu appear on the display in the following order:
- Now playing
- Playlists
- Artists
- Artists
- Songs
- Podcasts
- Genres
- Composers
- Audiobooks
- Shuffle songs
For more information about each item, see the iPod® Owner’s Manual.
 SEEK/CAT buttons:
Press the SEEK/CAT buttons  or
or
 to
to
skip backward or forward one track.
Press and hold the SEEK/CAT buttons
or  for 1.5 seconds while a track
is playing to reverse or fast forward the track being played.
The track plays at an increased speed while reversing or fast forwarding. When the button is released, the track returns to normal play speed.
REPEAT (RPT):
When the RPT button is pressed while a track is being played, the play pattern can be changed as follows:
Repeat Off → 1 Track Repeat → All Repeat → Repeat Off
1 Track Repeat: the current track will be repeated.
All Repeat: all songs in the current list are repeated.
Repeat Off: no repeat play pattern is applied.
RANDOM (RDM):
When the RDM button is pressed while a track is being played, the play pattern can be changed as follows: Shuffle Off → Track Shuffle → Album Shuffle → Shuffle Off
Track Shuffle: the tracks in the current list will be played randomly.
Album Shuffle: the albums in the current list will be played randomly.
Shuffle Off: no random play pattern is applied.
BACK button:
When the BACK button is pressed, it returns to the previous menu.
iPod®* player operation with Navigation System (if so equipped)
Connecting iPod®
| WARNING
Do not connect, disconnect or operate the USB device while driving. Doing so can be a distraction. If distracted you could lose control of your vehicle and cause an accident or serious injury. |
CAUTION
- Do not force the USB device into the USB port. Inserting the USB device tilted or up-side-down into the port may damage the port. Make sure that the USB device is connected correctly into the USB port.
- Do not grab the USB port cover (if so equipped) when pulling the USB device out of the port. This could damage the port and the cover.
- Do not leave the USB cable in a place where it can be pulled unintentionally.
Pulling the cable may damage the port.
Refer to your device manufacturer’s owner information regarding the proper use and care of the device.
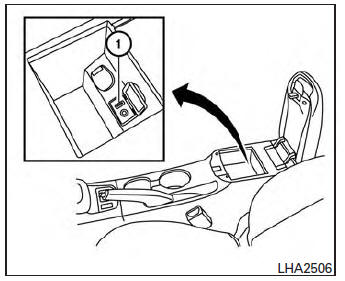
To connect an iPod® to the vehicle so that the iPod® can be controlled with the audio system controls and display screen, use the USB jack located in the center console 1 . Connect the iPod®-specific end of the cable to the iPod® and the USB end of the cable to the USB jack on the vehicle. If your iPod® supports charging via a USB connection, its battery will be charged while connected to the vehicle with the ignition switch in the ACC or ON position.
While connected to the vehicle, the iPod® may only be able to be operated by the vehicle audio controls.
To disconnect the iPod® from the vehicle, remove the USB end of the cable from the USB jack on the vehicle, then remove the cable from the iPod®.
* iPod® is a trademark of Apple Inc., registered in the U.S. and other countries.
Compatibility
The following models are compatible:
- iPod® Classic 5th generation (firmware version 1.3.0 or later)
- iPod® Classic 6th generation (firmware version 2.0.1 or later)
- iPod® Classic 7th generation (firmware version 2.0.4 or later)
- iPod® Touch 2nd generation (firmware version 4.2.1 or later)*
- iPod® Touch 3rd generation (firmware version 5.1 or later)
- iPod® Touch 4th generation (firmware version 5.1 or later)
- iPod® nano - 1st generation (firmware version 1.3.1 or later)
- iPod® nano - 2nd generation (firmware version 1.1.3 or later)
- iPod® nano - 3rd generation (firmware version 1.1.3 or later)
- iPod® nano - 4th generation (firmware version 1.0.4 or later)
- iPod® nano - 5th generation (firmware version 1.0.2 or later)
- iPod® nano - 6th generation (firmware version 1.1 or later)
- iPhone® 3G (firmware version 4.2.1 or later)
- iPhone® 3GS (firmware version 5.1 or later)
- iPhone® 4 (firmware version 5.1 or later)
- iPhone® 4S (firmware version 5.1 or later)
* Some features of this iPod® may not be fully functional.
Make sure that your iPod® firmware is updated to the version indicated above.
Audio main operation
Place the ignition switch in the ACC or ON position. Press the AUX button repeatedly to switch to the iPod® mode.
If the system has been turned off while the iPod® was playing, pressing the VOL/ON·OFF control knob will start the iPod®.
AUX button:
When the AUX button is pressed with the system off and the iPod® connected, the system will turn on. If another audio source is playing and the iPod® is connected, press the AUX button repeatedly until the center display changes to the iPod® mode.
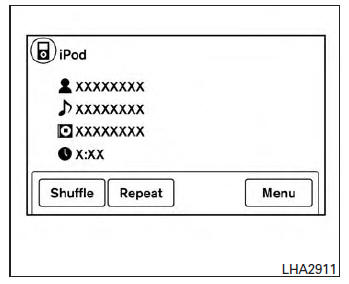
The interface for iPod® operation shown on the vehicle’s audio system display screen is similar to the iPod® interface. Use the touch-screen, BACK button or the scrolling knob to navigate the menus on the screen.
When the iPod® is playing, touch the “Menu” key to bring up the iPod® interface.
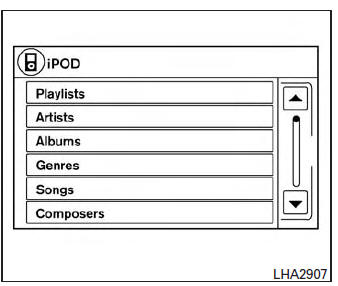
Depending on the iPod® model, the following items may be available on the menu list screen.
For further information about each item, see the iPod® Owner’s Manual.
- Playlists
- Artists
- Albums
- Genres
- Songs
- Composers
- Audiobooks
- Podcasts
Shuffle and repeat play mode:
While the iPod® is playing, the play pattern can be altered so that songs are repeated or played randomly.
Shuffle:
Touch the “Shuffle” key to apply a random play pattern to the iPod®. When the Shuffle mode is active, the text is highlighted. To cancel Shuffle mode, touch the “Shuffle” key again until the text is no longer highlighted.
Repeat:
Touch the “Repeat” key to apply a repeat play pattern to the iPod®. When the repeat mode is active, the text is highlighted. To cancel Repeat mode, touch the “Repeat” key again until the text is no longer highlighted.
 Seek buttons:
Press the seek button  or
or
 to skip
backward or forward one track.
Press and hold the seek button  or
or

for 1.5 seconds while a track is playing to reverse or fast forward the track being played. The track plays at an increased speed while reversing or fast forwarding. When the button is released, the track returns to normal play speed.
Scrolling menus:
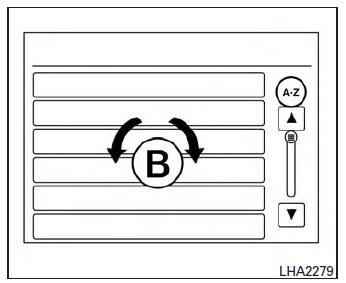
While navigating long lists of artists, albums or songs in the music menu, it is possible to scroll the list by the first character in the name. To activate character indexing, touch the “A-Z” key in the upper right corner of the screen. Turn the TUNE knob to choose the number or letter to jump to in the list and then press the AUDIO button.
Download Manual