CD care and cleaning
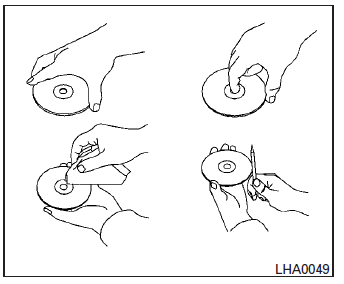
- Handle a CD by its edges. Do not bend the disc. Never touch the surface of the disc.
- Always place the discs in the storage case when they are not being used.
- To clean a disc, wipe the surface from the center to the outer edge using a clean, soft cloth. Do not wipe the disc using a circular motion.
- Do not use a conventional record cleaner or alcohol intended for industrial use.
- A new disc may be rough on the inner and outer edges. Remove the rough edges by rubbing the inner and outer edges with the side of a pen or pencil as illustrated.
Steering wheel switch for audio control (if so equipped)
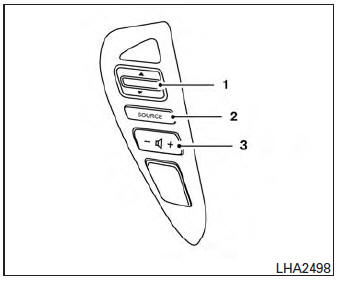
- Tuning switch
- Power on and SOURCE select switch
- Volume control button
The audio system can be operated using the controls on the steering wheel.
POWER on switch
With the ignition switch in the ACC or ON position, push the SOURCE switch to turn the audio system on.
SOURCE select switch
Push the source select switch to change the mode in the following sequence: AM → FM1 → FM2 → XM1 (satellite radio, if so equipped)→XM2 (satellite radio, if so equipped) →XM3 (satellite radio, if so equipped)→CD*→ USB/iPod®* (if so equipped)→Bluetooth® Audio* → AUX* → AM.
* These modes are only available when compatible media storage is inserted into the device or connected to the system.
Volume control switch
Push the volume control switch to increase or decrease the volume.
 Tuning switch
While the display is showing a map or audio screen, tilt the Tuning switch upward or downward to select a station, track, CD or folder. For most audio sources, tilting the switch up/down for more than 1.5 seconds provides a different function than a tilting up/down for less than 1.5 seconds.
AM and FM:
- Tilt up/down for less than 1.5 seconds to increase or decrease the preset station.
- Tilt up/down for more than 1.5 seconds to seek up or down to the next station.
XM/SXM (if so equipped):
- Tilt up/down for less than 1.5 seconds to increase or decrease the preset station.
- Tilt up/down for more than 1.5 seconds to go to the next or previous category.
iPod® (if so equipped):
- Tilt up/down for less than 1.5 seconds to increase or decrease the track number.
- Tilt up/down for more than 1.5 seconds to fast forward or rewind the current track.
CD:
- Tilt up/down for less than 1.5 seconds to increase or decrease the track number.
- Tilt up/down for more than 1.5 seconds to increase or decrease the folder number (if playing compressed audio files) or to fast forward or rewind the current track.
USB (if so equipped):
- Tilt up/down for less than 1.5 seconds to increase or decrease the track number.
- Tilt up/down for more than 1.5 seconds to fast forward or rewind the current track.
Bluetooth® Audio (if so equipped):
- Tilt up/down for less than 1.5 seconds to skip ahead or back to the next song.
- Tilt up/down for more than 1.5 seconds to reverse or fast forward the current track.
Pandora® Audio (if so equipped):
- Tilt up for less than 1.5 seconds to input “thumbs up” for the current song.
- Tilt down for less than 1.5 seconds to input “thumbs down” for the current song.
- Tilt up for more than 1.5 seconds to skip to the next song (if the maximum of six skips per station per hour has not been exceeded).
Antenna
Window antenna
The antenna pattern is printed inside the rear window.
CAUTION
- Do not place metalized film near the rear window glass or attach any metal parts to it. This may cause poor reception or noise.
- When cleaning the inside of the rear window, be careful not to scratch or damage the rear window antenna.
Lightly wipe along the antenna with a dampened soft cloth.
Download Manual