Parking
Vehicle features and options
This chapter describes model-specific equipment, systems, and functions that are currently available, or may become available in the future, even if they are not present in the vehicle.
Additional information:
Vehicle equipment.
Parking assistance systems
General information
The parking assistance systems include different individual systems. The individual systems help the driver when parking, maneuvering, or reversing by providing various assistance functions, sensors, and camera views.
Additional information:
Rearview camera.
Automatic camera perspective.
Side view.
3D view.
Car wash view.
Panorama View.
Door opening angle.
Remote 3D View.
Park Distance Control.
Active Park Distance Control.
Automatic Parking Assistant.
Back-up Assistant.
Safety information

Observe surrounding traffic and adapt driving style

Overview
Button in the vehicle


Park assistance button

Panorama View
Sensors
The parking assistance systems are controlled by the following sensors:
Ultrasonic sensors in the front/rear bumpers.
Ultrasonic sensors, side.
Radar sensors, side, front.
Radar sensors, side, rear.
Front camera.
Top view cameras.
Rearview camera.
Additional information:
Sensors of the vehicle.
Operating concept
The camera-based individual systems are operated with the function bars on the control display. The camera views can be viewed by selecting the appropriate icon.
In the Parking menu, some parking assistance systems can be configured individually.
Some parking assistance systems can be started by voice control, e.g., driving in/out of a parking space with the Automatic Parking Assistant.
Additional information:
BMW Intelligent Personal Assistant.
Calling up Park menu
Via Parking Assistant button
Press the button.

"Settings"
Select the desired settings.
Via iDrive
 Apps menu
"Vehicle"
"Driving settings"
"Driver Assistance"
"Parking and maneuvering"
Select the desired settings.
Display
Principle
Animation: parking view

With the Park Distance Control display and various camera views, the parking assistance systems help you park, maneuver, and reverse your vehicle.
General information
Depending on the equipment, one or more cameras capture the area from different selectable perspectives.
Depending on the view, the vehicle's surroundings or a part of it is depicted.
Depending on national-market version, the automatic camera perspective or the rearview camera is displayed.
Turning display on/off
General information
The parking assistance systems view switches off automatically when driving forwards or if a certain distance or speed is exceeded.
With reverse
When drive-ready state is switched on, the display is automatically switched on if selector lever position R is engaged.
Via Parking Assistant button
Press the button.
Display on the control display
General information
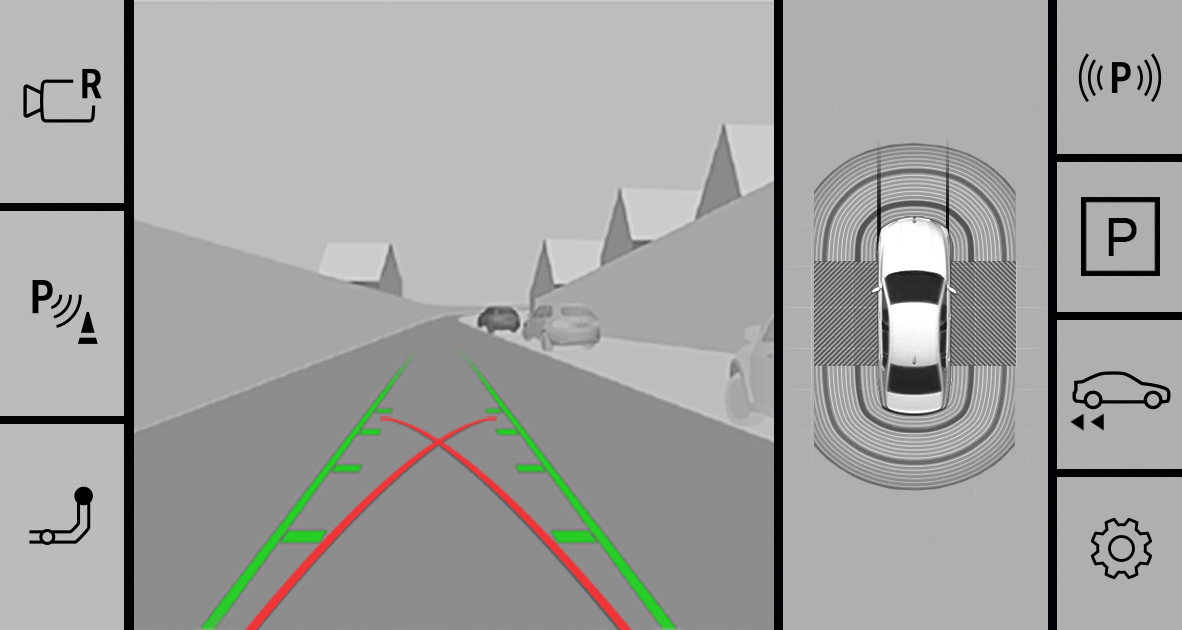
Depending on vehicle equipment and on the activated parking assistance system, the control display will vary.
Without Parking Assistant Plus
1
2
3
4
1
Toolbar, left
2
Camera image
3
Vehicle top view
4
Toolbar, right
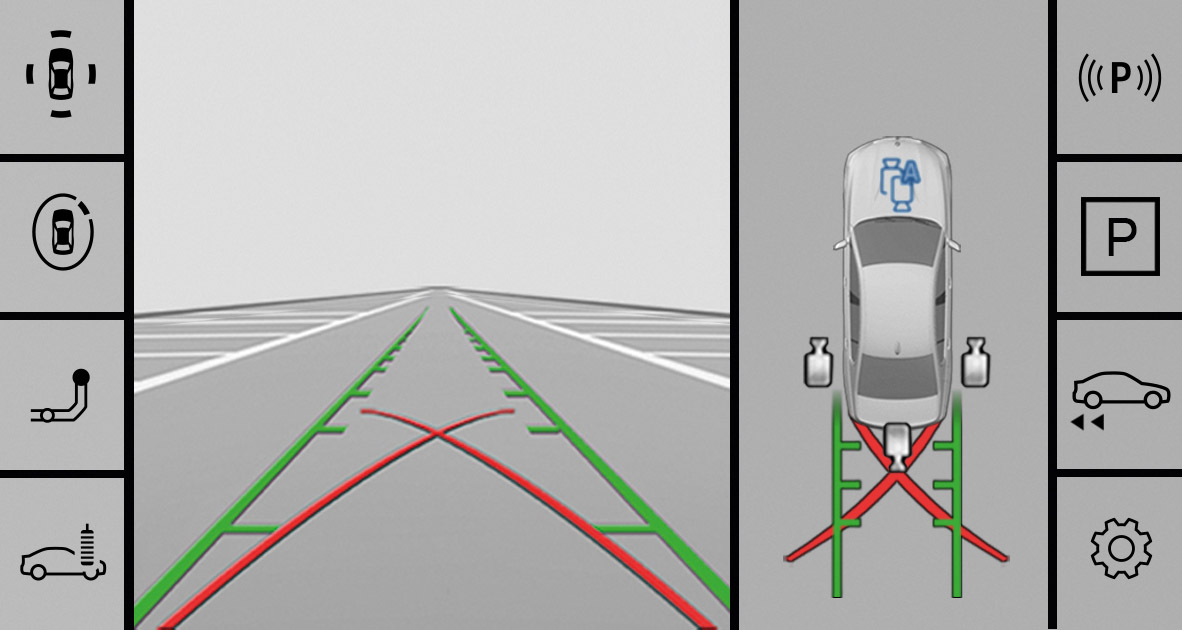
With Parking Assistant Plus
1
2
3
4
5
6
7
8
1
Toolbar, left
2
Camera image
3
Selection window
4
Automatic perspective
5
Side view, left
6
Rearview camera
7
Side view, right
8
Toolbar, right
Toolbar, left
Different views can be selected using the left toolbar depending on vehicle equipment:

"Rear view camera"
The view of the rearview camera is displayed.

"Only park. sensors"
The Park Distance Control view is displayed.

"Parking"
The view of different camera perspectives is displayed.

"3D view"
A three-dimensional view is displayed.

"Car wash"
The display of your own lane can be turned on for easier driving into the car wash.
Toolbar, right
The parking assistance functions are displayed in the right toolbar. The display may vary depending on vehicle equipment.
Status of the parking assistance systems.

"Autom. Parking"
Functions of the Automatic Parking Assistant.

"Back-Up Assistant"
Functions of the Back-up Assistant.
"Settings"
Settings in the Park menu.
Status of parking assistance systems
The status of active parking assistance systems is indicated by icons in the right-hand toolbar.
|
Icon |
Meaning |
|---|---|
|
|
No search for Automatic Parking Assistant offers. Automatic Parking Assistant has failed. |
|
|
Search for Automatic Parking Assistant offers is active. |
|
|
Automatic Parking Assistant: if the icon is green, the Automatic Parking Assistant is active. The system assumes vehicle control. Back-up Assistant: if the icon is green, the Back-up Assistant is active. The system takes over the steering. |

Additional displays
General information
Additional displays can be shown in the camera image of the display of the parking assistance systems, e.g., parking aid lines, to make parking and maneuvering easier.
Several additional displays can be active at the same time.
Turning additional displays on/off
Via Parking Assistant button
Enable the camera image.
"Settings"
Select the desired settings.
Parking aid lines
Pathway lines
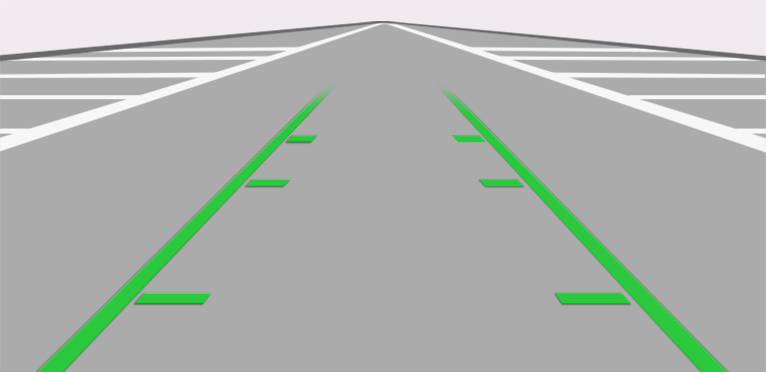
Pathway lines help you to estimate the space required when parking and maneuvering on level roads.
Lane lines are displayed in front of or behind the vehicle depending on the gear engaged.
The pathway lines are continuously adjusted to the steering movements depending on the steering-wheel angle.
Turning circle lines
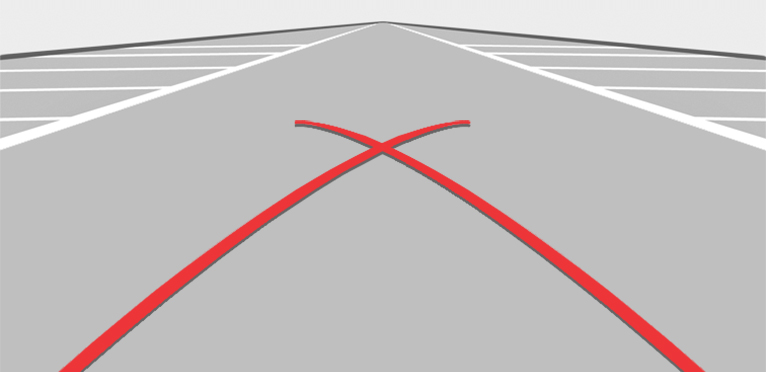
Turning circle lines can only be superimposed on the camera image together with pathway lines.
The lines show the course of the smallest possible turning circle on a level road.
Only one turning circle line is displayed after the steering wheel is turned past a certain angle.
Using parking aid lines
Position the vehicle so that the red turning circle line leads to within the limits of the parking space.
Turn the steering wheel to the point where the green pathway line covers the corresponding turning circle line.
Obstacle marking
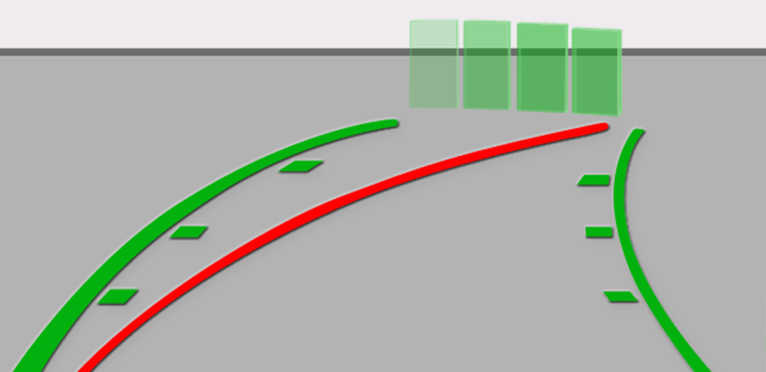
Obstacles are detected by the sensors.
The obstacles detected by the Park Distance Control are shown by marks in the camera image.
Colored gradients for the obstacle markings in green, yellow and red indicate the distances.
Functional limitations
The system can be used only to a limited extent in the following situations:
With a door open.
With open cargo area.
With exterior mirrors folded in.
Areas with gray hatching with an icon in the camera image identify areas that are currently not shown such as an open door.
System limits
Safety information
Observe the system limits
System limits of the sensors
Additional information:
Sensors of the vehicle.
Field of view
Because of the camera angle, the areas under the vehicle cannot be viewed by the cameras.
Detection of objects
Very low obstacles as well as high, protruding objects such as ledges may not be detected by the system.
The objects displayed on the control display may be closer than they appear. Do not estimate the distance to the objects on the control display.
Protruding cargo or a rear carrier can limit the detection range of the camera.
Malfunction
A camera failure is displayed on the control display.
The detection range of the failed camera is shown shaded on the control display.
Rearview camera
Principle
Animation: rearview camera
The rearview camera helps when reverse parking and maneuvering. The area behind the vehicle is shown on the control display.
Additional views can be shown on the display, e.g., parking aid lines and obstacle markings.
General information
Follow the information in the "Parking assistance systems" chapter.
Functional requirements
The trunk is fully closed.
The camera area is clean and clear.
Turning the rearview camera on/off
Turning the camera view on automatically
When drive-ready state is switched on, the rearview camera is automatically switched on if selector lever position R is engaged.
Turning the camera view off automatically
The rearview camera turns off automatically when driving forward or when a certain distance or speed is exceeded.
Turning the camera view on/off manually
Without Parking Assistant Plus
Press the button.
Select the icon on the left toolbar.
To exit the rearview camera view, select another camera view on the left toolbar.
With Parking Assistant Plus
Press the button.
 Select the icon in the selection window.
To exit the rearview camera view, select another camera view in the selection window.
Deactivated rearview camera
When the rearview camera is deactivated, for instance when the trunk is open, the camera image is displayed with gray shading.
Automatic camera perspective
Principle
The automatic camera perspective shows a steering-dependent view in the respective driving direction.
This perspective adapts to the respective driving situation.
General information
As soon as obstacles are detected, the view changes to a fixed display of the area in front of or behind the bumper, or switches to side Park Distance Control as necessary.
When the reverse gear is engaged, the automatic camera perspective is exited if necessary and the rearview camera view is displayed. If necessary, select the automatic camera perspective when reverse gear is engaged. The automatic camera perspective will then be maintained for the current parking operation.
Follow the information in the "Parking assistance systems" chapter.
Turning the automatic camera perspective on/off
Turning the camera view on/off automatically
When the parking assistance systems' display is turned on, automatic camera perspective is selected automatically.
 The icon in the selection window is selected automatically.
To exit the steering-dependent camera view, select another camera view in the selection window.
Turning the camera view on/off manually
Press the button.
Select the icon in the selection window.
To exit the steering-dependent camera view, select another camera view in the selection window.
Side protection
Principle
The side Park Distance Control is automatically displayed when the automatic camera perspective is turned on. The function shows obstacles located next to the vehicle.
General information
Follow the information in the "Parking assistance systems" chapter.
Display
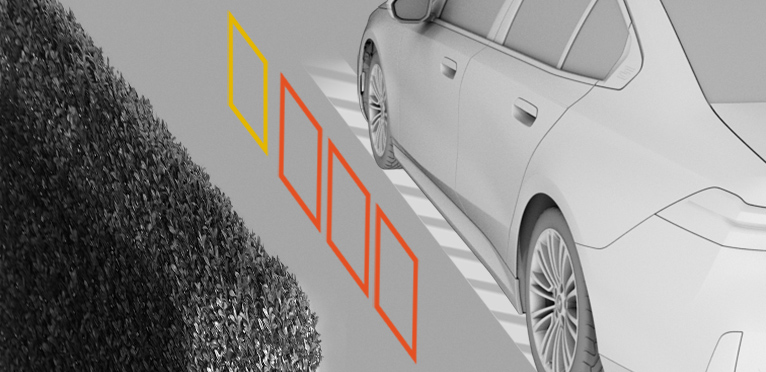
To protect the sides of the vehicle, obstacle markings are displayed on the sides of the vehicle.
No markings: no obstacles detected.
Color marks: warning against detected obstacles.
System limits
The system only displays stationary obstacles that were previously detected by sensors while passing them.
The system does not detect whether an obstacle moves later on. For this reason, at standstill, the marks are not shown anymore in the display after a certain time. The area next to the vehicle must be newly captured.
Side view
Principle
Side view shows the vehicle's side surroundings, making it easier to position the vehicle at the curb or with other obstacles on the side.
The side view looks from rear to front and, in case of danger, focuses automatically on possible obstacles.
General information
Follow the information in the "Parking assistance systems" chapter.
Turning the side view on/off
The selection window lets you choose the side view for the left or right side of the vehicle.
Press the button.
 Select the icon for the desired vehicle side in the selection window.
To exit the side view, select another camera view in the selection window.
3D view
Principle
With 3D view, a circle is displayed around the vehicle top view in the selection window.
Specified perspectives can be selected on the circle.
General information
The current perspective is marked with a camera icon.
Follow the information in the "Parking assistance systems" chapter.
Turning the 3D view on/off
Press the button.
"3D view"
To exit the 3D view, select another camera view on the left toolbar.
Car wash view
Principle
The car wash view helps when driving into a car wash.
General information
Follow the information in the "Parking assistance systems" chapter.
Turning the car wash view on/off
Press the button.
"Car wash"
To exit the car wash view, select a different camera view in the left toolbar.
Display
Your own lane is displayed for easier driving into a car wash.
This view can be used to position the vehicle correctly within the washing system guide rails.
In a car wash, the vehicle must be able to roll freely forward.
Additional information:
Rolling or pushing the vehicle.
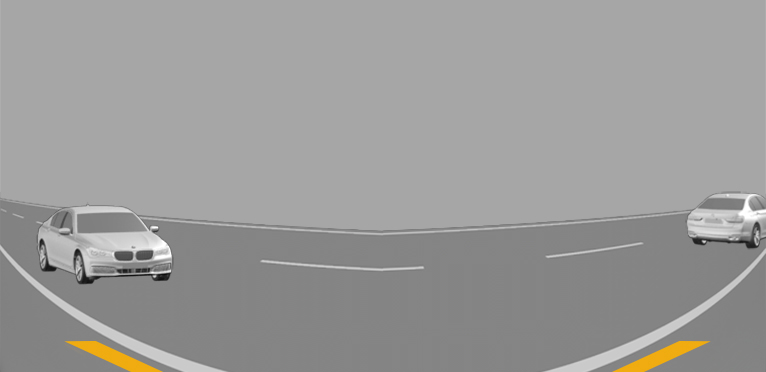
Panorama View
Principle
The panoramic view gives you an earlier view of crossing traffic at blind driveway exits and intersections.
General information
Road users concealed by obstacles to the left and right of the vehicle can only be detected relatively late from the driver's seat. The front camera and the rearview camera capture the area around the side of the vehicle to improve the view.
The camera image shows different levels of distortion in some areas and is thus not suitable for distance estimations.
Depending on vehicle equipment, the function can be used when driving forward or in reverse.
Follow the information in the "Parking assistance systems" chapter.
Sensors
The system is controlled by the following cameras:
Rearview camera.
Front camera.
Turning the panoramic view on/off
Press the button.
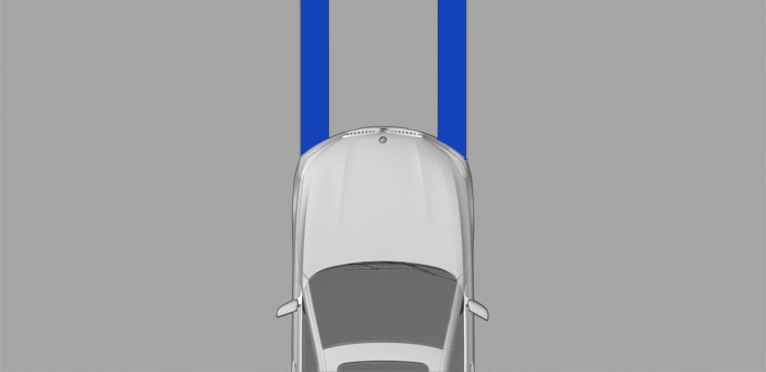
Display
Yellow lines on the screen display identify the bumpers of your own vehicle.
Depending on the engaged selector lever position, the camera view of the rearview camera or front camera will be displayed.
Automatic activation of panorama view
Principle
Positions at which panorama view should switch on automatically can be saved as activation points.
General information
Up to ten activation points can be stored.
The activation points can be used when driving forward and, depending on national-market version, when reversing.
Follow instructions in the Parking assistance systems chapter.
Functional requirements
A GPS signal must be received.
Depending on national-market version: A BMW ID or driver profile must be activated.
The direction of travel, selector lever position, and vehicle angle must correspond to a stored activation point.
Storing activation points
Drive your vehicle to the location where you want the system to turn on, then stop.
Press the button.
"Activation point"
The current position is displayed.
"Save activation point"
Activation points are stored with one of the following pieces of information if possible:
With the city/town.
With the city/town and the street.
With the GPS coordinates.
Using activation points
The use of activation points can be switched on and off.
Press the button.
"Settings"
"GPS-based"
Displaying activation points
Press the button.
"Manage points"
A list of all activation points is displayed.
Editing activation points
Press the button.
"Manage points"
A list of all activation points is displayed.
Select an activation point as needed.
Select the desired setting.
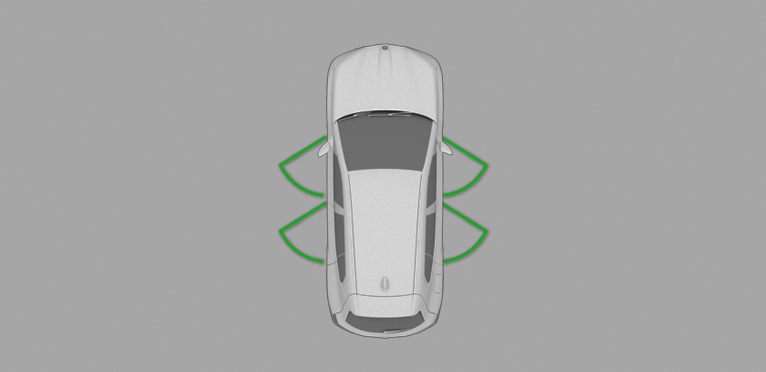
Door opening angle
Principle
Depending on vehicle equipment, the door opening angle display is shown automatically when stationary.
This display helps estimate how far the doors can be opened when parking.
If obstacle marking is activated, the parking view indicates fixed obstacles that obstruct the opening angles of the doors.
General information
Follow the information in the "Parking assistance systems" chapter.
Display
Manual transmission: the maximum opening angles of the doors are displayed after a short time when the vehicle is stationary.
M Steptronic Sport transmission: the maximum opening angles of the doors are displayed in selector lever position P.
System limits
The system does not provide a warning of approaching road users.
The vehicle's surroundings are distorted in the display for technical reasons.
Even if the door opening angle indicator on the control display does not overlap with any other objects, it is necessary to park carefully next to other objects.
Because of the perspective, higher, protruding objects may be closer than they appear on the control display.
Remote 3D View
Principle
The My BMW App and camera views in parking view such as automatic camera perspective enable you to display the vehicle’s surroundings on a mobile device.
The function displays a snapshot of the situation.
General information
For reasons of data protection, the function can only be used three times within two hours.
Follow the information in the "Parking assistance systems" chapter.
Sensors
The system is controlled by the following cameras:
Front camera.
Top view cameras.
Rearview camera.
Functional requirements
Data transfer must be activated.
Data protection.
The My BMW App must be installed on the mobile end device.
ConnectedDrive countries: a BMW ID with an existing ConnectedDrive account must be activated.
BMW ID/driver profiles.
Activating/deactivating Remote 3D View
The function can be activated or deactivated individually or together with other functions.
Apps menu
"Vehicle"
"System settings"
"Data privacy"
Select the desired setting.
After activation, Remote 3D View can be accessed using the My BMW App.
Functional limitations
The system may not be fully operational or may not be available in the following situations:
With a door or the cargo area open. Dark fields in the display indicate areas that are not recorded by the system.
With manually folded-in exterior mirrors.
When other camera functions are being performed in the vehicle.
The vehicle moves faster than walking speed.
In case of missing or weak Internet connection.
Park Distance Control
Principle
Animation: Park Distance Control
Park Distance Control assists with parking. Acoustic and visual warnings signal obstacles in front of or behind the vehicle.
Obstacles that are detected by the side ultrasonic sensors can also be reported.
General information
The range of the system, depending on obstacles and environmental conditions, is approx. 6 ft/2 m.
An acoustic warning sounds in case of an impending collision at a distance to the object of approx. 27 in/70 cm.
For objects behind the vehicle, the acoustic warning is issued as early as a distance to the object of approx. 5 ft/1.50 m.
Follow the information in the "Parking assistance systems" chapter.
Safety information
Observe surrounding traffic and adapt driving style
Avoiding fast driving with Park Distance Control
Sensors
The system is controlled by the following sensors:
Ultrasonic sensors in the front/rear bumpers.
Ultrasonic sensors, side.
Turning Park Distance Control on/off
Turning on the system automatically
The system switches on automatically in the following situations:
When drive-ready state is switched on when selector lever position R is engaged.
While approaching detected obstacles if the speed is lower than approx. 2.5 mph/4 km/h. The activation distance depends on the situation in question.
The automatic activation of detected obstacles can be activated or deactivated.
Apps menu
"Vehicle"
"Driving settings"
"Driver Assistance"
"Parking and maneuvering"
"Automatic PDC activation"
Turning off the system automatically
When driving forward, the system turns off automatically as needed when a certain distance or speed is exceeded.
Turning the system on/off manually
Press the button.
On: the LED illuminates.
Off: the LED goes out.
If the system is manually switched on when the reverse gear is engaged, the rearview camera image is displayed.
Depending on the national-market version, the system cannot be turned off manually when the reverse gear is engaged.
Acoustic warning
General information
An intermittent tone indicates when the vehicle is approaching an object. E.g., when an object is detected at the rear left of the vehicle, a sound is heard from the rear left speaker.
The shorter the distance to the object, the shorter the intervals of the intermittent tones.
When the distance to a detected object is less than approx. 8 in/20 cm, a continuous tone is sounded.
When there are objects in front of and behind the vehicle at the same time, at a distance smaller than approx. 8 in/20 cm, an alternating continuous tone will sound between the front and rear speakers.
The intermittent tones and the continuous tone are turned off when selector lever position P is engaged.
Depending on national-market version, the intermittent tones are switched off after a short time when the vehicle is stationary.
If an object approaches when the vehicle is stationary, the acoustic signal is reactivated.
Adjusting the volume
The volume of the acoustic warning can be adjusted.
Apps menu
"Vehicle"
"Driving settings"
"Driver Assistance"
"Parking and maneuvering"
"PDC signal volume"
Set the desired value.
Visual warning
General information
The approach to an object is displayed on the control display as soon as the system is activated.
Objects that are farther away are already displayed before a signal sounds.
Depending on the view, pathway lines, turning circle lines and obstacle markings are shown for a better estimation of the space required.
Depending on the equipment, the detection range of the sensors is represented by shaded annular surfaces. Green, yellow, and red markings indicate when obstacles are detected in the detection zone.
If vehicle is equipped with Cross Traffic Warning: A warning is also shown on the display for vehicles approaching from the side at the rear and front.
To protect the sides of the vehicle, obstacle markings are displayed on the sides of the vehicle.
Display
Depending on vehicle equipment, warnings may be displayed in front of, next to, and behind the vehicle.
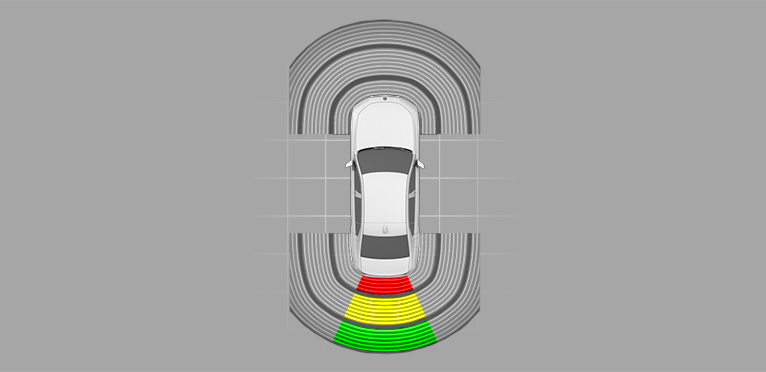
View behind vehicle.
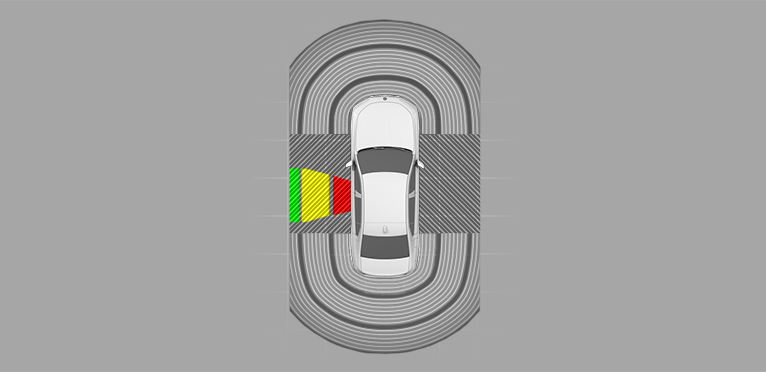
View next to vehicle.
Shaded area: detection range of sensors.
Gray shaded area: no obstacles were detected in the detection range.
Colored marks in shaded area: obstacles were detected in the detection range.
Shaded area interrupted: the area next to the vehicle has not yet been detected.
System limits
General information
The function for protecting the vehicle sides only shows stationary obstacles that were previously detected by the sensors when passing by.
The system does not detect whether an obstacle moves later on. When the vehicle is stationary, the gray shaded areas on the sides are hidden after a certain time. The area on the side of the vehicle must be newly captured.
Also follow the information on system limits in the "Parking assistance systems" chapter.
Unwarranted warnings
Reaching the system limits can cause unwarranted warnings.
To prevent unwarranted warnings, for instance in car washes, turn off automatic Park Distance Control activation on obstacle detection.
Malfunction

An icon is displayed on the control display.
Depending on the vehicle equipment: the detection range of the sensors is not displayed on the control display.
A Check Control message is displayed.
Park Distance Control malfunction. Have the vehicle checked by an authorized service center or another qualified service center or repair shop.
Active Park Distance Control
Principle
The Park Distance Control brake function initiates emergency braking if there is an acute risk of collision.
General information
Due to system limits, a collision cannot be prevented under all circumstances.
The function is available below walking speed when driving in reverse or rolling backward.
Pressing the accelerator pedal interrupts the brake intervention. Emergency braking is not performed.
After emergency braking to a stop, further creeping toward an obstacle is possible. Proceed with caution. To move forward, lightly press the accelerator pedal and release as needed.
If the accelerator pedal is depressed longer, the vehicle drives off. Manual braking is possible at any time.
Follow the information in the "Parking assistance systems" chapter.
Safety information
Observe surrounding traffic and adapt driving style
Sensors
The system is controlled by the following sensors:
Ultrasonic sensors in the rear bumpers.
Ultrasonic sensors, side.
Deactivating Active Park Distance Control temporarily
After emergency braking, the function can be temporarily deactivated on the control display.
"Obstacle detected. Emergency braking."
"Deactivate temporarily"
During continued driving in this surrounding situation, no further emergency braking will occur.
The function is automatically reactivated when Park Distance Control is switched on again.
Settings
It is possible to set which areas on the vehicle will be protected by the system.
Apps menu
"Vehicle"
"Driving settings"
"Driver Assistance"
"Parking and maneuvering"
"Active PDC emergency braking"
Select the desired setting.
Display

As soon as the system engages, an icon is displayed with a corresponding message.
System limits
General information
Follow the system limits in the "Parking assistance systems" chapter.
Automatic Parking Assistant
Principle
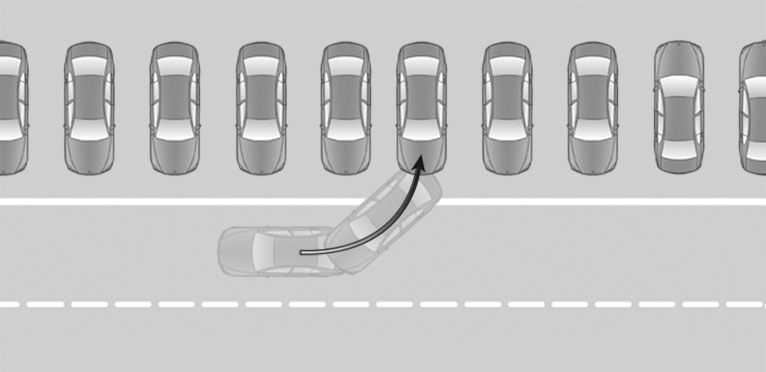
Animation: Automatic Parking Assistant
Automatic Parking Assistant provides support when parallel parking and parking transverse to the road.
The ultrasonic sensors measure both sides of the vehicle when driving slowly forward. Suitable parking spaces are calculated based on the objects detected, e.g., parking vehicles. The system status is displayed.
Manual transmission: The system calculates the best possible parking line for driving into parking spaces, and takes control of steering while parking.
M Steptronic Sport transmission: The system calculates the best possible parking line for driving into parking spaces, and takes control of the vehicle while parking.
The operating principle and operation of the system is divided into the following steps:
Parking space search.
Turning on.
Parking.
The parking manoeuver during parking is performed automatically.
General information
Follow the information in the "Parking assistance systems" chapter.
Safety information
Observe surrounding traffic and adapt driving style
Observe surrounding traffic and intervene where appropriate
Parking methods
Park Assist supports the following functions:
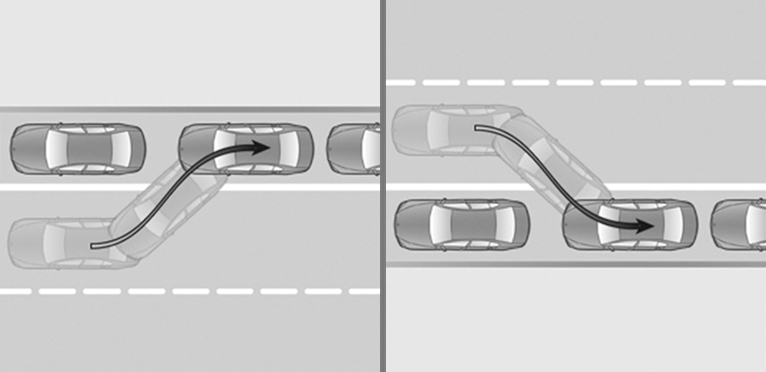
Parallel parking: reverse parking parallel to the road.
Perpendicular parking: reverse parking perpendicular to the road.
Sensors
The Automatic Parking Assistant is controlled by the following sensors:
Ultrasonic sensors in the front/rear bumpers.
Ultrasonic sensors, side.
Functional requirements
Measurement of parking spaces
Maximum speed while driving forward approx. 22 mph/35 km/h.
Maximum distance to row of parked vehicles: 5 ft/1.5 m.
Suitable parking space
Longitudinal parking:
Minimum length of a detected object, e.g., a parking vehicle: approx. 3 ft/1 m.
Minimum length of gap between two objects: own vehicle length plus approx. 2.6 ft/0.8 m.
Minimum depth: approx. 5 ft/1.5 m.
Perpendicular parking:
Minimum length of a detected object, e.g., a parking vehicle: approx. 3 ft/1 m.
Minimum width of the gap: own vehicle width plus approx. 2.3 ft/0.7 m.
Minimum depth: own vehicle length.
The depth of perpendicular parking spaces must be estimated by the driver. Due to technical limitations, the system is only able to approximate the depth of perpendicular parking spaces.
Parking operation
Doors and cargo area are closed.
M Steptronic Sport transmission: driver’s seat belt is fastened.
Turning the signal tone on/off
The signal tone for suitable parking spaces can be turned on and off.
Apps menu
"Vehicle"
"Driving settings"
"Driver Assistance"
"Parking and maneuvering"
"Sound when available"
Parking using the Automatic Parking Assistant
For the parking space search when driving past parked vehicles at a speed of up to approx. 22 mph/35 km/h and a distance of max. 5 ft/1.5 m.
 The parking space search is activated.
Press thebutton or engage reverse gear.
The parking assistance systems view is displayed.
The status of the parking space search and possible parking spaces are displayed on the control display.
Select suggested parking method.
 Green: the system takes control of the parking operation.
Follow the instructions on the control display.
Manual transmission: to achieve the best possible parking position, wait for the automatic steering operation after changing gear on the stationary vehicle.
M Steptronic Sport transmission: the speed can be reduced using the brake. Other interventions will cancel the system. At the end of the parking operation, selector lever position P is set.
Depending on national-market version, an intermittent or continuous tone sounds for Park Distance Control.
The end of the parking operation is indicated on the control display.
Adjust the parking position yourself, if needed.
Canceling Automatic Parking Assistant manually
The Automatic Parking Assistant can be canceled manually at any time, e.g.:
Press the button.
"Autom. Parking": select the icon on the control display.
Canceling Automatic Parking Assistant automatically
The system automatically cancels in situations such as the following:
When the driver grasps the steering wheel or takes over steering.
Possibly on snow-covered or slippery road.
When there are obstacles that are hard to overcome such as curbs.
When there are obstacles that suddenly appear.
With insufficient distances, which are indicated by Park Distance Control.
When a maximum number of parking attempts or the time taken for parking is exceeded.
When changing over to another function on the control display.
Manual transmission:
If a gear is selected that does not match the instruction on the control display.
If the vehicle speed exceeds approx. 6 mph/10 km/h.
The turn signal opposite to the desired parking side is switched on.
M Steptronic Sport transmission:
With open cargo area.
With the doors open.
When setting the parking brake.
When operating the accelerator pedal or the selector lever.
The brake pedal remains depressed for longer while the vehicle is at a standstill.
When unfastening the driver's seat belt.
A Check Control message is displayed where applicable.
Continuing the parking operation
An interrupted parking operation can be continued, if needed.
Restart the Automatic Parking Assistant and follow the instructions on the control display.
System limits
General information
Follow the system limits in the "Parking assistance systems" chapter.
No parking assistance
The Automatic Parking Assistant does not offer assistance in the following situations:
In tight curves.
For diagonal parking spaces.
For parking spaces that are only marked with lines on the ground. The system orients itself according to objects.
For special parking spaces, e.g., metered parking spaces with automatic locking mechanisms, or mechanical parking systems.
Functional limitations
The system may be limited in the following situations:
On bumpy road surfaces such as gravel roads.
On slippery ground.
On steep uphill or downhill grades.
With accumulations of leaves/snow in the parking space.
In case of changes to an already-measured parking space.
With ditches or edges, for instance an edge of a port.
Parking spaces that are not suitable may be detected or suitable parking spaces may not be detected at all.
Malfunction
A Check Control message is displayed.
The Automatic Parking Assistant has malfunctioned. Have the vehicle checked by an authorized service center or another qualified service center or repair shop.
Back-up assistant
Principle
Animation: Back-up Assistant
The Back-up Assistant helps when reversing, e.g., when pulling out of tight or unclear parking or road situations.
General information
The vehicle stores the driving movements of the last distance covered. This stored distance can be driven in reverse with automated steering.
The system takes over the steering. The driver must control the speed using the accelerator and brake pedals.
A maximum of 164 ft/50 m are stored.
Follow the information in the "Parking assistance systems" chapter.
Safety information
Observe surrounding traffic and adapt driving style
Observe surrounding traffic and intervene where appropriate
Functional requirements
Drive forward without interruption to store the distance covered.
To store the distance covered, do not drive faster than 22 mph/35 km/h.
Dynamic Stability Control is activated.
Driving in reverse with automated steering
Turn on drive-ready state.
With the vehicle at a standstill, press button or engage reverse gear.
The parking assistance systems view is displayed.
"Back-Up Assistant"
Follow the instructions on the control display where required.
Take your hands off the steering wheel and carefully drive in reverse with the accelerator pedal and the brake.
Green: the system takes control of steering.
When driving in reverse, observe the vehicle's surroundings.
In case of obstacles, stop immediately and take over control of the vehicle. Follow the instructions for Park Distance Control.
Right before the end of the stored distance covered, a signal tone will sound and a message is displayed.
Stop no later than when normal road traffic is reached and take control of the vehicle such as by shifting to forward gear.
Canceling the Back-up Assistant manually
The assisted reversing by the Back-up Assistant can be canceled manually:
Via touchscreen:"Back-Up Assistant"
Press the button.
Canceling the Back-up Assistant automatically
The system automatically cancels in situations such as the following:
When the driver grasps the steering wheel or takes over steering.
When shifting from reverse to another selector lever position.
During activation or intervention by driver assistance systems.
After an extended period of time when the vehicle is stationary.
When exiting the stored lane when reversing, for instance with maximum steering-wheel angle.
When the view on the control display is overlaid with messages.
In case of a slippery surface.
When the vehicle is rolling such as on a slope.
In case of changed ambient conditions.
If the vehicle speed exceeds approx. 6 mph/9 km/h.
System limits
The maximum speed when reversing is limited to approx. 6 mph/9 km/h.
A warning is issued at a speed of approx. 4 mph/7 km/h.
If the maximum speed is exceeded, the function is interrupted.
After driving a stored distance covered with major steering-wheel angles, the function of the system will be limited for the return trip.
Different influences can lead to side deviations when driving the stored distance covered in reverse. For example, this includes the following factors:
Steering movements when the vehicle is stationary while storing the distance covered.
The speed is not adapted to the distance covered.
Certain road characteristics such as gradients, inclines or slippery road surface.
Greatly deviating conditions when storing and driving the route, for instance other tires or changed ambient conditions like weather.
Also follow the information on system limits in the "Parking assistance systems" chapter.
Download Manual