Breakdown Assistance
Vehicle features and options
This chapter describes model-specific equipment, systems, and functions that are currently available, or may become available in the future, even if they are not present in the vehicle.
Additional information:
Vehicle equipment.
Hazard warning system

Hazard warning system button
The red light in the button flashes when the hazard warning system is turned on.
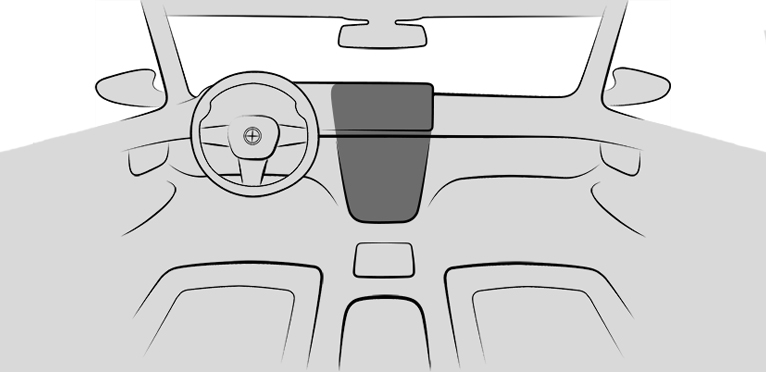
Warning triangle

The warning triangle is located on the inside of the tailgate.
Press on the release, arrow 1, and swivel the cover down, arrow 2.
First-aid kit
General information
Depending on the vehicle equipment and national-market version, the vehicle is equipped with a first-aid kit.
Some of the articles have a limited service life.
Check the expiration dates of the contents regularly and replace any expired items promptly.
Storage
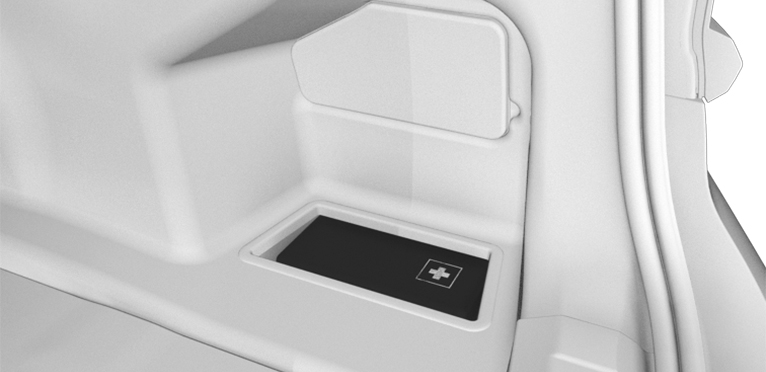
Storage for the first-aid kit is provided in the right storage compartment of the cargo area.
BMW Roadside Assistance
Principle
BMW Group Roadside Assistance can be contacted if assistance is needed in the event of a breakdown.
General information
In the event of a breakdown, data on the vehicle's condition is transmitted to the BMW Roadside Assistance.
There are various ways of contacting BMW Roadside Assistance.
Via additional text in the Check Control message.
Via a call with a mobile phone.
Via the BMW app.
Functional requirements
Active ConnectedDrive contract, equipment with intelligent emergency call or BMW ConnectedDrive services.
Cellular network reception.
Standby state is switched on.
Starting BMW Roadside Assistance manually
If the vehicle is equipped with Teleservices, support is first offered through Teleservice Diagnosis and, where applicable, then through Teleservice Help.
 Apps menu
"All apps"
"BMW Assist"
"BMW Roadside Assistance" or select the desired service.
Follow the displays on the control display. A voice connection is established.
Teleservice Diagnosis
Teleservice Diagnostics enables detailed vehicle data to be transmitted via cellular networks, which is necessary for vehicle diagnosis. This data is transmitted automatically. It may be necessary to approve this on the control display.
Teleservice Help
Depending on the country, Teleservice Help enables an in-depth diagnosis of the vehicle by BMW Roadside Assistance via wireless transmission.
You can launch Teleservice Help by requesting it through BMW Roadside Assistance.
Park the vehicle in a safe place.
Set the parking brake.
Turn on control display.
Consent to Teleservice Help.
BMW Accident Assistance
Principle
BMW Group Accident Assistance can be contacted if assistance is needed in the event of an accident.
General information
If the vehicle sensors detect a minor to moderately severe accident, which did not deploy any airbags, a Check Control message is displayed in the instrument cluster. In addition, a text message appears on the control display.
When BMW Accident Assistance is triggered, data on the vehicle's condition is sent to BMW.
Functional requirements
Active ConnectedDrive contract, equipment with intelligent emergency call or BMW ConnectedDrive services.
Cellular network reception.
Standby state is switched on.
Starting BMW Accident Assistance
If an accident is detected automatically
A text message relating to BMW Accident Assistance appears on the control display.
The connection can be established directly:
"Contact accident assistance"
The Check Control message for BMW Accident Assistance can also be called up from the stored Check Control messages for a certain length of time.
Additional information:
Check Control.
Starting BMW Accident Assistance manually
BMW Accident Assistance can also be contacted independently of the automatic accident detection function.
Apps menu
"All apps"
"BMW Assist"
"BMW Accident Assistance" or select the desired service.
Follow the displays on the control display. A voice connection is established.
Emergency Call
Intelligent emergency call
Principle
In case of an emergency, an emergency call can be triggered automatically by the system or manually.
General information
Depending on the vehicle equipment and national-market version, the vehicle is equipped with an Assist system.
Only press the SOS button in the headliner in an emergency.
The Intelligent Assist system establishes a connection with the BMW Response Center.
For technical reasons, the emergency call cannot be guaranteed under unfavorable conditions.
Overview
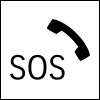
The SOS button is located in the headliner.
Functional requirements
Standby state is switched on.
The Assist system is functional.
The integrated SIM card in the vehicle has been activated.
Automatic triggering
Under certain conditions, for example if the airbags are deployed, an emergency call is automatically triggered immediately after an accident of corresponding severity. Automatic Collision Notification is not affected by pressing the SOS button.
Manual triggering
Tap the cover flap.
Press and hold the SOS button until the LED in the area of the button illuminates green.
The LED is illuminated green when an emergency call has been initiated.
If a cancel prompt appears on the control display, the emergency call can be aborted.
If the situation allows, wait in the vehicle until the voice connection has been established.
The LED flashes green when a connection to the BMW Response Center has been established.
The BMW Response Center then makes contact with the occupants of the vehicle and initiates further steps to help.
Even if you are unable to respond, the BMW Response Center can take further steps to help you under certain circumstances.
For this purpose, data that serves to determine the necessary rescue measures, for instance the current position of the vehicle when it can be determined, is transmitted to the BMW Response Center.
Even if the BMW Response Center is no longer heard through the loudspeakers, the BMW Response Center may still be able to hear the occupants of the vehicle.
The BMW Response Center ends the emergency call.
Malfunction
The function of the emergency call may be impaired.
The LED near the SOS button flashes for approximately 30 seconds. A Check Control message is displayed.
An emergency call may be disrupted in the following circumstances, among others:
Extended vehicle idle times.
Intense sunlight on vehicle roof.
Have the vehicle checked by an authorized service center or another qualified service center or repair shop.
Jump-starting
General information
If the battery is discharged, the engine can be started using the battery of another vehicle and two jumper cables. Only use jumper cables with fully insulated clamp handles.
Safety information

Do not touch live parts

Pay attention to the correct order during connection
Body contact between vehicles
Preparation
Check whether the battery of the other vehicle has a voltage of 12 volts. The voltage information can be found on the battery.
Switch off the engine of the assisting vehicle.
Switch off any electrical components in both vehicles.
Jump-start terminals
The jump-start terminals are located in the engine compartment.
Additional information:
For an overview.
Open the covers of the jump-start terminals.
Connecting the cables
Before you begin, switch off all unnecessary electronic systems/components such as the radio on the assisting and receiving vehicles.
Open the lid of the jump-start terminal.
Attach one terminal clamp of the positive jumper cable to the positive battery terminal, or to the corresponding jump-start terminal of the vehicle providing assistance.
Attach the terminal clamp on the other end of the cable to the positive battery terminal, or to the corresponding jump-start terminal of the vehicle to be started.
Attach one terminal clamp of the negative jumper cable to the negative battery terminal, or to the corresponding engine or body ground of assisting vehicle.
Attach the second terminal clamp to the negative battery terminal, or to the corresponding engine or body ground of the vehicle to be started.
Starting the engine
Never use spray fluids to start the engine.
Start the engine of the assisting vehicle and let it run for several minutes at an increased idle speed.
If the vehicle to be started has a diesel engine: let the engine of the assisting vehicle run for approx. 10 minutes.
Start the engine of the vehicle that is to be started in the usual way.
If the first attempt to start the engine is not successful, wait a few minutes before making another attempt in order to allow the discharged battery to recharge.
Let both engines run for several minutes.
Disconnect the jumper cables in the reverse order.
Check the battery and recharge, if needed.
Tow-starting and towing
Safety information
Switching off Forward Collision Mitigation and Cruise Control
Manual transmission
Safety information
Observe when lifting the vehicle
Towing or pushing the vehicle
A broken-down vehicle can be towed or pushed.
Follow the following instructions:
Make sure that the standby state is switched on; otherwise, the low beams, tail lights, turn signals, and wipers may be unavailable.
Do not tow the vehicle with the rear axle tilted, as the front wheels could turn.
When the engine is stopped, there is no power assistance. Consequently, more effort needs to be applied when braking and steering.
Larger steering wheel movements are required.
The towing vehicle must not be lighter than the vehicle being towed; otherwise, it will not be possible to control handling.
Do not exceed a towing speed of 30 mph/50 km/h.
Do not exceed a towing distance of 30 miles/50 km.
Additional information:
Rolling or pushing the vehicle.
Tow truck
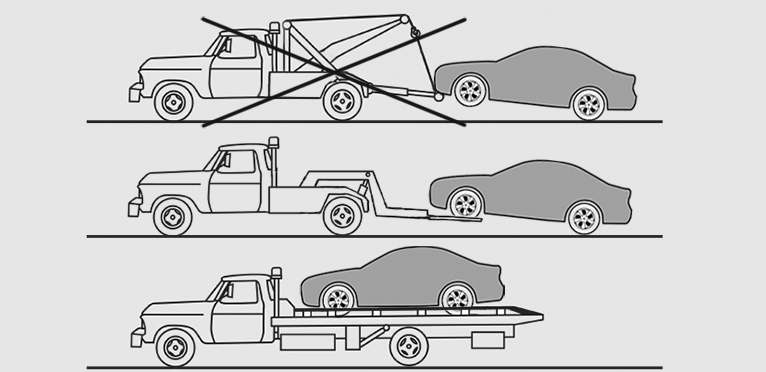
The vehicle should be transported with a tow truck with a so-called spectacle lift or on a loading platform.
M Steptronic Sport transmission: transporting the vehicle
{N66615}Transporting the vehicle
General information
Do not transport the vehicle by towing it.
Safety information
Do not have the vehicle towed
Observe when lifting the vehicle
Pushing the vehicle
To remove a broken-down vehicle from the hazardous area, push it for a short distance at a speed of no more than 6 mph/10 km/h.
Additional information:
Rolling or pushing the vehicle.
Tow truck
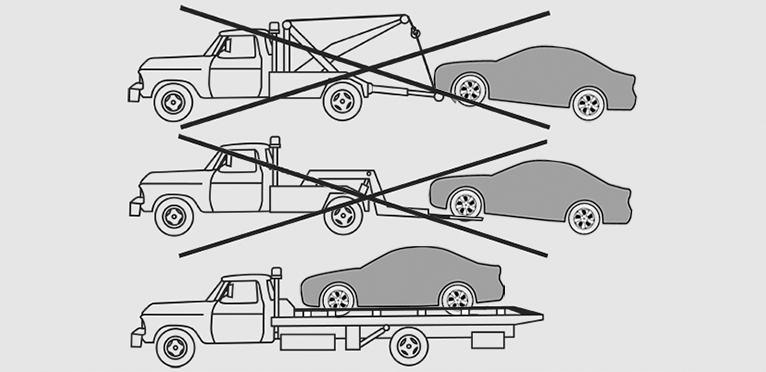
The vehicle should only be transported on a loading platform.
Towing other vehicles
General information
Switch on the hazard warning system, depending on local regulations.
If the electrical system has failed, clearly identify the vehicle being towed by placing a sign or a warning triangle in the rear window.
Safety information
Observe approved gross vehicle weight
Attaching the tow bar/tow rope correctly
Tow bar
The tow fittings used should be on the same side on both vehicles.
If it is impossible to avoid mounting the tow bar at an inclination, note the following:
Free movement is limited when cornering.
The tow bar will generate lateral forces if it is secured with an inclination.
Tow rope
Observe the following notes when using the tow rope:
Use nylon ropes or straps, which will enable the vehicle to be towed without jerking.
Make sure the tow rope is not twisted when fastening.
Check the attachment of the tow fitting and tow rope in regular intervals.
Do not exceed a towing speed of 30 mph/50 km/h.
Do not exceed a towing distance of 3 miles/5 km.
When driving off to tow the vehicle, make sure that the tow rope is taut.
Tow fitting
General information
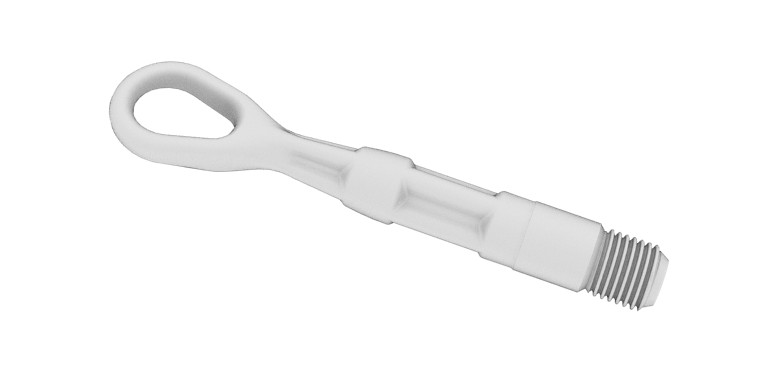
The screw-in tow fitting should always be carried in the vehicle.
The tow fitting can be screwed in at the front or rear of the vehicle.
The tow fitting is found in the onboard vehicle tool kit.
Observe the following notes when using the tow fitting:
Use only the tow fitting provided with the vehicle.
Turn the tow fitting at least 5 turns clockwise and screw it in as far as it will go. If necessary, tighten with a suitable object.
After use, unscrew the tow fitting counter-clockwise.
Use the tow fitting for towing on paved roads only.
Avoid lateral loading of the tow fitting, for instance do not lift the vehicle by the tow fitting.
Check the attachment of the tow fitting in regular intervals.
Additional information:
Onboard vehicle tool kit.
Safety information
Observe when using tow fitting
Screw thread for tow fitting
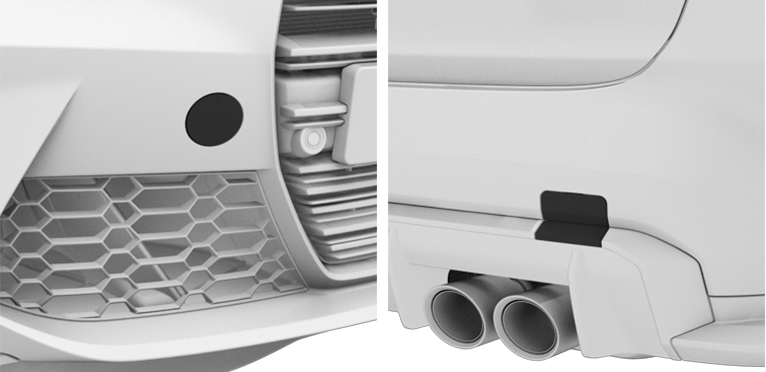
Press on the mark on the edge of the cover to push it out.
Tow-starting
Do not tow-start the vehicle.
Start the engine by jump-starting, if possible.
Have the cause of starting issues corrected by an authorized service center or another qualified service center or repair shop.
Additional information:
Jump-starting.
Download Manual