Child safety
|
|
|
When children are in the vehi- cle
Never leave children unattended in the vehicle, and never allow children to have or use the key. Children may be able to start the vehicle or shift the vehicle into neutral. There is also a danger that children may injure them- selves by playing with the win- dows, the moon roof (if equipped) or other features of the vehicle. In addition, heat build-up or extremely cold temperatures inside the vehicle can be fatal to children. |
 WARNING
48 1-2. Child safety
Points to remember: P.48 Child restraint system: P.50
When using a child restraint sys- tem: P.52
Child restraint system compati- bility for each seating position (for Puerto Rico): P.54
Child restraint system installa- tion method
anchorage (for Puerto Rico):
P.66
The laws of all 50 states of the
U.S.A. as well as Canada now require the use of child restraint systems.
|
|
|
When a child is riding
Observe the following precau- tions. Failure to do so may result in death or serious injury. |
 WARNING
Confirm with the operation manual enclosed with the child restraint system about the installation of the child restraint system.
|
Installation method |
Page |
|
|
Seat belt attachment |
|
P.59 |

|
Installation method |
Page |
|
|
Except for Puerto Rico: |
Except for Puerto Rico For Puerto Rico |
|
|
Child restraint LATCH |
||
|
anchors attachment |
||
|
P.64, 66 |
||
|
For Puerto Rico: |
||
|
ISOFIX lower anchor- |
||
|
age attachment |
52 1-2. Child safety
|
Installation method |
Page |
|
|
Except for Puerto Rico: Anchor brackets (for top tether strap) attach- ment |
Seats with an adjustable type head restraint: Except for Puerto Rico For Puerto Rico Seats with an integrated type head restraint: Except for Puerto Rico For Puerto Rico |
P.68, 70 |
|
For Puerto Rico: Top tether anchorage attachment |
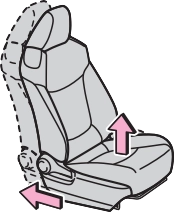
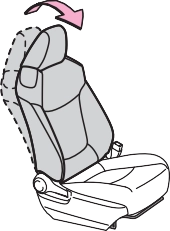
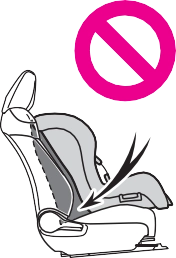
For the safety of a child, install a child restraint system to a rear seat. When installing a child restraint system to a front pas- senger seat is unavoidable, adjust the seat as follows and
install the child restraint system:
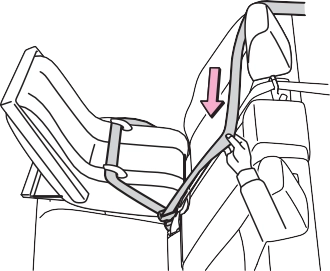
If there is a gap between the child seat and the seatback, adjust the
seatback angle until good contact is achieved.
Otherwise, put the head restraint in the upper most position.
|
|
|
|
|
|
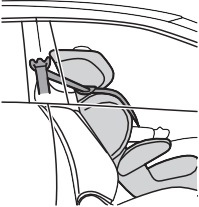
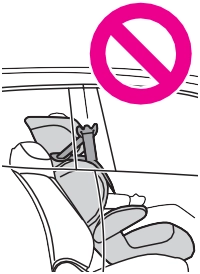
Do not allow the child to lean his/her head or any part of his/her body against the door or the area of the seat, front or rear pillars, or roof side rails from which the SRS side airbags or SRS curtain shield airbags deploy even if the child is seated in the child restraint sys- tem. It is dangerous if the SRS side and curtain shield airbags inflate, and the impact could cause death or serious injury to the child.
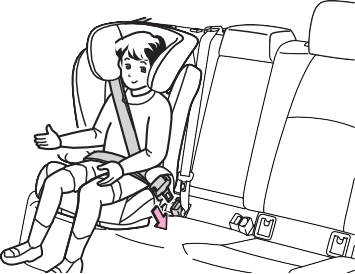
When a booster seat is installed, always ensure that the shoulder belt is positioned across the center of the child’s shoulder. The belt should be kept away from the child’s neck, but not so that it could fall off the child’s shoulder.
Use child restraint system suit- able to the age and size of the child and install it to the rear seat.
|
 WARNING
|
If the driver’s seat interferes with the child restraint system and prevents it from being attached correctly, attach the child restraint system to the right-hand rear seat.
Adjust the front passenger seat so that it does not interfere with the child restraint system.
|
Compatibility of each seating position with child restraint sys- tems (P.56) displays the type of child restraint systems that can be used and possible seat- ing positions for installation using symbols.
Also, the recommended child restraint system that is suitable for your child can be selected. Otherwise, check [Recom- mended child restraint systems and Compatibility table] for rec- ommended child restraint sys- tems. (P.58)
Check the selected child
restraint system together with the following [Before confirming the compatibility of each seating position with child restraint sys- tems].
1 Checking the child restraint system standards.
Use a child restraint system that conforms to UN(ECE) R44*1 or UN(ECE) R129*1, 2.
The following approval mark is displayed on child restraint systems which are con- formed.
Check for an approval mark attached to the child restraint system.
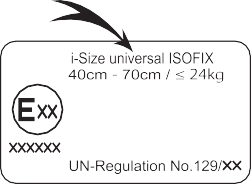
Example of the displayed regulation number
The weight range of the child
who is applicable for an UN(ECE) R44 approval mark is indicated.
UN(ECE) R129 approval mark*3
The height range of the child
who is applicable as well as available weights for an UN(ECE) R129 approval mark is indicated.
which of the following catego- ries the child restraint system is suitable.
Also, if there are any uncer- tainties, check the user’s guide included with the child restraint system or contact the retailer of the child restraint system.
|
|

*1: UN(ECE) R44 and UN(ECE)
R129 are U.N. regulations for child restraint systems.
*2: The child restraint systems men-
tioned in the table may not be available outside of the EU area.
*3: The displayed mark may differ depending on the product.
Suitable for “universal” cate- gory child restraint system fixed with the seat belt.

 Suitable for child restraint systems given on recom- mended child restraint sys- tems and compatibility table (P.58).
 Suitable for i-Size and ISO- FIX child restraint system.
 Includes a top tether anchor- age point.
*1: Move the front seat fully rear- ward. If the passenger seat height can be adjusted, move it to the upper most position.
 *2: Adjust the seatback angle to the most upright position. When installing a forward-facing child seat, if there is a gap between the child seat and the seatback, adjust the seatback angle until good contact is achieved.
*3: If the head restraint interferes with your child restraint system, and the head restraint can be removed, remove the head restraint.
Otherwise, put the head restraint in the upper most position.
|
Seating position |
|||||
|
Seat position number |
|
|
|
|
|
|
Vehicle with front pas- senger occupant detection system |
|||||
|
Passenger airbag indi- cator light |
|||||
|
ON |
OFF* |
||||
|
Seating position suitable for universal belted (Yes/No) |
Yes Forward fac- ing only |
Yes |
Yes |
Yes |
Yes |
|
i-Size seating position (Yes/No) |
No |
No |
Yes |
No |
Yes |
|
Seating position suitable for lateral fixture (L1/L2/No) |
No |
No |
No |
No |
No |
|
Suitable rearward facing fix- ture (R1/R2X/R2/R3/No) |
No |
No |
R1, R2X, R2 |
No |
R1, R2X, R2 |
|
Suitable forward facing fix- ture (F2X/F2/F3/No) |
No |
No |
F2X, F2, F3 |
No |
F2X, F2, F3 |
|
Suitable junior seat fixture (B2/B3/No) |
No |
No |
B2, B3 |
No |
B2, B3 |


*: When it is unavoidable to install a rear-facing child restraint system on the front passenger seat, a child restraint system can be installed it the PAS- SENGER AIR BAG OFF indicator lamp is lit.
If your child restraint system has no kind of “fixture” (or if you cannot find information in the table below), please refer to the child restraint system “vehicle list” for compatibility information or ask the retailer of your child seat.
|
Fixture |
Description |
|
F3 |
Full-height, forward-facing child restraint systems |
|
F2 |
Reduced-height forward-facing child restraint systems |
|
F2X |
Reduced-height forward-facing child restraint systems |
|
R3 |
Full-size, rearward-facing child restraint systems |
|
R2 |
Reduced-size, rearward-facing child restraint systems |
|
R2X |
Reduced-size, rearward-facing child restraint systems |
|
R1 |
Rearward-facing infant seat |
|
L1 |
Left lateral-facing (carrycot) infant seat |
|
L2 |
Right lateral-facing (carrycot) infant seat |
|
B2 |
Junior seat |
|
B3 |
Junior seat |
|
Mass groups |
Recom- mended Child Restraint System |
Seating position |
||||
|
|
|
|
|
|||
|
Vehicle with front pas- senger occupant detection system |
||||||
|
Passenger airbag indi- cator light |
||||||
|
ON |
OFF* |
|||||
|
0, 0+ Up to 28 lb. (13 kg) |
MIDI 2 (Yes/No) |
No |
No |
Yes |
No |
Yes |
|
I 20 to 39 lb. (9 to 18 kg) |
MIDI 2 (Yes/No) |
No |
No |
Yes |
No |
Yes |


*: When it is unavoidable to install a rear-facing child restraint system on the front passenger seat, a child restraint system can be installed it the PAS- SENGER AIR BAG OFF indicator lamp is lit.
able outside the LATIN area.
When securing some types of child restraint systems in rear seat, it may not be possible to properly use the seat belts in positions next to the child restraint without interfering with it or affecting seat belt effective- ness. Be sure your seat belt fits snugly across your shoulder and low on your hips. If it does not, or if it interferes with the child restraint, move to a different position. Failure to do so may result in death or serious injury.
|
|
|
A child restraint system for a small child or baby must itself be properly restrained on the seat with the lap portion of the lap/shoulder belt.
Install the child restraint system in accordance to the operation manual enclosed with the child restraint system.
For Puerto Rico: If the child restraint system on hand is not within the “universal” category
60 1-2. Child safety
(or the necessary information is not in the table), refer to the “Vehicle List” provided by the child restraint system maker for various possible installation positions, or check the compati- bility after asking the retailer of the child seat. (P.55, 56)
in lock mode. In lock mode, the belt cannot be extended.
|
|
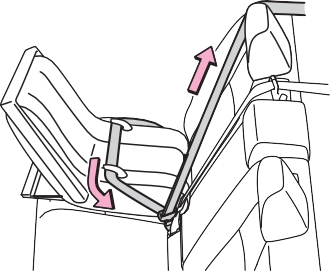
After the shoulder belt has retracted to a point where there is no slack in the belt, pull the belt to check that it cannot be extended.
|
|
1 If installing the child restraint system to the front passen- ger seat is unavoidable, refer to P.52for the front passenger seat adjustment.
Otherwise, put the head restraint in the upper most position. (P.136)
buckle. Make sure that the belt is not twisted.
|
|
|
|
After the shoulder belt has retracted to a point where there is no slack in the belt, pull the belt to
check that it cannot be extended.
Otherwise, put the head restraint in the upper most position. (P.136)
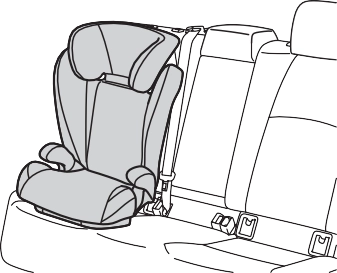
Booster type
|
|
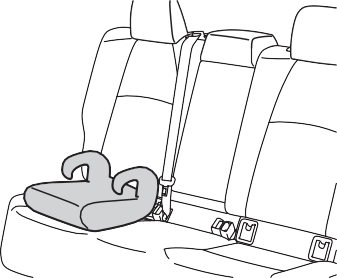
High back type
|
|
Check that the shoulder belt is cor- rectly positioned over the child’s shoulder and that the lap belt is as
|
|
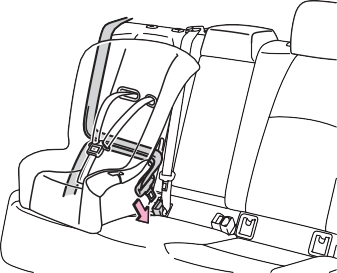
When releasing the buckle, the child restraint system may spring up due to the rebound of the seat cushion. Release the buckle while holding down the child restraint system.
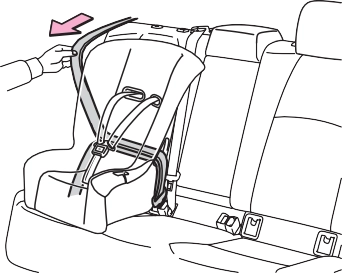
Since the seat belt automatically reels itself, slowly return it to the stowing position.
|
|
|
When installing a child restraint system
Observe the following precau- tions. Failure to do so may result in death or serious injury. |
 WARNING

LATCH anchors are provided for the outboard rear seat. (Marks displaying the location of the anchors are attached to the seats.)
Install the child restraint system in accordance to the operation manual enclosed with the child restraint system.
Otherwise, put the head restraint in the upper most position. (P.136)
With flexible lower attach- ments
The bars are installed behind the anchor covers.
For owners in Canada:
The symbol on a child restraint sys-
tem indicates  the presence of a lower connector system.
With rigid lower attachments
The bars are installed behind the anchor covers.
For owners in Canada:
The symbol on a child restraint sys-
tem indicates  the presence of a lower connector system.
There are no LATCH anchors behind the rear center seat.
However, the inboard LATCH anchors of the outboard seats, which are 15.6 in. (396 mm) apart, can be used if the child restraint system manufacturer’s instructions permit use of those anchors with the anchor spacing stated.
Child restraint systems with rigid lower attachments cannot be installed in the center seat. This type of child restraint system can only be installed in the out- board seat.
The LATCH system conforms to FMVSS225 or CMVSS210.2.
Child restraint systems conforming to FMVSS213 or CMVSS213 speci- fications can be used.
This vehicle is designed to conform to SAE J1819.
|
|
|
When installing a child restraint system
Observe the following precau- tions. Failure to do so may result in death or serious injury. When using the LATCH anchors, be sure that there are no foreign objects around the anchors and that the seat belt is not caught behind the child restraint system.
Follow all installation instruc- tions provided by the child restraint system manufacturer.
|
 WARNING
Lower anchorages are provided for the outboard rear seats. (Marks displaying the location of the anchorages are attached to the seats.)
Install the child restraint system in accordance to the operation manual enclosed with the child restraint system.
If the child restraint system on hand is not within the “universal” category (or the necessary infor- mation is not in the table), refer to the “Vehicle List” provided by the child restraint system maker for various possible installation positions, or check the compati- bility after asking the retailer of the child seat. (P.55, 56)
Otherwise, put the head restraint in the upper most position. (P.136)
With flexible lower attach- ments
The bars are installed behind the
anchorage covers.
2 Remove the anchorage cov- ers, and install the child restraint system to the seat.
The bars are installed behind the anchorage covers.
4 After installing the child restraint system, rock it back and forth to ensure that it is installed securely. (P.63)
There are no lower anchorages behind the rear center seat.
However, the inboard lower anchorages of the outboard seats, which are 15.6 in. (396 mm) apart, can be used if the child restraint system manufac- turer’s instructions permit use of those anchorages with the anchorage spacing stated.
Child restraint systems with rigid lower attachments cannot be installed in the center seat. This type of child restraint system can only be installed in the out- board seat.
Adjust the support leg and ISOFIX connectors as follows:
Anchor brackets are provided for each rear seat.
Use anchor brackets when fix- ing the top tether strap.
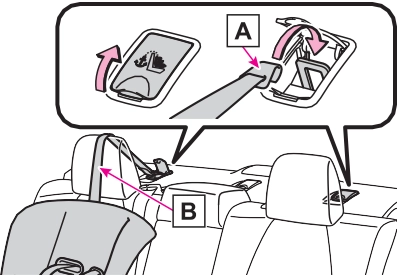
Seats with an adjustable type head restraint
|
|
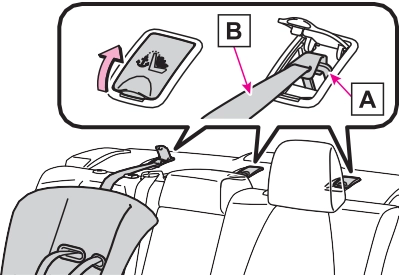
Anchor brackets Top tether strap
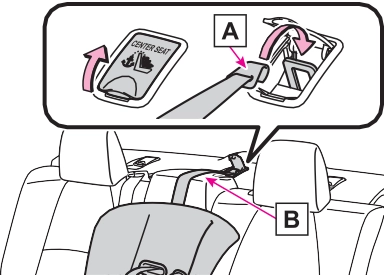
Seats with an integrated type head restraint
|
|
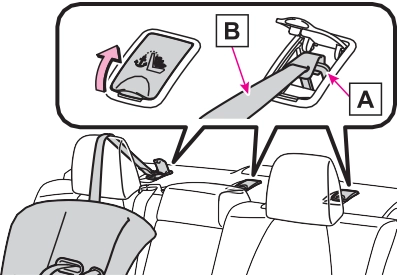
Anchor brackets Top tether strap
1-2. Child safety 69
Install the child restraint system in accordance to the operation manual enclosed with the child restraint system.
Rear outboard seats
If the head restraint interferes with your child restraint system, and the head restraint can be removed, remove the head restraint.
Otherwise, put the head restraint in the upper most position. (P.136)
Make sure the top tether strap is securely latched. (P.63)
When installing the child restraint system with the head restraint being raised, be sure to have the top tether strap pass underneath the head restraint.
Hook
Top tether strap
Seats with an integrated type head restraint
|
|
Hook
Top tether strap
Rear center seat
Latch the hook onto the anchor bracket and tighten the top tether strap.
Make sure the top tether strap is securely latched. (P.63)
|
|
Top tether strap
The LATCH system conforms to FMVSS225 or CMVSS210.2.
Child restraint systems conforming to FMVSS213 or CMVSS213 speci- fications can be used.
This vehicle is designed to conform to SAE J1819.


Top tether anchorages are pro- vided for each rear seat.
Use top tether anchorages when fixing the top strap.
Seats with an adjustable type head restraint
|
|
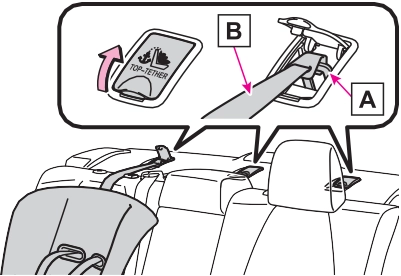
Top tether anchorages Top strap
Seats with an integrated type head restraint
|
|
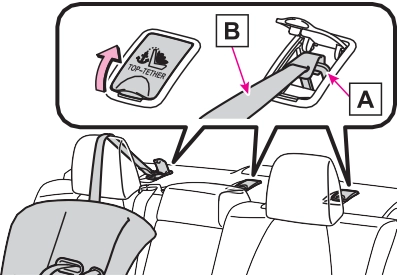
Top tether anchorages Top strap
Install the child restraint system in accordance to the operation manual enclosed with the child restraint system.
Rear outboard seats
1 Adjust the head restraint to the upmost position.
If the head restraint interferes with your child restraint system, and the head restraint can be removed, remove the head restraint.
Otherwise, put the head restraint in the upper most position. (P.136)
Make sure the top strap is securely latched. (P.63)
When installing the child restraint system with the head restraint being raised, be sure to have the top strap pass underneath the head restraint.
Hook Top strap
Seats with an integrated type head restraint
Hook Top strap
Rear center seat
Latch the hook onto the top tether anchorage and tighten the top strap.
Make sure the top strap is securely latched. (P.63)
|
|

|
|
|
When installing a child restraint system
Observe the following precau- tions. Failure to do so may result in death or serious injury. Firmly attach the top strap and make sure that the belt is not twisted.
Do not attach the top strap to anything other than the top tether anchorages.
After securing a child restraint system, never adjust the seat.
Follow all installation instruc- tions provided by the child restraint system manufacturer.
|
 WARNING
|
|
|
Outboard rear seats: When installing the child restraint sys- tem with the head restraint being raised, after the head restraint has been raised and then the top tether anchorage has been fixed, do not lower the head restraint.
|
 WARNING
|
|
|
Top tether anchorages
When not in use, make certain to close the lid. If it remains open, the lid may be damaged. |
 NOTICE
Download Manual