Tire Sealant and Inflator Kit
 WARNING: Do not use the inflator kit on run flat tires. This could cause loss of vehicle control. WARNING: Depending on the type and extent of tire damage, some tires can only be partially sealed or not sealed at all. Loss of tire pressure can affect vehicle handling, leading to loss of vehicle control. WARNING: Do not use the kit on a previously damaged tire, for example when it has been driven under inflated. This could cause loss of vehicle control, personal injury or death. WARNING: Do not use the inflator kit on run flat tires. This could cause loss of vehicle control. WARNING: Depending on the type and extent of tire damage, some tires can only be partially sealed or not sealed at all. Loss of tire pressure can affect vehicle handling, leading to loss of vehicle control. WARNING: Do not use the kit on a previously damaged tire, for example when it has been driven under inflated. This could cause loss of vehicle control, personal injury or death. |
If your vehicle does not have a spare wheel it has a tire sealant and inflator kit. The kit is in the left-hand side of the luggage compartment. Only use the kit supplied with your vehicle.
Note: The kit can only temporarily repair one tire puncture with a maximum puncture size of up to 0.24 in (6 mm).

| A B C D E F G Note: Make sure you regularly check the expiry date on the sealant bottle. |

- Gradually reduce the vehicle speed and stop your vehicle as soon as it is safe to do so.
- Apply the parking brake and switch the ignition off.
- Check for a punctured tire.
Note: Do not remove objects, for example nails or screws from a punctured tire.
Using the Tire Sealant and Inflator Kit
| WARNING: Check the sidewall of the tire prior to inflation. If there are any cracks, bumps or similar damage, do not attempt to inflate the tire. This could cause personal injury. WARNING: Watch the sidewall of the tire when inflating. If any cracks, bumps or similar damage appears, switch the compressor off and let the air out by means of the pressure relief valve. Do not continue driving with this tire. This could cause loss of vehicle control. WARNING: Do not stand directly beside the tire while the compressor is operating. This could cause personal injury if the tire bursts. WARNING: Do not leave the kit unattended when it is in use. Failure to follow this instruction could result in personal injury or death. WARNING: If the tire does not inflate to the recommended tire pressure within 15 minutes, stop and call roadside assistance. |
Note: The recommended tire pressures are on the tire label or safety certification label, located on the B-pillar, inside the driver's door
| WARNING: Do not run the engine when operating the air compressor unless the vehicle is outdoors or in a well-ventilated area. WARNING: The power plug may get hot after use and should be handled carefully when unplugging. |
To temporarily repair a punctured tire, do the following:
Note:
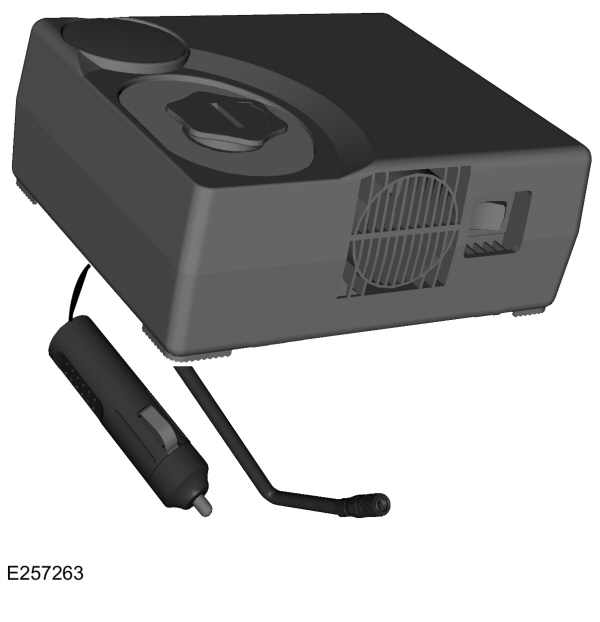
- Release the tire inflation pipe and the 12 volt DC power point connector from the underside of the compressor.

- Turn the sealant bottle access cap counterclockwise and remove it.
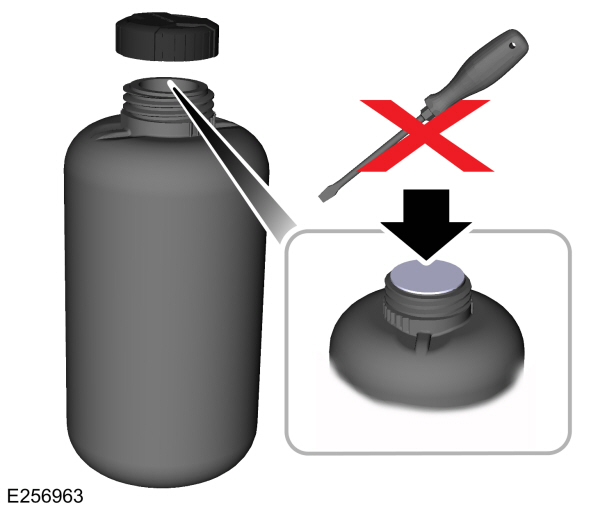
- Remove the sealant bottle cap. Do not pierce or remove the seal.

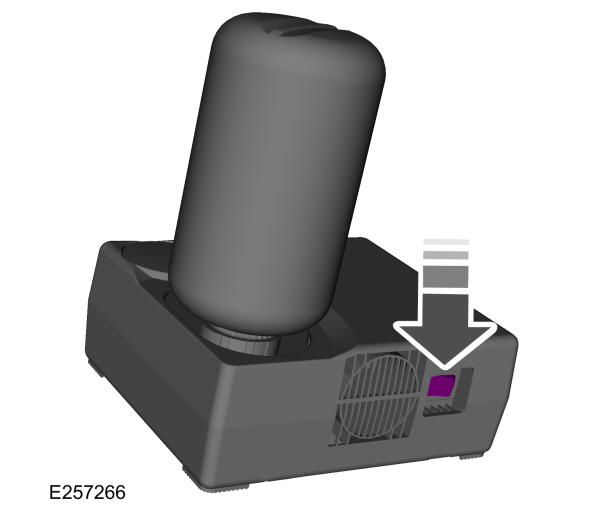
- Attach the sealant bottle to the compressor. Turn the sealant bottle clockwise until you feel a strong resistance.
Note: Attaching the sealant bottle to the compressor pierces the seal. Do not loosen the bottle as sealant could escape.

- Remove the tire valve dust cap and attach the tire inflation pipe.

- Plug the 12 volt DC power point connector into the 12 volt DC socket. See Auxiliary Power Points.
- Start the engine.
- Switch the compressor on.
- Inflate the tire to the recommended tire pressure shown on the Tire Label on the B pillar. Do not operate the compressor for more than 15 minutes continuously. Switch the compressor and the ignition off and check the current tire pressure with the pressure gauge.
Note: If the recommended tire pressure is not reached within 15 minutes, you may disconnect the compressor, slowly roll the vehicle forward by one car length to distribute the sealant within the tire, then restart the inflation process. If the recommended inflation pressure is still not reached, the tire could be damaged beyond a temporary repair. Stop and call roadside assistance.

- Remove the power plug from the 12 volt DC power point connector.
- Unscrew the pipe from the tire valve and put the protective cap back in place. Replace the valve cap on the tire valve.
Note: Some residual sealant fluid may drip or briefly spray out the pipe while you disconnect it. This is normal.
- Do not remove the sealant bottle from the compressor. This avoids leakage of residual sealant.
- Remove the warning label showing the maximum permissible speed 31.1 mph (50 km/h)from the side of the compressor and place it on top of the instrument panel or the center of the dash in the driver's field of view. Make sure the label does not obscure anything important.
- Store the kit, the bottle lid and cap safely in your vehicle. You need the kit again when you check the tire pressure after driving the vehicle a short distance.
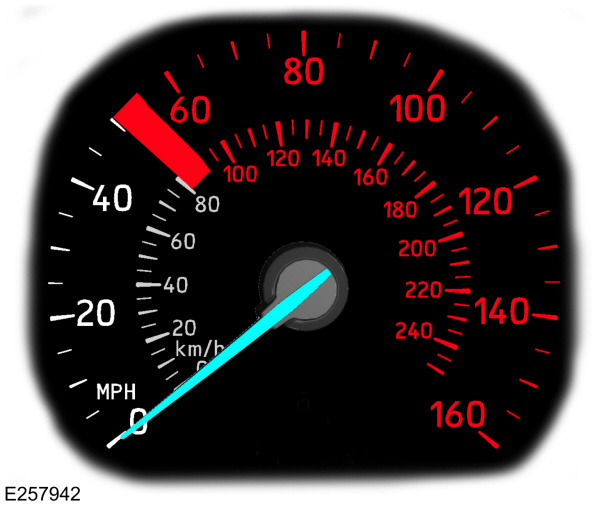
- Promptly drive the vehicle cautiously for 4 mi (6 km) to distribute the sealant evenly inside the tire. Do not exceed31.1 mph (50 km/h).
Note: If you experience any unusual vibration, ride disturbance or noise while driving, do not proceed to the second stage of this operation. Reduce your speed until you can safely pull off to the side of the road to call for roadside assistance.
- After4 mi (6 km) stop and check the tire pressure using the kit.
- Remove the valve cap from the tire valve and firmly screw the air compressor pipe onto the valve stem by turning clockwise.
- With the compressor off, the gauge of the kit displays the tire inflation pressure.
Note: If the tire pressure has dropped to 2 bar or below, the tire could be damaged beyond a temporary repair. Stop and call roadside assistance. Do not drive your vehicle.

- If necessary, turn on the compressor and adjust the tire to the recommended tire pressure. Check the tire pressure with the compressor turned off to get an accurate pressure reading.
- Unscrew the compressor pipe from the valve stem and reinstall the valve cap. Leave the sealant bottle attached to the compressor. Safely store the tire sealant and inflator kit in your vehicle.
After Using the Tire Sealant and Inflator Kit
| WARNING: If you experience heavy vibrations, unsteady steering behavior or noises while driving, reduce your speed gradually and stop your vehicle as soon as it is safe to do so. Recheck the tire and its pressure. If the tire pressure is less than 18.9 psi (1.3 bar) or if there are any cracks, bumps or similar damage visible, do not continue driving with this tire. This could cause loss of vehicle control. |
The kit only provides temporary mobility. Regulations concerning tire repair or replacement after using the kit could differ from country to country. We recommend you consult a tire specialist.
After using the kit:
- Do not drive your vehicle more than 124 mi (200 km) before repairing or replacing the punctured tire.
- Inform all other users of your vehicle that a tire was sealed using the kit. Make them aware of the special driving conditions that must be observed.
- Regularly check the tire pressure until the sealed tire is repaired or replaced by a tire specialist. Before the tire is removed from the rim, you must inform the tire specialist that the tire contains sealant.
- Take the kit to an authorized dealer to have the sealant bottle and the tire inflation pipe replaced.
Download Manual