Using the other interior features
Other interior features
1 To set the visor in the forward position, flip it down.
To set the visor in the side posi- tion, flip down, unhook, and swing it to the side.
To use the side extender, place the visor in the side position, then slide it backward.
Open the cover
The light turns on when the cover is opened.
When using electronic goods, make sure that the power consumption of all the connected power outlets is less than 120 W.
Type A (instrument panel) Open the lid.
Type B (back of the front center seatback) Open the lid.
Type C (back of the front center seatback) Open the lid.
Type D (inside of the console box)
Pull the knob up and lift the lid, and open the lid.
Type E (back of the console box) Open the lid.
Type F (back of the console box) Open the lid.
The engine switch is in ACC or ON.
P. 363
Disconnect electrical devices with charging functions, such as mobile battery packs.
If such devices are left connected, the engine switch may not be turned off normally.
The USB charging ports are for charging only. They are not designed for data transfer or other purposes.
Depending on the external device, it may not charge properly. Refer to the manual included with the device before using a USB charging port.
Open the lid.
The engine switch is in ACC or ON.
Depending on the connected external device, charging may occasionally be suspended and then start again. This is not a malfunction.
NOTICE
Do not use the USB charging ports for a long period of time with the engine stopped.
An assist grip (type A) installed on the ceiling can be used to support your body while sitting on the seat.
An assist grip (type B) installed on the pillar can be used when getting in or out of the vehicle and others.
Assist grip (type A) Assist grip (type B)
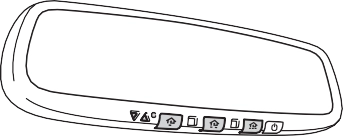
The HomeLink® wireless control system in your vehicle has 3 buttons
which can be programmed to operate 3 different devices. Refer to the programming methods on the following pages to determine the method which is appropriate for the device.
HomeLink® indicator light
Garage door operation indica- tors
Buttons
: If equipped
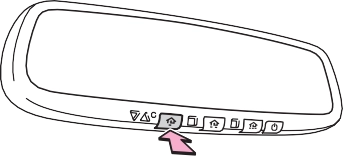
Press and release the HomeLink® button you want to program and check that the HomeLink® indicator light flashes orange.
 Point the remote control transmitter for the device at the rear view mirror, 1 to 3 in. (25 to 75 mm) from the HomeLink® buttons.
Keep the HomeLink® indicator light in view while programming.
Programming a device other than an entry gate (for U.S.A. owners)
Press and hold the remote control transmitter button until the HomeLink® indicator light changes from slowly flashing orange to rapidly flashing green (rolling code) or continuously lit green (fixed code), then release the button.
Programming an entry gate (for U.S.A. owners)/Programming a device in the Canadian market
Press and release the remote control transmitter button at 2 sec- ond intervals, repeatedly, until the HomeLink® indicator light changes from slowly flashing orange to rapidly flashing green (rolling code) or continuously lit green (fixed code).
4 Test the HomeLink® operation by pressing the newly pro- grammed button and observing the indicator light:
Repeat the steps above to program another device for any of the remaining HomeLink® buttons.
2 or more people may be necessary to complete rolling code pro- gramming.
Locate the “Learn” or “Smart” button on the garage door opener motor in the garage.
This button can usually be found where the hanging antenna wire is attached to the unit. The name and color of the button may vary by manufacturer. Refer to the Owner’s manual supplied with the garage door opener motor for details.
Perform within 30 sec- onds after performing .
 Press and hold the desired HomeLink® button (inside the vehicle) for 2 seconds and release it. Repeat this sequence (press/hold/ release) up to 3 times to complete programming.
If the garage door opener motor operates when the HomeLink® button is pressed, the garage door opener motor recognizes the HomeLink® signal.
When enabled, 2-way communication allows you to check the sta- tus of the opening and closing of a garage door through indicators in your vehicle.
2-way communication is only available if the garage door opener motor used is a compatible device. (To check device compatibility, refer to www.HomeLink.com.)
Within 5 seconds after programming the garage door opener has been completed, if the garage door opener motor is trained to HomeLink®, both garage door operation indicators will flash rap- idly green and the light on the garage door opener motor will blink twice, indicating that 2-way communication is enabled.
If the indicators do not flash, perform and within the first 10 presses of the HomeLink® button after programming has been completed.
2 Press a programmed HomeLink® button to operate a garage door.
Within 1 minute of pressing the HomeLink® button, after the garage door operation has stopped, press the “Learn” or “Smart” button on the garage door opener motor. Within 5 seconds of the establishment of 2-way communication with the garage door opener, both garage door operation indicators in the vehicle will flash rapidly green and the light on the garage door opener motor will blink twice, indicating that 2-way communication is enabled.
When the following procedure is performed, buttons which already have devices registered to them can be overwritten:
With one hand, press and hold the desired HomeLink® button.
When the HomeLink® indicator starts flashing orange, release the HomeLink® button and perform “Programming the Home- Link®” (it takes 20 seconds for the HomeLink® indicator to start flashing).
Press the appropriate HomeLink® button. The HomeLink® indicator light should turn on.
The status of the opening and
closing of a garage door is shown by the indicators.
Opening Closing
This function is only available if the garage door opener motor used is a compatible device. (To check device compatibility, refer to www.HomeLink.com.)
|
Color |
Status |
|
Orange (flashing) |
Currently opening/closing |
|
Green |
Opening/closing has completed |
|
Red (flashing) |
Feedback signals cannot be received |
To recall the previous door operation status, press and release
either HomeLink® buttons and or and
simultaneously. The last recorded status will be displayed for 3 sec- onds.
Press and hold the 2 outside but-
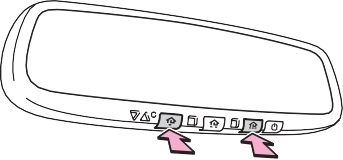 tons for 10 seconds until the HomeLink® indicator light changes from continuously lit orange to rapidly flashing green.
If you sell your vehicle, be sure to erase the programs stored in the HomeLink® memory.
For vehicles sold in the U.S.A. FCC ID: NZLAECHL5
NOTE:
This device complies with part 15 of the FCC Rules. Operation is subject to the following two conditions: (1) this device may not cause harmful interfer- ence, and (2) This device must accept any interference received, including interference that may cause undesired operation.
FCC WARNING:
Changes or modifications not expressly approved by the party responsible for compliance could void the user’s authority to operate the equipment.
For vehicles sold in Canada NOTE:
This device complies with Industry Canada licence-exempt RSS standard(s).
Operation is subject to the following two conditions: (1) this device may not cause interference, and (2) this device must accept any interference, includ- ing interference that may cause undesired operation of the device.
REMARQUE:
Le present appareil est conforme aux CNR d’Industrie Canada applicables aux appareils radio exempts de licence. L’exploitation est autorisee aux deux conditions suivantes: (1) l’appareil ne doit pas produire de brouillage, et (2) l’utilisateur de l’appareil doit accepter tout brouillage radioelectrique subi, meme si le brouillage est susceptible d’en compromettre le fonctionnement.
Visit on the web at www.homelink.com/toyota or call 1-800-355-3515.
HomeLink and the HomeLink house icon are registered trademarks of Gen- tex Corporation.
press and hold the button for 3 seconds.
|
Display |
Direction |
|
N |
North |
|
NE |
Northeast |
|
E |
East |
|
SE |
Southeast |
|
S |
South |
|
SW |
Southwest |
|
W |
West |
|
NW |
Northwest |
: If equipped
If you cross over a map boundary shown in illustration, the compass will deviate.
To obtain higher precision of accurate calibration, refer to the following.
Press and hold the button for 6 seconds.
A number (1 to 15) appears on the compass display.
If the direction is displayed several seconds after adjustment, the cali- bration is complete.
Press and hold the button for 9 seconds.
“C” appears on the compass display.
If there is not enough space to drive in a circle, drive around the block until the direction is dis- played.
The compass may not show the correct direction in the following conditions:
(There is a magnet or metal object near the inside rear view mirror.)
Maintenance and care
Cleaning and protecting
the vehicle exterior 400
Cleaning and protecting
the vehicle interior 403
Maintenance requirements 406
General maintenance 408
Emission inspection and maintenance (I/M)
programs 411
6
Do-it-yourself service precautions 412
Hood 414
Engine compartment 415
Tires 426
Tire inflation pressure 442
Wheels 445
Air conditioning filter 448
Wireless remote control/ electronic key battery 451
Checking and replacing
fuses 454
Light bulbs 457
Download Manual