Adjusting the seats
|
3 |
||||
|
1 Seat position adjustment switch |
4 |
Seat cushion (front) angle adjustment switch |
Operati |
|
|
2 Seatback angle adjustment switch |
5 |
Seat vertical height adjust- ment switch |
on of eac |
|
|
3 Seat cushion length adjust- ment switch (if equipped) |
6 |
Seat lumbar support adjust- ment switch |
h comp |
|
|
Passenger’s seat
|
onen |
|||
|
Manual seat |
t |

 lever
lever
Power seat
Seat position adjustment switch
Seatback angle adjustment switch
Seat lumbar support adjust- ment switch
Seat position adjustment levers
Seatback angle adjustment levers
Center seat seatback angle adjustment lever
The driver’s seat and steering wheel move in accordance with engine switch position and the driver’s seat belt condition. (P. 152)
WARNING
Fingers or hands may become jammed in the seat mechanism.
If the seat is too reclined, the lap belt may slide past the hips and apply restraint forces directly to the abdomen, or your neck may contact the shoulder belt, increasing the risk of death or serious injury in the event of an accident.
Adjustments should not be made while driving as the seat may unexpect- edly move and cause the driver to lose control of the vehicle.
Make sure to leave enough space around the feet so they do not get stuck.
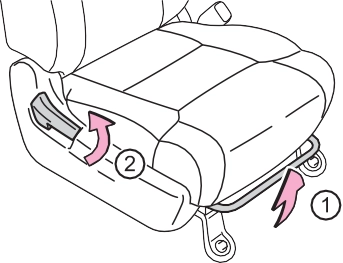
Pull and release the lever to unlock while raising the bottom cushion until it locks.
When returning the bottom cushion to its original position, pull and release the lever, then carefully lower the bottom cush- ion using your other hand.
WARNING
Observe the following precautions.
Failure to do so may result in death or serious injury.
Do not allow passengers to sit on raised bottom cushion or place anything on storage box (Double Cab models) while driving.
Observe the following precautions.
Failure to do so may result in death or serious injury.
When all of the following have been performed, the driver’s seat and steering wheel are automati- cally adjusted to a position that allows driver to enter and exit the vehicle easily.
When any of the following has been performed, the driver’s seat and steering wheel automatically return to their original positions.
When exiting the vehicle, the power easy access system may not operate if the seat is already close to the rearmost position, etc.
The seat movement amount settings of the power easy access system can be customized. (Customizable features: P. 564)
: If equipped
Two different driving positions can be recorded into memory.
Check that the shift lever is in P. Turn the engine switch to ON.
Adjust the driver’s seat, steering wheel, and outside rear view mirrors to the desired positions.
While pressing the “SET” button, or within 3 seconds after the “SET” button is pressed, press button “1” or “2” until the buzzer sounds.
If the selected button has already been preset, the previ- ously recorded position will be overwritten.
Press one of the buttons for the driving position you want to recall until the buzzer sounds.
Perform any of the following:
The adjusted seat positions can be recorded except for lumbar support posi- tions.
Recorded seat positions (except the steering wheel position) can be activated up to 30 seconds after the driver’s door is opened, even if the key is removed from the engine switch.
If a seat position is already in the furthest possible position and the seat is operated in the same direction, the recorded position may be slightly different when it is recalled.
Record your driving position to button “1” or “2” before performing the following:
Turn the engine switch off and close the driver’s door.
While pressing the button “1” or “2”, press on the wire- less remote control until the signal beeps.
The driving position is recalled when the driver’s door is unlocked using the wireless remote control and the driver’s door is opened.
In case that the alarm is triggered, immediately stop the alarm. (P. 95)
Turn the engine switch off and close the driver’s door.
While pressing the “SET” button, press  on the wireless remote control until you hear 2 beeps.
The recorded seat positions are erased when the battery is disconnected.
 Pull the head restraints up.
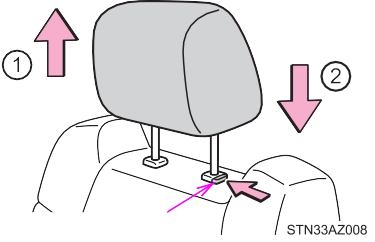
Push the head restraint down while pressing the lock release button.
Pull the head restraints up.
Push the head restraint down while pressing the lock release button.
To use
Lift up the head restraint back to the neutral position and then push the head restraint down.
Lift up the head restraint while pressing the right lock release but- ton, and fold it forward.
Front seats and rear center seat (CrewMax models)
Pull the head restraint up while pressing the lock release button.
Rear center seat (Double Cab models)
Pull the head restraint up while pressing the lock release button.
Rear outer seat
Pull the head restraint up while pressing both lock release buttons.
Front seats and rear center seat (CrewMax models)
Align the head restraint with the installa- tion holes and push it down to the lock position. Press and hold the lock release button when lowering the head restraint.
Rear center seat (Double Cab models)
Align the head restraint with the installa- tion holes and push it down to the lock position. Press and hold the lock release button when lowering the head restraint.
Rear outer seat
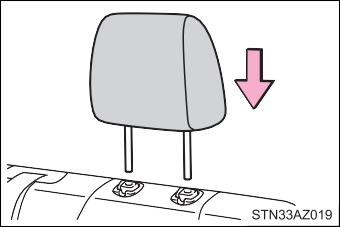 Align the head restraint with the installa- tion holes and push it down to the lock position.
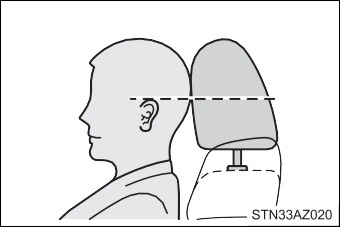 Make sure that the head restraints are adjusted so that the center of the head restraint is closest to the top of your ears.
Always raise the head restraint one level from the stowed position when using.
Download Manual