Other interior features
Other interior features
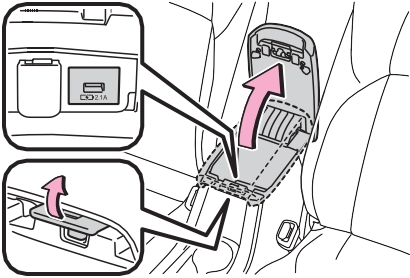
The USB charging port are used to supply 2.1 A of electricity at 5 V to external devices.
The USB charging port are for charging only. They are not designed for data transfer or other purposes.
Depending on the external device, it may not charge prop- erly. Refer to the manual included with the device before using a USB charging port.
Lift the lid while pulling up the knob.
|
|
The engine switch is in ACC or ON.
such as a USB memory device, is connected
Depending on the connected exter- nal device, charging may occasion- ally be suspended and then start again. This is not a malfunction.
|
|
|
To prevent damage to the USB charging port
Do not insert foreign objects into the port.
Do not spill water or other liq- uids into the port.
Do not apply excessive force to or impact the USB charging port.
Do not disassemble or modify the USB charging port.
To prevent damage to exter- nal devices
Do not leave external devices in the vehicle. The temperature inside the vehicle may become high, resulting in damage to an external device.
Do not push down on or apply unnecessary force to an exter- nal device or the cable of an external device while it is con- nected.
To prevent battery discharge
Do not use the USB charging port for a long period of time with the engine stopped. |
 NOTICE
405
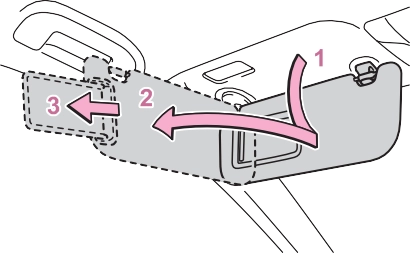
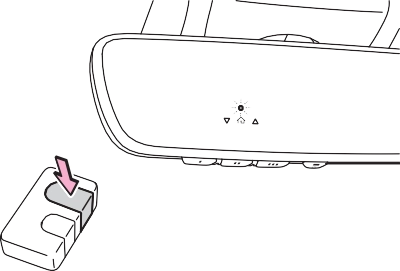
Lift the lid while pulling up the knob and open the power outlet lid.
|
|
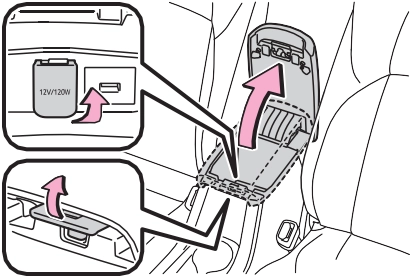
The engine switch is in ACC or ON.
Disconnect electrical devices with charging functions, such as mobile battery packs.
If such devices are left connected, the engine switch may not be turned off normally.

The wireless charger cannot be used with a portable device that is larger than the charging area. Additionally, depending on the portable device, the wireless charger may not operate prop- erly. Refer to the operation man- ual of the portable device.
The “Qi” symbol is a trademark of the Wireless Power Consor- tium.
Power supply switch Operation indicator light Charge area
Pressing the switch again turns the wireless charger off.
When turned on, the operation indi- cator light (green) comes on.
When the engine switch is turned off, the on/off state of the wireless charger will be memorized.
While charging, the operation indi- cator light (orange) will be illumi- nated.
If charging does not begin, move the portable device as close to the center of the charging area as pos- sible.
When charging is complete, the operation indicator light (green) will illuminate.
407
|
Operation indicator light |
State |
|
Off |
The Wireless charger is off |
|
Green (illuminated) |
Standby (charging is possible) |
|
Charging is complete* |
|
|
Orange (illuminated) |
A portable device has been placed on the charging area (identifying the portable device) |
|
Charging in progress |
*: Depending on the portable device, the operation indicator light may stay illuminated (orange) after charging has completed.
If an error is detected, the operation indicator light will blink (orange). Take the appropriate measures according to the table below.
|
Operation indicator light |
Suspected cause |
Measure |
|
Blinks (orange) at a one second interval continu- ously |
Vehicle to charger com- munication failure. |
Contact your Toyota dealer. |
|
Blinks (orange) 3 times repeatedly |
A foreign object exists between the portable device and charging area. |
Remove the foreign object. |
|
Portable device is not positioned properly on the charging area. |
Move the portable device toward the cen- ter of the charging area. |
|
|
Blinks (orange) 4 times repeatedly |
The temperature of the wireless charger is excessively high. |
Stop charging immedi- ately and continue charging after a while. |
The engine switch is in ACC or ON.
charger. However, compatibility with all devices which meet the Qi wireless charging standard is not guaranteed.
Do not charge a portable device if a cover or accessory which is not Qi compatible is attached. Depending on the type of cover and/or acces- sory attached, it may not be possi- ble to charge the portable device. If the portable device is placed on the charging area and does not charge, remove the cover and/or accesso- ries.
Turn off the wireless charger and check if the noise is reduced. If noise is reduced, press and hold the power supply switch of the wireless charger for 2 seconds. The fre- quency of the wireless charger is changed and noise may be reduced. When the frequency is changed, the operation indicator light will blink (orange) 2 times.
This is not a malfunction.If a porta- ble device becomes warm while charging and charging stops due to the protection function of the portable device, wait until the por- table device cools down and charge it again.
When the power supply switch is turned on or while a portable device is being identified, operation sounds may be heard. This is not a malfunc- tion.
P.425
6-4. Other interior features
409
6-4. Other interior features
411
|
|
|
When wireless keys (that emit radio waves) other than those of your vehicle are being used nearby.
If in situations other than above the wireless charger does not operate properly or the operation indicator light is blinking, the wire- less charger may be malfunction- ing. Contact your Toyota dealer. To prevent failure or damage to data
Do not bring magnetic cards, such as a credit card, or mag- netic recording media, close to the wireless charger while charging. Otherwise, data may be erased due to the influence of magnetism.
Additionally, do not bring preci- sion instruments such as wrist watches, close to the wireless charger, as such objects may malfunction. Do not leave portable devices in the cabin. The temperature inside the cabin may become high when parked in the sun, and cause damage to the device.
To prevent battery discharge
Do not use the wireless charger for a long period of time with the engine stopped. |
 NOTICE
|
|
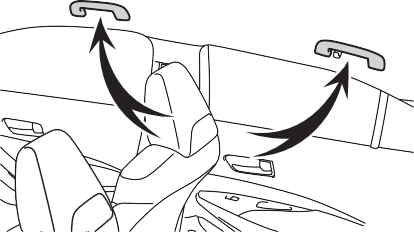
Slide the cover to open.
The vanity light turns on. (if equipped)
If the vanity lights remain on when the engine switch is OFF, the lights will go off automatically after 20 min- utes.
413
|
|

|
|
|
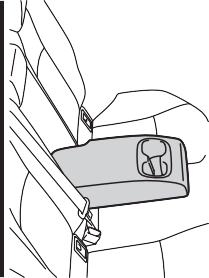
To prevent damage to the armrest
Do not apply too much load on the armrest. |
 NOTICE
 An assist grip installed on the ceiling can be used to support your body while sitting on the seat.
The coat hooks are provided with the rear assist grips.
|
|
*: If equipped
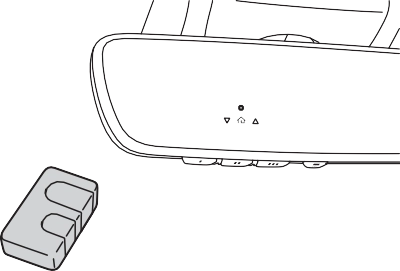
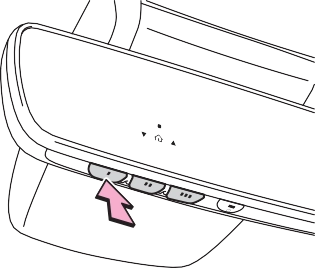
HomeLink® indicator light
Garage door operation indi- cators
HomeLink® icon
Illuminates while HomeLink® is operating.
Except for vehicles sold in Canada
 For vehicles sold in Canada
Visit on the web at www. homelink.com/toyota or call 1-800-355-3515.
415
Steps 1 through 3 must be per- formed within 60 seconds, oth- erwise the indicator light will stop flashing and programming will not be able to be completed.
Keep the HomeLink® indicator light in view while programming.
|
|
Programming a device other than an entry gate (for U.S.A. owners)
Press and hold the handheld transmitter button until the HomeLink® indicator light changes from slowly flashing orange to rapidly flashing green (rolling code) or continuously lit green (fixed code), then release the button.
|
|
Programming an entry gate (for U.S.A. owners)/Program- ming a device in the Cana- dian market
Press and release the remote control transmitter button at 2 second intervals, repeatedly, until the HomeLink® indicator light changes from slowly flash- ing (orange) to rapidly flashing (green) (rolling code) or continu- ously lit (green) (fixed code).
garage door or other device should operate when a Home- Link® button is pressed and released.
door opener motor for details.
417
5 Repeat the steps above to program another device for any of the remaining Home- Link® buttons.
2 or more people may be neces- sary to complete rolling code programming.
1 Locate the “Learn” or “Smart” button on the garage door opener motor in the garage.
This button can usually be found where the hanging antenna wire is attached to the unit. The name and color of the button may vary by manufacturer. Refer to the owner’s manual supplied with the garage
Perform 3 within 30 seconds after
performing 2.
If the garage door opener motor operates when the HomeLink® button is pressed, the garage door
opener motor recognizes the HomeLink® signal.
|
|
When enabled, 2-way communi- cation allows you to check the status of the opening and clos- ing of a garage door through indicators in your vehicle.
2-way communication is only available if the garage door opener motor used is a compati- ble device. (To check device compatibility, refer to www.homelink.com.)
1 Within 5 seconds after pro- gramming the garage door opener has been completed, if the garage door opener motor is trained to Home- Link®, both garage door operation indicators will flash rapidly (green) and the light on the garage door opener motor will blink twice, indicat- ing that 2-way communica- tion is enabled.
If the indicators do not flash, per-
form 2 and 3 within the first 10 presses of the HomeLink® button after programming has been com- pleted.
When the following procedure is performed, buttons which already have devices registered to them can be overwritten:
(it takes 20 seconds for the HomeLink® indicator to start flashing).
The indicators can operate
419
The status of the opening and closing of a garage door is shown by the indicators.
Opening Closing
This function is only available if the
garage door opener motor used is a compatible device. (To check device compatibility, refer to www.homelink.com.)
m) of the garage door. However, if there are obstructions between the garage door and the vehicle, such as houses and trees, feedback signals from the garage door may not be received.
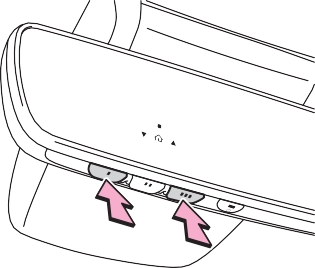
To recall the previous door oper- ation status, press and release either HomeLink® buttons
and or and simultaneously. The last recorded status will be dis- played for 3 seconds.
Press and hold the 2 outside buttons for 10 seconds until the HomeLink® indicator light changes from continuously lit (orange) to rapidly flashing (green).
If you sell your vehicle, be sure to erase the programs stored in the
HomeLink® memory.
|
|
Maintenance and care 7
7-2. Maintenance
.................................. 427
421
7
Download Manual