Trailer Reversing Aid - Vehicles With: Pro Trailer Backup Assist
The Pro Trailer Backup Assist utilizes the control knob on the instrument panel to help you steer a trailer. Turn the control knob in the direction you want the trailer to go and the system steers the vehicle.
The trailer reversing aid uses a sensor attached to the trailer to detect the trailer angle relative to the towing vehicle and provides instructions, graphics and camera views on the touchscreen.

|
|
 WARNING: This system is an extra driving aid. It does not replace your attention and judgment, or the need to apply the brakes. This system does NOT automatically brake your vehicle. If you fail to press the brake pedal when necessary, you may collide with another vehicle.
Note: The system is not a substitute for safe driving practices. Always be aware of your vehicle and trailer combination, and the surrounding environment.
Note: The system does not detect or prevent your vehicle or trailer from making contact with obstacles in the surrounding environment.
Note: The front end of your vehicle swings out when changing the direction of the trailer.
Note: In certain conditions, the trailer could turn faster or the trailer angle could increase more than anticipated. Always monitor the clearance between the trailer and vehicle and the surroundings.
You must configure a trailer in the system to use the trailer reversing aids. This is a one-time setup process and the trailer information is saved in the system for the next time you use that trailer.
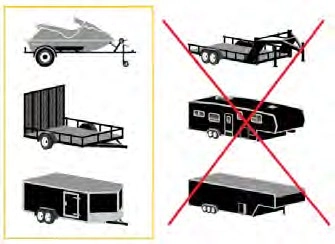
The system only works with conventional trailers. It does not work with other types including goose neck and fifth wheel. The following illustration shows examples of conventional trailers on the left-hand side.
410
E209766
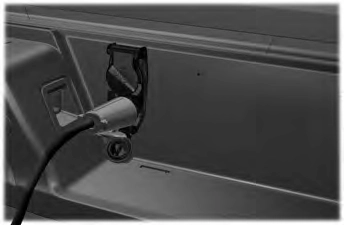
Hitch your trailer to the truck and connect the electrical wiring harness. Check to make sure that the wiring is working. See Connecting a Trailer (page 371).
E209759
Park your vehicle and hitched trailer on a level surface.
For best results, make sure that your trailer rides level with the ground when you hitch your vehicle. See Connecting a Trailer (page 371).
E209760
Make sure that the trailer and your vehicle are in line with each other. You can do this by putting the transmission in drive (D) and pulling straight forward.
411
Refer to the instructions included with your trailer sensor for detailed information regarding installation.
Note: Make sure the arrows on the sensor housing are facing up. Mount the sensor to a vertical part of the trailer that pivots when you turn your vehicle. Do not mount to a stationary surface such as the truck side of the trailer hitch.
Calibrating the system requires driving forward and turning left or right. Follow the instructions on the touchscreen to complete the calibration process.
Note: To calibrate the system, you need an area where you can safely drive forward and turn left or right. An open parking lot is an ideal place to perform the calibration.
Note: Keep the steering wheel straight when instructed to by the touchscreen. If the steering wheel is in a turned position during this instruction, the calibration pauses.
Note: During calibration, the system determines the trailer length. The system supports trailer lengths of 6–33 ft (1.85–10.05 m) distance from the hitch point to the center of the axle or axles. The system is designed to work with drawbars that have a license plate to hitch ball center measurement of 9–18 in (23–46 cm) when installed. Do not attempt to use drawbars or trailers that have a length outside of this range as the system performance degrades and could cause improper system function.
Note: The touchscreen shows if you are going too slow or fast. Calibration pauses if the speed is outside the required range of 2–16 mph (4–25 km/h).
Note: You need to turn approximately 90° to calibrate the system. Some trailers could require you to drive straight then turn multiple times before calibration is complete. The touchscreen provides instructions and notifies you when calibration is complete.
412
USING THE TRAILER REVERSING AID CONTROLLER
Use the control knob to steer the trailer. Take your hands off the steering wheel and turn the control knob instead. The control knob acts as the steering control for the trailer.
Turn and hold counterclockwise to make the trailer go left.
Press the button and use the touchscreen to select the connected trailer.
Note: A trailer must be configured to use Pro Trailer Backup Assist. See Configuring the Trailer (page 410).
Note: If you use the steering wheel when using Pro Trailer Backup Assist, the system turns off and a message displays in the touchscreen.
Note: If the trailer was connected just prior to turning the system on, you may need to drive forward to initialize the system. Follow the instructions on the touchscreen to activate the system.
Turn and hold clockwise to make the trailer go right.
413
Release the knob when the trailer is moving in the direction you want.
Note: The more you turn the knob, the sharper the trailer turns.
Note: Quickly turning and releasing the knob results in a jerky movement of the vehicle.
Note: You may have to use the knob to correct the trailer direction when attempting to move the trailer straight back under some conditions.
Up to seven camera views could be available when using the trailer reversing aid. Use the view that helps you the most when reversing your vehicle and trailer.
360° camera view. Shows a 360° view on the right-hand side of the touchscreen with a rear
camera view on the left-hand side of the touchscreen.
Rear view camera view. Shows your trailer hitch or what is directly behind your vehicle.
Rear split view camera view. Shows a 180° degree view of what is behind your vehicle.
Bed camera view. Shows the truck bed.
Note: If you have a 12 in (30 cm) touchscreen, this view provides a picture-in-picture view.
Trailer AUX camera view. Shows a rear view camera image of what is behind your trailer. You
need to separately purchase this camera and have it installed.
Note: If you have a 12 in (30 cm) touchscreen, this view provides a picture-in-picture view.
Trailer reverse guidance view. Shows you a view of the sides of your truck and the trailer. In auto
mode, this view moves as the trailer moves so that you do not have to adjust the camera as you turn. Left and right arrows let you see other camera views.
Auto. Press to return to auto view.
Note: Auto mode is the default setting.
The hitch angle graphic shows a small representation of your truck and trailer with visual feedback to help you monitor the trailer. The graphic shows two different colored lines for the trailer hitch angle. A black line shows you where your trailer is in relation to your vehicle. The white line represents the amount the trailer can turn based on knob input.
The graphic shows a yellow and red zone for the hitch angle to warn you of a high angle condition that could require you to pull forward to reduce the hitch angle. The angle limits for each zone vary based on the trailer length.
414
The yellow zone indicates you are approaching the maximum controllable trailer angle for the system. When the trailer enters this zone, it is more difficult to reduce the trailer turn when backing up. It may be necessary to put your vehicle back into drive (D) and pull forward to get the truck and trailer back to an in-line position.
The red zone indicates you have exceeded the maximum controllable trailer angle for the system. Immediately stop reversing. Put your vehicle into drive (D) and pull forward until the trailer is no longer in the red zone.
Setting the Trailer Angle Limit
Default setting. This provides a balanced limit that returns from a turn to straight backing with minimal change to the trailer direction.
Increases the trailer angle limit close to the maximum controllable angle to allow sharper turns but also causes more change in the trailer direction when straightening out from a turn.
415
|
Message |
Description |
|
Detecting Trailer Please Wait… |
Displays when the system turns on and is initializing. |
|
Pro Trailer Backup Assist™ System is Not Available |
A condition exists that prevents the system from turning on. If the message continues to display, visit your authorized dealer to have your vehicle checked. |
|
Trailer Reverse Guidance System is Not Available |
|
|
Pro Trailer Backup Assist™ Driving Required to Initialize Steering Press Knob to Exit |
The steering system needs to learn internal parameters to fully enable the feature. Drive your vehicle straight forward above 25 mph (40 km/h) for approximately 5 minutes. |
|
Trailer Reverse Guidance Driving Required to Initialize Steering Press OK to Exit |
|
|
Pro Trailer Backup Assist™ Stop now Maximum trailer angle Press Knob to Exit |
Displays when you reach the maximum controllable trailer angle for the system. Place your vehicle in drive (D) and pull forward to get the truck and trailer back to an in-line position. If this message consistently displays, you may need to repeat the trailer calibration. Delete the trailer from the system and repeat the setup and calibration process. |
|
Stop now. Deactivated by trailer angle. |
Displays when you exceed the maximum controllable trailer angle for the system. Place your vehicle in drive (D) and pull forward to get your vehicle and trailer back to an in-line position, then activate the system by selecting the connected trailer and following the instructions on the touchscreen. If this message consistently displays, you may need to repeat the trailer setup and calibration. Delete the trailer from the system and repeat the setup and calibra- tion process. |
|
Pro Trailer Backup Assist™ Stop Now Take Control of Steering Wheel |
Displays when the system can no longer steer the vehicle and you must take over steering. |
416
|
Message |
Description |
|
Pro Trailer Backup Assist™ Sensor Not Detected Refer to Owner's Manual Press Knob to Exit |
Displays when the system does not detect the sensor. Check the sensor connection, that there is no damaged wiring between the connector and sensor and that there is only one sensor connected. |
|
Trailer Reverse Guidance Sensor Not Detected Refer to Owner's Manual Press OK to Exit |
|
|
Pro Trailer Backup Assist™ Trailer Not Detected. Shift to Park Press Knob to Exit |
These messages display when the system does not detect the trailer. Check that the sensor is correctly installed and the trailer length is within the allowed range. If these messages continue to display, visit your authorized dealer to have your vehicle checked. |
|
Pro Trailer Backup Assist™ Trailer Not Detected. Refer to Owner's Manual. Press Knob to Exit |
|
|
Trailer Reverse Guidance Trailer Not Detected. Refer to Owner's Manual. Press OK to Exit |
|
|
Pro Trailer Backup Assist™ Trailer Not Detected Pull Forward to Initialize Press Knob to Exit |
These messages display when your vehicle has not moved after the trailer sensor is connected or extended operation below 1 mph (1 km/h). Drive forward above 2 mph (3 km/h) to initialize the system. |
|
Trailer Reverse Guidance Trailer Not Detected Pull Forward to Initialize Press OK to Exit |
|
|
Pro Trailer Backup Assist™ Stop Now System Not Active Press Knob to Exit |
Displays when your vehicle is backing up but the system is not activated. Select the connected trailer on the touchscreen and follow the instructions to activate the system. This message also displays when you back up during the calibration process. |
|
Pro Trailer Backup Assist™ Backup Slowly Turn Knob to Steer Press Knob to Exit |
Displays when the system turns on and is available to use. |
417
Verify the sensor is correctly installed. Other factors such as the hitch connection, road camber, road slope and trailer suspension could influence how straight the system can reverse the trailer when the control knob is not turned. You can compensate for the trailer drifting to the right or left by slowly turning the knob until the trailer is following your desired path and then holding the knob in that position.
There could be an issue with the connection, the wiring harness could be damaged, you could have multiple sensors connected or the sensor could be incorrectly installed. Check that the 12-way connector is fully inserted into the 12-way socket. The red rubber seal is not visible when the connector is fully inserted. Also check that the wiring harness sensor connection is fully inserted at the trailer sensor, and check for damaged wiring between the 12-way connector and the trailer sensor. Also, check that the sensor is installed on a vertical surface with the arrows pointing straight up.
There could be steering input or trailer movement during the straight drive portion of the calibration process.
The sensor could be incorrectly installed, the trailer length could be outside the allowed range or the road surface could be too rough or bumpy.
There could be a sub-system that the system uses that is not correctly operating or there could be a battery voltage issue. If the system continues to display it is not available, visit your authorized dealer to have your vehicle checked.
The steering system needs to learn internal parameters to fully turn on the feature. Drive your vehicle straight forward above 25 mph (40 km/h) for approximately 5 minutes. This could also occur when your vehicle is new, there is a battery voltage issue or if the steering system has been serviced.
Verify that the sensor is properly connected. See Trailer Sensor Installation (page 412). Repeat calibration on a different route if you have verified sensor installation.
418
This occurs when the vehicle has not moved during the current key cycle after you connect and select the trailer in the touchscreen or you operate the system at speeds below 1 mph
(1 km/h) for an extended period of time. Drive forward above 2 mph (3 km/h) and the system indicates when it initializes.
You are at the maximum controllable trailer angle for the system. Place your vehicle in drive (D) and pull forward to get the truck and trailer back to an
in-line position. If this message consistently displays, this could indicate the sensor is incorrectly installed, the trailer needs to be recalibrated or the drawbar or the trailer dimensions are outside of the supported range. The system is designed to work with drawbars that have a license plate to hitch ball center measurement of 9–18 in (23–46 cm) when installed. The system is designed to work with trailers that have a hitch point to center of the axle or axles measurement of 6–33 ft
(1.85–10.05 m). Do not attempt to use drawbars or trailers that have a length outside of this range as the system performance degrades and could cause improper system function.
Check that the correct trailer is selected in the touchscreen. Verify the sensor is installed according to the instructions included in the sensor kit and check that the drawbar and the trailer dimensions are within the allowed range. Then, delete the trailer from the system and repeat the setup process to calibrate the trailer.
The system is no longer steering the vehicle and you must take over steering. There are four reasons the system could display this message. The first reason the system could display this message is that you have touched the steering wheel when the system is steering. The second reason the system could display this message is that you have exceeded the maximum speed for the feature. The third reason the system could display this message is that the trailer is not detected. The final reason the system could display this message is that an internal condition for system operation is not met that requires your vehicle to return to manual control of the steering.
Note: The system is designed to be used with the same trailer connection every time you choose the trailer from the touchscreen. When using a different drawbar or a different pin hole on drawbars with more than one, connecting the drawbar to your vehicle affects the trailer position and you may need to repeat the trailer setup and calibration process.
419
Download Manual